2010 SUZUKI SX4 jump start
[x] Cancel search: jump startPage 116 of 297
3-15OPERATING YOUR VEHICLE
80J23-03E
Canceling the manual mode
To cancel the manual mode, shift the gear-
shift lever from “M” to “D”.
Temporary manual mode
Pull the shift paddle (if equipped) toward
you when driving with the gearshift lever in
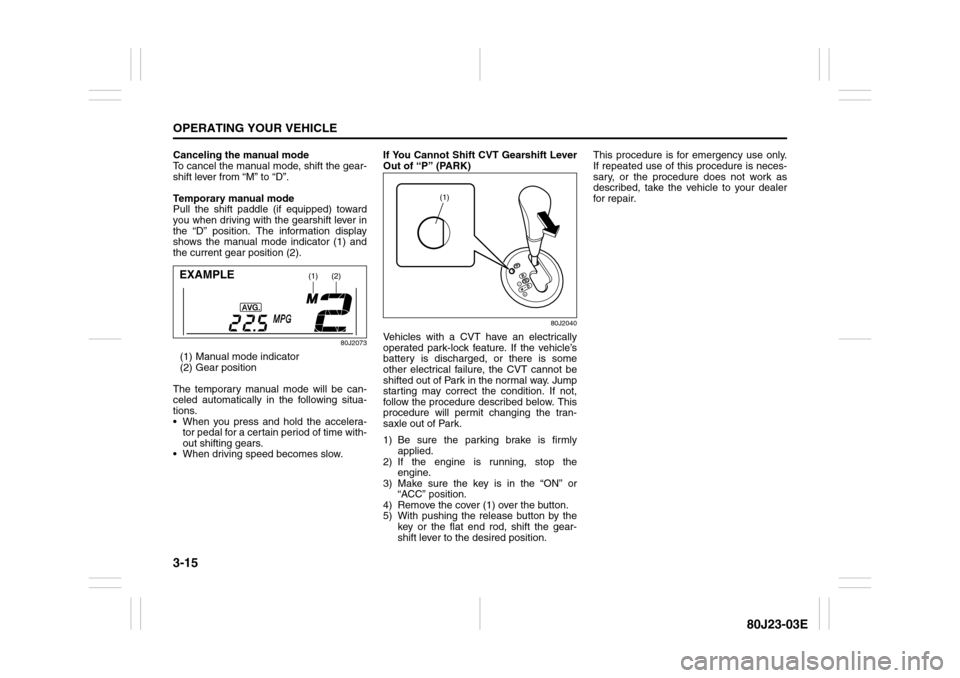
the “D” position. The information display
shows the manual mode indicator (1) and
the current gear position (2).
80J2073
(1) Manual mode indicator
(2) Gear position
The temporary manual mode will be can-
celed automatically in the following situa-
tions.
When you press and hold the accelera-
tor pedal for a certain period of time with-
out shifting gears.
When driving speed becomes slow.If You Cannot Shift CVT Gearshift Lever
Out of “P” (PARK)
80J2040
Vehicles with a CVT have an electrically
operated park-lock feature. If the vehicle’s
battery is discharged, or there is some
other electrical failure, the CVT cannot be
shifted out of Park in the normal way. Jump
starting may correct the condition. If not,
follow the procedure described below. This
procedure will permit changing the tran-
saxle out of Park.
1) Be sure the parking brake is firmly
applied.
2) If the engine is running, stop the
engine.
3) Make sure the key is in the “ON” or
“ACC” position.
4) Remove the cover (1) over the button.
5) With pushing the release button by the
key or the flat end rod, shift the gear-
shift lever to the desired position.This procedure is for emergency use only.
If repeated use of this procedure is neces-
sary, or the procedure does not work as
described, take the vehicle to your dealer
for repair.
(1)
(2)
EXAMPLE
(1)
Page 241 of 297

7-36
INSPECTION AND MAINTENANCE
80J23-03E
Your vehicle is equipped with a battery that
requires infrequent maintenance. You will
never have to add water. You should, how-
ever, periodically check the battery, battery
terminals and battery hold-down bracket
for corrosion. Remove corrosion using a
stiff brush and ammonia mixed with water,
or baking soda mixed with water. After
removing corrosion, rinse with clean water.
The test indicator on the top of the battery
provides information on the condition of
the battery.
If your vehicle is not going to be driven for
a month or longer, disconnect the cable
from the negative terminal of the battery to
help prevent discharge.
FusesYour vehicle has three types of fuses, as
described below:
Main Fuse – The main fuse takes current
directly from the battery.
Primary Fuses – These fuses are between
the main fuse and individual fuses, and are
for electrical load groups.
Individual Fuses – These fuses are for indi-
vidual electrical circuits.
For details on protected circuits, refer to
the “Fuses and Protected Circuits” section
in this manual.
To remove a fuse, use the fuse puller pro-
vided in the fuse box.
63J095
Fuses in the Engine Compartment
80J051
80J052
WARNING
To avoid harm to yourself or damage
to your vehicle or battery, follow the
jump starting instructions in the
“EMERGENCY SERVICE” section of
this manual if it is necessary to jump
start your vehicle.
WARNING
Battery posts, terminals and related
accessories contain lead and lead
compounds. Wash hands after han-
dling.
(1)
(2) (3)
(28) (27) (26) (25) (6) (7) (9) (11)
(15) (16) (17) (18) (19)
(24)
(8) (4) (5) (10)
(22) (21)
(23)(20)(12) (13) (14)
(30)
(29)
Page 257 of 297
EMERGENCY SERVICE
8
80J23-03E
60G411
EMERGENCY SERVICETire Changing Tool ............................................................. 8-1
Jacking Instructions ........................................................... 8-2
Changing Wheels ................................................................ 8-4
Jump Starting Instructions ................................................ 8-5
Towing a Disabled Vehicle ................................................. 8-6
If the Starter Does Not Operate .......................................... 8-6
If the Engine is Flooded ...................................................... 8-7
If the Engine Overheats ...................................................... 8-7
Page 262 of 297
8-5EMERGENCY SERVICE
80J23-03E
Jump Starting Instructions
When jump starting your vehicle, use
the following procedure:
60A269
1) Use only a 12-volt battery to jump start
your vehicle. Position the good 12-volt
battery close to your vehicle so that the
jumper cables will reach both batteries.
When using a battery installed on
another vehicle, DO NOT LET THE
VEHICLES TOUCH. Set the parking
brakes fully on both vehicles.2) Turn off all vehicle accessories, except
those necessary for safety reasons (for
example, headlights or hazard lights).
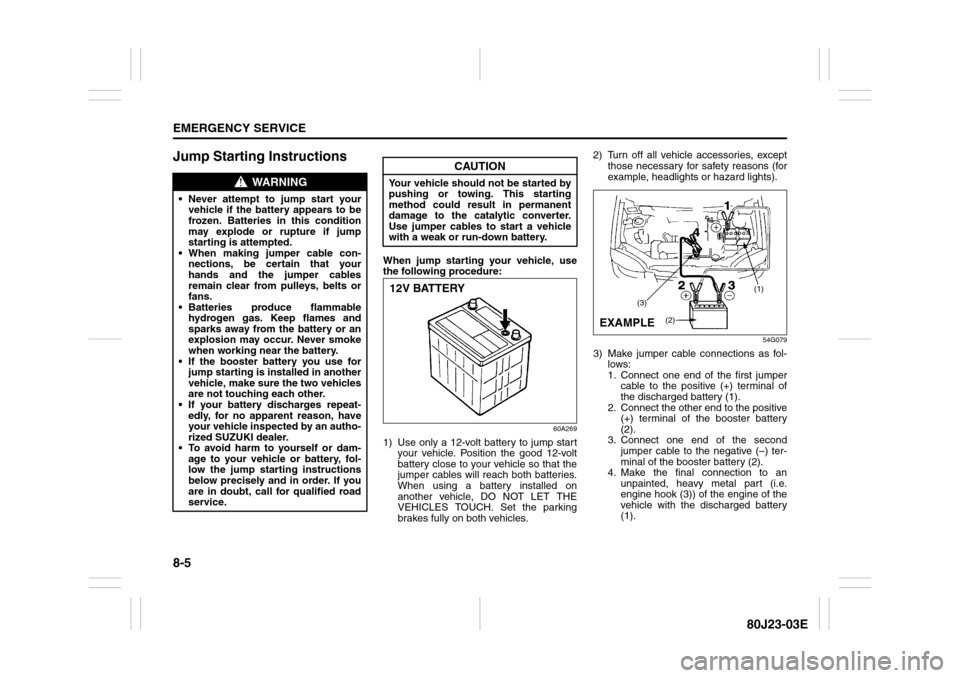
54G079
3) Make jumper cable connections as fol-
lows:
1. Connect one end of the first jumper
cable to the positive (+) terminal of
the discharged battery (1).
2. Connect the other end to the positive
(+) terminal of the booster battery
(2).
3. Connect one end of the second
jumper cable to the negative (–) ter-
minal of the booster battery (2).
4. Make the final connection to an
unpainted, heavy metal part (i.e.
engine hook (3)) of the engine of the
vehicle with the discharged battery
(1).
WARNING
Never attempt to jump start your
vehicle if the battery appears to be
frozen. Batteries in this condition
may explode or rupture if jump
starting is attempted.
When making jumper cable con-
nections, be certain that your
hands and the jumper cables
remain clear from pulleys, belts or
fans.
Batteries produce flammable
hydrogen gas. Keep flames and
sparks away from the battery or an
explosion may occur. Never smoke
when working near the battery.
If the booster battery you use for
jump starting is installed in another
vehicle, make sure the two vehicles
are not touching each other.
If your battery discharges repeat-
edly, for no apparent reason, have
your vehicle inspected by an autho-
rized SUZUKI dealer.
To avoid harm to yourself or dam-
age to your vehicle or battery, fol-
low the jump starting instructions
below precisely and in order. If you
are in doubt, call for qualified road
service.
CAUTION
Your vehicle should not be started by
pushing or towing. This starting
method could result in permanent
damage to the catalytic converter.
Use jumper cables to start a vehicle
with a weak or run-down battery.12V BATTERY
(1)
(3)
(2)
EXAMPLE
Page 263 of 297
8-6
EMERGENCY SERVICE
80J23-03E
4) If the booster battery you are using is
installed on another vehicle, start the
engine of the vehicle with the booster
battery. Run the engine at moderate
speed.
5) Start the engine of the vehicle with the
discharged battery.
6) Remove the jumper cables in the exact
reverse order in which you connected
them.
Towing a Disabled VehicleEmergency TowingIf your vehicle is disabled, it may be towed
by a tow truck using one of the following
methods:
1) Tow the vehicle with two wheels lifted
by the tow truck and the other two
wheels on a towing dolly.
2) Use the appropriate towing method
specified for your vehicle in the “Towing
Your Vehicle (recreational towing)” sec-
tion, but with the wheels lifted by the
tow truck instead of on a towing dolly.
Be sure to carefully follow the specific
instructions provided in the “Towing
Your Vehicle (recreational towing)” sec-
tion.
If the Starter Does Not
Operate1) Try turning the ignition switch to the
“START” position with the headlights
turned on to determine the battery con-
dition. If the headlights go excessively
dim or go off, it usually means that
either the battery has run down or bat-
tery terminal contact is poor. Recharge
the battery or correct battery terminal
contact if necessary.
2) If the headlights remain bright, check
the fuses. If the reason for failure of the
starter is not obvious, there may be a
major electrical problem. Have the vehi-
cle inspected by your authorized
SUZUKI dealer.
WARNING
Never connect the jumper cable
directly to the negative (–) terminal of
the discharged battery, or an explo-
sion may occur.
CAUTION
If vehicle damage (such as steering
or drivetrain damage, etc.) prevents
normal use of the towing procedures
for your vehicle described in the
“Towing Your Vehicle (recreational
towing)” section, have your vehicle
towed with two wheels lifted by the
tow truck and the other two wheels
on a towing dolly.
Page 277 of 297
10-4
GENERAL INFORMATION
80J23-03E
Reporting Safety DefectsIf you believe that your vehicle has a
defect which could cause a crash or
could cause injury or death, you
should immediately inform the
National Highway Traffic Safety
Administration (NHTSA) in addition to
notifying American Suzuki Motor Corp.
If NHTSA receives similar complaints,
it may open an investigation, and if it
finds that a safety defect exists in a
group of vehicles, it may order a recall
and remedy campaign. However,
NHTSA cannot become involved in
individual problems between you, your
dealer, or American Suzuki Motor
Corp.
To contact NHTSA, you may call the
Vehicle Safety Hotline toll-free at 1-
888-327-4236 (TTY: 1-800-424-9153);
go to http://www.safercar.gov; or write
to: Administrator, NHTSA, 1200 New
Jersey Ave., SE., Washington, D.C.
20590. You can also obtain other infor-
mation about motor vehicle safety
from http://www.safercar.gov.To contact American Suzuki, owners
in the continental United States can
call toll-free 1-800-934-0934, or write
to:
American Suzuki Motor Corporation
Automotive Customer Relations
3251 East Imperial Highway
Brea, CA 92821-6795
For owners outside the continental
United States, please refer to the dis-
tributor’s address listed in your War-
ranty Information booklet.
For vehicles registered for use and
principally operated in Canada please
contact Suzuki Canada Inc. at 1-905-
889-2677 extension 2254 or write to:
Suzuki Canada Inc.
Customer Relations
100 East Beaver Creek Road
Richmond Hill, On
L4B 1J6
Jacking Instructions: 5
Jump Starting Instructions: 7
Page 278 of 297
10-5GENERAL INFORMATION
80J23-03E
MEMO
Jump Starting Instructions: 7
Towing a Disabled Vehicle: 6
Page 293 of 297
13-3
INDEX80J23-03E
If Your Vehicle Gets Stuck .................................................... 4-4
Ignition Key Reminder........................................................... 2-1
Ignition Switch ....................................................................... 3-2
Illumination control setting................................................. 2-74
Illumination Indicator Light................................................. 2-67
Improving Fuel Economy ...................................................... 4-2
Information display.............................................................. 2-70
Inside Rearview Mirror ........................................................ 2-19
Installation of Child Restraint with Top Strap ................... 2-44
Installation with Lap-Shoulder Seat Belts
(child restraint with no top strap)....................................... 2-38
Installation with the LATCH System .................................. 2-40
Instantaneous Fuel Consumption ...................................... 2-70
Instrument Cluster ............................................................... 2-59
intelligent All Wheel Drive (i-AWD) AUTO Indicator
Light ...................................................................................... 2-67
intelligent All Wheel Drive (i-AWD) LOCK Indicator
Light ...................................................................................... 2-68
Interior Light Switch ............................................................ 5-45JJacking Instructions .............................................................. 8-2
Jump Starting Instructions ................................................... 8-5KKeyless Entry System Transmitter .................................... 2-13
Keyless Start System Indicator Light ................................ 2-66
Keyless Start System Remote Controller ............................ 2-6
Keys ........................................................................................ 2-1LLap-Shoulder Belt ................................................................ 2-30
Lighting Control Lever ........................................................ 2-75
Lighting Operation............................................................... 2-76Lights “On” reminder .......................................................... 2-76
Listening to a CD.................................................................. 5-22
Listening to a CD from an External CD Changer
(Option) ................................................................................. 5-34
Listening to a XM Satellite Radio (Option)......................... 5-31
Listening to Audio for AUX (Option) .................................. 5-33
Listening to the Radio ......................................................... 5-20
Low Fuel Warning Light ...................................................... 2-66
Low Tire Pressure Warning Light .............................. 2-60, 3-26
Luggage Compartment Board ............................................ 5-53
Luggage Compartment Cover............................................. 5-52
Luggage Compartment Light .............................................. 5-46
MMaintenance Recommended under Severe Driving
Conditions .............................................................................. 7-7
Maintenance Schedule .......................................................... 7-2
Malfunction Indicator Light ................................................. 2-65
Manual Heating and Air Conditioning System .................... 5-5
Manual Transaxle ................................................................. 3-10
Mirrors ................................................................................... 2-19OOdometer .............................................................................. 2-74
Oil Level Check .................................................................... 7-11
Oil Pressure Light................................................................ 2-64
On-Board Vehicle Computers and Event Data
Recorders ............................................................................. 10-3
Open Door Warning Light ................................................... 2-66
Outside Rearview Mirrors.................................................... 2-20PParking Brake Lever ..................................................... 3-6, 7-23
Pedals...................................................................................... 3-7