2010 SUZUKI SX4 clutch
[x] Cancel search: clutchPage 109 of 297
3-8
OPERATING YOUR VEHICLE
80J23-03E
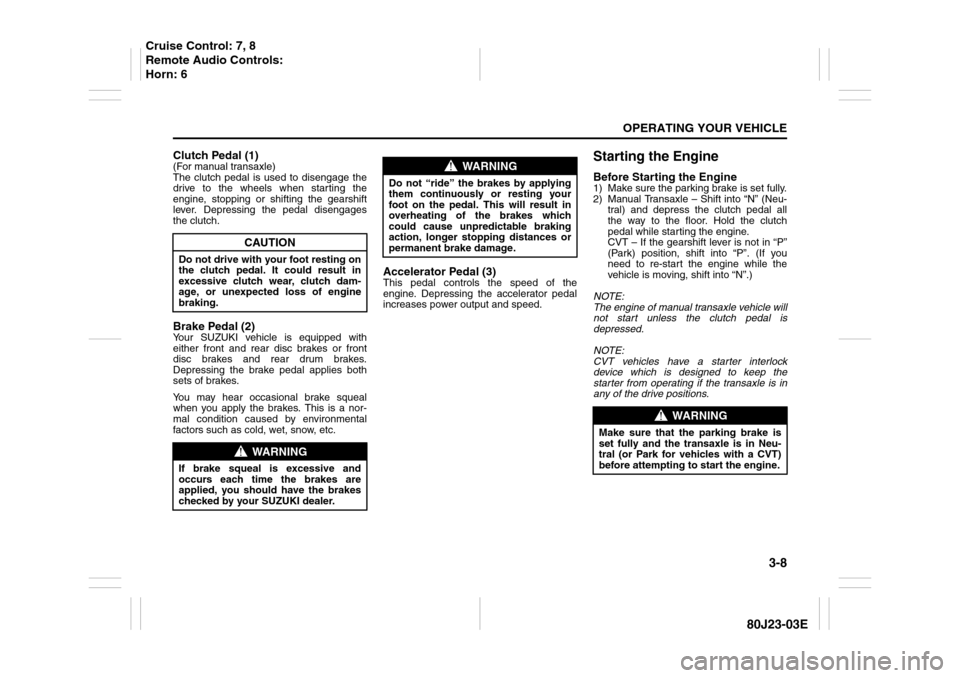
Clutch Pedal (1)(For manual transaxle)
The clutch pedal is used to disengage the
drive to the wheels when starting the
engine, stopping or shifting the gearshift
lever. Depressing the pedal disengages
the clutch.Brake Pedal (2)Your SUZUKI vehicle is equipped with
either front and rear disc brakes or front
disc brakes and rear drum brakes.
Depressing the brake pedal applies both
sets of brakes.
You may hear occasional brake squeal
when you apply the brakes. This is a nor-
mal condition caused by environmental
factors such as cold, wet, snow, etc.
Accelerator Pedal (3)This pedal controls the speed of the
engine. Depressing the accelerator pedal
increases power output and speed.
Starting the EngineBefore Starting the Engine1) Make sure the parking brake is set fully.
2) Manual Transaxle – Shift into “N” (Neu-
tral) and depress the clutch pedal all
the way to the floor. Hold the clutch
pedal while starting the engine.
CVT – If the gearshift lever is not in “P”
(Park) position, shift into “P”. (If you
need to re-start the engine while the
vehicle is moving, shift into “N”.)
NOTE:
The engine of manual transaxle vehicle will
not start unless the clutch pedal is
depressed.
NOTE:
CVT vehicles have a starter interlock
device which is designed to keep the
starter from operating if the transaxle is in
any of the drive positions.
CAUTION
Do not drive with your foot resting on
the clutch pedal. It could result in
excessive clutch wear, clutch dam-
age, or unexpected loss of engine
braking.
WARNING
If brake squeal is excessive and
occurs each time the brakes are
applied, you should have the brakes
checked by your SUZUKI dealer.
WARNING
Do not “ride” the brakes by applying
them continuously or resting your
foot on the pedal. This will result in
overheating of the brakes which
could cause unpredictable braking
action, longer stopping distances or
permanent brake damage.
WARNING
Make sure that the parking brake is
set fully and the transaxle is in Neu-
tral (or Park for vehicles with a CVT)
before attempting to start the engine.
Cruise Control: 7, 8
Remote Audio Controls:
Horn: 6
Page 111 of 297
3-10
OPERATING YOUR VEHICLE
80J23-03E
3) Close the engine hood securely before
starting the engine.
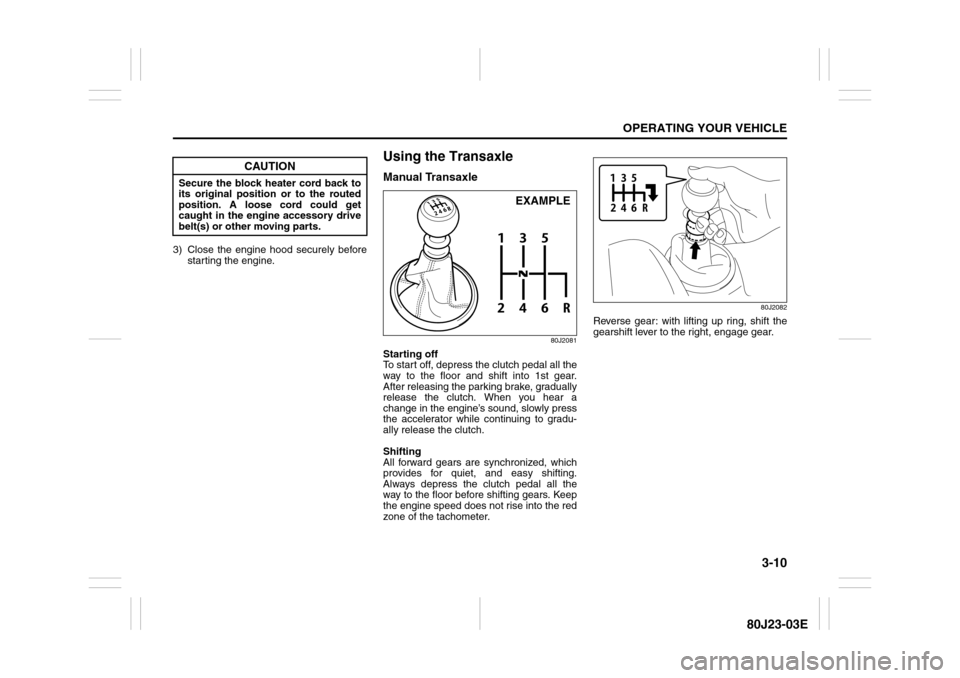
Using the TransaxleManual Transaxle
80J2081
Starting off
To start off, depress the clutch pedal all the
way to the floor and shift into 1st gear.
After releasing the parking brake, gradually
release the clutch. When you hear a
change in the engine’s sound, slowly press
the accelerator while continuing to gradu-
ally release the clutch.
Shifting
All forward gears are synchronized, which
provides for quiet, and easy shifting.
Always depress the clutch pedal all the
way to the floor before shifting gears. Keep
the engine speed does not rise into the red
zone of the tachometer.
80J2082
Reverse gear: with lifting up ring, shift the
gearshift lever to the right, engage gear.
CAUTION
Secure the block heater cord back to
its original position or to the routed
position. A loose cord could get
caught in the engine accessory drive
belt(s) or other moving parts.
EXAMPLE
Page 112 of 297
3-11OPERATING YOUR VEHICLE
80J23-03E
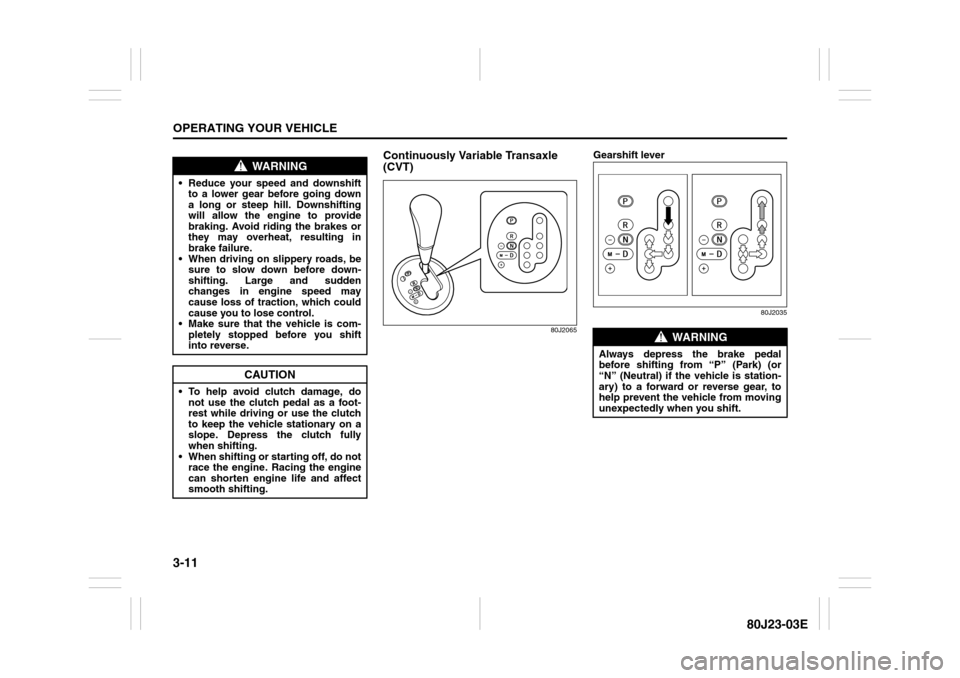
Continuously Variable Transaxle
(CVT)
80J2065
Gearshift lever
80J2035
WARNING
Reduce your speed and downshift
to a lower gear before going down
a long or steep hill. Downshifting
will allow the engine to provide
braking. Avoid riding the brakes or
they may overheat, resulting in
brake failure.
When driving on slippery roads, be
sure to slow down before down-
shifting. Large and sudden
changes in engine speed may
cause loss of traction, which could
cause you to lose control.
Make sure that the vehicle is com-
pletely stopped before you shift
into reverse.
CAUTION
To help avoid clutch damage, do
not use the clutch pedal as a foot-
rest while driving or use the clutch
to keep the vehicle stationary on a
slope. Depress the clutch fully
when shifting.
When shifting or starting off, do not
race the engine. Racing the engine
can shorten engine life and affect
smooth shifting.
WARNING
Always depress the brake pedal
before shifting from “P” (Park) (or
“N” (Neutral) if the vehicle is station-
ary) to a forward or reverse gear, to
help prevent the vehicle from moving
unexpectedly when you shift.
Page 121 of 297
3-20
OPERATING YOUR VEHICLE
80J23-03E
To Change Cruising Speed
Using the accelerator pedal
To reset at a faster cruising speed, acceler-
ate to the desired speed using the acceler-
ator pedal and push the “SET/COAST”
switch (3). The new speed will be main-
tained.
Using the brake pedal
To reset at a slower cruising speed, decel-
erate to the desired speed using the brake
pedal and push the “SET/COAST” switch
(3). The new speed will be maintained.
NOTE:
When the brake pedal is depressed, the
“SET” indicator light goes off until reset the
cruising speed.
Using the cruise control switch
To reset at a faster cruising speed, press
repeatedly or hold in the “RES/ACC”
switch (4). Vehicle speed will steadily
increase. When you release the switch, the
new speed will be maintained.
To reset at a slower cruising speed, press
repeatedly or hold in the “SET/COAST”
switch (3) until the vehicle has slowed to
the desired speed, then release the switch.
The new speed will be maintained.
NOTE:
You can adjust the set speed by approxi-
mately 1.0 mph (1.6 km/h) by pushing a
cruise control switch quickly.Cancellation of the Cruise Control
The “SET” indicator light will go off and the
cruise control will be canceled temporarily
with following procedures:
Push the “CANCEL” switch (2).
Depress the brake pedal.
For manual transaxle, depress the clutch
pedal.
For CVT, downshift from 3rd to 2nd in the
manual mode.
The vehicle speed falls more than about
20 percent from the set speed.
Any time the vehicle speed falls below
25 mph (40 km/h).
When the vehicle skids and ESP
® (if
equipped) is activated.
To resume the previously set speed, push
the “RES/ACC” switch (4) and turn on the
“SET” indicator light. Besides, the vehicle
speed has to be above 25 mph (40 km/h)
when the vehicle is not in the above condi-
tions.
To turn off the cruise control system, push
the “CRUISE” switch (1) and make sure
the “CRUISE” indicator light is off.
Also, if the malfunction indicator light in the
instrument cluster comes on or blinks, the
cruise control system will be turned off.
NOTE:
If you turn off the cruise control system, the
previously set speed in the memory is
cleared. Reset your cruising speed again.
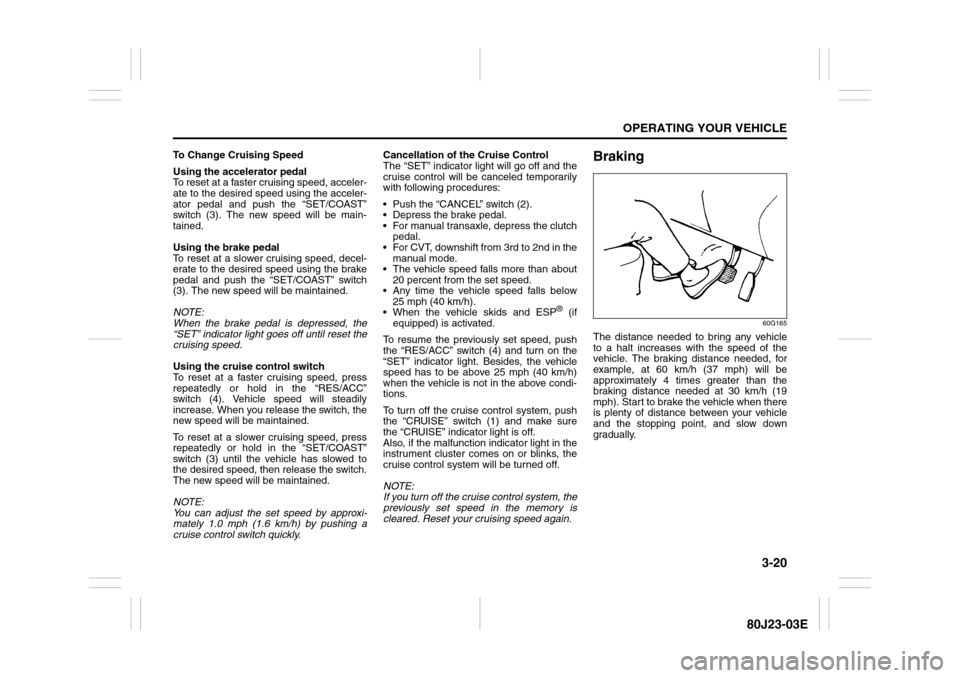
Braking
60G165
The distance needed to bring any vehicle
to a halt increases with the speed of the
vehicle. The braking distance needed, for
example, at 60 km/h (37 mph) will be
approximately 4 times greater than the
braking distance needed at 30 km/h (19
mph). Start to brake the vehicle when there
is plenty of distance between your vehicle
and the stopping point, and slow down
gradually.
Page 205 of 297

INSPECTION AND MAINTENANCE
7
80J23-03E
60G410
INSPECTION AND MAINTENANCEMaintenance Schedule ....................................................... 7-2
Periodic Maintenance Schedule ........................................ 7-3
Maintenance Recommended under Severe Driving
Conditions ........................................................................... 7-7
Drive Belt ............................................................................. 7-11
Engine Oil and Filter ........................................................... 7-11
Engine Coolant .................................................................... 7-14
Air Cleaner ........................................................................... 7-16
Spark Plugs ......................................................................... 7-16
Gear Oil ................................................................................ 7-18
Clutch Pedal ........................................................................ 7-19
Continuously Variable Transaxle (CVT) Fluid .................. 7-20
Brakes .................................................................................. 7-21
Steering Wheel .................................................................... 7-23
Tires ...................................................................................... 7-24
Battery .................................................................................. 7-35
Fuses .................................................................................... 7-36
Headlight Aiming ................................................................. 7-39
Bulb Replacement ............................................................... 7-40
Wiper Blades ....................................................................... 7-46
Windshield Washer Fluid ................................................... 7-50
Air Conditioning System .................................................... 7-50
Page 210 of 297
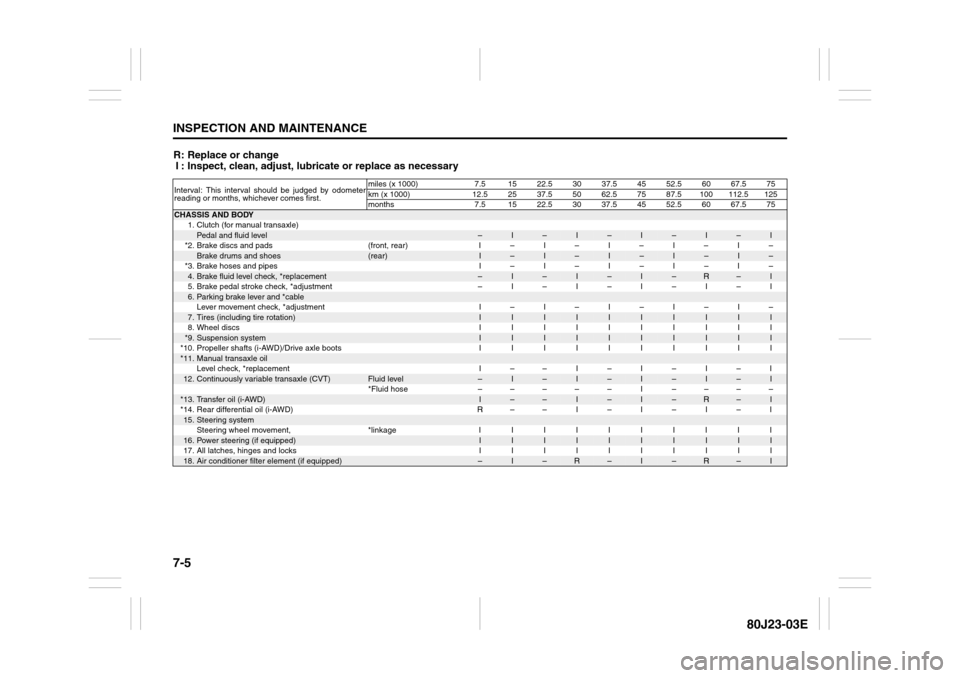
7-5INSPECTION AND MAINTENANCE
80J23-03E
R: Replace or change
I : Inspect, clean, adjust, lubricate or replace as necessaryInterval: This interval should be judged by odometer
reading or months, whichever comes first.miles (x 1000) 7.5 15 22.5 30 37.5 45 52.5 60 67.5 75
km (x 1000) 12.5 25 37.5 50 62.5 75 87.5 100 112.5 125
months 7.5 15 22.5 30 37.5 45 52.5 60 67.5 75CHASSIS AND BODY
1. Clutch (for manual transaxle)
Pedal and fluid level
–
I
–
I
–
I
–
I
–
I
*2. Brake discs and pads (front, rear) I – I – I – I – I –
Brake drums and shoes
(rear)
I
–
I
–
I
–
I
–
I
–
*3. Brake hoses and pipes I – I – I – I – I –
4.Brake fluid level check, *replacement
–
I
–
I
–
I
–
R
–
I
5. Brake pedal stroke check, *adjustment – I – I – I – I – I
6.Parking brake lever and *cableLever movement check, *adjustment I – I – I – I – I –7.Tires (including tire rotation)
I
I
I
I
I
I
I
I
I
I
8. Wheel discs I I I I I I I I I I
*9.
Suspension system
I
I
I
I
I
I
I
I
I
I
*10. Propeller shafts (i-AWD)/Drive axle boots I I I I I I I I I I
*11.
Manual transaxle oilLevel check, *replacement I – – I – I – I – I
12.
Continuously variable transaxle (CVT)
Fluid level
–
I
–
I
–
I
–
I
–
I
*Fluid hose ––––– I ––––
*13.
Transfer oil (i-AWD)
I
–
–
I
–
I
–
R
–
I
*14. Rear differential oil (i-AWD) R – – I – I – I – I
15.
Steering systemSteering wheel movement, *linkage I I I I I I I I I I
16.
Power steering (if equipped)
I
I
I
I
I
I
I
I
I
I
17. All latches, hinges and locks I I I I I I I I I I
18.
Air conditioner filter element (if equipped)
–
I
–
R
–
I
–
R
–
I
Page 211 of 297

7-6
INSPECTION AND MAINTENANCE
80J23-03E
R: Replace or change
I : Inspect, clean, adjust, lubricate or replace as necessary
NOTE:
This table shows the service schedule up to 250000 km (150000 miles).
Beyond 250000 km (150000 miles), perform the same services at the same intervals shown in the chart.
Beyond 250000 km (150000 miles), the maintenance services enclosed with a rectangle are required.Interval: This interval should be judged by odometer
reading or months, whichever comes first.miles (x 1000) 82.5 90 97.5 105 112.5 120 127.5 135 142.5 150
km (x 1000) 137.5 150 162.5 175 187.5 200 212.5 225 237.5 250
months 82.5 90 97.5 105 112.5 120 127.5 135 142.5 150CHASSIS AND BODY
1. Clutch (for manual transaxle)
Pedal and fluid level
–
I
–
I
–
I
–
I
–
I
*2. Brake discs and pads (front, rear) I – I – I – I – I –
Brake drums and shoes
(rear)
I
–
I
–
I
–
I
–
I
–
*3. Brake hoses and pipes I – I – I – I – I –
4.Brake fluid level check, *replacement
–
I
–
I
–
R
–
I
–
I
5. Brake pedal stroke check, *adjustment – I – I – I – I – I
6.Parking brake lever and *cableLever movement check, *adjustment I – I – I – I – I –7.Tires (including tire rotation)
I
I
I
I
I
I
I
I
I
I
8. Wheel discs I I I I I I I I I I
*9.
Suspension system
I
I
I
I
I
I
I
I
I
I
*10. Propeller shafts (i-AWD)/Drive axle boots I I I I I I I I I I
*11.
Manual transaxle oilLevel check, *replacement – R – I – I – I – I
12.
Continuously variable transaxle (CVT)
Fluid level
–
I
–
I
–
I
–
I
–
I
*Fluid hose – I ––––– I ––
*13.
Transfer oil (i-AWD)
–
I
–
I
–
R
–
I
–
I
*14. Rear differential oil (i-AWD) – I – I – I – I – I
15.
Steering systemSteering wheel movement, *linkage I I I I I I I I I I
16.
Power steering (if equipped)
I
I
I
I
I
I
I
I
I
I
17. All latches, hinges and locks I I I I I I I I I I
18.
Air conditioner filter element (if equipped)
–
R
–
I
–
R
–
I
–
R
Page 214 of 297
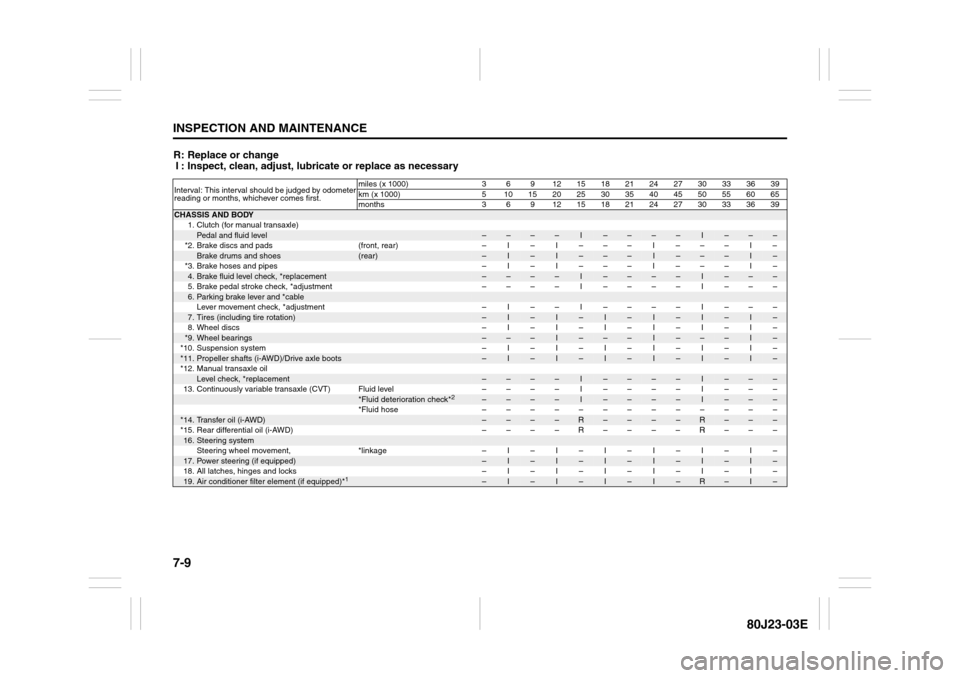
7-9INSPECTION AND MAINTENANCE
80J23-03E
R: Replace or change
I : Inspect, clean, adjust, lubricate or replace as necessaryInterval: This interval should be judged by odometer
reading or months, whichever comes first.miles (x 1000) 3 6 9 12 15 18 21 24 27 30 33 36 39
km (x 1000) 5 101520253035404550556065
months 3 6 9 12151821242730333639CHASSIS AND BODY
1. Clutch (for manual transaxle)
Pedal and fluid level
–
–
–
–
I
–
–
–
–
I
–
–
–
*2. Brake discs and pads (front, rear) – I – I – – – I – – – I –
Brake drums and shoes
(rear)
–
I
–
I
–
–
–
I
–
–
–
I
–
*3. Brake hoses and pipes – I – I – – – I – – – I –
4.Brake fluid level check, *replacement
–
–
–
–
I
–
–
–
–
I
–
–
–
5. Brake pedal stroke check, *adjustment – – – – I – – – – I – – –
6.Parking brake lever and *cableLever movement check, *adjustment – I – – I – – – – I – – –7.Tires (including tire rotation)
–
I
–
I
–
I
–
I
–
I
–
I
–
8. Wheel discs – I – I – I – I – I – I –
*9.
Wheel bearings
–
–
–
I
–
–
–
I
–
–
–
I
–
*10. Suspension system – I – I – I – I – I – I –
*11.
Propeller shafts (i-AWD)/Drive axle boots
–
I
–
I
–
I
–
I
–
I
–
I
–
*12. Manual transaxle oil
Level check, *replacement
–
–
–
–
I
–
–
–
–
I
–
–
–
13. Continuously variable transaxle (CVT) Fluid level – – – – I – – – – I – – –
*Fluid deterioration check*
2
–
–
–
–
I
–
–
–
–
I
–
–
–
*Fluid hose –––––––––––––
*14.
Transfer oil (i-AWD)
–
–
–
–
R
–
–
–
–
R
–
–
–
*15. Rear differential oil (i-AWD) – – – – R – – – – R – – –
16.
Steering systemSteering wheel movement, *linkage – I – I – I – I – I – I –
17.
Power steering (if equipped)
–
I
–
I
–
I
–
I
–
I
–
I
–
18. All latches, hinges and locks – I – I – I – I – I – I –
19.
Air conditioner filter element (if equipped)*
1
–
I
–
I
–
I
–
I
–
R
–
I
–