2010 SUZUKI SX4 lock
[x] Cancel search: lockPage 51 of 297
2-34
BEFORE DRIVING
80J23-03E
Front passenger’s seat belt reminder
The front passenger’s seat belt reminder
will activate only when there is a passen-
ger sitting in the front seat. In some situa-
tions, however, such as when you place
heavy objects in the front seat, the seat
belt reminder can be activated as if there
were a passenger present. The front pas-
senger’s seat belt reminder works in the
same manner as the driver’s seat belt
reminder, except that it is not activated
until 10 seconds after the ignition switch is
turned to the “ON” position.
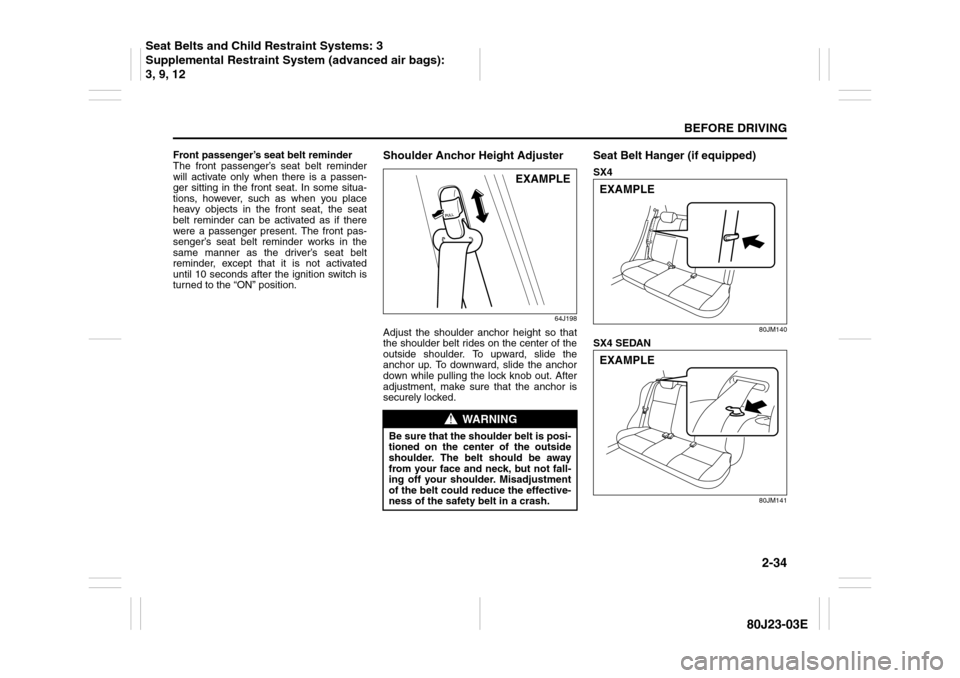
Shoulder Anchor Height Adjuster
64J198
Adjust the shoulder anchor height so that
the shoulder belt rides on the center of the
outside shoulder. To upward, slide the
anchor up. To downward, slide the anchor
down while pulling the lock knob out. After
adjustment, make sure that the anchor is
securely locked.
Seat Belt Hanger (if equipped)SX4
80JM140
SX4 SEDAN
80JM141
WARNING
Be sure that the shoulder belt is posi-
tioned on the center of the outside
shoulder. The belt should be away
from your face and neck, but not fall-
ing off your shoulder. Misadjustment
of the belt could reduce the effective-
ness of the safety belt in a crash.
EXAMPLE
EXAMPLEEXAMPLE
Seat Belts and Child Restraint Systems: 3
Supplemental Restraint System (advanced air bags):
3, 9, 12
Page 55 of 297
2-38
BEFORE DRIVING
80J23-03E
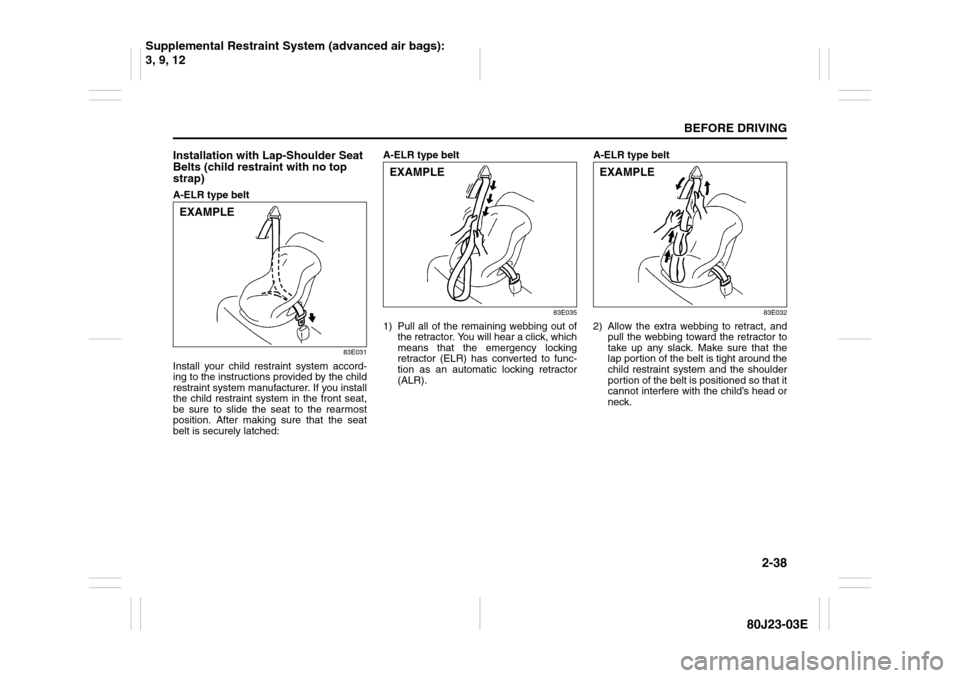
Installation with Lap-Shoulder Seat
Belts (child restraint with no top
strap)A-ELR type belt
83E031
Install your child restraint system accord-
ing to the instructions provided by the child
restraint system manufacturer. If you install
the child restraint system in the front seat,
be sure to slide the seat to the rearmost
position. After making sure that the seat
belt is securely latched:A-ELR type belt
83E035
1) Pull all of the remaining webbing out of
the retractor. You will hear a click, which
means that the emergency locking
retractor (ELR) has converted to func-
tion as an automatic locking retractor
(ALR).A-ELR type belt
83E032
2) Allow the extra webbing to retract, and
pull the webbing toward the retractor to
take up any slack. Make sure that the
lap portion of the belt is tight around the
child restraint system and the shoulder
portion of the belt is positioned so that it
cannot interfere with the child’s head or
neck.
EXAMPLE
EXAMPLE
EXAMPLE
Supplemental Restraint System (advanced air bags):
3, 9, 12
Page 56 of 297
2-39BEFORE DRIVING
80J23-03E
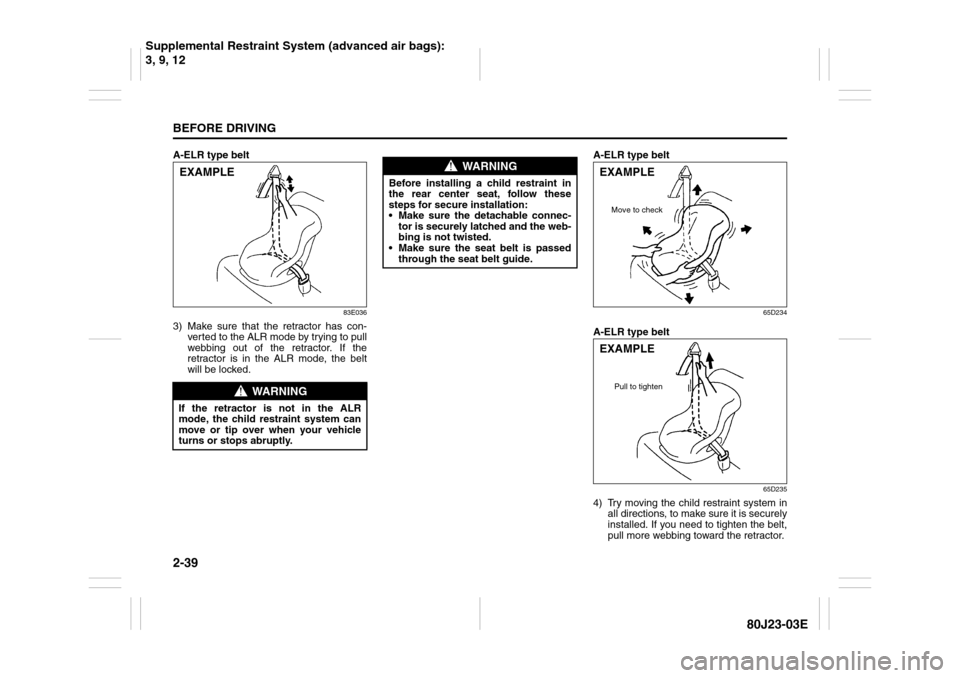
A-ELR type belt
83E036
3) Make sure that the retractor has con-
ver ted to the ALR mode by trying to pull
webbing out of the retractor. If the
retractor is in the ALR mode, the belt
will be locked.A-ELR type belt
65D234
A-ELR type belt
65D235
4) Try moving the child restraint system in
all directions, to make sure it is securely
installed. If you need to tighten the belt,
pull more webbing toward the retractor.
WARNING
If the retractor is not in the ALR
mode, the child restraint system can
move or tip over when your vehicle
turns or stops abruptly.EXAMPLE
WARNING
Before installing a child restraint in
the rear center seat, follow these
steps for secure installation:
Make sure the detachable connec-
tor is securely latched and the web-
bing is not twisted.
Make sure the seat belt is passed
through the seat belt guide.
EXAMPLE
Move to check
EXAMPLE
Pull to tighten
Supplemental Restraint System (advanced air bags):
3, 9, 12
Page 63 of 297

2-46
BEFORE DRIVING
80J23-03E
Seat Belt Pretensioner System
(for front seat belt only)
52D011
Your vehicle is equipped with a seat belt
pretensioner system at the front seating
positions. You can use the pretensioner
seat belts in the same manner as ordinary
seat belts.
The seat belt pretensioner system works
with the SUPPLEMENTAL RESTRAINT
SYSTEM (advanced air bags). The crash
sensors and the electronic controller of the
air bag system also control the seat belt
pretensioners. The pretensioners are trig-
gered only when there is a frontal or side
crash severe enough to trigger the air bags
and the seat belts are fastened. If the seat
belts are not fastened, the respective pre-
tensioner system will not be activated. For
precautions and general information
including servicing the pretensioner sys-
tem, refer to the “Supplemental Restraint
System (air bags)” section in addition to
this “Seat Belt Pretensioner System” sec-
tion, and follow all those precautions.
The pretensioner is located in each front
seat belt retractor. The pretensioner tight-
ens the seat belt so the belt fits the occu-
pant’s body more snugly in the event of a
frontal or side crash. The retractors will
remain locked after the pretensioners are
activated. Upon activation, some noise will
occur and some smoke may be released.
These conditions are not harmful and do
not indicate a fire in the vehicle.
WARNING
Failure to follow these instructions
may increase the risk of injury in a
crash.
Only use an extender for the per-
son, vehicle and seating position it
was provided for.
Do not use if open end of
extender’s buckle is within 152 mm
(6 inches) of center of occupant’s
body (See diagram).
Remove and stow the extender
when it is not being used.
WARNING
This section of the owner’s manual
describes your SUZUKI’s SEAT BELT
PRETENSIONER SYSTEM. Please
read and follow ALL these instruc-
tions carefully to minimize your risk
of severe injury or death.
EXAMPLE
Page 64 of 297
2-47BEFORE DRIVING
80J23-03E
The driver and all passengers must be
properly restrained by wearing seat belts
at all times, whether or not a pretensioner
is equipped at their seating position, to
help minimize the risk of severe injury or
death in the event of a crash.
Sit fully back in the seat; sit up straight; do
not lean forward or sideways. Adjust the
belt so the lap portion of the belt is worn
low across the pelvis, not across the waist.
Please refer to the “Seat Adjustment” sec-
tion and the instructions and precautions
about the seat belts in this “Seat Belts and
Child Restraint Systems” section for details
on proper seat and seat belt adjustments.
Please note that the pretensioners along
with the air bags will activate only in severe
frontal or side collisions. They are not
designed to activate in rear impacts, roll-
overs or minor frontal collisions. The pre-
tensioners can be activated only once. If
the pretensioners are activated (that is, if
the air bags are activated), have the pre-
tensioner system serviced by an autho-
rized SUZUKI dealer as soon as possible.
If the AIR BAG light on the instrument clus-
ter does not blink or come on briefly when
the ignition switch is turned to the “ON”
position, stays on for more than 10 sec-
onds, or comes on while driving, the pre-
tensioner system or the air bag system
may not work properly. Have both systems
inspected by an authorized SUZUKI dealer
as soon as possible.Service on or around the pretensioner sys-
tem components or wiring must be per-
formed only by an authorized SUZUKI
dealer who is specially trained. Improper
service could result in unintended activa-
tion of pretensioners or could render the
pretensioner inoperative. Either of these
two conditions may result in personal
injury.
To prevent damage or unintended activa-
tion of the pretensioners, be sure the bat-
tery is disconnected and the ignition switch
has been in the “LOCK” position for at least
90 seconds before performing any electri-
cal service work on your SUZUKI. Do not
touch pretensioner system components or
wiring. The wires are wrapped with yellow
tape or yellow tubing, and the couplers are
yellow. When scrapping your SUZUKI, ask
your SUZUKI dealer, body repair shop or
scrap yard for assistance.
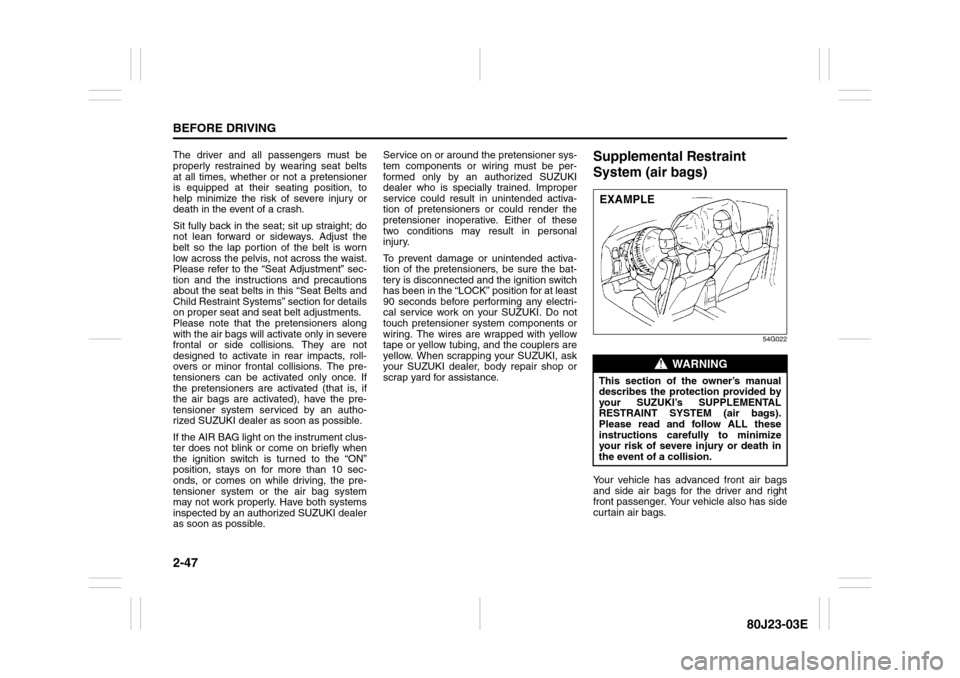
Supplemental Restraint
System (air bags)
54G022
Your vehicle has advanced front air bags
and side air bags for the driver and right
front passenger. Your vehicle also has side
curtain air bags.
WARNING
This section of the owner’s manual
describes the protection provided by
your SUZUKI’s SUPPLEMENTAL
RESTRAINT SYSTEM (air bags).
Please read and follow ALL these
instructions carefully to minimize
your risk of severe injury or death in
the event of a collision.EXAMPLE
Page 75 of 297
2-58
BEFORE DRIVING
80J23-03E
Servicing the Air Bag SystemIf the air bags inflate, have the air bags and
related components replaced by an autho-
rized SUZUKI dealer as soon as possible.
If your vehicle ever gets in deep water and
the driver’s floor is submerged, the air bag
controller could be damaged. If this hap-
pens, have the air bag system inspected
by the SUZUKI dealer as soon as possible.
Special procedures are required for servic-
ing or replacing an air bag. For that reason,
only an authorized SUZUKI dealer should
be allowed to service or replace your air
bags. Please remind anyone who services
your SUZUKI that it has air bags.
Service on or around air bag components
or wiring must be performed only by an
authorized SUZUKI dealer. Improper ser-
vice could result in unintended air bag
deployment or could render the air bags
inoperative. Either of these two conditions
may result in severe injury.To prevent damage or unintended inflation
of the air bag system, be sure the battery
is disconnected and the ignition switch has
been in the “LOCK” position for at least 90
seconds before performing any electrical
service work on your SUZUKI. Do not
touch air bag system components or wires.
The wires are wrapped with yellow tape or
yellow tubing, and the couplers are yellow
for easy identification.
Scrapping a car that has an undeployed air
bag can be hazardous. Ask your dealer,
body repair shop or scrap yard for help
with disposal.If it is necessary to modify the advanced
front air bag system to accommodate a
person with disabilities, owners in the con-
tinental United States can call American
Suzuki toll-free at 1-800-934-0934, or write
to:
American Suzuki Motor Corporation
Automotive Customer Relations
3251 East Imperial Highway
Brea, CA 92821-6795
If you purchased your SUZUKI in Canada
please contact the Suzuki Canada Cus-
tomer Relations Department by telephone
at 1-905-889-2677 extension 2254 or in
writing at:
Suzuki Canada Inc.
Customer Relations
100 East Beaver Creek Road
Richmond Hill, On
L4B 1J6
Page 78 of 297
2-61BEFORE DRIVING
80J23-03E
Refer to “Tire Pressure Monitoring System”
in the “OPERATING YOUR VEHICLE” sec-
tion for additional details on the tire pres-
sure monitoring system. Refer to “Tires” in
the “INSPECTION AND MAINTENANCE”
section for information on maintaining
proper tire pressure.
Brake System Warning Light
65D477
This light comes on briefly when the igni-
tion switch is turned to the “ON” position.
The light also comes on under the follow-
ing conditions: 1) when the parking brake
is engaged and 2) when the fluid in the
brake fluid reservoir falls below the speci-
fied level. The light should go out after fully
releasing the parking brake, if the fluid
level in the brake fluid reservoir is ade-
quate.
If this light and the ABS warning light stay
on, or come on simultaneously when driv-
ing, then there may be something wrong
with both the rear brake proportioning
valve function and anti-lock function of the
ABS.
If the brake system warning light comes on
while you are driving the vehicle, it may
mean that there is something wrong with
the vehicle’s brake system. If this happens,
you should:
WARNING
If the low tire pressure warning light
comes on and stays on, reduce your
speed and avoid abrupt steering and
braking. Stop in a safe place as soon
as possible and check your tires.
If you have a flat tire, replace it with
the spare tire. Refer to “Jacking
Instructions” in the “EMERGENCY
SERVICE” section. Refer to
“Replacing Tires and/or Wheels”
for instructions on how to restore
normal operation of the tire pres-
sure monitoring system after you
have had a flat tire.
If one or more of your tires is
under-inflated, adjust the inflation
pressure in all of your tires to the
recommended inflation pressure as
soon as possible.
Be aware that driving on a signifi-
cantly under-inflated tire can cause
the tire to overheat and can lead to
tire failure, and may affect steering
control and brake effectiveness. This
could lead to an accident, resulting in
severe injury or death.
Page 79 of 297

2-62
BEFORE DRIVING
80J23-03E
1) Pull off the road and stop carefully.
2) Test the brakes by carefully starting and
stopping on the shoulder of the road.
3) If you determine that it is safe, drive
cautiously at low speed to the nearest
dealer for repairs,
or
4) Have the vehicle towed to the nearest
dealer for repairs.NOTE:
Because the disc brake system is self-
adjusting, the fluid level will drop as the
brake pads become worn.
Replenishing the brake fluid reservoir is
considered normal periodic maintenance.
Anti-Lock Brake System (ABS)
Warning Light
65D529
When the ignition switch is turned to the
“ON” position, the light comes on briefly so
you can check that the light is working. If
the light stays on, or comes on when driv-
ing, there may be something wrong with
the ABS.
If the ABS light and the brake system
warning light stay on, or come on simulta-
neously when driving, then there may be
something wrong with both the rear brake
proportioning valve function and anti-lock
function of the ABS.
If one of these happens, have the system
inspected by your SUZUKI dealer. If the
ABS becomes inoperative, the brake sys-
tem will function as an ordinary brake sys-
tem that has no ABS.For details of the ABS, refer to “Anti-Lock
Brake System (ABS)” in the “OPERATING
YOUR VEHICLE” section.
SLIP Indicator Light (if equipped)
52KM133
ESP
® is a registered trademark of Daimler
AG.
This light blinks 5 times per second when
one of the ESP
® systems other than ABS
is activated. If this light blinks, drive care-
fully.
When the ignition switch is turned to the
“ON” position, the light comes on briefly so
you can check that the light is working. If
the light stays on, or comes on when driv-
ing and remains on, there may be some-
thing wrong with the ESP
® systems (other
than ABS). You should have the system
inspected by an authorized SUZUKI
dealer.
WARNING
Remember that stopping distance
may be longer, you may have to push
harder on the pedal, and the pedal
may go down farther than normal.
WARNING
If any of the following conditions
occur, you should immediately ask
your SUZUKI dealer to inspect the
brake system.
If the brake system warning light
does not go out after the parking
brake has been fully released.
If the brake system warning light
does not come on when the igni-
tion switch is turned to the “ON”
position.
If the brake system warning light
comes on at any time during vehi-
cle operation.