2010 SUZUKI SX4 Temperature
[x] Cancel search: TemperaturePage 212 of 297

7-7INSPECTION AND MAINTENANCE
80J23-03E
Maintenance Recommended under Severe Driving ConditionsFollow this schedule if your car is mainly operated under one or more of the following conditions:
When most trips are less than 6 kilometers (4 miles)
When most trips are less than 16 kilometers (10 miles) and outside temperature remain below freezing.
Idling and/or low-speed operation in stop-and-go traffic.
Operating in dusty areas.
Schedule should also be followed if the car is used for delivery service, police, taxi or other commercial applications.
R: Replace or change
I : Inspect, clean, adjust, lubricate or replace as necessary
#1: Be sure to perform the engine coolant level check under the daily inspection in “OPERATING YOUR VEHICLE” section.
If you replace the engine coolant other than the SUZUKI LLC: Super (Blue), follow the schedule of SUZUKI LLC: Standard (Green).Interval: This interval should be judged by
odometer reading or months, whichever
comes first.miles (x 1000) 3 6 9 12151821242730333639
km (x 1000) 5 10 15 20 25 30 35 40 45 50 55 60 65
months 3 6 9 12151821242730333639ENGINE & EMISSION CONTROL
1. Drive belt
Inspect for damage
–
–
–
–
–
–
–
–
–
I
–
–
–
*2.Valve lash (clearance) –––––––––––––
3.Engine oil and oil filter
R
R
R
R
R
R
R
R
R
R
R
R
R
*4. Cooling system hoses and connections – – – – I – – – – I – – –
5.Engine coolant
SUZUKI LLC: Standard (Green)
–
–
–
–
–
–
–
–
–
R
–
–
–
SUZUKI LLC: Super (Blue) (#1) First time only: Replace at 150000 km (90000 miles) or 90 months
Second time and after: Replace every 75000 km (45000 miles) or 45 months
*6. Exhaust pipes and mountings – – – – I – – – – I – – –
*7.
EVAP canister
Replace every 250000 km (150000 miles) or 180 months
*8. Emission-related hoses & tubes – ––––––––––––
9.Spark plugs
–
–
–
–
–
–
–
–
–
–
–
–
–
*10.Ignition coil (plug cap) ––––––––– I –––
*11.
Fuel tank & cap
–
–
–
–
I
–
–
–
–
I
–
–
–
12. Air cleaner filter element (paved road) I IIIIIIIIRIII
*13.
Fuel filter
Replace every 250000 km (150000 miles) or 150 months
*14. Fuel lines and connections – – – – I – – – – I – – –
*15.
Canister air suction filter
–
–
–
–
–
–
–
–
–
–
–
–
–
Page 217 of 297
7-12
INSPECTION AND MAINTENANCE
80J23-03E
52D084
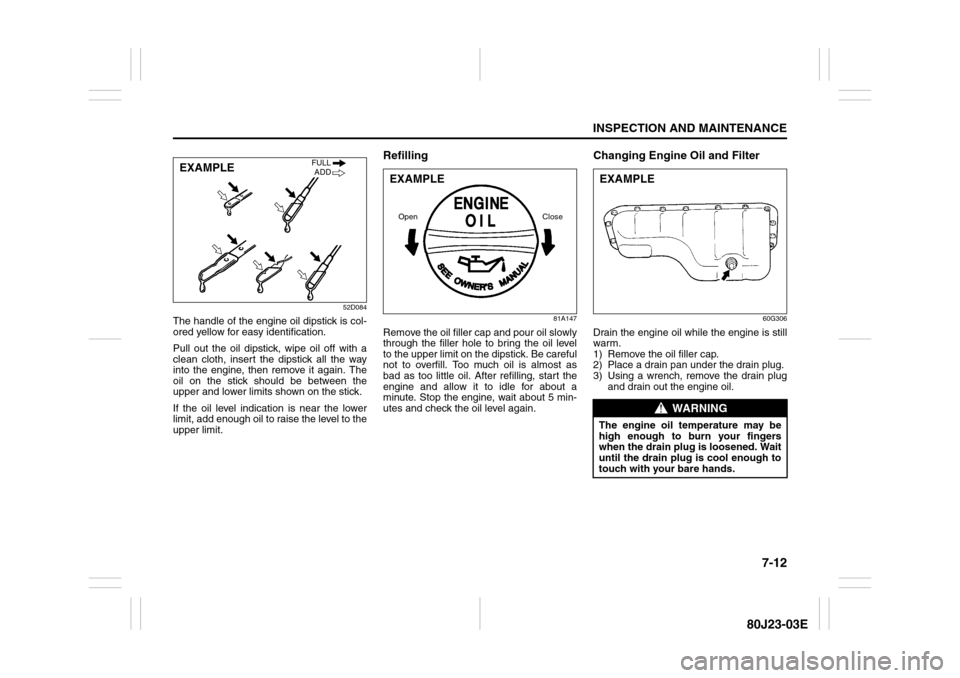
The handle of the engine oil dipstick is col-
ored yellow for easy identification.
Pull out the oil dipstick, wipe oil off with a
clean cloth, insert the dipstick all the way
into the engine, then remove it again. The
oil on the stick should be between the
upper and lower limits shown on the stick.
If the oil level indication is near the lower
limit, add enough oil to raise the level to the
upper limit.
Refilling
81A147
Remove the oil filler cap and pour oil slowly
through the filler hole to bring the oil level
to the upper limit on the dipstick. Be careful
not to overfill. Too much oil is almost as
bad as too little oil. After refilling, start the
engine and allow it to idle for about a
minute. Stop the engine, wait about 5 min-
utes and check the oil level again.
Changing Engine Oil and Filter
60G306
Drain the engine oil while the engine is still
warm.
1) Remove the oil filler cap.
2) Place a drain pan under the drain plug.
3) Using a wrench, remove the drain plug
and drain out the engine oil.
EXAMPLE
FULL
ADD
EXAMPLEOpen Close
WARNING
The engine oil temperature may be
high enough to burn your fingers
when the drain plug is loosened. Wait
until the drain plug is cool enough to
touch with your bare hands.EXAMPLE
Page 221 of 297

7-16
INSPECTION AND MAINTENANCE
80J23-03E
Coolant ReplacementSince special procedures are required, we
recommend you take your vehicle to your
SUZUKI dealer for coolant replacement.
Air Cleaner
80J2056
If the air cleaner is clogged with dust, there
will be greater intake resistance, resulting
in decreased power output and increased
fuel consumption.
Unclamp the side clamps, and remove the
element from the air cleaner case. If it
appears to be dirty, replace it with a new
one.
Spark PlugsYou should inspect spark plugs periodically
for carbon deposits. When carbon accu-
mulates on a spark plug, a strong spark
may not be produced. Remove carbon
deposits with a wire or pin and adjust the
spark plug gap.
To access the spark plugs,
80J2069
1) Remove the air cleaner inlet hose (1).
Remove the front part (2), then remove
the rear part (3) of the air cleaner case.
CAUTION
SUZUKI LLC: Standard (Green)
coolant;
The mixture you use should con-
tain 50% concentration of anti-
freeze.
If the lowest ambient temperature
in your area is expected to be
–35°C (–31°F) or below, use higher
concentrations up to 60% following
the instructions on the antifreeze
container.
CAUTION
When putting the cap on the reser-
voir tank, line up the mark on the cap
and the mark on the tank. Failure to
follow this can result in coolant leak-
age.
CAUTION
The air cleaner element should be
replaced every 50000 km (30000
miles). More frequent replacement is
necessary when you drive under
dusty conditions.
CAUTION
When remove the engine cover, make
sure the cover does not interfere the
vehicle to avoid damage to the cover.
(1) (2)(3)
Page 225 of 297
7-20
INSPECTION AND MAINTENANCE
80J23-03E
Continuously Variable
Transaxle (CVT) FluidSpecified FluidUse a CVT fluid SUZUKI CVT FLUID
GREEN-1 or Shell GREEN-1V.Fluid Level CheckYou must check the fluid level with the CVT
fluid at normal operating temperature.
To check the fluid level:
1) To warm up the transaxle fluid, drive the
vehicle or idle the engine until the tem-
perature gauge indicates normal oper-
ating temperature.
2) Then drive for ten more minutes.
NOTE:
Do not check the fluid level if you have just
driven the vehicle for a long time at high
speed, or if you have driven in city traffic inhot weather. Wait until the fluid cools down
(about 30 minutes), or the fluid level indica-
tion will not be correct.
3) Park your vehicle on level ground.
4) Apply the parking brake and then start
the engine in “P” (Park). Let it idle for
two minutes and keep it running during
the fluid level check.
5) With your foot on the brake pedal, move
the gearshift lever through each gear,
pausing for about three seconds in
each range. Then move it back to the
“P” (Park) position.
75F08680J2071
80J2072
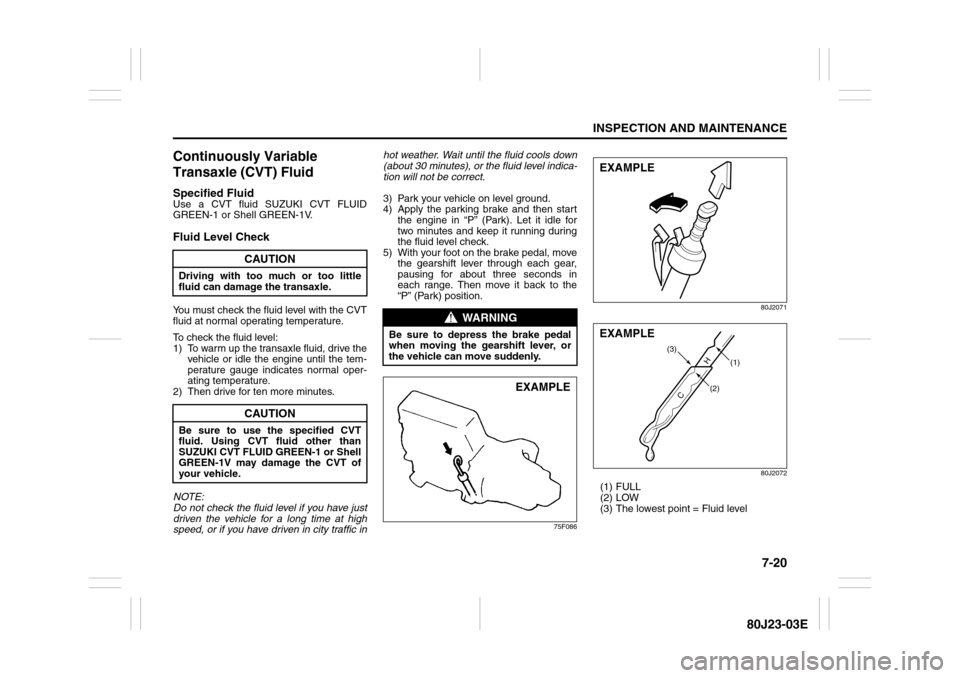
(1) FULL
(2) LOW
(3) The lowest point = Fluid level
CAUTION
Driving with too much or too little
fluid can damage the transaxle.
CAUTION
Be sure to use the specified CVT
fluid. Using CVT fluid other than
SUZUKI CVT FLUID GREEN-1 or Shell
GREEN-1V may damage the CVT of
your vehicle.
WARNING
Be sure to depress the brake pedal
when moving the gearshift lever, or
the vehicle can move suddenly.
EXAMPLE
EXAMPLE
(2)H
C
(1) (3)
EXAMPLE
Page 229 of 297
7-24
INSPECTION AND MAINTENANCE
80J23-03E
Power Steering (if equipped)
54G225
(1) UPPER
(2) LOWER
Check the steering box case, vane pump
and hose connections for leaks or damage.Power Steering FluidCheck the fluid level by looking at the res-
ervoir in the engine compartment when the
fluid is cold (about room temperature).
Check that the fluid level is between the (1)
and (2) lines. If the fluid level is near the (2)
line, fill it up to the (1) line with an auto-
matic transaxle fluid equivalent to ATF
DEXRON
®-II (Esso JWS 2326) or
DEXRON®-III. Do not overfill.
TiresFor safe operation of your vehicle, it is
important that the tires be the correct
type and size, in good condition, and
properly inflated. Be sure to follow the
requirements and recommendations in
this section.
Tire Sidewall Labeling
Useful information about a tire is
molded into its sidewall. The example
below shows a typical passenger car
tire.
Typical Passenger Car Tire Sidewall
67D027
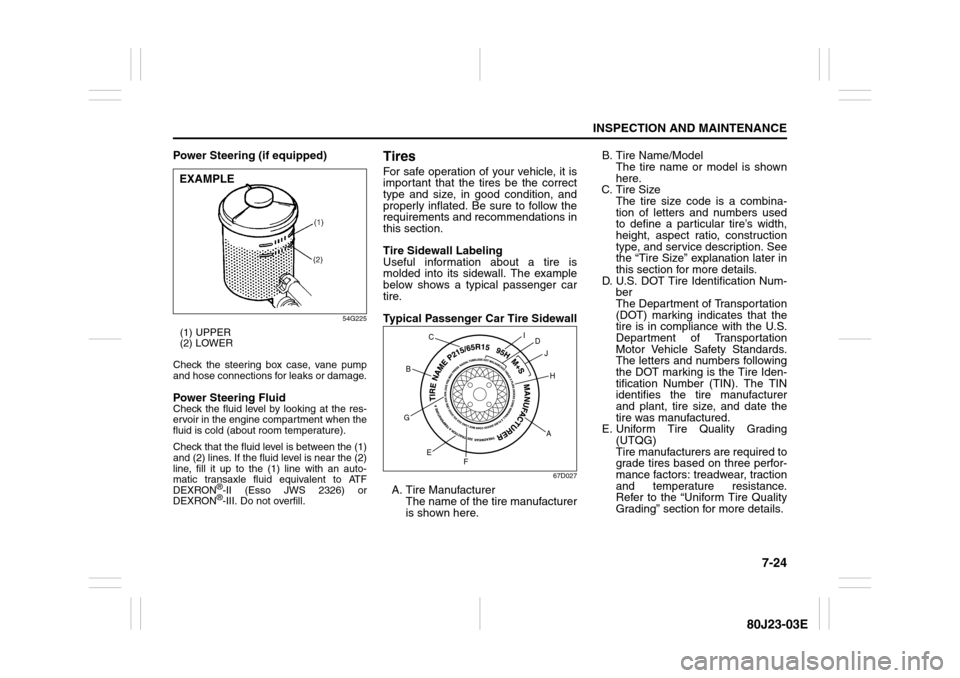
A. Tire Manufacturer
The name of the tire manufacturer
is shown here.B. Tire Name/Model
The tire name or model is shown
here.
C. Tire Size
The tire size code is a combina-
tion of letters and numbers used
to define a particular tire’s width,
height, aspect ratio, construction
type, and service description. See
the “Tire Size” explanation later in
this section for more details.
D. U.S. DOT Tire Identification Num-
ber
The Department of Transportation
(DOT) marking indicates that the
tire is in compliance with the U.S.
Department of Transportation
Motor Vehicle Safety Standards.
The letters and numbers following
the DOT marking is the Tire Iden-
tification Number (TIN). The TIN
identifies the tire manufacturer
and plant, tire size, and date the
tire was manufactured.
E. Uniform Tire Quality Grading
(UTQG)
Tire manufacturers are required to
grade tires based on three perfor-
mance factors: treadwear, traction
and temperature resistance.
Refer to the “Uniform Tire Quality
Grading” section for more details.
EXAMPLE
AH B
G
E
FD
J I
C
Page 232 of 297
7-27INSPECTION AND MAINTENANCE
80J23-03E
NOTE:
The tire inflation pressure will change
due to changes in atmospheric pres-
sure, temperature or tire temperature
when driving. To reduce the chance that
the low tire pressure warning light will
come on due to normal changes in tem-
perature and atmospheric pressure, it is
important to check and adjust the tire
pressures when the tires are cold. Tires
that appear to be at the specified pres-
sure when checked after driving, when
the tires are warm, could have pressure
below the specification when the tires
cool down. Also, tires that are inflated to
the specified pressure in a warm
garage may have pressure below the
specification when the vehicle is driven
outside in very cold temperature. If you
adjust the tire pressure in a garage that
is warmer than the outside tempera-
ture, you should add 1 psi to the recom-
mended cold tire inflation pressure for
every 10°F difference between garage
temperature and outside temperature.Measuring Air Pressure
Use the following steps to achieve
proper tire inflation:
1) Identify the recommended tire pres-
sure on the vehicle’s Tire and Load-
ing Information Label or in the
owner’s manual.
2) Remove the valve cap from the tire
valve stem.
3) Using a reliable pressure gauge,
measure the tire inflation pressure
by pressing the tire gauge firmly
onto the valve to get a pressure
measurement. Remember that
inflation pressures should be
checked when the tires are “cold”,
meaning before they have been
driven one mile or after sitting for
three hours or more allowing the tire
to cool to ambient air temperature.
4) If the air pressure is too high, slowly
release the air by pressing on the
tire valve stem with the edge of the
tire gauge until you reach the cor-
rect pressure.
5) If the air pressure is too low, fill the
tire with air at a service station until
it reaches the recommended pres-
sure.
6) Make sure all tires have the same
air pressure (unless the owner’s
manual indicates otherwise).
WARNING
Air pressures should be
checked when the tires are cold
or you may get inaccurate read-
ings.
Check the inflation pressure
from time to time while inflating
the tire gradually, until the spec-
ified pressure is obtained.
Never underinflate or overin-
flate the tires.
Underinflation can cause
unusual handling characteristics
or can cause the rim to slip on
the tire bead, resulting in an acci-
dent or damage to the tire or rim.
Underinflation can also cause
tires to overheat, leading to tire
failure.
Overinflation can cause the tire
to burst, resulting in personal
injury.
Overinflation can also cause
unusual handling characteristics
which may result in an accident.
Page 234 of 297
7-29INSPECTION AND MAINTENANCE
80J23-03E
Uniform Tire Quality Grading
The U.S. National Highway Traffic
Safety Administration has developed a
grading system for evaluating the per-
formance of passenger car tires. The
following information will help you
understand the grading system, which
applies to vehicles sold in the U.S.
Consult your SUZUKI dealer or tire
retailer for help in choosing the correct
replacement tires for your vehicle.
Quality grades can be found where
applicable on the tire sidewall between
tread shoulder and maximum section
width. For example:
Treadwear 200 Traction AA Tempera-
ture A
DOT Quality Grades
Treadwear
Traction AA A B C
Temperature A B C
All Passenger Car Tires Must Conform
To Federal Safety Requirements in
Addition To These GradesTreadwear
The treadwear grade is a comparative
rating based on the wear rate of the tire
when tested under controlled condi-
tions on a specified government test
course. For example, a tire graded 150
would wear one and one-half (1 1/2)
times as well on the government course
as a tire graded 100. The relative per-
formance of tires depends upon the
actual conditions of their use, however
and may depart significantly from the
norm due to variations in driving habits,
service practices and differences in
road characteristics and climate.
Traction – AA, A, B, C
The traction grades, from highest to
lowest, are AA, A, B and C. Those
grades represent the tire’s ability to
stop on wet pavement as measured
under controlled conditions on speci-
fied government test surfaces of
asphalt and concrete. A tire marked C
may have poor traction performance.
WARNING
Replacing the wheels and tires
equipped on your vehicle with
certain combinations of aftermar-
ket wheels and tires can signifi-
cantly change the steering and
handling characteristics of your
vehicle. Oversized tires may also
rub against the fender over
bumps, causing vehicle damage
or tire failure. Therefore, use only
those wheel and tire combina-
tions approved by SUZUKI Motor
Corporation as standard or
optional equipment for your vehi-
cle. For information regarding the
specified tires, refer to the Tire
Information Label located on the
driver’s side door pillar or the
“SPECIFICATIONS” section.
CAUTION
Replacing the original tires with
tires of a different size may result
in false speedometer or odometer
readings. Check with your
SUZUKI dealer before purchas-
ing replacement tires that differ in
size from the original tires.
WARNING
The traction grade assigned to
this tire is based on straight-
ahead braking traction tests, and
does not include acceleration,
cornering, hydroplaning or peak
traction characteristics.
Page 235 of 297
7-30
INSPECTION AND MAINTENANCE
80J23-03E
Temperature – A, B, C
The temperature grades are A (the
highest), B and C, representing the
tire’s resistance to the generation of
heat and its ability to dissipate heat
when tested under controlled condi-
tions on a specified indoor laboratory
test wheel. Sustained high tempera-
ture can cause the material of the tire
to degenerate and reduce tire life, and
excessive temperature can lead to
sudden tire failure. The grade C corre-
sponds to a level of performance
which all passenger car tires must
meet under the Federal Motor Vehicle
Safety Standard No. 109. Grades B
and A represent higher levels of per-
formance on the laboratory test wheel
than the minimum required by law.Tire Rotation
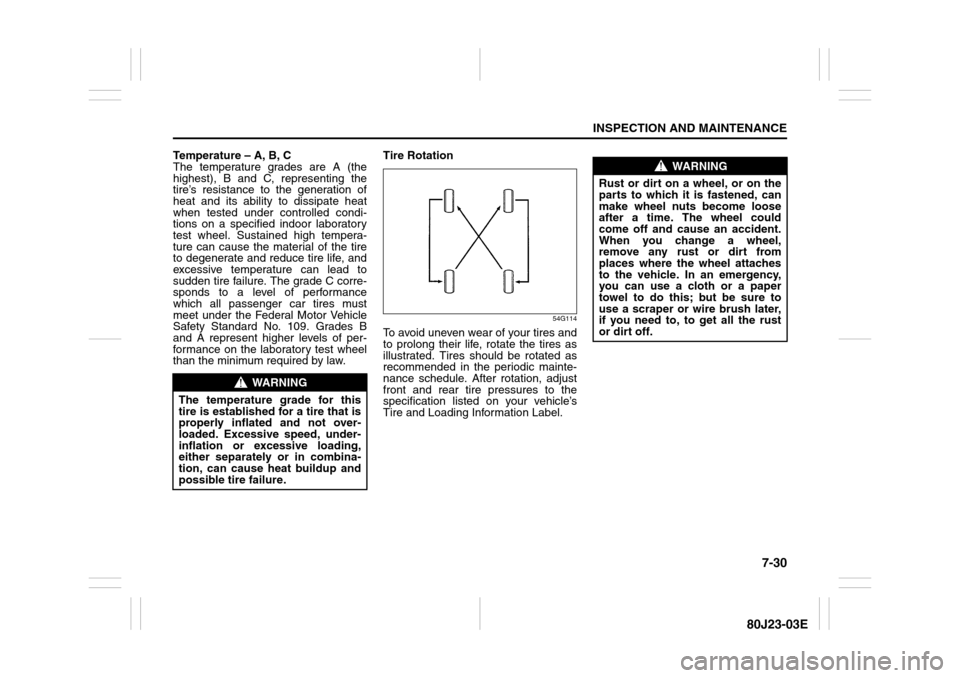
54G114
To avoid uneven wear of your tires and
to prolong their life, rotate the tires as
illustrated. Tires should be rotated as
recommended in the periodic mainte-
nance schedule. After rotation, adjust
front and rear tire pressures to the
specification listed on your vehicle’s
Tire and Loading Information Label.
WARNING
The temperature grade for this
tire is established for a tire that is
properly inflated and not over-
loaded. Excessive speed, under-
inflation or excessive loading,
either separately or in combina-
tion, can cause heat buildup and
possible tire failure.
WARNING
Rust or dirt on a wheel, or on the
parts to which it is fastened, can
make wheel nuts become loose
after a time. The wheel could
come off and cause an accident.
When you change a wheel,
remove any rust or dirt from
places where the wheel attaches
to the vehicle. In an emergency,
you can use a cloth or a paper
towel to do this; but be sure to
use a scraper or wire brush later,
if you need to, to get all the rust
or dirt off.