2010 SUZUKI SX4 seats
[x] Cancel search: seatsPage 57 of 297
2-40
BEFORE DRIVING
80J23-03E
To revert from ALR to ELR
65D267
When you unbuckle the seat belt and allow
it to retract to a certain length, the retractor
will automatically revert back to the normal
ELR mode.
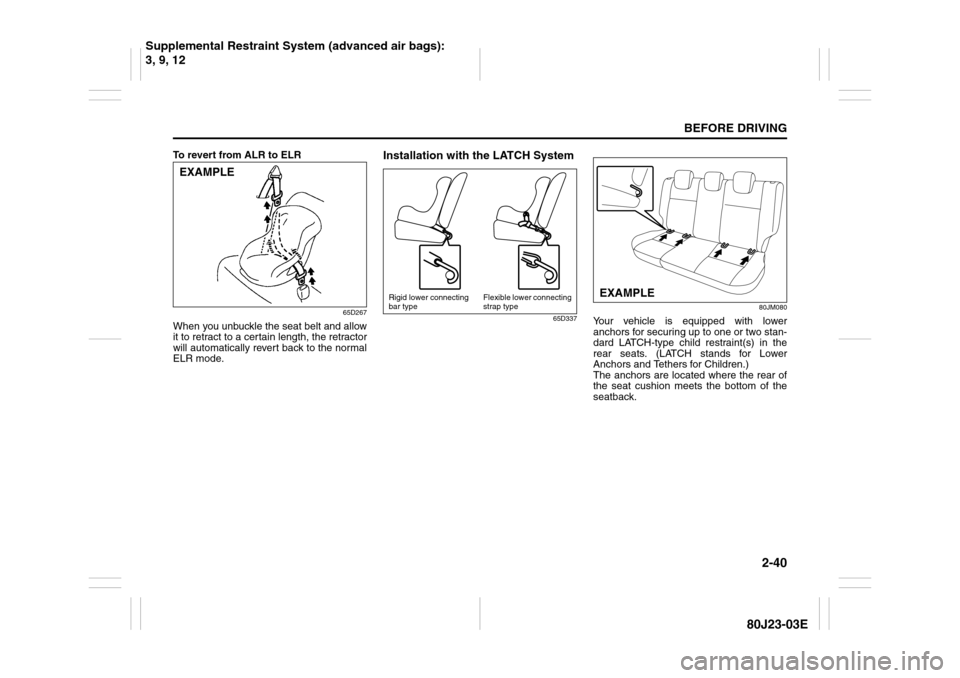
Installation with the LATCH System
65D33780JM080
Your vehicle is equipped with lower
anchors for securing up to one or two stan-
dard LATCH-type child restraint(s) in the
rear seats. (LATCH stands for Lower
Anchors and Tethers for Children.)
The anchors are located where the rear of
the seat cushion meets the bottom of the
seatback.
EXAMPLE
Rigid lower connecting
bar typeFlexible lower connecting
strap type
EXAMPLE
Supplemental Restraint System (advanced air bags):
3, 9, 12
Page 58 of 297
2-41BEFORE DRIVING
80J23-03E
SX4 SEDAN
80JC028
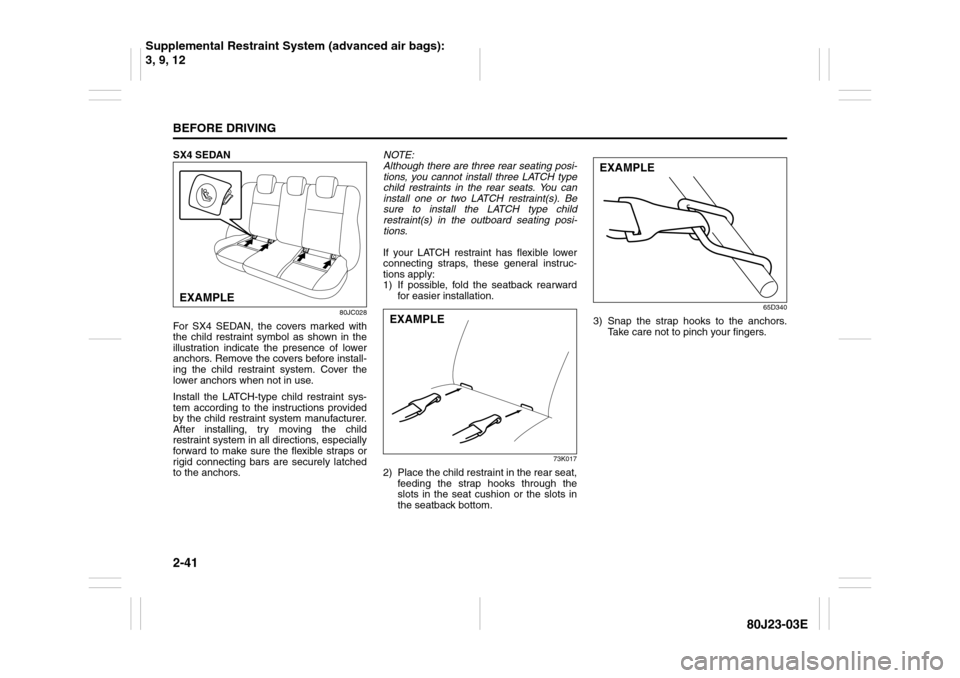
For SX4 SEDAN, the covers marked with
the child restraint symbol as shown in the
illustration indicate the presence of lower
anchors. Remove the covers before install-
ing the child restraint system. Cover the
lower anchors when not in use.
Install the LATCH-type child restraint sys-
tem according to the instructions provided
by the child restraint system manufacturer.
After installing, try moving the child
restraint system in all directions, especially
forward to make sure the flexible straps or
rigid connecting bars are securely latched
to the anchors.NOTE:
Although there are three rear seating posi-
tions, you cannot install three LATCH type
child restraints in the rear seats. You can
install one or two LATCH restraint(s). Be
sure to install the LATCH type child
restraint(s) in the outboard seating posi-
tions.
If your LATCH restraint has flexible lower
connecting straps, these general instruc-
tions apply:
1) If possible, fold the seatback rearward
for easier installation.
73K017
2) Place the child restraint in the rear seat,
feeding the strap hooks through the
slots in the seat cushion or the slots in
the seatback bottom.
65D340
3) Snap the strap hooks to the anchors.
Take care not to pinch your fingers.
EXAMPLE
EXAMPLE
EXAMPLE
Supplemental Restraint System (advanced air bags):
3, 9, 12
Page 62 of 297
2-45BEFORE DRIVING
80J23-03E
5) When routing the top strap, be sure to
pass the top strap as shown in the illus-
tration. For SX4 SEDAN, if the top strap
cannot be properly tightened when
passed under the head restraint as
shown in the Type 1 and Type 2 illustra-
tions, pass the top strap over the top of
the head restraint as shown in the Type
3 illustration. (Refer to “Head
Restraints” section for details on how to
raise or lower the head restraint.)
6) Make sure that cargo does not interfere
with routing of the top strap.
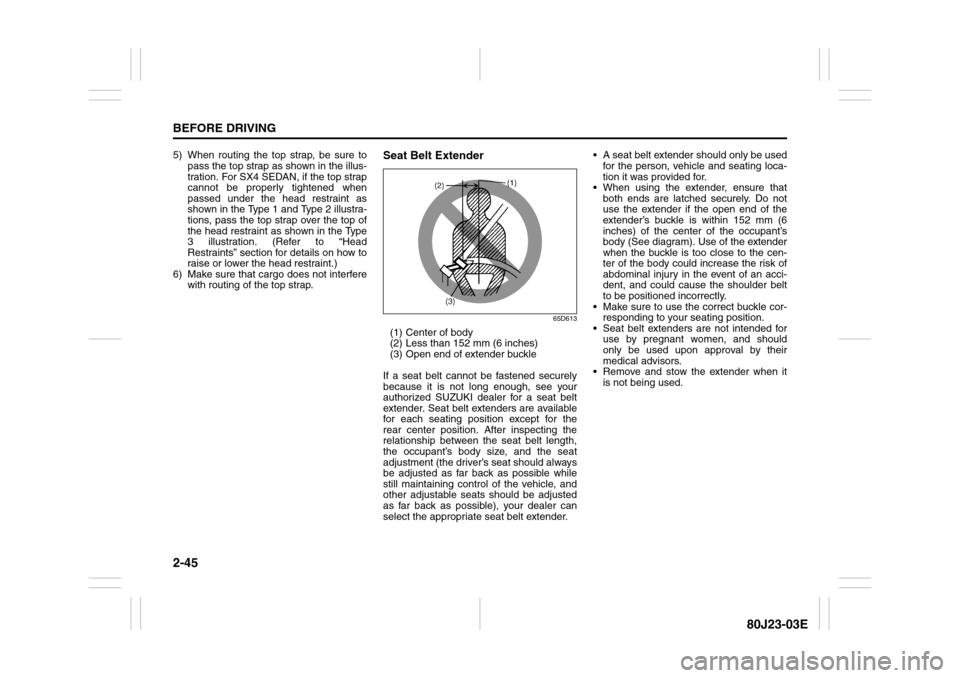
Seat Belt Extender
65D613
(1) Center of body
(2) Less than 152 mm (6 inches)
(3) Open end of extender buckle
If a seat belt cannot be fastened securely
because it is not long enough, see your
authorized SUZUKI dealer for a seat belt
extender. Seat belt extenders are available
for each seating position except for the
rear center position. After inspecting the
relationship between the seat belt length,
the occupant’s body size, and the seat
adjustment (the driver’s seat should always
be adjusted as far back as possible while
still maintaining control of the vehicle, and
other adjustable seats should be adjusted
as far back as possible), your dealer can
select the appropriate seat belt extender. A seat belt extender should only be used
for the person, vehicle and seating loca-
tion it was provided for.
When using the extender, ensure that
both ends are latched securely. Do not
use the extender if the open end of the
extender’s buckle is within 152 mm (6
inches) of the center of the occupant’s
body (See diagram). Use of the extender
when the buckle is too close to the cen-
ter of the body could increase the risk of
abdominal injury in the event of an acci-
dent, and could cause the shoulder belt
to be positioned incorrectly.
Make sure to use the correct buckle cor-
responding to your seating position.
Seat belt extenders are not intended for
use by pregnant women, and should
only be used upon approval by their
medical advisors.
Remove and stow the extender when it
is not being used.
Page 73 of 297

2-56
BEFORE DRIVING
80J23-03E
How the System WorksIn a frontal collision, the crash sensors will
detect rapid deceleration and send a signal
to the controller. If the controller judges
that the deceleration represents a severe
frontal crash, the controller will trigger the
inflators. The controller also judges:
Whether the front air bags should deploy
at reduced power or at full power accord-
ing to crash severity.
Whether the air bags should deploy at
reduced power or at full power according
to crash severity, driver’s seat fore/aft
position and whether or not the front
passenger’s seat belt is fastened.
Whether the front passenger’s front air
bag should deploy or not based on clas-
sification of the occupant of the front
passenger’s seat.
Since your vehicle is equipped with side air
bags, and side curtain air bags, crash sen-
sors will detect a side collision, and if the
controller judges that the side collision is
severe enough, it will trigger the side air
bag and side curtain air bag inflators.
The inflators inflate the appropriate air
bags with nitrogen or argon gas. The
inflated air bags provide a cushion for your
head (front air bags and side curtain air
bags only) and upper body. The air bag
inflates and deflates so quickly that you
may not even realize that it has activated.
The air bag will neither hinder your view
nor make it harder to exit the vehicle.Air bags must inflate quickly and forcefully
in order to reduce the chance of serious or
fatal injuries. However, an unavoidable
consequence of the quick inflation is that
the air bag may irritate bare skin, such as
the facial area against a front air bag. Also,
upon inflation, a loud noise will occur and
some powder and smoke will be released.
These conditions are not harmful and do
not indicate a fire in the car. Be aware,
however, that some air bag components
may be hot for a while after inflation.
A seat belt helps keep you in the proper
position for maximum protection when an
air bag inflates. Adjust your seat as far
back as possible while still maintaining
control of the vehicle. Sit fully back in your
seat; sit up straight; do not lean over the
steering wheel or dashboard. Front occu-
pants should not lean on or sleep against
the door. Please refer to the “Seat Adjust-
ment” section and the “Seat Belts and
Child Restraint Systems” section in the
“BEFORE DRIVING” section for details on
proper seat and seat belt adjustments.
WARNING
Do not spill any liquids on the seat.
Liquids can damage the sensors
under the front seat.
Have the driver’s seat position sen-
sor and the front passenger’s sen-
sor mat inspected by your dealer
after a collision.
Do not replace the front seats. If
you replace them, the air bags and
front passenger sensing system
may not work properly.
Do not use a seat cover. If you use
a seat cover, the front passenger
sensing system may not work prop-
erly.
Page 74 of 297

2-57BEFORE DRIVING
80J23-03E
65D610
54G582
Note that even though your vehicle may be
moderately damaged in a collision, the col-
lision may not have been severe enough to
trigger the front, side, or side curtain air
bags to inflate. If your car sustains ANY
front-end or side damage, have the air bag
system inspected by an authorized
SUZUKI dealer to ensure it is in proper
working order.
Your vehicle is equipped with a diagnostic
module which records information about
the air bag system if the air bags deploy in
a crash. The module records information
about overall system status, which sensors
activated the deployment, and whether the
front seat belts were in use.
WARNING
The driver should not lean over the
steering wheel. The front passen-
ger should not rest his or her body
against the dashboard, or other-
wise get too close to the dash-
board. For vehicles with side air
bags and side curtain air bags,
occupants should not lean on or
sleep against the door. In these sit-
uations, the out-of-position occu-
pant would be too close to an
inflating air bag, and may suffer
severe injury.
Do not attach any objects to, or
place any objects over, the steering
wheel or dashboard. Do not place
any objects between the air bag
and the driver or front passenger.
These objects may interfere with air
bag operation or may be propelled
by the air bag in the event of a
crash. Either of these conditions
may cause severe injury.
For vehicles with side air bags, do
not place seat covers on the front
seats, because seat covers could
restrict the air bag’s inflation. Also,
do not place any cup holders or
other objects on the door, as these
objects could be propelled by the
air bag in the event of a crash.
Either of these conditions may
cause severe injury.
Page 107 of 297
3-6
OPERATING YOUR VEHICLE
80J23-03E
81A297S
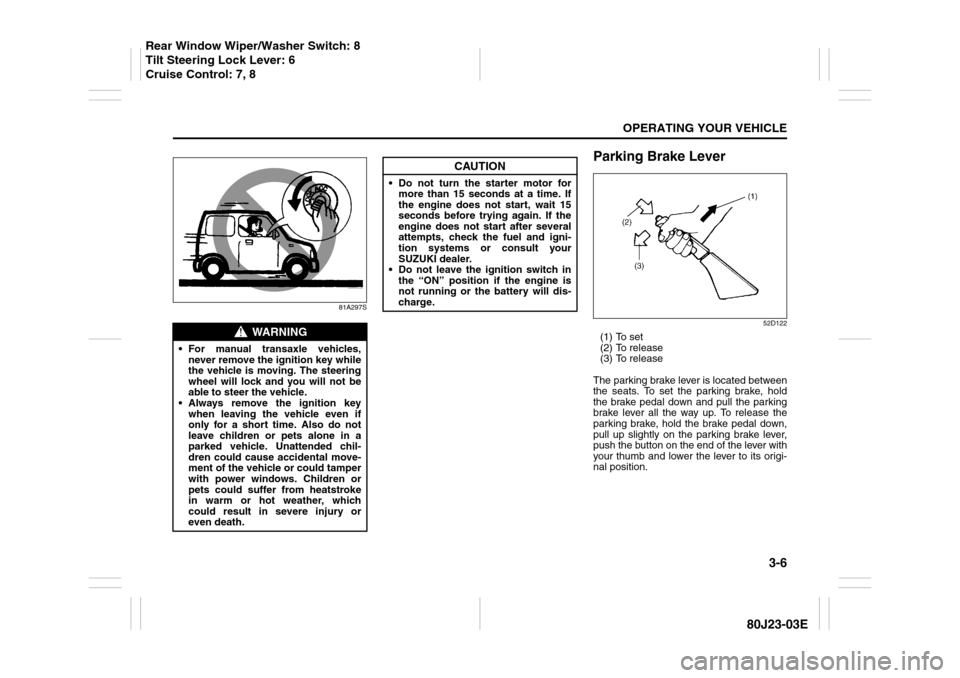
Parking Brake Lever
52D122
(1) To set
(2) To release
(3) To release
The parking brake lever is located between
the seats. To set the parking brake, hold
the brake pedal down and pull the parking
brake lever all the way up. To release the
parking brake, hold the brake pedal down,
pull up slightly on the parking brake lever,
push the button on the end of the lever with
your thumb and lower the lever to its origi-
nal position.
WARNING
For manual transaxle vehicles,
never remove the ignition key while
the vehicle is moving. The steering
wheel will lock and you will not be
able to steer the vehicle.
Always remove the ignition key
when leaving the vehicle even if
only for a short time. Also do not
leave children or pets alone in a
parked vehicle. Unattended chil-
dren could cause accidental move-
ment of the vehicle or could tamper
with power windows. Children or
pets could suffer from heatstroke
in warm or hot weather, which
could result in severe injury or
even death.
CAUTION
Do not turn the starter motor for
more than 15 seconds at a time. If
the engine does not start, wait 15
seconds before trying again. If the
engine does not start after several
attempts, check the fuel and igni-
tion systems or consult your
SUZUKI dealer.
Do not leave the ignition switch in
the “ON” position if the engine is
not running or the battery will dis-
charge.
Rear Window Wiper/Washer Switch: 8
Tilt Steering Lock Lever: 6
Cruise Control: 7, 8
Page 145 of 297
5-4
OTHER CONTROLS AND EQUIPMENT
80J23-03E
System Operating InstructionsNatural ventilation
Select “VENTILATION” and “FRESH AIR”,
the temperature selector to the desired
temperature position, and the blower
speed selector to “OFF”. Fresh air will flow
through the vehicle during driving.
Forced ventilation
The control settings are the same as for
natural ventilation except you set the
blower speed selector to a position other
than “OFF”.
Normal heating (using outside air)
Select “HEAT” and “FRESH AIR”, the tem-
perature selector to the desired tempera-
ture position and the blower speed selector
to the desired blower speed position. Set-
ting the blower speed selector to a higher
blower speed position increases heating
efficiency.
Quick heating (using recirculated air)
The control settings are the same as for
normal heating except you select “RECIR-
CULATED AIR”. If you use this heating
method for an extended period of time, the
air in the vehicle can become contami-
nated and the windows can become misty.
Therefore, use this method only for quick
heating and change to the normal heating
method as soon as possible.
Head cooled/Feet warmed heating
Select “BI-LEVEL” and “FRESH AIR”, the
temperature selector to the desired tem-perature position, and the blower speed
selector to the desired blower speed posi-
tion. Unless the temperature selector is in
the fully COLD position or fully HOT posi-
tion, the air that comes out of the center
and side outlets will be cooler than the air
that comes out of the floor outlets.
Defrosting/Feet warmed heating
Select “HEAT & DEFROST” and “FRESH
AIR”, the temperature selector to the
desired temperature position, and the
blower speed selector to HIGH. When the
windshield has become clear, set the
blower speed selector to the desired
blower speed position.
Defrosting
Select “DEFROST” and “FRESH AIR”, the
temperature selector to the desired tem-
perature position (higher temperature pro-
vides more efficient defrosting), and the
blower speed selector to HIGH. When the
windshield has become clear, set the
blower speed selector to the desired
blower speed position.
79J070
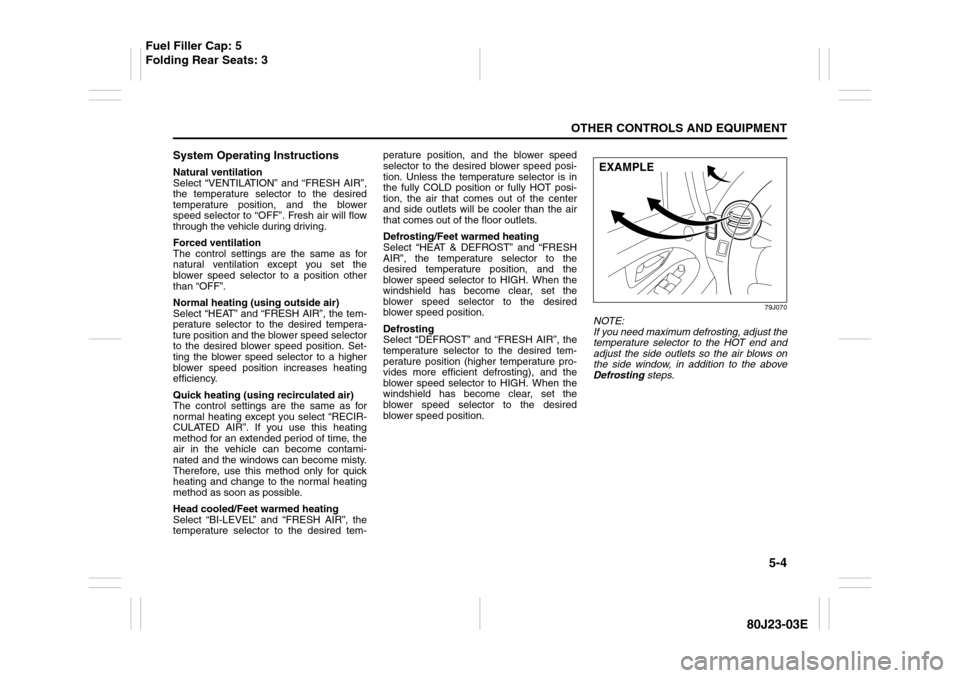
NOTE:
If you need maximum defrosting, adjust the
temperature selector to the HOT end and
adjust the side outlets so the air blows on
the side window, in addition to the above
Defrosting steps.EXAMPLE
Fuel Filler Cap: 5
Folding Rear Seats: 3
Page 146 of 297
5-5OTHER CONTROLS AND EQUIPMENT
80J23-03E
Manual Heating and Air
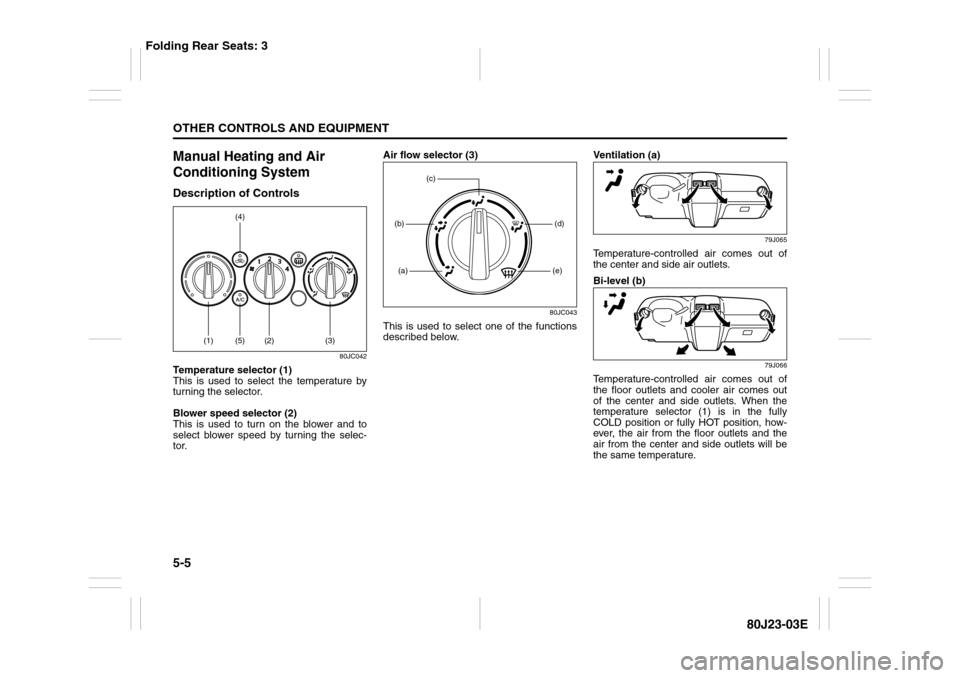
Conditioning SystemDescription of Controls
80JC042
Temperature selector (1)
This is used to select the temperature by
turning the selector.
Blower speed selector (2)
This is used to turn on the blower and to
select blower speed by turning the selec-
tor.Air flow selector (3)
80JC043
This is used to select one of the functions
described below.Ventilation (a)
79J065
Temperature-controlled air comes out of
the center and side air outlets.
Bi-level (b)
79J066
Temperature-controlled air comes out of
the floor outlets and cooler air comes out
of the center and side outlets. When the
temperature selector (1) is in the fully
COLD position or fully HOT position, how-
ever, the air from the floor outlets and the
air from the center and side outlets will be
the same temperature.
(1)
(2)
(5)
(3)
(4)
(a)(b)
(e)(d)
(c)
Folding Rear Seats: 3