2010 SUZUKI SX4 oil level
[x] Cancel search: oil levelPage 214 of 297
7-9INSPECTION AND MAINTENANCE
80J23-03E
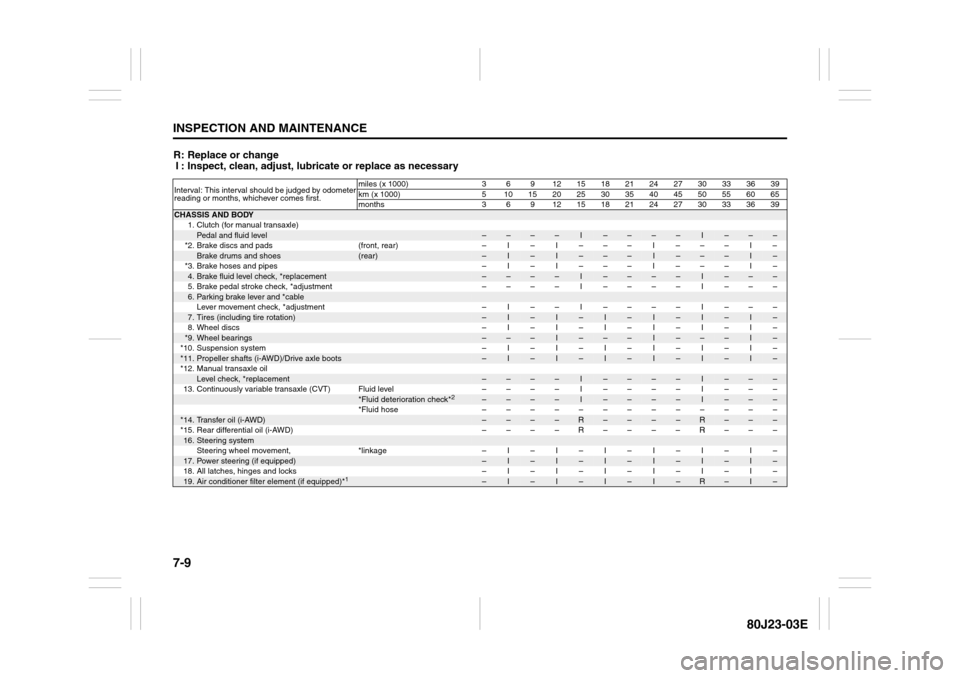
R: Replace or change
I : Inspect, clean, adjust, lubricate or replace as necessaryInterval: This interval should be judged by odometer
reading or months, whichever comes first.miles (x 1000) 3 6 9 12 15 18 21 24 27 30 33 36 39
km (x 1000) 5 101520253035404550556065
months 3 6 9 12151821242730333639CHASSIS AND BODY
1. Clutch (for manual transaxle)
Pedal and fluid level
–
–
–
–
I
–
–
–
–
I
–
–
–
*2. Brake discs and pads (front, rear) – I – I – – – I – – – I –
Brake drums and shoes
(rear)
–
I
–
I
–
–
–
I
–
–
–
I
–
*3. Brake hoses and pipes – I – I – – – I – – – I –
4.Brake fluid level check, *replacement
–
–
–
–
I
–
–
–
–
I
–
–
–
5. Brake pedal stroke check, *adjustment – – – – I – – – – I – – –
6.Parking brake lever and *cableLever movement check, *adjustment – I – – I – – – – I – – –7.Tires (including tire rotation)
–
I
–
I
–
I
–
I
–
I
–
I
–
8. Wheel discs – I – I – I – I – I – I –
*9.
Wheel bearings
–
–
–
I
–
–
–
I
–
–
–
I
–
*10. Suspension system – I – I – I – I – I – I –
*11.
Propeller shafts (i-AWD)/Drive axle boots
–
I
–
I
–
I
–
I
–
I
–
I
–
*12. Manual transaxle oil
Level check, *replacement
–
–
–
–
I
–
–
–
–
I
–
–
–
13. Continuously variable transaxle (CVT) Fluid level – – – – I – – – – I – – –
*Fluid deterioration check*
2
–
–
–
–
I
–
–
–
–
I
–
–
–
*Fluid hose –––––––––––––
*14.
Transfer oil (i-AWD)
–
–
–
–
R
–
–
–
–
R
–
–
–
*15. Rear differential oil (i-AWD) – – – – R – – – – R – – –
16.
Steering systemSteering wheel movement, *linkage – I – I – I – I – I – I –
17.
Power steering (if equipped)
–
I
–
I
–
I
–
I
–
I
–
I
–
18. All latches, hinges and locks – I – I – I – I – I – I –
19.
Air conditioner filter element (if equipped)*
1
–
I
–
I
–
I
–
I
–
R
–
I
–
Page 215 of 297
7-10
INSPECTION AND MAINTENANCE
80J23-03E
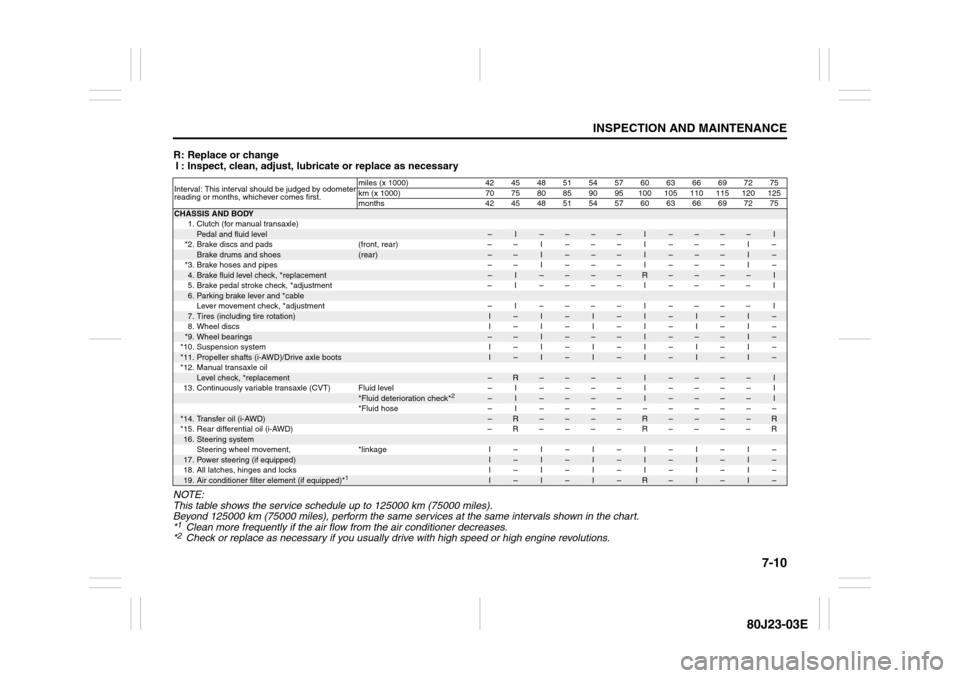
R: Replace or change
I : Inspect, clean, adjust, lubricate or replace as necessary
NOTE:
This table shows the service schedule up to 125000 km (75000 miles).
Beyond 125000 km (75000 miles), perform the same services at the same intervals shown in the chart.
*1Clean more frequently if the air flow from the air conditioner decreases.
*2Check or replace as necessary if you usually drive with high speed or high engine revolutions.
Interval: This interval should be judged by odometer
reading or months, whichever comes first.miles (x 1000) 42 45 48 51 54 57 60 63 66 69 72 75
km (x 1000) 70 75 80 85 90 95 100 105 110 115 120 125
months 42 45 48 51 54 57 60 63 66 69 72 75CHASSIS AND BODY
1. Clutch (for manual transaxle)
Pedal and fluid level
–
I
–
–
–
–
I
–
–
–
–
I
*2. Brake discs and pads (front, rear) – – I – – – I – – – I –
Brake drums and shoes
(rear)
–
–
I
–
–
–
I
–
–
–
I
–
*3. Brake hoses and pipes – – I – – – I – – – I –
4.Brake fluid level check, *replacement
–
I
–
–
–
–
R
–
–
–
–
I
5.Brake pedal stroke check, *adjustment – I –––– I –––– I
6.Parking brake lever and *cableLever movement check, *adjustment – I –––– I –––– I7.Tires (including tire rotation)
I
–
I
–
I
–
I
–
I
–
I
–
8.Wheel discs I–I–I–I–I–I–
*9.
Wheel bearings
–
–
I
–
–
–
I
–
–
–
I
–
*10. Suspension system I – I – I – I – I – I –
*11.
Propeller shafts (i-AWD)/Drive axle boots
I
–
I
–
I
–
I
–
I
–
I
–
*12. Manual transaxle oil
Level check, *replacement
–
R
–
–
–
–
I
–
–
–
–
I
13. Continuously variable transaxle (CVT) Fluid level – I–––– I –––– I
*Fluid deterioration check*
2
–
I
–
–
–
–
I
–
–
–
–
I
*Fluid hose – I ––––––––––
*14.
Transfer oil (i-AWD)
–
R
–
–
–
–
R
–
–
–
–
R
*15.Rear differential oil (i-AWD) –R––––R––––R
16.
Steering systemSteering wheel movement, *linkage I – I – I – I – I – I –
17.
Power steering (if equipped)
I
–
I
–
I
–
I
–
I
–
I
–
18. All latches, hinges and locks I – I – I – I – I – I –
19.
Air conditioner filter element (if equipped)*
1
I
–
I
–
I
–
R
–
I
–
I
–
Page 216 of 297
7-11INSPECTION AND MAINTENANCE
80J23-03E
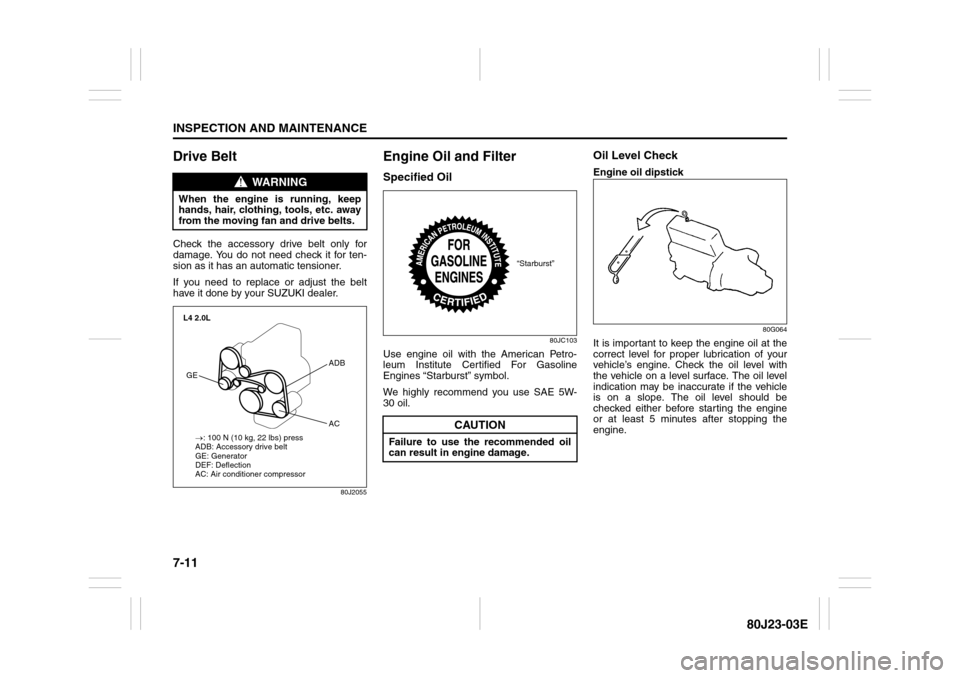
Drive Belt Check the accessory drive belt only for
damage. You do not need check it for ten-
sion as it has an automatic tensioner.
If you need to replace or adjust the belt
have it done by your SUZUKI dealer.
80J2055
Engine Oil and FilterSpecified Oil
80JC103
Use engine oil with the American Petro-
leum Institute Certified For Gasoline
Engines “Starburst” symbol.
We highly recommend you use SAE 5W-
30 oil.
Oil Level CheckEngine oil dipstick
80G064
It is important to keep the engine oil at the
correct level for proper lubrication of your
vehicle’s engine. Check the oil level with
the vehicle on a level surface. The oil level
indication may be inaccurate if the vehicle
is on a slope. The oil level should be
checked either before starting the engine
or at least 5 minutes after stopping the
engine.
WARNING
When the engine is running, keep
hands, hair, clothing, tools, etc. away
from the moving fan and drive belts.
→: 100 N (10 kg, 22 lbs) press
ADB: Accessory drive belt
GE: Generator
DEF: Deflection
AC: Air conditioner compressor L4 2.0LGEADB
AC
CAUTION
Failure to use the recommended oil
can result in engine damage.
“Starburst”
Page 217 of 297
7-12
INSPECTION AND MAINTENANCE
80J23-03E
52D084
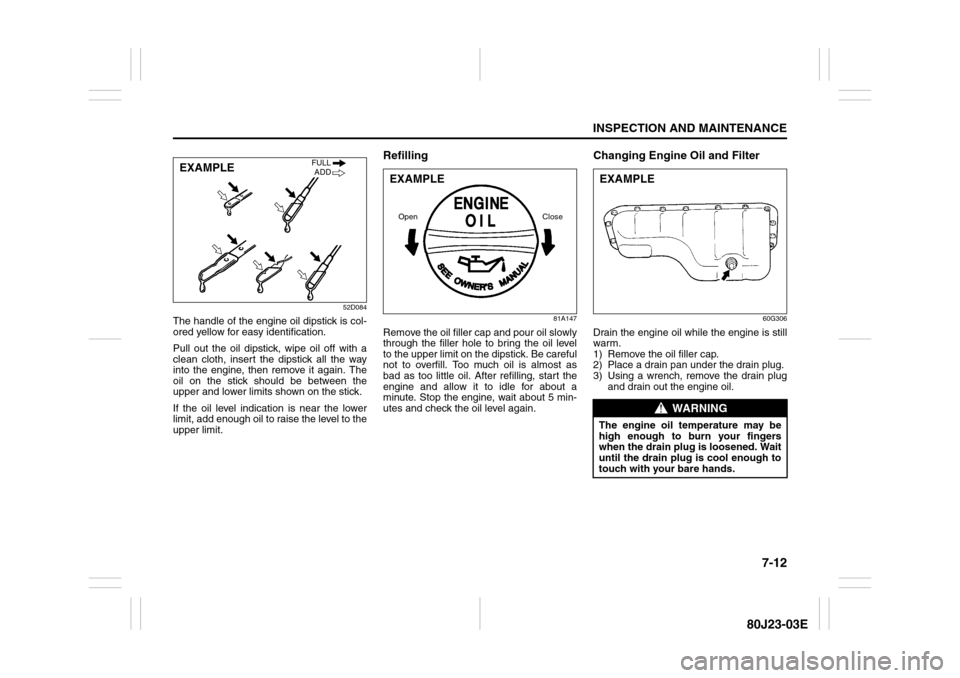
The handle of the engine oil dipstick is col-
ored yellow for easy identification.
Pull out the oil dipstick, wipe oil off with a
clean cloth, insert the dipstick all the way
into the engine, then remove it again. The
oil on the stick should be between the
upper and lower limits shown on the stick.
If the oil level indication is near the lower
limit, add enough oil to raise the level to the
upper limit.
Refilling
81A147
Remove the oil filler cap and pour oil slowly
through the filler hole to bring the oil level
to the upper limit on the dipstick. Be careful
not to overfill. Too much oil is almost as
bad as too little oil. After refilling, start the
engine and allow it to idle for about a
minute. Stop the engine, wait about 5 min-
utes and check the oil level again.
Changing Engine Oil and Filter
60G306
Drain the engine oil while the engine is still
warm.
1) Remove the oil filler cap.
2) Place a drain pan under the drain plug.
3) Using a wrench, remove the drain plug
and drain out the engine oil.
EXAMPLE
FULL
ADD
EXAMPLEOpen Close
WARNING
The engine oil temperature may be
high enough to burn your fingers
when the drain plug is loosened. Wait
until the drain plug is cool enough to
touch with your bare hands.EXAMPLE
Page 219 of 297
7-14
INSPECTION AND MAINTENANCE
80J23-03E
NOTE:
When it is difficult to remove the oil filter,
we recommend you take your vehicle to
your SUZUKI dealer for oil filter replace-
ment.Refill with Oil and Check for Leaks1) Pour oil through the filler hole and
install the filler cap.
For the approximate capacity of the oil,
refer to the “Capacities” item in the
“SPECIFICATIONS” section.
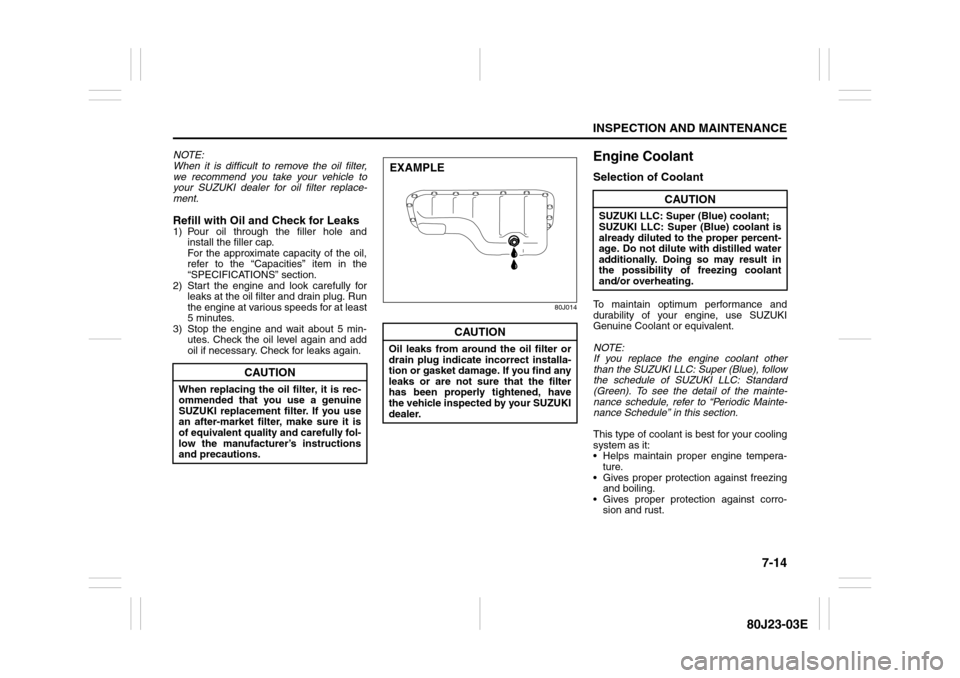
2) Start the engine and look carefully for
leaks at the oil filter and drain plug. Run
the engine at various speeds for at least
5 minutes.
3) Stop the engine and wait about 5 min-
utes. Check the oil level again and add
oil if necessary. Check for leaks again.
80J014
Engine CoolantSelection of CoolantTo maintain optimum performance and
durability of your engine, use SUZUKI
Genuine Coolant or equivalent.
NOTE:
If you replace the engine coolant other
than the SUZUKI LLC: Super (Blue), follow
the schedule of SUZUKI LLC: Standard
(Green). To see the detail of the mainte-
nance schedule, refer to “Periodic Mainte-
nance Schedule” in this section.
This type of coolant is best for your cooling
system as it:
Helps maintain proper engine tempera-
ture.
Gives proper protection against freezing
and boiling.
Gives proper protection against corro-
sion and rust.
CAUTION
When replacing the oil filter, it is rec-
ommended that you use a genuine
SUZUKI replacement filter. If you use
an after-market filter, make sure it is
of equivalent quality and carefully fol-
low the manufacturer’s instructions
and precautions.
CAUTION
Oil leaks from around the oil filter or
drain plug indicate incorrect installa-
tion or gasket damage. If you find any
leaks or are not sure that the filter
has been properly tightened, have
the vehicle inspected by your SUZUKI
dealer.EXAMPLE
CAUTION
SUZUKI LLC: Super (Blue) coolant;
SUZUKI LLC: Super (Blue) coolant is
already diluted to the proper percent-
age. Do not dilute with distilled water
additionally. Doing so may result in
the possibility of freezing coolant
and/or overheating.
Page 223 of 297
7-18
INSPECTION AND MAINTENANCE
80J23-03E
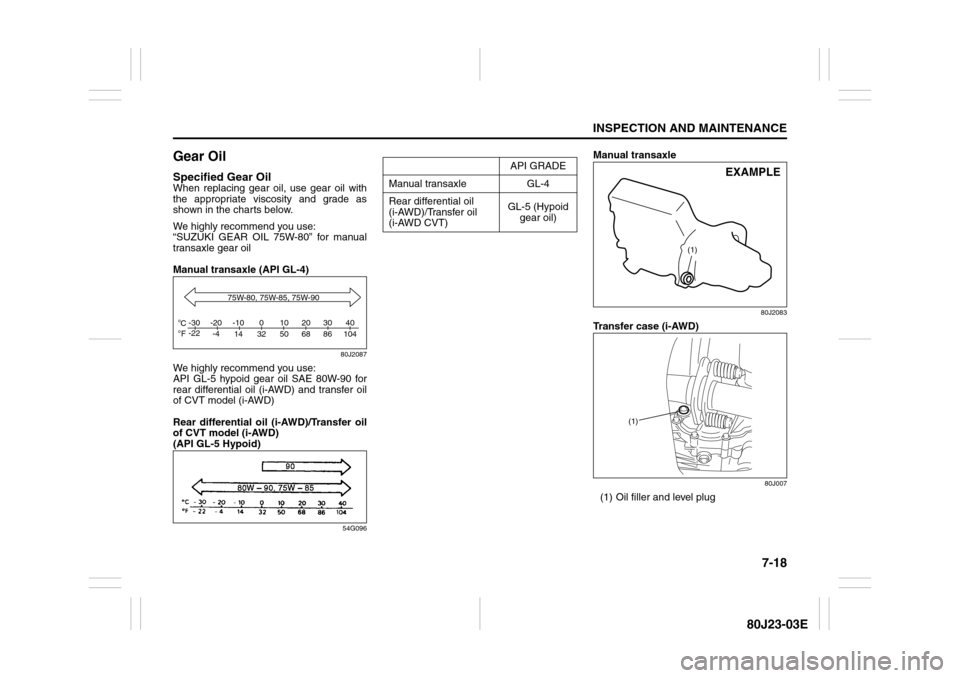
Gear OilSpecified Gear OilWhen replacing gear oil, use gear oil with
the appropriate viscosity and grade as
shown in the charts below.
We highly recommend you use:
“SUZUKI GEAR OIL 75W-80” for manual
transaxle gear oil
Manual transaxle (API GL-4)
80J2087
We highly recommend you use:
API GL-5 hypoid gear oil SAE 80W-90 for
rear differential oil (i-AWD) and transfer oil
of CVT model (i-AWD)
Rear differential oil (i-AWD)/Transfer oil
of CVT model (i-AWD)
(API GL-5 Hypoid)
54G096
Manual transaxle
80J2083
Transfer case (i-AWD)
80J007
(1) Oil filler and level plug
C
Fo o-30
-22-20
-4-10
14 32 50 68 86 104010203040
75W-80, 75W-85, 75W-90
API GRADE
Manual transaxle GL-4
Rear differential oil
(i-AWD)/Transfer oil
(i-AWD CVT)GL-5 (Hypoid
gear oil)
(1)
EXAMPLE
(1)
Page 224 of 297
7-19INSPECTION AND MAINTENANCE
80J23-03E
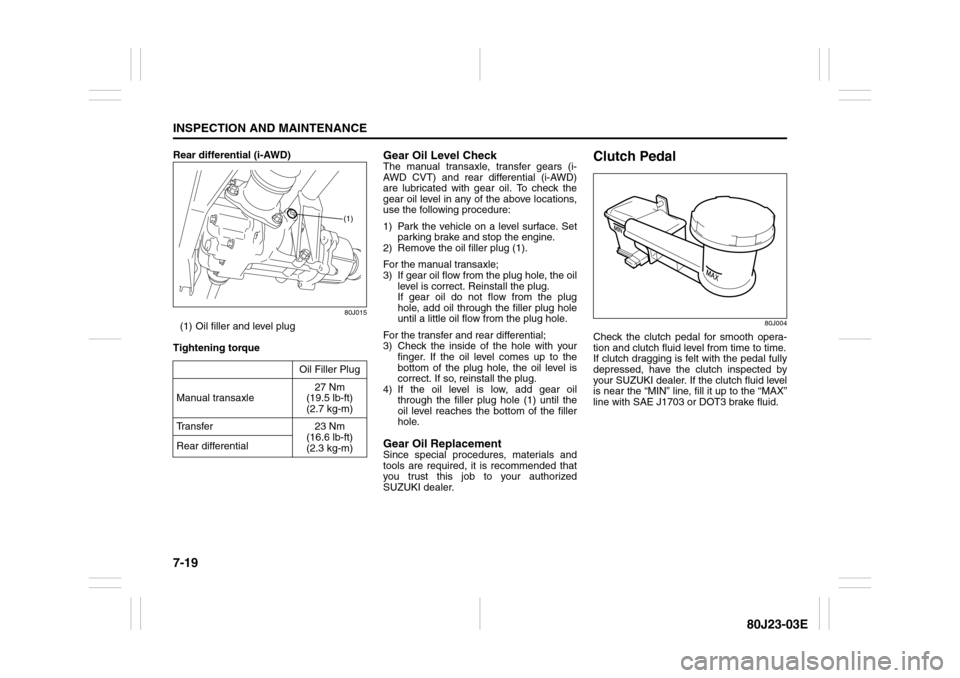
Rear differential (i-AWD)
80J015
(1) Oil filler and level plug
Tightening torque
Gear Oil Level CheckThe manual transaxle, transfer gears (i-
AWD CVT) and rear differential (i-AWD)
are lubricated with gear oil. To check the
gear oil level in any of the above locations,
use the following procedure:
1) Park the vehicle on a level surface. Set
parking brake and stop the engine.
2) Remove the oil filler plug (1).
For the manual transaxle;
3) If gear oil flow from the plug hole, the oil
level is correct. Reinstall the plug.
If gear oil do not flow from the plug
hole, add oil through the filler plug hole
until a little oil flow from the plug hole.
For the transfer and rear differential;
3) Check the inside of the hole with your
finger. If the oil level comes up to the
bottom of the plug hole, the oil level is
correct. If so, reinstall the plug.
4) If the oil level is low, add gear oil
through the filler plug hole (1) until the
oil level reaches the bottom of the filler
hole.Gear Oil ReplacementSince special procedures, materials and
tools are required, it is recommended that
you trust this job to your authorized
SUZUKI dealer.
Clutch Pedal
80J004
Check the clutch pedal for smooth opera-
tion and clutch fluid level from time to time.
If clutch dragging is felt with the pedal fully
depressed, have the clutch inspected by
your SUZUKI dealer. If the clutch fluid level
is near the “MIN” line, fill it up to the “MAX”
line with SAE J1703 or DOT3 brake fluid. Oil Filler Plug
Manual transaxle27 Nm
(19.5 lb-ft)
(2.7 kg-m)
Transfer 23 Nm
(16.6 lb-ft)
(2.3 kg-m) Rear differential
(1)
Page 226 of 297
7-21INSPECTION AND MAINTENANCE
80J23-03E
6) The handle of the CVT fluid dipstick is
colored red or orange for easy identifi-
cation.
Remove the dipstick, clean it and push
it back in until the cap seats. Pull out
the dipstick and read the fluid level.
The fluid level should be between the
two marks in the “HOT” range on the
dipstick.
7) Add just enough specified fluid through
the dipstick hole to fill the transaxle to
the proper level. It takes only 0.6 liters
(1.27 US pt) for CVT to raise the level
from “LOW” to “FULL”.Deterioration Checking or Chang-
ing OilSince special procedures, materials and
tools are required to check the deteriora-
tion of CVT oil or change, it is recom-
mended that you trust this job to your
authorized SUZUKI dealer.
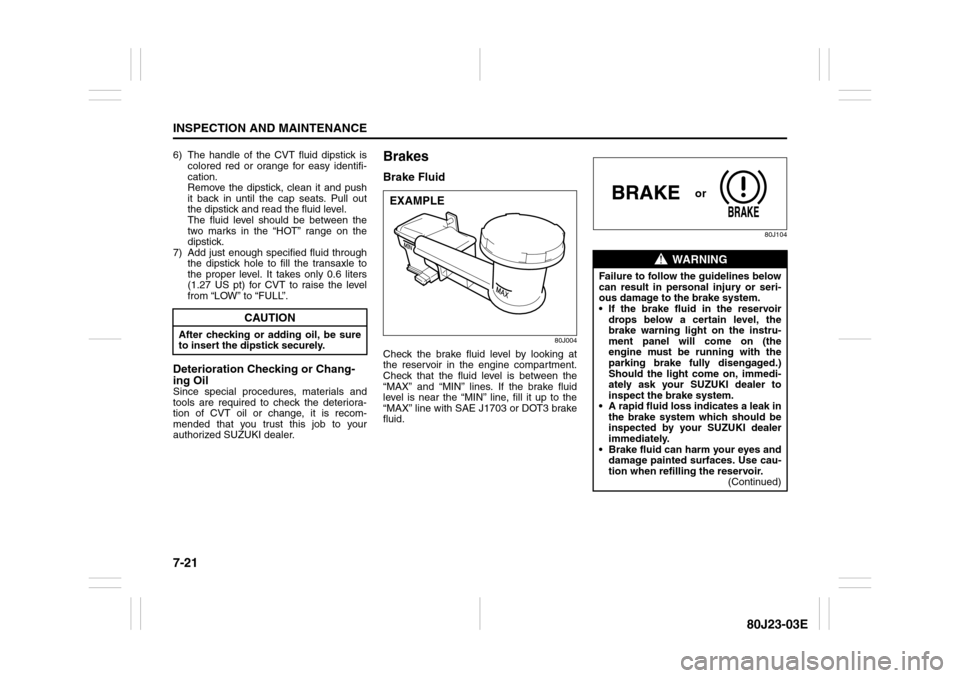
BrakesBrake Fluid
80J004
Check the brake fluid level by looking at
the reservoir in the engine compartment.
Check that the fluid level is between the
“MAX” and “MIN” lines. If the brake fluid
level is near the “MIN” line, fill it up to the
“MAX” line with SAE J1703 or DOT3 brake
fluid.
80J104
CAUTION
After checking or adding oil, be sure
to insert the dipstick securely.
EXAMPLE
WARNING
Failure to follow the guidelines below
can result in personal injury or seri-
ous damage to the brake system.
If the brake fluid in the reservoir
drops below a certain level, the
brake warning light on the instru-
ment panel will come on (the
engine must be running with the
parking brake fully disengaged.)
Should the light come on, immedi-
ately ask your SUZUKI dealer to
inspect the brake system.
A rapid fluid loss indicates a leak in
the brake system which should be
inspected by your SUZUKI dealer
immediately.
Brake fluid can harm your eyes and
damage painted surfaces. Use cau-
tion when refilling the reservoir.
(Continued)
or