Page 34 of 297
2-17BEFORE DRIVING
80J23-03E
Theft Deterrent Light
80JM022
This light will blink with the ignition switch
in the “OFF” or “ACC” position. The blink-
ing light is intended to deter theft by lead-
ing others to believe that the vehicle is
equipped with a security system.
WindowsPower Window ControlsDriver’s side
80JC095
The power windows can only be operated
when the ignition switch is in the “ON” posi-
tion.
The driver’s door has switches (1), (2), (4),
(5), to operate the driver’s window, the
front passenger’s window, the rear left win-
dow and the rear right window, respec-
tively.Passenger’s door
80JC096
The passenger’s door has a switch (3) to
operate the passenger’s window.
(1)
(2)
(4)
(5)
EXAMPLE
(3)
EXAMPLE
Seat Belts and Child Restraint Systems: 3
Page 37 of 297
2-20
BEFORE DRIVING
80J23-03E
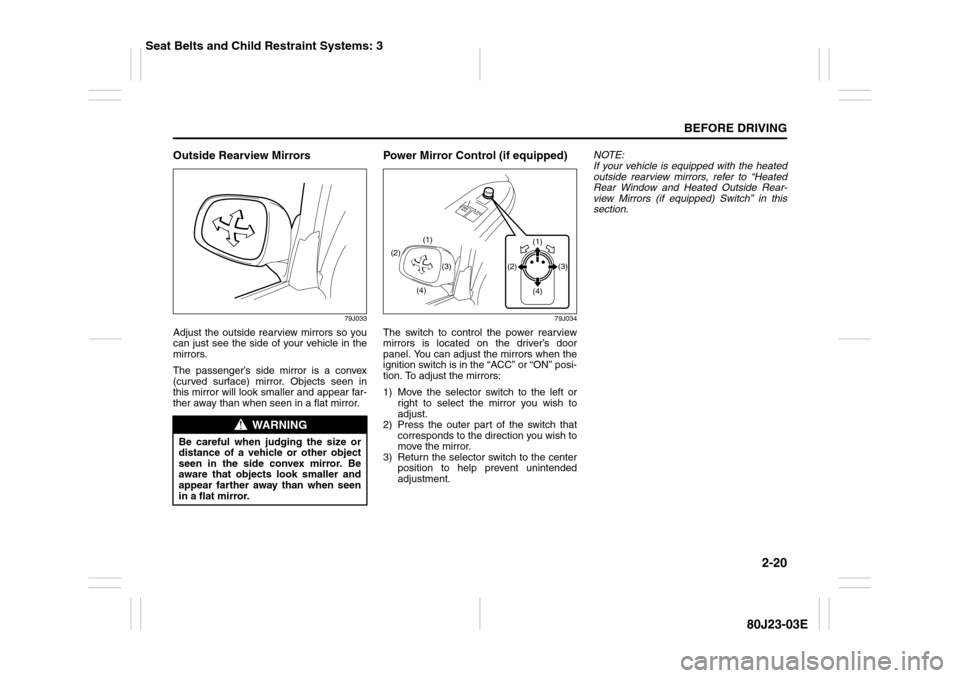
Outside Rearview Mirrors
79J033
Adjust the outside rearview mirrors so you
can just see the side of your vehicle in the
mirrors.
The passenger’s side mirror is a convex
(curved surface) mirror. Objects seen in
this mirror will look smaller and appear far-
ther away than when seen in a flat mirror.
Power Mirror Control (if equipped)
79J034
The switch to control the power rearview
mirrors is located on the driver’s door
panel. You can adjust the mirrors when the
ignition switch is in the “ACC” or “ON” posi-
tion. To adjust the mirrors:
1) Move the selector switch to the left or
right to select the mirror you wish to
adjust.
2) Press the outer part of the switch that
corresponds to the direction you wish to
move the mirror.
3) Return the selector switch to the center
position to help prevent unintended
adjustment.NOTE:
If your vehicle is equipped with the heated
outside rearview mirrors, refer to “Heated
Rear Window and Heated Outside Rear-
view Mirrors (if equipped) Switch” in this
section.
WARNING
Be careful when judging the size or
distance of a vehicle or other object
seen in the side convex mirror. Be
aware that objects look smaller and
appear farther away than when seen
in a flat mirror.
(2)
(4)(3) (1)
(1)
(3) (2)
(4)
Seat Belts and Child Restraint Systems: 3
Page 40 of 297
2-23BEFORE DRIVING
80J23-03E
80J2012
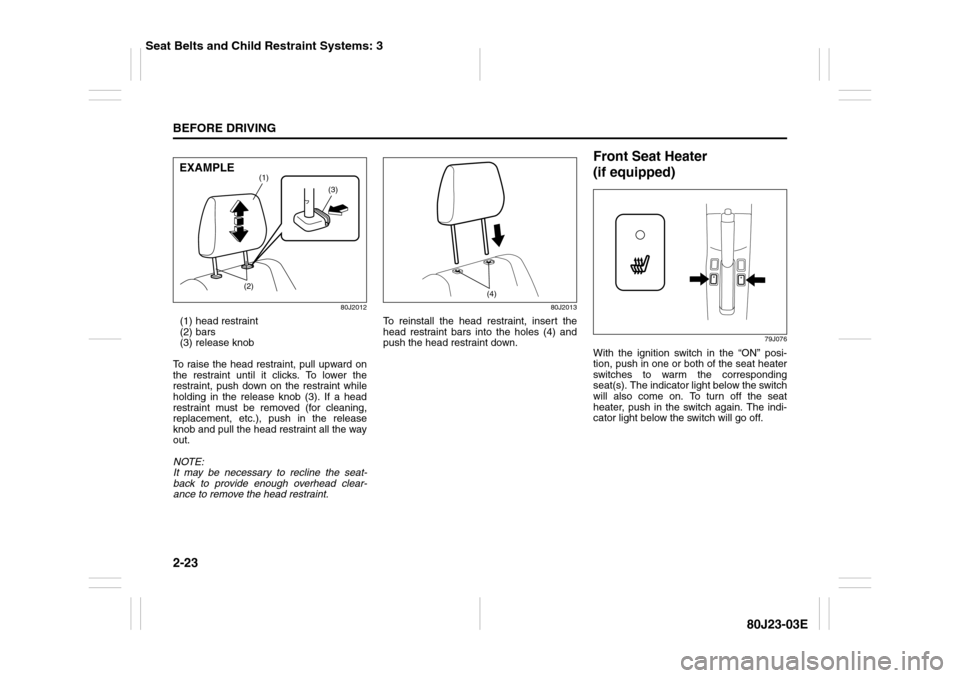
(1) head restraint
(2) bars
(3) release knob
To raise the head restraint, pull upward on
the restraint until it clicks. To lower the
restraint, push down on the restraint while
holding in the release knob (3). If a head
restraint must be removed (for cleaning,
replacement, etc.), push in the release
knob and pull the head restraint all the way
out.
NOTE:
It may be necessary to recline the seat-
back to provide enough overhead clear-
ance to remove the head restraint.
80J2013
To reinstall the head restraint, insert the
head restraint bars into the holes (4) and
push the head restraint down.
Front Seat Heater
(if equipped)
79J076
With the ignition switch in the “ON” posi-
tion, push in one or both of the seat heater
switches to warm the corresponding
seat(s). The indicator light below the switch
will also come on. To turn off the seat
heater, push in the switch again. The indi-
cator light below the switch will go off.
(3)
(1)
(2)
EXAMPLE
(4)
Seat Belts and Child Restraint Systems: 3
Page 58 of 297
2-41BEFORE DRIVING
80J23-03E
SX4 SEDAN
80JC028
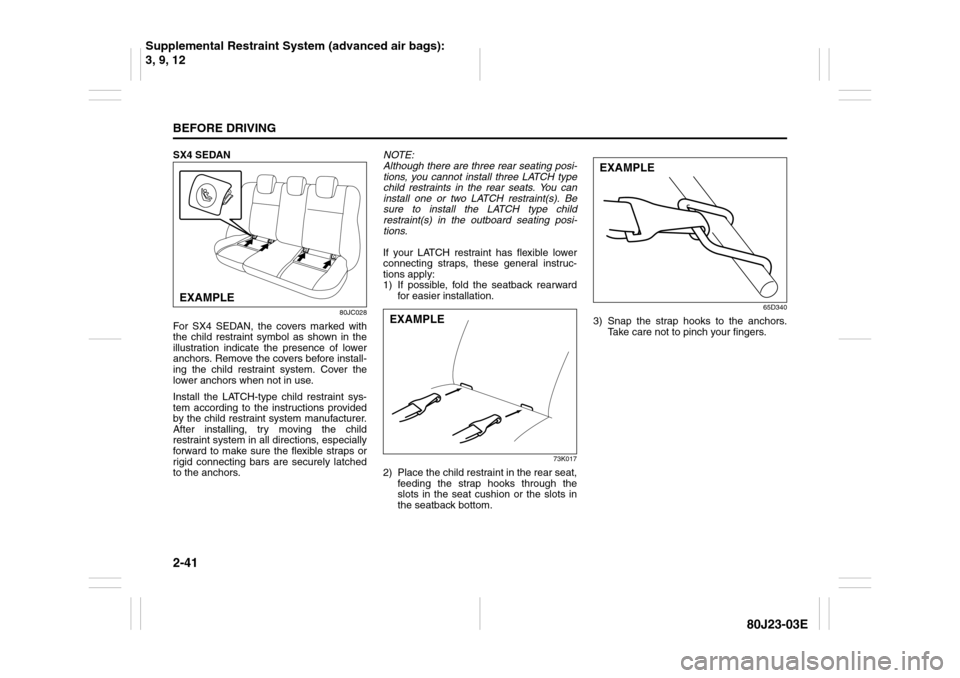
For SX4 SEDAN, the covers marked with
the child restraint symbol as shown in the
illustration indicate the presence of lower
anchors. Remove the covers before install-
ing the child restraint system. Cover the
lower anchors when not in use.
Install the LATCH-type child restraint sys-
tem according to the instructions provided
by the child restraint system manufacturer.
After installing, try moving the child
restraint system in all directions, especially
forward to make sure the flexible straps or
rigid connecting bars are securely latched
to the anchors.NOTE:
Although there are three rear seating posi-
tions, you cannot install three LATCH type
child restraints in the rear seats. You can
install one or two LATCH restraint(s). Be
sure to install the LATCH type child
restraint(s) in the outboard seating posi-
tions.
If your LATCH restraint has flexible lower
connecting straps, these general instruc-
tions apply:
1) If possible, fold the seatback rearward
for easier installation.
73K017
2) Place the child restraint in the rear seat,
feeding the strap hooks through the
slots in the seat cushion or the slots in
the seatback bottom.
65D340
3) Snap the strap hooks to the anchors.
Take care not to pinch your fingers.
EXAMPLE
EXAMPLE
EXAMPLE
Supplemental Restraint System (advanced air bags):
3, 9, 12
Page 59 of 297
2-42
BEFORE DRIVING
80J23-03E
65D341
4) Return the seatback to the normal,
upright position. Tighten the lower
straps as described in the child restraint
owner’s manual. Attach the top tether
strap, if applicable.
65D342
5) Make sure the child restraint is securely
fastened by trying to move the child
restraint system in all directions, espe-
cially forward.If your LATCH restraint has rigid lower con-
necting bars, these general instructions
apply:
1) If possible, fold the seatback rearward
for easier installation.
78F114
2) Place the child restraint in the rear seat,
inserting the connecting bars through
the slots in the seat cushion or the slots
in the seatback bottom.
EXAMPLE
WARNING
The seatback should always be
securely latched in a fairly upright
position when any type of child seat
is installed. An unlatched or reclined
seatback will reduce the intended
effectiveness of the child restraint
system.EXAMPLE
EXAMPLE
Page 60 of 297
2-43BEFORE DRIVING
80J23-03E
54G183
3) Use your hands to carefully align the
connecting bar tips with the anchors.
Take care not to pinch your fingers.
54G184
4) Push the child restraint toward the
anchors so that the connecting bar tips
are partially hooked to the anchors.
Use your hands to confirm the position.
54G185
5) Grasp the front of the child restraint and
push the child restraint forcefully to
latch the connecting bars. Make sure
they are securely latched by trying to
move the child restraint system in all
directions, especially forward.
6) Return the seatback if folded. Attach
the top tether strap, if applicable.
EXAMPLE
EXAMPLE
WARNING
The seatback should always be
securely latched in a fairly upright
position when any type of child seat
is installed. An unlatched or reclined
seatback will reduce the intended
effectiveness of the child restraint
system.EXAMPLE
Page 61 of 297
2-44
BEFORE DRIVING
80J23-03E
Installation of Child Restraint with
To p S t r a pSX4
80JS072
SX4 SEDAN
80JC102
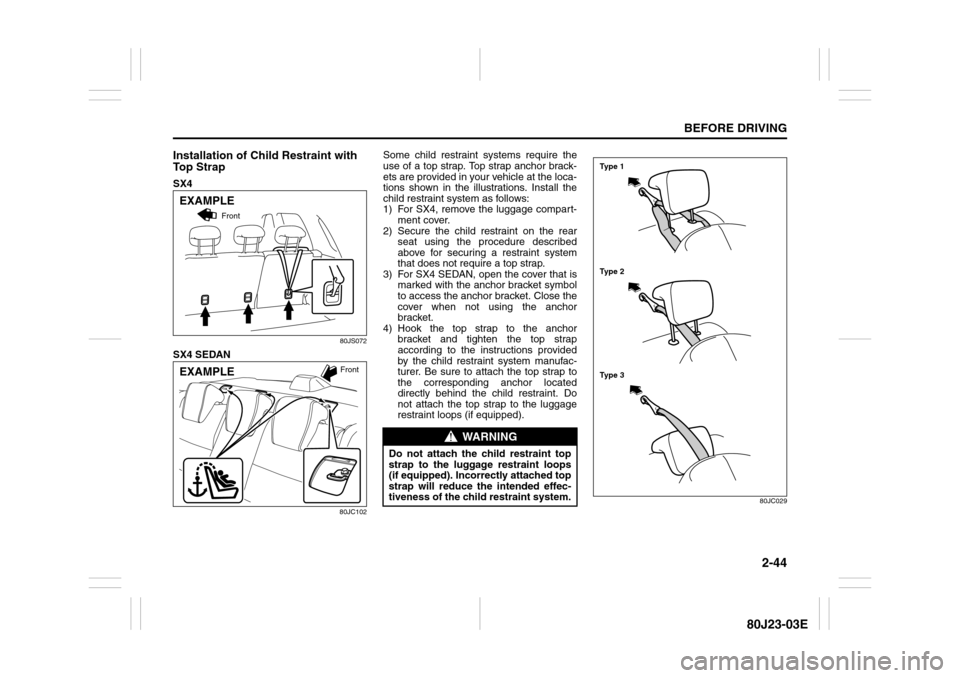
Some child restraint systems require the
use of a top strap. Top strap anchor brack-
ets are provided in your vehicle at the loca-
tions shown in the illustrations. Install the
child restraint system as follows:
1) For SX4, remove the luggage compart-
ment cover.
2) Secure the child restraint on the rear
seat using the procedure described
above for securing a restraint system
that does not require a top strap.
3) For SX4 SEDAN, open the cover that is
marked with the anchor bracket symbol
to access the anchor bracket. Close the
cover when not using the anchor
bracket.
4) Hook the top strap to the anchor
bracket and tighten the top strap
according to the instructions provided
by the child restraint system manufac-
turer. Be sure to attach the top strap to
the corresponding anchor located
directly behind the child restraint. Do
not attach the top strap to the luggage
restraint loops (if equipped).
80JC029
EXAMPLE
Front
EXAMPLE
Front
WARNING
Do not attach the child restraint top
strap to the luggage restraint loops
(if equipped). Incorrectly attached top
strap will reduce the intended effec-
tiveness of the child restraint system.
Ty p e 2 Ty p e 1
Ty p e 3
Page 62 of 297
2-45BEFORE DRIVING
80J23-03E
5) When routing the top strap, be sure to
pass the top strap as shown in the illus-
tration. For SX4 SEDAN, if the top strap
cannot be properly tightened when
passed under the head restraint as
shown in the Type 1 and Type 2 illustra-
tions, pass the top strap over the top of
the head restraint as shown in the Type
3 illustration. (Refer to “Head
Restraints” section for details on how to
raise or lower the head restraint.)
6) Make sure that cargo does not interfere
with routing of the top strap.
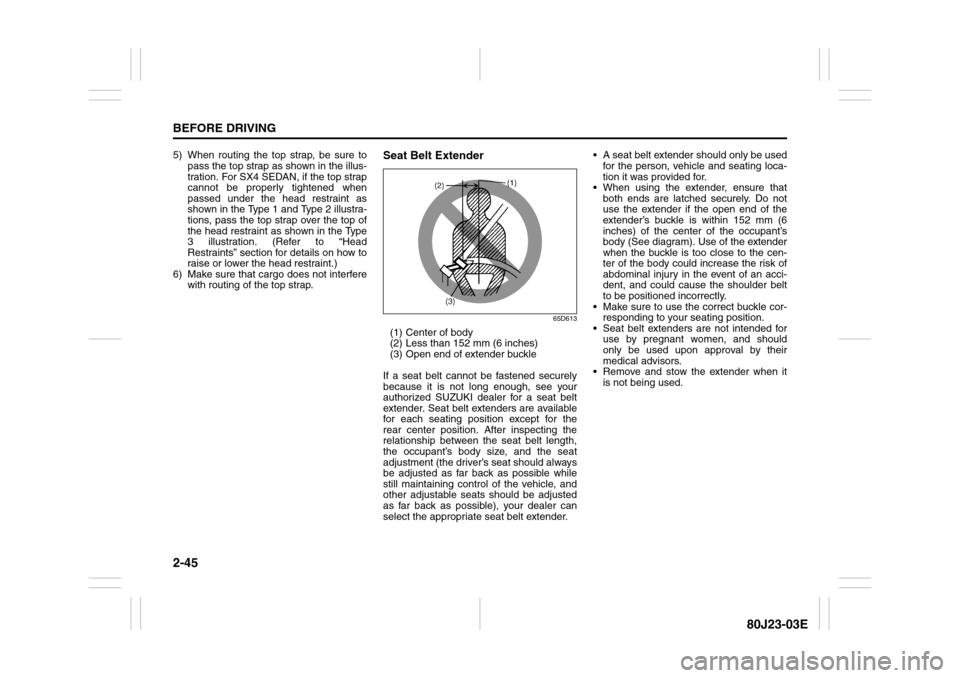
Seat Belt Extender
65D613
(1) Center of body
(2) Less than 152 mm (6 inches)
(3) Open end of extender buckle
If a seat belt cannot be fastened securely
because it is not long enough, see your
authorized SUZUKI dealer for a seat belt
extender. Seat belt extenders are available
for each seating position except for the
rear center position. After inspecting the
relationship between the seat belt length,
the occupant’s body size, and the seat
adjustment (the driver’s seat should always
be adjusted as far back as possible while
still maintaining control of the vehicle, and
other adjustable seats should be adjusted
as far back as possible), your dealer can
select the appropriate seat belt extender. A seat belt extender should only be used
for the person, vehicle and seating loca-
tion it was provided for.
When using the extender, ensure that
both ends are latched securely. Do not
use the extender if the open end of the
extender’s buckle is within 152 mm (6
inches) of the center of the occupant’s
body (See diagram). Use of the extender
when the buckle is too close to the cen-
ter of the body could increase the risk of
abdominal injury in the event of an acci-
dent, and could cause the shoulder belt
to be positioned incorrectly.
Make sure to use the correct buckle cor-
responding to your seating position.
Seat belt extenders are not intended for
use by pregnant women, and should
only be used upon approval by their
medical advisors.
Remove and stow the extender when it
is not being used.