2010 SUBARU TRIBECA roof
[x] Cancel search: roofPage 118 of 422
&If you have accidentally trig-
gered the alarm system
! To stop the alarm
Do any of the following operations. . Press any button on the remote trans-
mitter.. Turn the ignition switch to the “ON ”
position. & Arming the system
! To arm the system using remote transmitter
1. Close all windows and the moonroof.
2. Remove the key from the ignition switch.
3. Open the doors and get out of the vehicle.
4. Make sure that the engine hood is locked.
5. Close all doors and the rear gate.
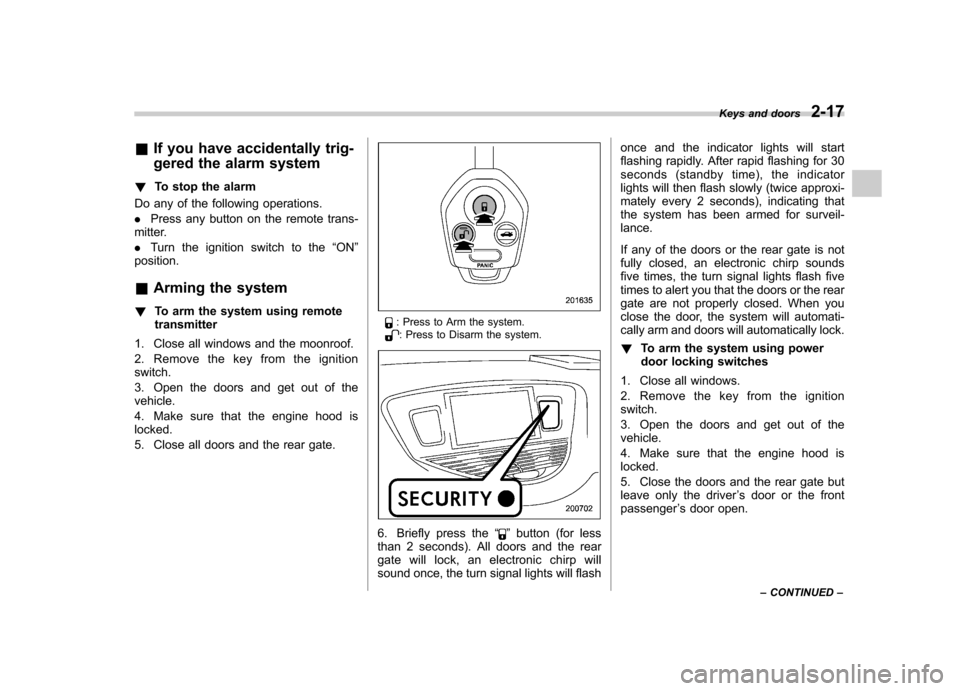
: Press to Arm the system.: Press to Disarm the system.
6. Briefly press the “”button (for less
than 2 seconds). All doors and the rear
gate will lock, an electronic chirp will
sound once, the turn signal lights will flash once and the indicator lights will start
flashing rapidly. After rapid flashing for 30
seconds (standby time), the indicator
lights will then flash slowly (twice approxi-
mately every 2 seconds), indicating that
the system has been armed for surveil-lance.
If any of the doors or the rear gate is not
fully closed, an electronic chirp sounds
five times, the turn signal lights flash five
times to alert you that the doors or the rear
gate are not properly closed. When you
close the door, the system will automati-
cally arm and doors will automatically lock. !
To arm the system using power
door locking switches
1. Close all windows.
2. Remove the key from the ignition switch.
3. Open the doors and get out of the vehicle.
4. Make sure that the engine hood is locked.
5. Close the doors and the rear gate but
leave only the driver ’s door or the front
passenger ’s door open. Keys and doors
2-17
– CONTINUED –
Page 119 of 422

2-18Keys and doors
6. Push the front side ( “LOCK ”side) of
the power door locking switch to set the
door locks.
7. Close the door. An electronic chirp will
sound once, the turn signal lights will flash
once and the indicator lights will start
flashing rapidly. After rapid flashing for 30
seconds (standby time), the indicator
lights will then flash slowly (twice approxi-
mately every 2 seconds), indicating that
the system has been armed for surveil-lance. NOTE . The system can be armed even if the
engine hood, the windows and/or
moonroof are opened. Always make
sure that they are fully closed before
arming the system. .
The 30-second standby time can be
eliminated if you prefer. Have it per-
formed by your SUBARU dealer.. The system is in the standby mode
for a 30-second period after locking the
doors with the remote transmitter. The
security indicator light will flash at
short intervals during this period.. If any of the following actions is
done during the standby period, the
system will not switch to the surveil-
lance state.
–Doors are unlocked using the
remote transmitter. – Any of the doors or the rear gate
is opened. – Ignition switch is turned to the
“ ON ”position.
& Disarming the system
Briefly press the “
”button (for less than
2 seconds) on the remote transmitter. The driver ’s door will unlock, an electronic
chirp will sound twice, the turn signal
lights will flash twice and the indicator
light will turn off.
To unlock all other doors and the rear
gate, briefly press the “
”button a
second time within 5 seconds. NOTE
If the interval between the first and
second presses of the
“
”button (for
unlocking of all of the doors and the
rear gate) is extremely short, the sys-
tem may not respond. ! Emergency disarming
If you cannot disarm the system using the
transmitter (i.e. the transmitter is lost,
broken or the transmitter battery is too
weak), you can disarm the system without
using the transmitter.
The system can be disarmed if you turn
the ignition switch from the “LOCK ”to the
“ ON ”position with a registered key.
& Valet mode
When you choose the valet mode, the
alarm system does not operate. In valet
mode, the remote transmitter is used only
for locking and unlocking the doors and
rear gate and panic activation.
To enter the valet mode, change the
setting of your vehicle ’s alarm system for
deactivation mode. Refer to “Activating
and deactivating the alarm system ”F 2-
16. The security indicator light will con-
tinue to flash once every 3 seconds
indicating that the system is in the valetmode.
Page 126 of 422
NOTE
If the rear gate cannot be unlocked due
to a discharged vehicle battery, a
malfunction in the door locking/unlock-
ing system or other causes, you can
unlock it by manually operating the
rear gate lock release lever. For the
procedure, refer to“Rear gate –if the
rear gate cannot be unlocked ”F 9-18. Moonroof (if equipped)
WARNING
Never let anyone ’s hands, arms,
head or any objects protrude from
the moonroof. A person could be
seriously injured if the vehicle stops
suddenly or turns sharply or if the
vehicle is involved in an accident.
To avoid serious personal injury
caused by entrapment, always con-
form to the following instructions
without exception. . Before closing the moonroof,
make sure that no one ’s hands,
arms, head or other objects will
be accidentally caught in themoonroof.
. Before leaving the vehicle, al-
ways remove the key from the
ignition switch for safety and
never allow an unattended child
to remain in the vehicle. Failure
to follow this procedure could
result in injury to a child operat-
ing the moonroof. .
Never try to check the anti-en-
trapment function by deliberately
placing part of your body in themoonroof.
CAUTION
. Do not sit on the edge of the open
moonroof.
. Do not operate the moonroof if
falling snow or extremely cold
conditions have caused it to
freeze shut.
. The anti-entrapment function
does not operate when the moon-
roof is being tilted down. Be sure
to confirm that it is safe to do so
before tilting the moonroof down.
The moonroof has both tilting and slidingfunctions.
The moonroof operates only when the
ignition switch is in the “ON ”position.
Keys and doors
2-25
– CONTINUED –
Page 127 of 422
2-26Keys and doors
& Tilt function
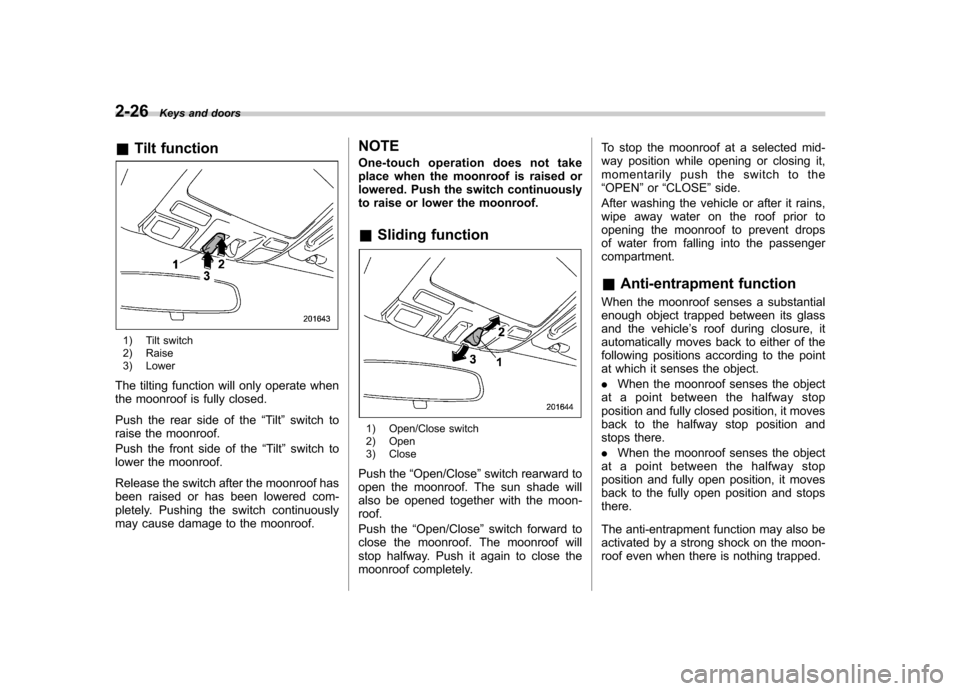
1) Tilt switch
2) Raise
3) Lower
The tilting function will only operate when
the moonroof is fully closed.
Push the rear side of the “Tilt ”switch to
raise the moonroof.
Push the front side of the “Tilt ”switch to
lower the moonroof.
Release the switch after the moonroof has
been raised or has been lowered com-
pletely. Pushing the switch continuously
may cause damage to the moonroof. NOTE
One-touch operation does not take
place when the moonroof is raised or
lowered. Push the switch continuously
to raise or lower the moonroof. &
Sliding function
1) Open/Close switch
2) Open
3) Close
Push the “Open/Close ”switch rearward to
open the moonroof. The sun shade will
also be opened together with the moon-roof.
Push the “Open/Close ”switch forward to
close the moonroof. The moonroof will
stop halfway. Push it again to close the
moonroof completely. To stop the moonroof at a selected mid-
way position while opening or closing it,
momentarily push the switch to the“
OPEN ”or “CLOSE ”side.
After washing the vehicle or after it rains,
wipe away water on the roof prior to
opening the moonroof to prevent drops
of water from falling into the passengercompartment.
& Anti-entrapment function
When the moonroof senses a substantial
enough object trapped between its glass
and the vehicle ’s roof during closure, it
automatically moves back to either of the
following positions according to the point
at which it senses the object. . When the moonroof senses the object
at a point between the halfway stop
position and fully closed position, it moves
back to the halfway stop position and
stops there. . When the moonroof senses the object
at a point between the halfway stop
position and fully open position, it moves
back to the fully open position and stopsthere.
The anti-entrapment function may also be
activated by a strong shock on the moon-
roof even when there is nothing trapped.
Page 128 of 422
CAUTION
Never attempt to test this function
using fingers, hands or other parts
of your body.
NOTE
For the sake of safety, it is recom-
mended that you avoid driving with the
moonroof fully opened. & Sun shade
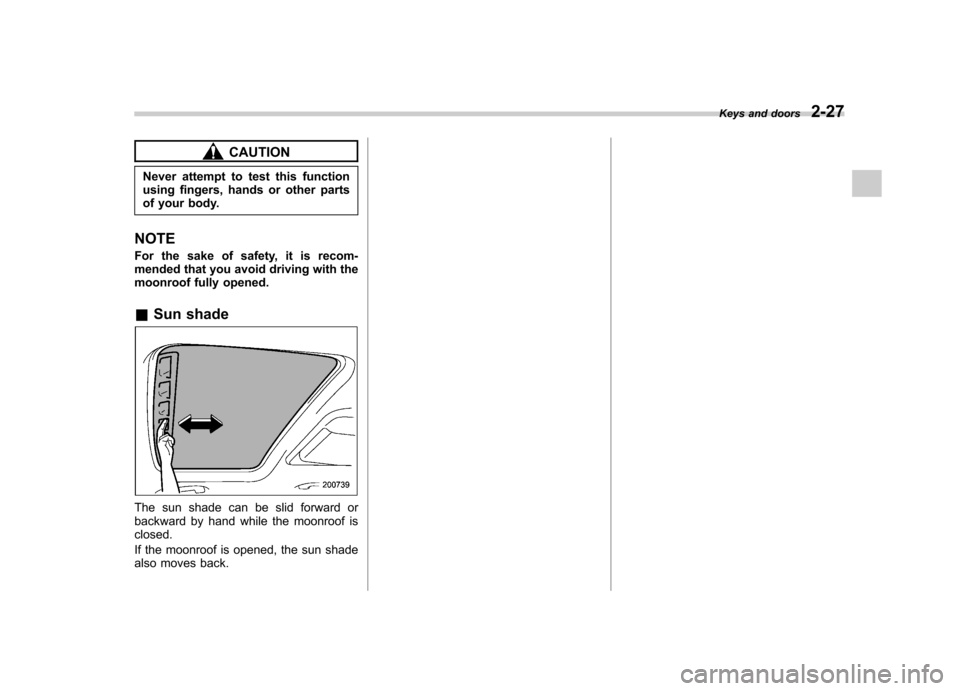
The sun shade can be slid forward or
backward by hand while the moonroof isclosed.
If the moonroof is opened, the sun shade
also moves back. Keys and doors
2-27
Page 132 of 422
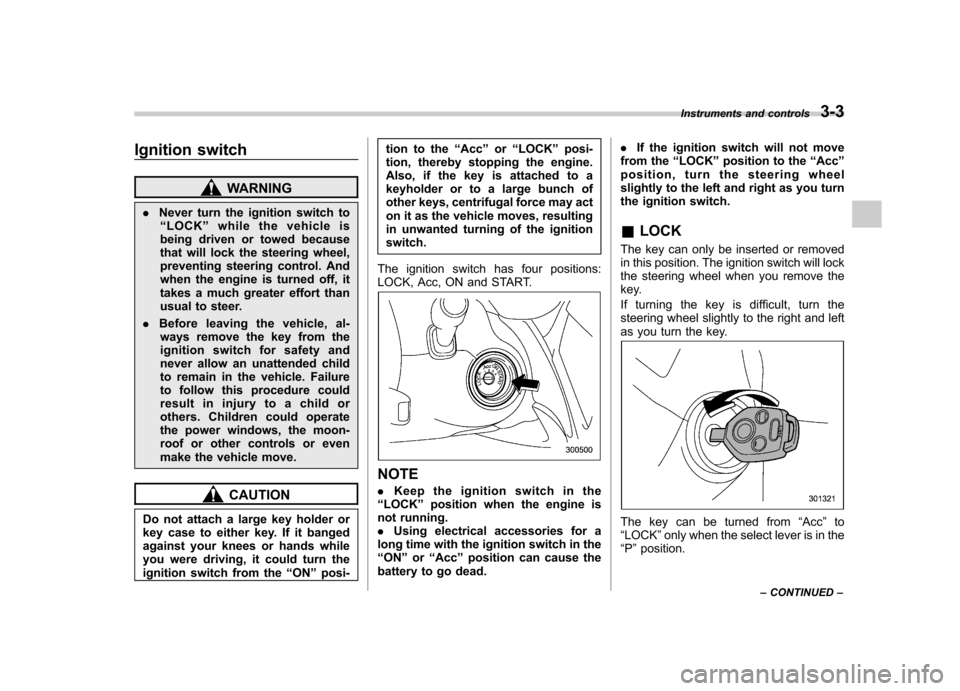
Ignition switch
WARNING
. Never turn the ignition switch to
“ LOCK ”while the vehicle is
being driven or towed because
that will lock the steering wheel,
preventing steering control. And
when the engine is turned off, it
takes a much greater effort than
usual to steer.
. Before leaving the vehicle, al-
ways remove the key from the
ignition switch for safety and
never allow an unattended child
to remain in the vehicle. Failure
to follow this procedure could
result in injury to a child or
others. Children could operate
the power windows, the moon-
roof or other controls or even
make the vehicle move.
CAUTION
Do not attach a large key holder or
key case to either key. If it banged
against your knees or hands while
you were driving, it could turn the
ignition switch from the “ON ”posi- tion to the
“Acc ”or “LOCK ”posi-
tion, thereby stopping the engine.
Also, if the key is attached to a
keyholder or to a large bunch of
other keys, centrifugal force may act
on it as the vehicle moves, resulting
in unwanted turning of the ignitionswitch.
The ignition switch has four positions:
LOCK, Acc, ON and START.
NOTE . Keep the ignition switch in the
“ LOCK ”position when the engine is
not running. . Using electrical accessories for a
long time with the ignition switch in the“ ON ”or “Acc ”position can cause the
battery to go dead. .
If the ignition switch will not move
from the “LOCK ”position to the “Acc ”
position, turn the steering wheel
slightly to the left and right as you turn
the ignition switch. & LOCK
The key can only be inserted or removed
in this position. The ignition switch will lock
the steering wheel when you remove the
key.
If turning the key is difficult, turn the
steering wheel slightly to the right and left
as you turn the key.
The key can be turned from “Acc ”to
“ LOCK ”only when the select lever is in the
“ P ”position. Instruments and controls
3-3
– CONTINUED –
Page 233 of 422

6-16Interior equipment
Convenient tie-down hooks
CAUTION
The convenient tie-down hooks are
designed only for securing light
cargo. Never try to secure cargo
that exceeds the capacity of the
hooks. The maximum load capacity
is 44 lbs (20 kg) per hook.
The cargo area is equipped with four tie-
down hooks so that cargo can be secured
with a luggage net or ropes.
When using the tie-down hooks, turn them
down out of the storing recesses. When
not in use, put the hooks up into the
storing recesses. Under-floor storage compart- ment
The subfloor storage compartment is
located under the floor of the cargo area
and can be used to store small items. To
open the lid, pull the handle up.
CAUTION
. Always keep the lid of the sub-
floor storage compartment
closed while driving to reduce
the risk of injury in the event of
sudden stop or an accident.
. Do not store spray cans, contain-
ers with flammable or corrosive
liquids or any other dangerous
items in the subfloor storagecompartment. &
5-seater models
Hang the hook provided on the underside
of the rear half lid on the rear edge of the
roof to keep the lid open.
Page 234 of 422

&7-seater models
Hang the hook provided on the underside
of the lid on the rear edge of the roof to
keep the lid open. HomeLink
®Wireless Control
System (if equipped)
1) HomeLink® buttons
2) Indicator light
3) Hand-held transmitter* * Not part of your vehicle ’s remote
keyless entry system but of a
HomeLink®-compatible device.
The HomeLink® Wireless Control System,
located on the driver ’s sun visor, is a
handy way to operate, from inside of your
vehicle, up to three remote-controlled
indoor and outdoor devices, such as
garage door openers, entrance gates,
door locks, home lighting, and security
systems. There are three HomeLink®
buttons on the sun visor, each of which
you can program for operation of one desired device. For details on the device
types which can be operated by this
system, consult the HomeLink website at
www.homelink.com or call 1-800-355-3515.
Note the following about this system:
If your vehicle is equipped with the
HomeLink® Wireless Control System, it
complies with Part 15 of the Federal
Communication Commission Rules in the
U.S. and the RSS-210 of Industry Canada
in Canada. Its operation is subject to the
following two conditions:
(1) this device may not cause harmful
interference, and (2) this device must
accept any interference received, includ-
ing interference that may cause undesiredoperation.
Changes and modifications to this system
by anyone other than an authorized
service facility could void authorization to
use this equipment.
HomeLink and the HomeLink house are
registered trademarks of Johnson Con-
trols, Inc.
WARNING
. When programming the
HomeLink ®Wireless Control
System, you may be operating a Interior equipment
6-17
– CONTINUED –