Page 1 of 12
Q2010 FORESTER Owner Reference Guide
199382_10_Forester_QRG_042709.indd 24/27/09 4:08:32 PM
Page 2 of 12
A BAlA n c e o f co m f o r t, Ut i l i t y An d cApA B i l i t y For 2010, we expanded upon our initial credo
– “Sports Utility Tough, Car Easy®.” The enhancements we’ve made are intended to provide you with more driving pleasure,
comfort, convenience, and security. The exterior boasts bold new styling. The interior provides enhanced comfort and function.
The cargo area has been designed to make even better use of the available room. The stronger body structure adds to passive
safety; stronger body structure combined with reduced vehicle weight makes for improved handling – a factor in active safety.
Forester for 2010 is the essence of Subaru. We look forward to providing you with a satisfying owner experience.
1
2
3
4
5
10
6
12
11
9
8
7
2
199382_10_Forester_QRG_042709.indd 34/27/09 4:08:48 PM
Page 3 of 12

pAn e l il l Um i n At i o nWhen the headlight switch is in the or position, you can adjust
the brightness of the instrument panel
illumination for better visibility. To
brighten, turn the control dial upward. To
darken, turn the control dial downward.
Ho o d re l e As eTo open your hood, pull the hood release
lever located under the left side of the
instrument panel.
HeA d l i g Ht sDaytime running lights are standard on your
vehicle. To turn on parking lights or headlights,
twist the end of the turn signal lever forward.
To change headlights from low beam to high
beam, push the turn signal lever forward; to
return to low beam, pull the lever back. To
flash the headlights, pull the lever toward you
and then release it.
fo g li g Ht s (i f e q Ui p p e d)Your fog lights will only operate when your
headlights are on low beam. To turn the fog
lights on, turn the dial up. To turn the fog
lights off, turn the dial back down.
co o l An t te m p e r AtU r eIllumination in BLUE indicates insufficient
warming up of the engine. Illumination in RED
indicates overheating condition of the engine.
cH e c k en g i n e li g HtIf this light comes on and stays on, see
your Subaru dealer as soon as possible.
There may be a problem with your
emission control system. NOTE: If you
have recently fueled your vehicle, the
“CHECK ENGINE” light may stay on due
to a missing or loose fuel filler cap. (The
cap should be tightened until it clicks.)
lo w fUe l
w
A r n i n g li g Ht If this light appears, refuel promptly; your
tank is nearly empty. Approximately 2.6 U.S.
gallons of fuel remain.
ABs wAr n i n g li g HtIf the ABS (Anti-lock Brake System) light
comes on and stays on after the vehicle
speed exceeds approximately 8 mph,
the ABS system may not be working
properly. (The conventional brake system
will continue to operate normally.) Have
the ABS system checked by your Subaru
dealer at the first available opportunity.
crU i s e co n t r o lSET Push the “CRUISE” button located
on the steering wheel. The “CRUISE”
indicator light on the instrument panel
will turn on. Press the accelerator pedal
until your vehicle reaches the desired
speed. Push the “SET/COAST” button
and release. Ease off the accelerator pedal. Your vehicle will maintain the
desired speed.
TEMPORARY CANCEL There are four
ways to temporarily cancel cruise
control: depress the brake pedal; push
the “CANCEL” button; press the clutch
pedal (manual transmission); or, shift
the selector lever into the “N” position
(automatic transmission).
RESUME
Push the “RES/ACC” button with
the vehicle speed approximately 20 mph
or more.
SHUT OFF To quit cruise control,
push the main “CRUISE” button again,
or, when the vehicle is stopped, turn
the ignition switch to the “ACC” or
“LOCK” position.
INCREASE SPEED Push the
“RES/ACC” button, hold until your
vehicle reaches the desired speed, and
release. To increase speed using the
accelerator pedal, press the pedal until
you reach the desired speed. Push the
“SET/COAST” button to set the speed.
DECREASE SPEED Push and hold the
“SET/COAST” button, until your vehicle
slows to the desired speed, then release.
To decrease the speed using the brake
pedal, press the pedal to release cruise
control temporarily. When the speed
decreases to the desired rate, push the
“SET/COAST” button.
wi n d sHi e l d wi p e r sTo turn wipers on, press the wiper control
lever down one level for intermittent, two
levels for low, or three levels for high speed.
Return the lever to the “OFF” position to
stop wipers. For a single wipe/mist, pull
the lever toward you. To spray washer fluid
spray, press the washer button at the end
of the wiper control lever. To operate the
rear wiper, turn the knob on the end of
the control lever forward to intermittent,
continuous, or wash position. Turn the end
of the lever backward for wash operation
when the rear wiper is not in use.
pAs s e n g e r fr o n t Al Ai r B A g
on/off i
n d i c At o r sThese indicators, located next to the clock,
show the status of the front seat passenger’s
SRS frontal air bag. If the air bag is enabled,
the frontal air bag ON indicator light will
illuminate. If the air bag is disabled (not
activated to deploy in an accident), the OFF
indicator will illuminate. Please refer to your
Owner’s Manual for complete details.
HA zA r d wAr n i n g flA sH e r sPress the hazard button to turn flashers
on to warn other drivers when you are
experiencing emergency conditions.
Press again to turn flashers off.
10
2
1
3
4
7
8
9
5 11
12
6
Instrument panel
3
199382_10_Forester_QRG_042709.indd 44/27/09 4:08:49 PM
Page 4 of 12

ti l t/t e l e s c o p i c st e e r i n g co lUm nThe tilt and telescopic lever is underneath the steering wheel on the low\
er left side
of the steering column. Push it down firmly to adjust the vertical and lengthwise
position of the wheel; push it back up firmly to lock the wheel in place. When
adjusting the steering wheel, there are cases in which the lever cannot be pushed
back to the fixed position. In such cases, readjust the steering position and push the
lever back to the fixed position again. Do not adjust while driving.
seA t HeA t e r s (i f e q Ui p p e d)Located (on the center console) between the driver and passenger seats\
, turn
the dial forward to the desired position. An indicator light next to the dial
will turn on. Turn the switch off before exiting the vehicle.
AUx i l i Ar y po w e r so c k e t sLocated in the center console compartment, rear cargo area sidewall and under
the climate controls. NOTE: Electrical power (12V DC) from the battery is on tap
at the socket when the ignition switch is in either the “ACC” or “ON” position.
You can use an in-car electrical appliance by connecting it to the socket.
re m o t e ke y l e s s en t r y
to lo c k Al l do o r s (A
n d r e Ar g At e)
Briefly press “LOCK/ARM.” An electronic chirp will sound one time and the hazard lights
will flash one time. If any of the doors (or the rear gate) are not fully closed, an electronic
chirp will sound five times and the hazard lights will flash five \
times to alert you that the
doors (or the rear gate) are not properly closed. If all doors are properly closed, the system
will automatically lock the vehicle.
U
n l o c k dr i v e r’s do o r
Briefly press “UNLOCK/DISARM.” An electronic chirp will sound two times, the hazard lights will flash two times, and
the security system will be disarmed. To unlock all doors and the rear gate, briefly press the “UNLOCK/DISARM” button
a second time within five seconds.
d
e A c t i v At e o r Ac t i v At e el e c t r o n i c cH i r p
(1) Sit in the driver’s seat and shut all doors and rear gate. (2) Hold down the rear side (unlock side) of the power door
locking switch. (3) While holding down the unlock side of the power door locking switch, remove and insert the key from
the ignition switch at least 6 times within 10 seconds after Step 2. (4) Open and close the driver’s door once within 10
seconds after Step 3. (5) The hazard warning flashers will flash three times to indicate completion of the\
setting.
V
e H i c l e fi n d e r fUn c t i o n
This function can help you find your vehicle when it is parked among many vehicles in a large parking lot, provided you
are within 30 feet of the vehicle. Press the “LOCK” button three times within five seconds. The horn will sound one
time and the hazard lights will flash three times.
Additional features
Al A r m sy s t e mThe alarm sounds when the doors are opened to warn of an unauthorized entry. To arm: Press the LOCK button of the
keyless transmitter. To disarm: Press the “UNLOCK” button of the keyless transmitter.
im m oBi l i z e rWhen the security alarm is activated, the immobilizer interrupts the starter motor to prevent an intruder fro\
m starting
your vehicle without a registered key.
ce n t e r co n s o l e Ar m r e s tThe center console can be used as an armrest or additional storage space. To
use the center console as an armrest, move the armrest part of the console
top to the desired position. Adjust the armrest to suit your driving position. To
use the center console as additional storage space, raise the console top to the
vertical position.
fU e l fi l l e r li d re l e As e le v e rLocated on the floor near the driver’s door. To open the fuel filler lid, pull the lid release lever up and release.
4
199382_10_Forester_QRG_042709.indd 54/27/09 4:09:06 PM
Page 5 of 12

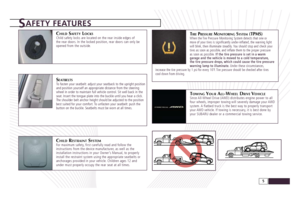
Safety features
cHi l d sAf e t y lo c k sChild safety locks are located on the rear inside edges of
the rear doors. In the locked position, rear doors can only be
opened from the outside
.
seA tB e l t sTo fasten your seatbelt: adjust your seatback to the upright position
and position yourself an appropriate distance from the steering
wheel in order to maintain full vehicle control. Sit well back in the
seat. Insert the tongue plate into the buckle until you hear a click.
The shoulder belt anchor height should be adjusted to the position
best suited for your comfort. To unfasten your seatbelt: push the
button on the buckle. Seatbelts must be worn at all times.
cH i l d re s t r Ai n t sy s t e mFor maximum safety, first carefully read and follow the
instructions from the device manufacturer, as well as the
installation instructions in your Owner’s Manual, to properly
install the restraint system using the appropriate seatbelts or
anchorages provided in your vehicle. Children ages 12 and
under must properly occupy the rear seat at all times.
ti r e pr e s s Ur e mo n i t o r i n g sy s t e m (tpms)When the Tire Pressure Monitoring System detects that one or
more of your tires is significantly under-inflated, the warning light
will blink, then illuminate steadily. You should stop and check your
tires as soon as possible, and inflate them to the proper pressure
as soon as possible. If the tire pressure is set in a warm
garage and the vehicle is moved to a cold temperature,
the tire pressure drops, which could cause the tire pressure
warning lamp to illuminate. Under these circumstances,
increase the tire pressure by 1 psi for every 10˚F. Tire pressure should be checked after tires
cool down from driving.
to w i n g yo Ur Al l-wHe e l dr i v e veH i c l eSince All-Wheel Drive (AWD) distributes engine power to all
four wheels, improper towing will severely damage your AWD
system. A flatbed truck is the best way to properly transport
your AWD vehicle. If towing is necessary, it is best done by
your SUBARU dealer or a commercial towing service.
5
199382_10_Forester_QRG_042709.indd 64/27/09 4:09:19 PM
Page 6 of 12
HoUr s o f li s t e n i n g At yo Ur fi n g e r t i p s Your Forester is equipped with a standard
FM/AM stereo and either a single-disc or six-disc CD changer for hours o\
f listening enjoyment at your fingertips.
6
1
2
3
4
5
6
9
8
7
1112
13
14
10
199382_10_Forester_QRG_042709.indd 74/27/09 4:09:28 PM
Page 7 of 12

po w e r/vo lUm e/Br i g Ht n e s s Push the dial to turn the radio ON or
OFF. Turn the dial counterclockwise
to decrease volume and clockwise to
increase volume. The brightness of the
radio display dims when the light switch
is in the
or position. If this
makes the display difficult to read, press
the volume dial for more than 2 seconds
to return display to original brightness.
fm/AmPush the “FM/AM” button to select FM1,
FM2, FM3 or AM reception.
so Un d/tUn e co n t r o l diA lEach brief press of the “SOUND” control
dial changes BASS, MIDDLE, TREBLE, FADER
or BALANCE. Once the desired mode is
selected, turn the dial clockwise to increase
BASS, MIDRANGE, TREBLE and VOLUME.
Turning clockwise while in FADER mode will
increase front speaker volume and decrease
rear speaker volume. While in BALANCE
mode, turning clockwise will increase
right speaker volume and decrease left
speaker volume. Turning counterclockwise
while in desired mode will decrease BASS,
MIDRANGE, TREBLE and VOLUME. Turning
counterclockwise while in FADER mode will
increase rear speaker volume and decrease
front speaker volume. While in BALANCE
mode, turning dial counterclockwise will
increase left speaker volume and decrease
right speaker volume. For manual tuning, turn the “SOUND/TUNE” control dial clockwise
to increase frequency and turn the dial
counterclockwise to decrease frequency.
pr e s e t sYou can save up to six favorite stations
for each band – FM1, FM2, FM3 and AM.
Select a frequency and station. Press one of
the preset buttons for at least 1.5 seconds
to store it. After setting your presets, you
can get a favorite station easily by pressing
the desired preset button.
sc
A nPress the “SCAN” button to begin
previewing the first 5 seconds of the
next highest frequency upward through
the band. Press “SCAN” again to stop
scanning and select a station you enjoy.
se e kPress the right arrow to increase the
tuning frequency. Press the left arrow to
decrease the tuning frequency.
sAt (i f e q Ui p p e d) Press the “SAT” button to select the
satellite radio mode. See your Owner’s
Manual for detailed information.
cAtPress the “CAT” button for more than
2 seconds to turn category mode on.
Radio operations (channel selection and channel scan) are performed only in that
selected category.
lo
AdPress the “LOAD” button. After the
DISC indicator begins to blink, “IN”
will appear on the display. You have 15
seconds to insert your disc. Insert the
disc slowly and it will automatically be
drawn in and playback will begin. Repeat
these steps to insert up to six discs.
To load the entire magazine, press the
“LOAD” button for more than 2 seconds.
The disc number indicator associated
with the idle position will blink. You
have 15 seconds to load the first disc.
Once that’s completed, the next disc
indicator will blink. When the magazine
is full, playback begins with the disc that
was inserted first.
trA c k s e l e c t i o nBriefly press the “^” button to skip to
the beginning of the next track. Each
time this button is pressed, the indicated
track number will increase. Briefly press
the “
^” button to skip to the beginning
of the current track. Each time this
button is pressed, the indicated track
number will decrease.
di s c s e l e c t i o n B U t t o n s Press the “CD/AUX” button to turn on
the CD. Select and press one of the
desired disc selection buttons to hear the selected CD. Press the “CD/AUX”
button to select the AUX mode (when
the AUX unit is connected to the AUX
terminal). The AUX terminal is located in
the center console.
te x t
Press the “TEXT” button for more than
2 seconds for song or track. You will see
12 scrolling characters at a time.
re p e At/rA n d o m
Briefly press the “RPT” button and
release while a song is playing to play
the song repeatedly. To cancel the repeat
mode, press the button again. Press
the “RDM” button and hold it for more
than 2 seconds while the disc is being
played. The RDM indicator will come on
and all songs on the disc will be played
in random order. To cancel the random
mode, press the “RDM” button again.
ej e c t cdPress the disc select button of the
disc you wish to eject. Press “EJECT”
to remove the disc. To eject all discs
from the magazine, press and hold
the “EJECT” button for more than 2
seconds. Remove each disc as it is
ejected from the changer.
12
2
1
4
5
8
3
13
14
Audio controls
11
9
7
610
7
199382_10_Forester_QRG_042709.indd 84/27/09 4:09:29 PM
Page 8 of 12
mAi n t Ai n co m f o r t i n An y co n d i t i o n For hot, cold and everything in between, Subaru
climate control systems allow you to maintain comfort in any condition. \
With the automatic climate control
system, the “AUTO” feature automatically controls air temperature,\
fan speed, and distribution of air flow at
the touch of a button.
8
1
2
3
4
5
6
7
199382_10_Forester_QRG_042709.indd 94/27/09 4:09:47 PM