2010 SUBARU FORESTER window
[x] Cancel search: windowPage 205 of 402

6-4Interior equipment
illuminate when only the rear gate is opened.) .The doors are unlocked using the
remote keyless entry transmitter.. The ignition switch is turned from the
“ Acc ”position to the “LOCK ”position.
The automatically illuminated map lights
remain on for several seconds and then
gradually turn off after all doors are
closed. While the lights are on, if any of
the following operations are performed,
the map lights turn off immediately. . The ignition switch is turned from the
“ LOCK ”position to the “Acc ”or “ON ”
position.. All doors and the rear gate are locked
using the remote keyless entry transmitter.
The setting of the period for which the
lights remain on (OFF delay timer) can be
changed as follows. . Models with genuine SUBARU navi-
gation system:
The setting can be changed using the
navigation monitor. For details, please
refer to the Owner ’s Manual supplement
for the navigation system. Also, the setting
can be changed by a SUBARU dealer.
Contact your SUBARU dealer for details. .
Models without genuine SUBARU
navigation system:
The setting can be changed by a
SUBARU dealer. Contact your SUBARU
dealer for details. Sun visors
To block out glare, swing down the visors.
To use the sun visor at a side window,
swing it down and move it sideways.
Page 221 of 402

7-4Starting and operating
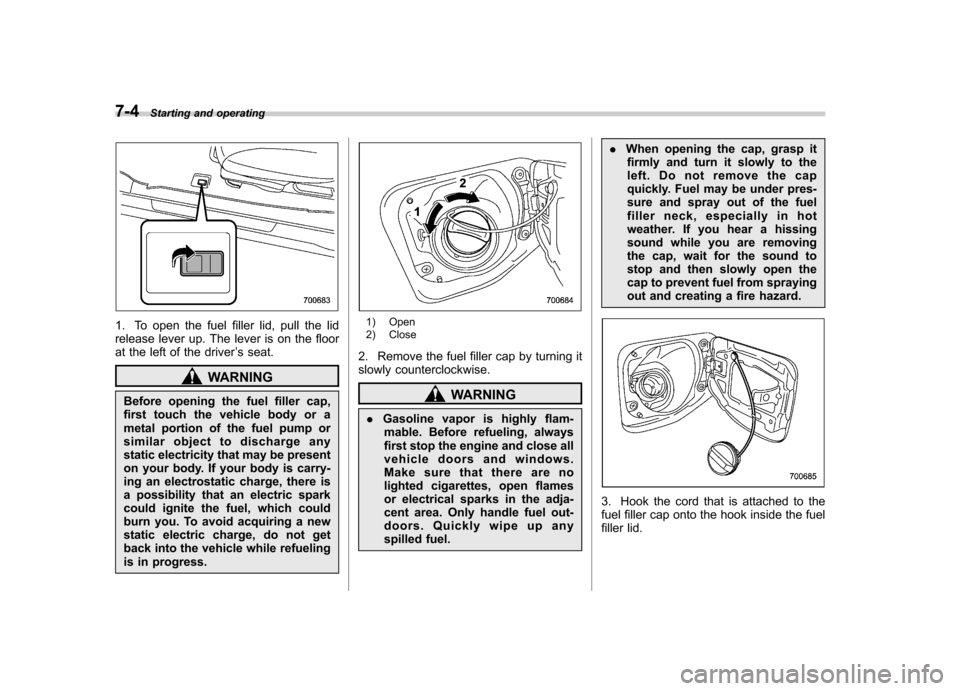
1. To open the fuel filler lid, pull the lid
release lever up. The lever is on the floor
at the left of the driver ’s seat.
WARNING
Before opening the fuel filler cap,
first touch the vehicle body or a
metal portion of the fuel pump or
similar object to discharge any
static electricity that may be present
on your body. If your body is carry-
ing an electrostatic charge, there is
a possibility that an electric spark
could ignite the fuel, which could
burn you. To avoid acquiring a new
static electric charge, do not get
back into the vehicle while refueling
is in progress.
1) Open
2) Close
2. Remove the fuel filler cap by turning it
slowly counterclockwise.
WARNING
. Gasoline vapor is highly flam-
mable. Before refueling, always
first stop the engine and close all
vehicle doors and windows.
Make sure that there are no
lighted cigarettes, open flames
or electrical sparks in the adja-
cent area. Only handle fuel out-
doors. Quickly wipe up any
spilled fuel. .
When opening the cap, grasp it
firmly and turn it slowly to the
left. Do not remove the cap
quickly. Fuel may be under pres-
sure and spray out of the fuel
filler neck, especially in hot
weather. If you hear a hissing
sound while you are removing
the cap, wait for the sound to
stop and then slowly open the
cap to prevent fuel from spraying
out and creating a fire hazard.
3. Hook the cord that is attached to the
fuel filler cap onto the hook inside the fuel
filler lid.
Page 224 of 402

trouble codes, and the OBD system
readiness monitors are complete. .A vehicle
fails the OBD inspection if the
“ CHECK ENGINE ”warning light/MIL is
not properly operating or there are one or
more diagnostic trouble codes stored in
the vehicle ’s computer with the “CHECK
ENGINE ”warning light/MIL illuminated.
. A state emission inspection may reject
(not pass or fail) a vehicle if the number of
OBD system readiness monitors “Not
Ready ”is greater than one. Under this
condition, the vehicle operator should be
instructed to drive his/her vehicle for a few
days to set the monitors and return for an
emission re-inspection. . Owners of rejected or failing vehicles
should contact their SUBARU Dealer for service. Preparing to drive
You should perform the following checks
and adjustments every day before you
start driving.
1. Check that all windows, mirrors, and
lights are clean and unobstructed.
2. Check the appearance and condition
of the tires. Also check tires for properinflation.
3. Look under the vehicle for any sign of leaks.
4. Check that the hood and rear gate are
fully closed.
5. Check the adjustment of the seat.
6. Check the adjustment of the inside
and outside mirrors.
7. Fasten your seatbelt. Check that your
passengers have fastened their seatbelts.
8. Check the operation of the warning
and indicator lights when the ignition
switch is turned to the
“ON ”position.
9. Check the gauges, indicator and warn-
ing lights after starting the engine.
NOTE
Engine oil, engine coolant, brake fluid,
washer fluid and other fluid levels
should be checked daily, weekly or at
fuel stops. Starting the engineCAUTION
Do not operate the starter motor
continuously for more than 10 sec-
onds. If the engine fails to start after
operating the starter for 5 to 10
seconds, wait for 10 seconds or
more before trying again.
& Manual transmission model
1. Apply the parking brake.
2. Turn off unnecessary lights and ac- cessories.
3. Press the clutch pedal to the floor and
shift the shift lever into neutral. Hold the
clutch pedal to the floor while starting theengine.
The starter motor will only operate when
the clutch pedal is pressed fully to the
floor.
4. Turn the ignition switch to the “ON ”
position and check the operation of the
warning and indicator lights. Refer to“ Warning and indicator lights ”F 3-9.
5. Turn the ignition switch to the “START ”
position without depressing the accelera-
tor pedal. Release the key immediately
after the engine has started. Starting and operating
7-7
– CONTINUED –
Page 227 of 402

7-10Starting and operating
Remote engine start system
(dealer option)
WARNING
. Do not remote start a vehicle in
an enclosed environment (e.g., in
a closed garage). Prolonged op-
eration of a motor vehicle in an
enclosed environment can cause
a harmful build-up of Carbon
Monoxide. Carbon Monoxide is
harmful to your health. Exposure
to high levels of Carbon Monox-
ide can cause headaches, dizzi-
ness or in extreme cases uncon-
sciousness and/or death.
. Before performing any servicing
of the vehicle, temporarily place
the remote engine start system in
service mode to prevent the
system from unexpectedly start-
ing the engine.
& Starting your vehicle
The remote control start system is acti-
vated by pressing the “
”button twice
within 3 seconds on your remote control
transmitter. The system will check certain
pre-conditions before starting, and if all
safety parameters are correct, the engine
will start within 5 seconds. While the
vehicle is operating via remote engine
start, the vehicle ’s power window features
will be disabled. Also, the system has a
timer and will shut down after 15 minutes if
you do not operate the vehicle. Press and
hold the “
”button for 2 seconds again to
turn the vehicle off. If the vehicle ’s starter
cranks but does not start or starts and
stalls, the remote engine start system will
power off then attempt to start the vehicle an additional four times. If the vehicle fails
to start after the additional attempts, the
remote engine start system will abort and
return to a non-activated state.
& Remote start safety features
For safety and security reasons, the
system will fail to start and beep the horn
twice or shut down the engine during
remote start operation if any of the
following conditions occur. . The brake pedal is pressed before the
vehicle ignition switch is turned “on ”.
. The key was already in the ignition
switch.. The engine hood is opened.
. The vehicle ’s engine idle speed has
reached a level over 3,000 rpm.. The alarm is triggered by opening a
door or the rear gate.
NOTE . The security indicator light on the
dashboard will stop flashing while
under remote engine start operation,
but the vehicle is still protected.. If the vehicle is entered during
remote engine star t operation, the
system will not record entry in the
alarm history.
Page 228 of 402

&Entering the vehicle while it
is running via remote start
1. Unlock the vehicle doors using the
keyless entry system. If the vehicle ’s
doors are unlocked manually using the
key, the vehicle ’s alarm system will trigger
and the remote engine start system will
turn off. Inserting the key into the ignition
switch and turning it to the “ON ”position or
pressing the unlock button “
”on the
remote keyless entry transmitter will dis-
arm the alarm system. Refer to “Alarm
system ”F 2-14.
2. Enter the vehicle. Do not depress the
brake pedal.
3. Insert the key into the ignition switch
and turn to the “ON ”position. If the ignition
switch is accidentally turned to the“ START ”position, the system ’s “starter
anti-grind ”feature will prevent the starter
from re-cranking.
4. Depress the brake pedal. The remote
starter disengages, the vehicle ’s power
window features are re-enabled and the
vehicle will operate normally.
& Entering the vehicle follow-
ing remote engine start shut-down
An alarm trigger may occur if the vehicle is
opened by the remote keyless entry transmitter within a few seconds immedi-
ately following remote engine start shut-down.
& Pre-heating or pre-cooling
the interior of the vehicle
Before exiting the vehicle, set the tem-
perature controls to the desired setting
and operation. After the system starts the
vehicle, the heater or air-conditioning will
activate and heat or cool the interior to
your setting. & Service mode
In service mode, the remote start function
is temporarily disabled to prevent the
system from unexpectedly starting the
engine while being serviced. ! To engage the service mode
Turn the ignition switch to the “ON ”
position, depress and hold the brake
pedal, then press and release the “
”
button on the remote control transmitter
three times. The system will pause for 1
second and then flash the turn signal
lights and honk the horn three times
indicating that the system is in service
mode. When attempting to activate the
remote start system while in service
mode, the turn signal lights will flash and
the horn will honk two times and will not start. !
To disengage the service mode
Turntheignitionswitchtothe “ON ”
position, depress and hold the brake
pedal, then press and release the “
”
button on the remote control transmitter
three times. The system will pause for 1
second and flash the turn signal lights 1
time indicating that the system has exited
service mode.
NOTE
When taking your vehicle in for service,
it is recommended that you inform the
service personnel that your vehicle is
equipped with a remote control startsystem. & Remote transmitter program-
ming and programmable fea-
ture option
New transmitters can be programmed to
the engine starter system in the event that
remote transmitters are lost, stolen or
damaged. The remote engine start system
also has one programmable feature that
can be adjusted for user preference.
The remote engine starter system can be
programmed to either make an audible
horn chirp upon remote start activation or
not. Remote transmitter programming and Starting and operating
7-11
– CONTINUED –
Page 258 of 402

exhaust fumes are entering the
vehicle, have the problem
checked and corrected as soon
as possible. If you must drive
under these conditions, drive
only with all windows fully open.
. Keep the rear gate closed while
driving to prevent exhaust gas
from entering the vehicle.
NOTE
Due to the expansion and contraction
of the metals used in the manufacture
of the exhaust system, you may hear a
crackling sound coming from the ex-
haust system for a short time after the
engine has been shut off. This sound isnormal. Catalytic converter
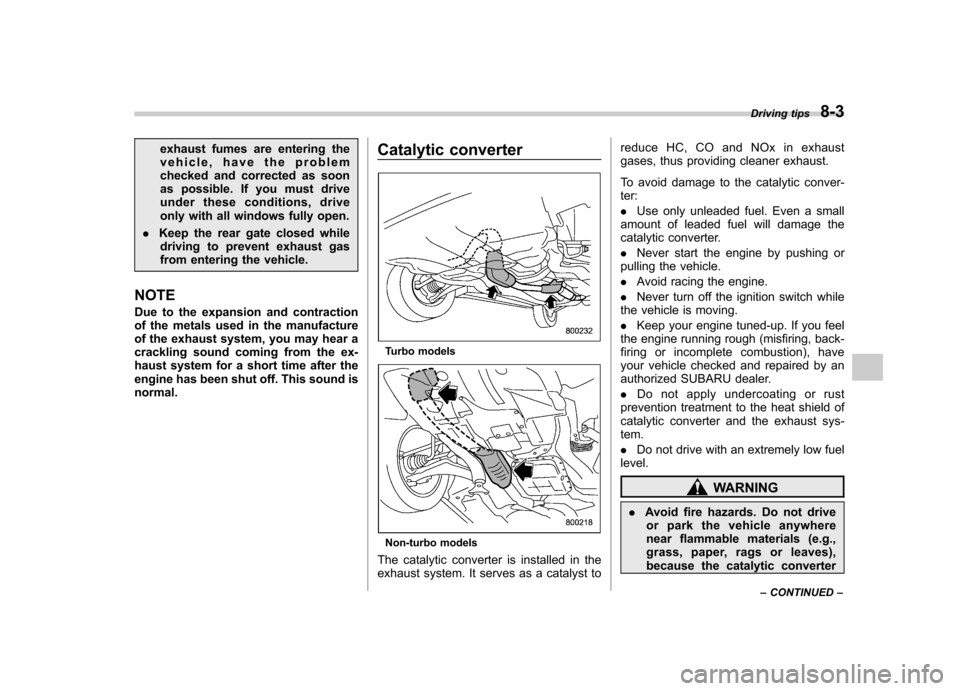
Turbo models
Non-turbo models
The catalytic converter is installed in the
exhaust system. It serves as a catalyst to reduce HC, CO and NOx in exhaust
gases, thus providing cleaner exhaust.
To avoid damage to the catalytic conver- ter: .
Use only unleaded fuel. Even a small
amount of leaded fuel will damage the
catalytic converter. . Never start the engine by pushing or
pulling the vehicle.. Avoid racing the engine.
. Never turn off the ignition switch while
the vehicle is moving.. Keep your engine tuned-up. If you feel
the engine running rough (misfiring, back-
firing or incomplete combustion), have
your vehicle checked and repaired by an
authorized SUBARU dealer. . Do not apply undercoating or rust
prevention treatment to the heat shield of
catalytic converter and the exhaust sys-tem. . Do not drive with an extremely low fuel
level.
WARNING
. Avoid fire hazards. Do not drive
or park the vehicle anywhere
near flammable materials (e.g.,
grass, paper, rags or leaves),
because the catalytic converter Driving tips
8-3
– CONTINUED –
Page 263 of 402

8-8Driving tips
Winter driving
&Operation during cold weather
Carry some emergency equipment, such
as a window scraper, a bag of sand,
flares, a small shovel and jumper cables.
Check the battery and cables. Cold
temperatures reduce battery capacity.
The battery must be in good condition to
provide enough power for cold winterstarts.
Use an engine oil of proper grade and
viscosity for cold weather. Heavy summer
oil will cause harder starting.
Keep the door locks from freezing by
squirting them with deicer or glycerin. Forcing a frozen door open may damage
or separate the rubber weather strips
around the door. If the door is frozen,
use hot water to melt the ice, and after-
wards thoroughly wipe the water away.
Use a windshield washer fluid that con-
tains an antifreeze solution. Do not use
engine antifreeze or other substitutes
because they may damage the paint of
the vehicle.
SUBARU Windshield Washer Fluid con-
tains 58.5% methyl alcohol and 41.5%
surfactant, by volume. Its freezing tem-
perature varies according to how much it
is diluted, as indicated in the followingtable.
Washer Fluid Con- centration Freezing Temperature
30% 10.4 8F( �12 8C)
50% �48F( �20 8C)
100% �
49 8F( �45 8C)
In order to prevent freezing of washer
fluid, check the freezing temperatures in
the table above when adjusting the fluid
concentration to the outside temperature.
If you fill the reservoir tank with a fluid with
a different concentration from the one
used previously, purge the old fluid from
the piping between the reservoir tank and washer nozzles by operating the washer
for a certain period of time. Otherwise, if
the concentration of the fluid remaining in
the piping is too low for the outside
temperature, it may freeze and block thenozzles.
CAUTION
. Adjust the washer fluid concen-
tration appropriately for the out-
side temperature. If the concen-
tration is inappropriate, sprayed
washer fluid may freeze on the
windshield and obstruct your
view, and the fluid may freeze in
the reservoir tank.
. State or local regulations on
volatile organic compounds may
restrict the use of methanol, a
common windshield washer anti-
freeze additive. Washer fluids
containing non-methanol anti-
freeze agents should be used
only if they provide cold weather
protection without damaging
your vehicle ’s paint, wiper blades
or washer system.
Page 265 of 402

8-10Driving tips
roads. This may cause loss of
vehicle control.
CAUTION
Avoid prolonged continuous driving
in snowstorms. Snow will enter the
engine ’s intake system and may
hinder the airflow, which could re-
sult in engine shutdown or evenbreakdown.
! Wiper operation when snowing
Before driving in cold weather, make sure
the wiper blades are not frozen to the
windshield or rear window. If the wiper
blades are frozen to the windshield or rear
window, use the defroster with the airflow
control dial in the “
”position and the
temperature control dial set for maximum
warmth until the wiper blades are com-
pletely thawed out. If your vehicle is
equipped with a wiper deicer, it is helpful
to thaw the windshield wiper blades. To
thaw out the rear wiper blade, use the rear
window defogger.
When driving in snow, if frozen snow starts
to stick on the surface of the windshield
despite wiper operation, use the defroster
with the airflow control dial in “
”and the
temperature control dial set for maximum warmth. After the windshield gets warmed
enough to melt the frozen snow on it,
wash it away using the windshield washer.
Snow stuck on the wiper arm prevents the
wiper from working effectively. If snow is
stuck on the wiper arm, pull off the road to
a safe place, then remove it. If you stop
the vehicle at road side, use the hazard
warning flasher to alert other drivers.
We recommend use of non-freezing type
wiper blades (winter blades) during the
seasons you could have snow and freez-
ing temperatures. Blades of this type give
superior wiping performance in snowy
conditions. Be sure to use blades that
are suitable for your vehicle.
CAUTION
During high-speed driving, non-
freezing type wiper blades may not
perform as well as standard wiper
blades. If this happens, reduce the
vehicle speed.
NOTE
When the season requiring non-freez-
ing type wiper blades is over, replace
them with standard wiper blades. &
Corrosion protection
Refer to “Corrosion protection ”F 10-4.
& Snow tires
WARNING
. When replacing original tires with
winter (snow) tires, make sure
you use only the same size,
construction and load range as
the original tires listed on the tire
placard. Using other sizes and
construction may affect speed-
ometer/odometer calibration and
clearance between the body and
tires. It also may be dangerous
and lead to loss of vehicle con-trol.
. You must install four winter tires
that are of the same size, con-
struction, brand, and load range.
Mixing other sizes or construc-
tions may result in severe me-
chanical damage to the drive
train of your vehicle and may
affect ride, handling, braking and
speedometer/odometer calibra-
tion. It also may be dangerous
and lead to loss of vehicle con-trol.