Page 354 of 402
surface.
5. To install the bulb to the headlight
assembly, turn it clockwise until it clicks.
6. Reconnect the electrical connector.
7. Install the air intake duct with clips
(right-hand side). &Position light
1. Turn the bulb socket counterclockwise
and pull out the socket.
2. Pull the bulb out of the socket. Install a
new bulb.
3. Install the bulb socket by turning it clockwise. &
Front turn signal light
It may be difficult to replace the bulbs.
Have the bulbs replaced by your SUBARU
dealer if necessary. & Rear combination lights
1. Using a Phillips screwdriver, remove
the upper and lower screws that secure
the rear combination light assembly.
2. Slide the rear combination light as-
sembly rearward and remove it from thevehicle.
1) Brake/tail light
2) Rear turn signal light
3) Back-up light Maintenance and service
11-49
– CONTINUED –
Page 355 of 402
11-50Maintenance and service
3. Remove the bulb socket from the rear
combination light assembly by turning itcounterclockwise.
4. Pull the bulb out of the bulb socket and
replace it with a new one.
5. Set the bulb socket into the rear
combination light assembly and turn it
clockwise until it locks.
6. Put the rear combination light assem-
bly into place while aligning the clip with
the guide on the vehicle.
7. Tighten the upper and lower screws. &License plate light
1. Remove the mounting screws using a
Phillips screwdriver. 2. Remove the cover and lens.
3. Pull the bulb out of the socket. Install a
new bulb.
4. Reinstall the lens and cover.
5. Tighten the mounting screws. &
Dome light, map light, cargo
area light and door step light
CAUTION
When the door is opened, the map
light illuminates and becomes very
hot. When replacing the map light
bulb, close the door and be careful
not to burn yourself.
Dome light (type A)
Page 356 of 402
Dome light (type B)
Map light
Cargo area light
Door step light
1. Remove the lens by prying the edge of
the lens with a flat-head screwdriver. 2. Pull the bulb out of the socket. Install a
new bulb.
3. Reinstall the lens. &
Other bulbs
Other bulbs may be difficult to replace.
Have the bulbs replaced by your
SUBARU dealer if necessary. Maintenance and service
11-51
Page 358 of 402
Specifications..................................................... 12-2
Dimensions ........................................................ 12-2
Engine ............................................................... 12-3
Electrical system ................................................ 12-3
Capacities .......................................................... 12-4
Tires .................................................................. 12-5
Wheel alignment ................................................ 12-5 Fuses and circuits
............................................. 12-6
Fuse panel located in the passenger compartment ................................................... 12-6
Fuse panel located in the engine compartment ................................................... 12-8
Bulb chart ......................................................... 12-10
Vehicle identification ....................................... 12-13Specifications
12
Page 367 of 402
12-10Specifications
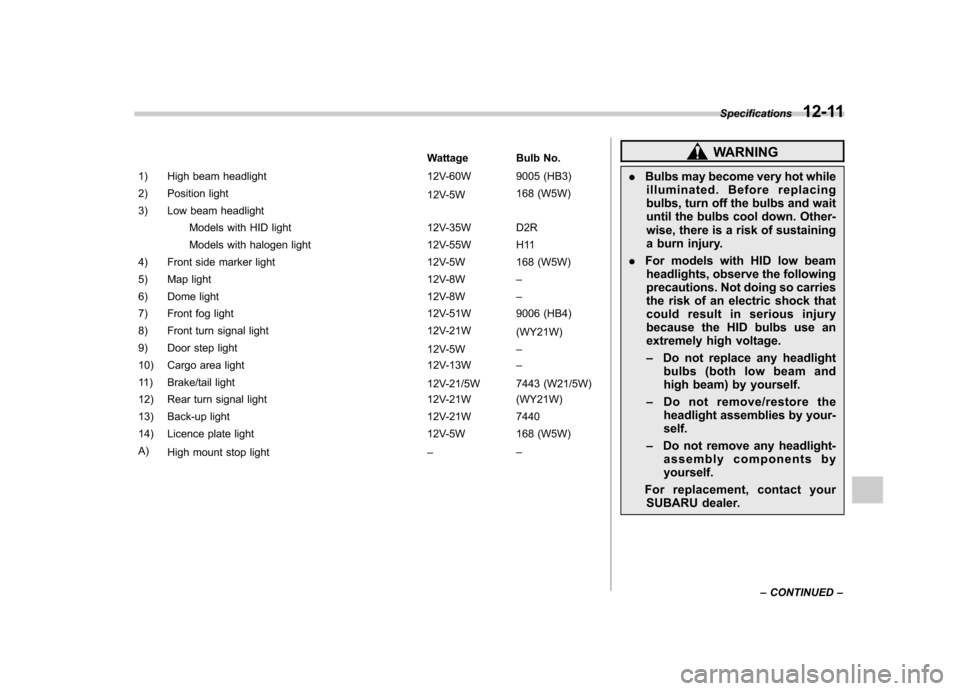
Bulb chart
A: The high mount stop light is the LED (Light Emitting Diode) type. Consult your SUBARU dealer for replacement.
Page 368 of 402

Wattage Bulb No.
1) High beam headlight 12V-60W 9005 (HB3)
2) Position light 12V-5W168 (W5W)
3) Low beam headlight
Models with HID light 12V-35W D2R
Models with halogen light 12V-55W H11
4) Front side marker light 12V-5W 168 (W5W)
5) Map light 12V-8W–
6) Dome light 12V-8W–
7) Front fog light 12V-51W 9006 (HB4)
8) Front turn signal light 12V-21W (WY21W)
9) Door step light 12V-5W–
10) Cargo area light 12V-13W–
11) Brake/tail light 12V-21/5W 7443 (W21/5W)
12) Rear turn signal light 12V-21W (WY21W)
13) Back-up light 12V-21W 7440
14) Licence plate light 12V-5W 168 (W5W)A) High mount stop light ––WARNING
. Bulbs may become very hot while
illuminated. Before replacing
bulbs, turn off the bulbs and wait
until the bulbs cool down. Other-
wise, there is a risk of sustaining
a burn injury.
. For models with HID low beam
headlights, observe the following
precautions. Not doing so carries
the risk of an electric shock that
could result in serious injury
because the HID bulbs use an
extremely high voltage. – Do not replace any headlight
bulbs (both low beam and
high beam) by yourself.
– Do not remove/restore the
headlight assemblies by your-self.
– Do not remove any headlight-
assembly components byyourself.
For replacement, contact your SUBARU dealer. Specifications
12-11
– CONTINUED –
Page 369 of 402
12-12Specifications
CAUTION
Replace any bulb only with a new
bulb of the specified wattage. Using
a bulb of different wattage could
result in a fire.
Page 392 of 402

Pad and lining...................................................... 11-29
Parking ........................................................ 7-31, 11-29
Pedal .................................................................. 11-27
System ................................................................. 7-22
Brake pedal Free play ............................................................. 11-27
Reserve distance .................................................. 11-27
Brake system ............................................................ 7-22
Warning light ......................................................... 3-17
Braking ..................................................................... 7-21
Tips...................................................................... 7-21
Breaking-in of new brake pads and linings ................... 11-29
Bulb
Chart .................................................................. 12-10
Replacing ............................................................. 11-46
C Capacities ................................................................. 12-4
Cargo area
Cover ................................................................... 6-13
Light ............................................................. 6-3, 11-50
Tie-down hooks ..................................................... 6-15
Cargo tray ................................................................. 10-6
Catalytic converter ....................................................... 8-3
Center Console .................................................................. 6-5
Ventilators ............................................................... 4-3
Center and side ventilators ............................................ 4-3
Changing Coolant ................................................................ 11-13
Flat tire ................................................................... 9-6 Oil and oil filter
....................................................... 11-9
Charge warning light ................................................... 3-14
CHECK ENGINE warning light/Malfunction indicator lamp ...................................................................... 3-12
Checking Brake pedal free play ............................................ 11-27
Brake pedal reserve distance ................................. 11-27
Clutch function ..................................................... 11-27
Clutch pedal free play ........................................... 11-28
Coolant level ........................................................ 11-13
Fluid level (automatic transmission fluid) .................. 11-20
Fluid level (brake fluid) .......................................... 11-24
Fluid level (clutch fluid) .......................................... 11-25
Fluid level (power steering fluid) .. ........................... 11-23
Fluid level (washer fluid) ........................................ 11-38
Oil level (engine oil) ................................................ 11-8
Oil level (front differential gear oil) .......................... 11-21
Oil level (manual transmission oil) .......................... 11-19
Child restraint systems ................................................ 1-23
Installation of a booster seat .................................... 1-29
Installation with A/ELR seatbelt ... ............................. 1-26
Lower and tether anchorages ................................... 1-30
Top tether anchorages ............................................ 1-33
Child safety ................................................................... 5
Locks .................................................................... 2-19
Chime Key........................................................................ 3-5 Light ..................................................................... 3-25
Seatbelt. ........................................................ 1-13, 3-10
Cleaning Aluminum wheels ................................................... 10-3 Index
14-3