2010 SUBARU FORESTER automatic transmission
[x] Cancel search: automatic transmissionPage 114 of 402

Ignition switch
WARNING
. Never turn the ignition switch to
“ LOCK ”while the vehicle is
being driven or towed because
that will lock the steering wheel,
preventing steering control. And
when the engine is turned off, it
takes a much greater effort than
usual to steer.
. Before leaving the vehicle, al-
ways remove the key from the
ignition switch for safety and
never allow an unattended child
to remain in the vehicle. Failure
to follow this procedure could
result in injury to a child or
others. Children could operate
the power windows, the moon-
roof or other controls or even
make the vehicle move.
CAUTION
Do not attach a large key holder or
key case to either key. If it banged
against your knees or hands while
you are driving, it could turn the
ignition switch from the “ON ”posi- tion to the
“Acc ”or “LOCK ”posi-
tion, thereby stopping the engine.
Also, if the key is attached to a
keyholder or to a large bunch of
other keys, centrifugal force may act
on it as the vehicle moves, resulting
in unwanted turning of the ignitionswitch.
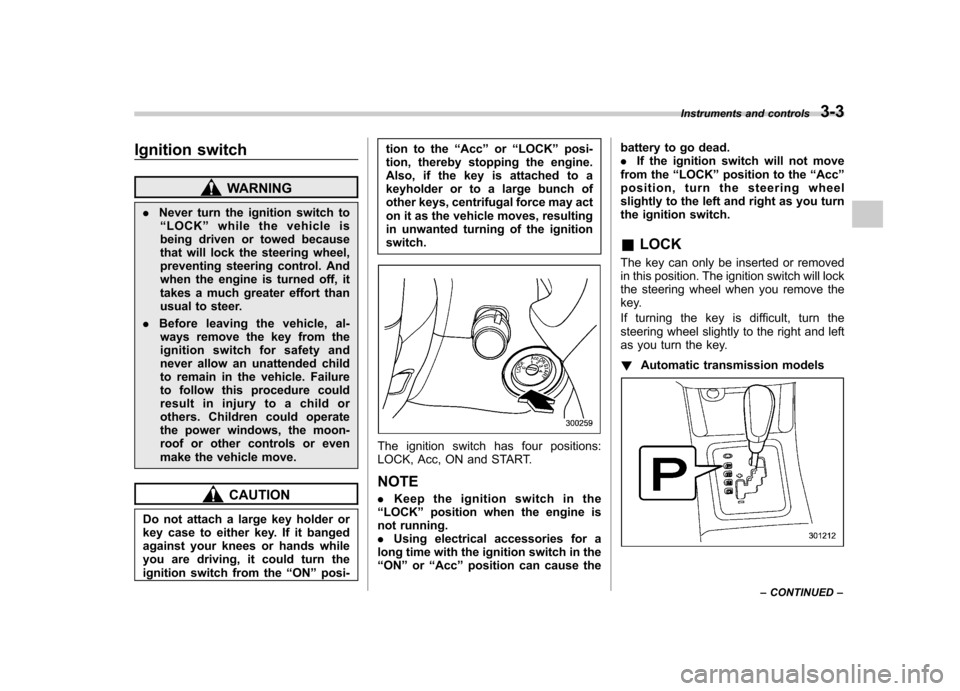
The ignition switch has four positions:
LOCK, Acc, ON and START. NOTE . Keep the ignition switch in the
“ LOCK ”position when the engine is
not running. . Using electrical accessories for a
long time with the ignition switch in the“ ON ”or “Acc ”position can cause the battery to go dead..
If the ignition switch will not move
from the “LOCK ”position to the “Acc ”
position, turn the steering wheel
slightly to the left and right as you turn
the ignition switch. & LOCK
The key can only be inserted or removed
in this position. The ignition switch will lock
the steering wheel when you remove the
key.
If turning the key is difficult, turn the
steering wheel slightly to the right and left
as you turn the key. ! Automatic transmission models
Instruments and controls 3-3
– CONTINUED –
Page 115 of 402

3-4Instruments and controls
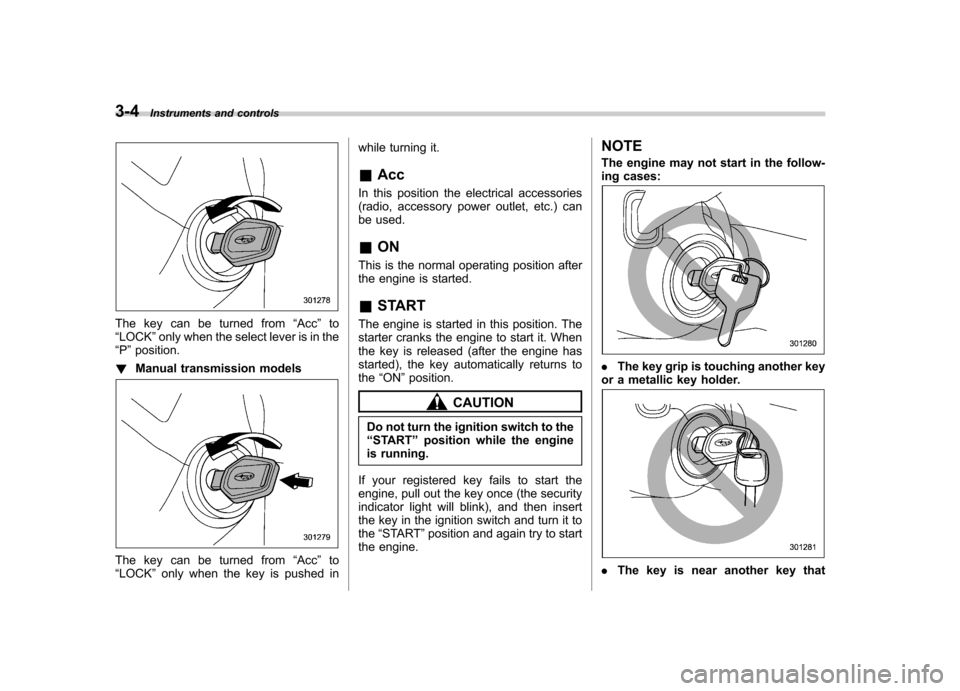
The key can be turned from “Acc ”to
“ LOCK ”only when the select lever is in the
“ P ”position.
! Manual transmission models
The key can be turned from “Acc ”to
“ LOCK ”only when the key is pushed in while turning it. &
Acc
In this position the electrical accessories
(radio, accessory power outlet, etc.) can
be used. & ON
This is the normal operating position after
the engine is started. & START
The engine is started in this position. The
starter cranks the engine to start it. When
the key is released (after the engine has
started), the key automatically returns tothe “ON ”position.
CAUTION
Do not turn the ignition switch to the “ START ”position while the engine
is running.
If your registered key fails to start the
engine, pull out the key once (the security
indicator light will blink), and then insert
the key in the ignition switch and turn it tothe “START ”position and again try to start
the engine. NOTE
The engine may not start in the follow-
ing cases:
.
The key grip is touching another key
or a metallic key holder.
. The key is near another key that
Page 125 of 402

3-14Instruments and controls
creases over the specified range, the
indicator light/warning light blinks inRED. At this time, the engine is close to
overheating.
If the engine coolant temperature in-
creases further, the indicator light/warning
light illuminates in REDcontinuously. At
this time, the engine may be overheating.
When the indicator light/warning light
blinks in REDor illuminates in RED, safely
stop the vehicle as soon as possible, and
refer to the emergency steps for the
engine overheating. Refer to “Engine
overheating ”F 9-12. Afterward, have the
system checked by your nearest
SUBARU dealer.
Also, if the indicator light/warning light
often blinks in RED, the electrical system
may be malfunctioning. Contact your
SUBARU dealer for an inspection.
NOTE
If the engine is restarted after a certain
driving condition, this indicator light/
warning light may illuminate in RED.
However, this is not a malfunction if the
indicator light/warning light turns off
after a short time. &
Charge warning light
If this light illuminates when the engine is
running, it may indicate that the charging
system is not working properly.
If the light illuminates while driving or does
not turn off after the engine starts, stop the
engine at the first safe opportunity and
check the alternator belt. If the belt is
loose, broken or if the belt is in good
condition but the light remains on, contact
your nearest SUBARU dealer immedi-
ately. &Oil pressure warning light
If this light illuminates when the engine is
running, it may indicate that the engine oil
pressure is low and the lubricating system
is not working properly.
If the light illuminates while driving or does
not turn off after the engine starts, stop the
engine at the first safe opportunity and
check the engine oil level. If the oil level is
low, add oil immediately. If the engine oil is
at the proper level but the light remains on,
contact your nearest SUBARU dealer
immediately.
CAUTION
Do not operate the engine with the
oil pressure warning light on. This
may cause serious engine damage.
& AT OIL TEMP warning
light (AT models)
The AT oil temperature warning light “AT
OIL TEMP ”illuminates when the ignition
switch is turned to the “ON ”position and
turns off after the engine has started.
If this light illuminates when the engine is
running, it may indicate that the automatic
transmission fluid temperature is too hot.
If the light illuminates while driving, im-
mediately stop the vehicle in a safe place
and let the engine idle until the warning
light turns off. ! Automatic transmission control
system warning
If the light flashes after the engine starts, it
may indicate that the automatic transmis-
sion control system is not working prop-
erly. Contact your nearest SUBARU deal-
er for service immediately.
Page 132 of 402

&Select lever and gear posi-
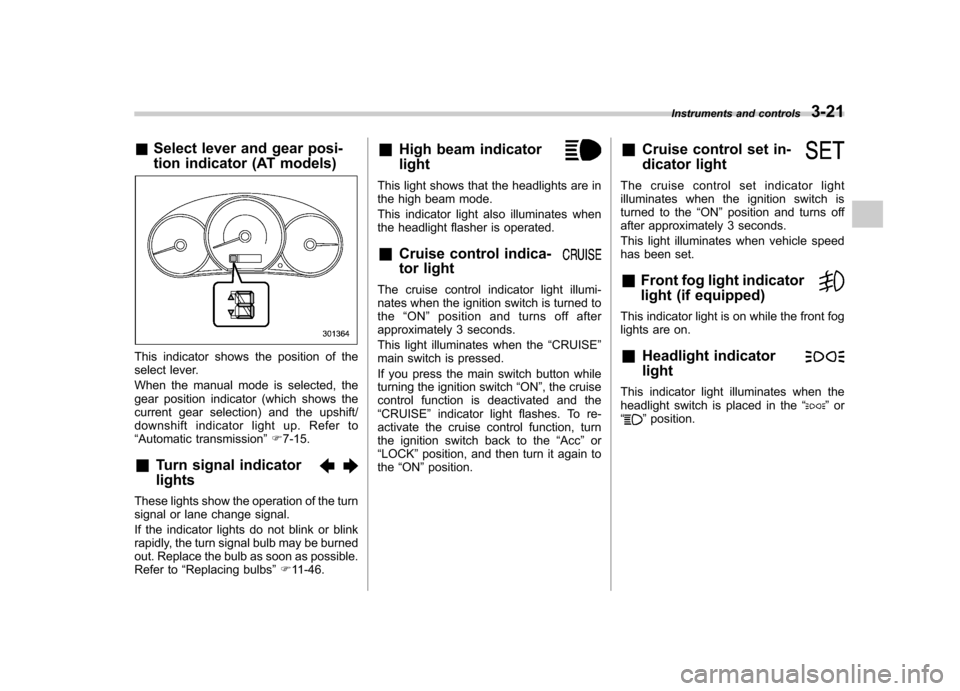
tion indicator (AT models)
This indicator shows the position of the
select lever.
When the manual mode is selected, the
gear position indicator (which shows the
current gear selection) and the upshift/
downshift indicator light up. Refer to“Automatic transmission ”F 7-15.
& Turn signal indicator lights
These lights show the operation of the turn
signal or lane change signal.
If the indicator lights do not blink or blink
rapidly, the turn signal bulb may be burned
out. Replace the bulb as soon as possible.
Refer to “Replacing bulbs ”F 11-46. &
High beam indicator light
This light shows that the headlights are in
the high beam mode.
This indicator light also illuminates when
the headlight flasher is operated. &Cruise control indica-
tor light
The cruise control indicator light illumi-
nates when the ignition switch is turned tothe “ON ”position and turns off after
approximately 3 seconds.
This light illuminates when the “CRUISE ”
main switch is pressed.
If you press the main switch button while
turning the ignition switch “ON ”, the cruise
control function is deactivated and the “ CRUISE ”indicator light flashes. To re-
activate the cruise control function, turn
the ignition switch back to the “Acc ”or
“ LOCK ”position, and then turn it again to
the “ON ”position. &
Cruise control set in-
dicator light
The cruise control set indicator light
illuminates when the ignition switch is
turned to the “ON ”position and turns off
after approximately 3 seconds.
This light illuminates when vehicle speed
has been set. & Front fog light indicator
light (if equipped)
This indicator light is on while the front fog
lights are on. & Headlight indicator light
This indicator light illuminates when the
headlight switch is placed in the “”or
“” position. Instruments and controls
3-21
Page 143 of 402

3-32Instruments and controls
speed is high).
When the transmission is shifted into
reverse, the rear wiper will switch to
continuous operation. When the transmis-
sion is shifted to a position other than
reverse, the rear wiper will return to
intermittent operation. !Washer
To wash the rear window while the rear
wiper is operating, turn the knob clockwise
to the “
”position. The washer fluid
sprays until you release the knob.
To wash the rear window when the rear
wiper is not in use, turn the knob counter-
clockwise to the “
”position. The washer
fluid sprays, and 2 seconds later the rear
wiper operates. Releasing the knob stops
the washer fluid spray, and 3 seconds
later the rear wiper stops. Mirrors
Always check that the inside and outside
mirrors are properly adjusted before you
start driving. &
Inside mirror
The inside mirror has a day and night
position. Pull the tab at the bottom of the
mirror toward you for the night position.
Push it away for the day position. The
night position reduces glare from head-lights. &
Auto-dimming mirror/com-
pass (if equipped)
1) Auto dimming indicator
2) Left (mirror) button
3) Photosensor
4) Right (compass) button
5) Compass display
The auto-dimming mirror has an anti-glare
feature which automatically reduces glare
coming from headlights of vehicles behind
you. It also contains a built-in compass. . By pressing and releasing the left
button, the automatic dimming function is
toggled on or off. When the automatic
dimming function is on, the auto dimming
indicator light (green) located on the left
button will illuminate. . By pressing and releasing the right
Page 145 of 402

3-34Instruments and controls
& Auto-dimming mirror/com-
pass with HomeLink
®(if
equipped)
1) HomeLink®button 1
2) HomeLink®button 2
3) LED
4) HomeLink
®button 3
5) Sensor
6) Automatic dimming on/off button
7) Compass display button
8) Compass display
The auto-dimming mirror has an anti-glare
feature which automatically reduces glare
coming from headlights of vehicles behind
you. It also contains a built-in compass
and HomeLink
®wireless control system.
. By pressing the automatic dimming on/
off button, the automatic dimming function
is toggled on or off. When the automatic dimming function is on, the LED indicator
will illuminate.
Even with the mirror in the automatic
dimming mode, the mirror surface turns
bright if the transmission is shifted into
reverse. This is to ensure good rearward
visibility during reversing. .
By pressing the compass display but-
ton, the compass display is toggled on or
off. When the compass is on, an illumi-
nated compass reading will appear in the
upper right corner of the mirror.
When cleaning the mirror, use a paper
towel or similar material dampened with
glass cleaner. Do not spray glass cleaner
directly on the mirror as that may cause
the liquid cleaner to enter the mirror
housing and damage the mirror. !
Photosensors
The mirror has a photosensor attached on
both the front and back sides. During
nighttime driving, these sensors detect
distracting glare from vehicle headlights
behind you and automatically dim the
mirror to eliminate glare and preserve
your vision. For this reason, use care not
to cover the sensors with stickers, or other
similar items. Periodically wipe the sen-
sors clean using a piece of dry soft cotton
cloth or an applicator.
Page 218 of 402

Fuel...................................................................... 7-2
Fuel requirements ............................................... 7-2
Fuel filler lid and cap ........................................... 7-3
State emission testing (U.S. only) ...................... 7-6
Preparing to drive ............................................... 7-7
Starting the engine .............................................. 7-7
Manual transmission model ................................. 7-7
Automatic transmission model ............................ 7-8
Stopping the engine ............................................ 7-9
Remote engine start system (dealer option) ................................................. 7-10
Starting your vehicle .......................................... 7-10
Remote start safety features ............................... 7-10
Entering the vehicle while it is running via remote start ................................................................. 7-11
Entering the vehicle following remote engine start shutdown ......................................................... 7-11
Pre-heating or pre-cooling the interior of the vehicle ............................................................. 7-11
Service mode ..................................................... 7-11
Remote transmitter programming and programmable feature option ............................ 7-11
System maintenance .......................................... 7-12
Manual transmission .......................................... 7-14
Shifting speeds .................................................. 7-14
Driving tips ........................................................ 7-15
Automatic transmission ..................................... 7-15
Select lever ........................................................ 7-16
Shift lock function .............................................. 7-17
Selection of manual mode .................................. 7-19
Driving tips ........................................................ 7-20 SPORT mode
..................................................... 7-20
Power steering ................................................... 7-21
Braking ............................................................... 7-21
Braking tips ....................................................... 7-21
Brake system .................................................... 7-22
Disc brake pad wear warning indicators ............. 7-22
ABS (Anti-lock Brake System) .......................... 7-23
ABS system self-check ...................................... 7-23
ABS warning light .............................................. 7-23
Electronic Brake Force Distribution (EBD) system ............................................................. 7-24
Steps to take if EBD system malfunctions ..... ..... 7-25
Vehicle Dynamics Control system .................... 7-26
Vehicle Dynamics Control system monitor..... ..... 7-27
Vehicle Dynamics Control OFF switch ................ 7-29
Tire pressure monitoring system (TPMS) (U.S.-spec. models). ........................................ 7-30
Parking your vehicle ......................................... 7-31
Parking brake .................................................... 7-31
Parking tips ....................................................... 7-32
Hill start assist system (MT models) ................ 7-33
Hill start assist warning light .............................. 7-34
Cruise control .................................................... 7-34
To set cruise control .......................................... 7-35
To temporarily cancel the cruise control ............. 7-35
To turn off the cruise control .............................. 7-36
To change the cruising speed .. .......................... 7-36
Cruise control indicator light .............................. 7-37
Cruise control set indicator light ........................ 7-38
Starting and operating
7
Page 225 of 402

7-8Starting and operating
If the engine does not start, try the following. (1) Turn the ignition switch to the“OFF ”position and wait for at least
10 seconds. After checking that the
parking brake is firmly set, turn the
ignition switch to the “START ”position
while depressing the accelerator pedal
slightly (approximately a quarter of the
full stroke). Release the accelerator
pedal as soon as the engine starts.
(2) If this fails to start the engine, turn
the ignition switch back to the “OFF ”
position and wait for at least 10
seconds. Then fully depress the accel-
erator pedal and turn the ignition
switch to the “START ”position. If the
engine starts, quickly release the
accelerator pedal.
(3) If this fails to start the engine, turn
the ignition switch again to the “OFF ”
position. After waiting for 10 seconds
or longer, turn the ignition switch to the“ START ”position without depressing
the accelerator pedal.
(4) If the engine still refuses to start,
contact your nearest SUBARU dealer
for assistance.
6. Confirm that all warning and indicator
lights have gone off after the engine has
started. The fuel injection system auto-
matically lowers the idle speed as the engine warms up.
NOTE . The engine may be difficult to start
when the battery has been discon-
nected and reconnected (for mainte-
nance or other purposes). This diffi-
culty is caused by the electronically
controlled throttle ’s self-diagnosis
function. To overcome it, keep the
ignition switch in the “ON ”position
for approximately 10 seconds before
starting the engine.. For non-turbo models, to protect the
engine while the shift lever is in the
neutral position, the engine is con-
trolled so that the engine speed may
not become too high even if the accel-
erator pedal is depressed hard. & Automatic transmission model
1. Apply the parking brake.
2. Turn off unnecessary lights and ac- cessories.
3. Shift the select lever to the “P ” or “N ”
position (preferably “P ”position).
The starter motor will only operate when
the select lever is at the “P ”or “N ”position.
4. Turn the ignition switch to the “ON ”
position and check the operation of the warning and indicator lights. Refer to“
Warning and indicator lights ”F 3-9.
5. Turn the ignition switch to the “START ”
position without depressing the accelera-
tor pedal. Release the key immediately
after the engine has started.
If the engine does not start, try the following.
(1) Turn the ignition switch to the“OFF ”position and wait for at least
10 seconds. After checking that the
parking brake is firmly set, turn the
ignition switch to the “START ”position
while depressing the accelerator pedal
slightly (approximately a quarter of the
full stroke). Release the accelerator
pedal as soon as the engine starts.
(2) If this fails to start the engine, turn
the ignition switch back to the “OFF ”
position and wait for at least 10
seconds. Then fully depress the accel-
erator pedal and turn the ignition
switch to the “START ”position. If the
engine starts, quickly release the
accelerator pedal.
(3) If this fails to start the engine, turn
the ignition switch again to the “OFF ”
position. After waiting for 10 seconds
or longer, turn the ignition switch to the“ START ”position without depressing
the accelerator pedal.