2010 SUBARU FORESTER lock
[x] Cancel search: lockPage 299 of 402

9-18In case of emergency
2. Insert a hex-head wrench in the end of
the motor shaft.
To close the moonroof, turn the wrench counterclockwise.
Have your vehicle checked and repaired
by an authorized SUBARU dealer.
Page 302 of 402

by hand. Some warm water washers are
of the high temperature, high pressure
type, and they can damage or deform the
resin parts such as moldings, or cause
water to leak into the vehicle. &Waxing and polishing
Always wash and dry the vehicle before
waxing and polishing.
Use a good quality polish and wax and
apply them according to the manufac-turer ’s instructions. Wax or polish when
the painted surface is cool.
Be sure to polish and wax the chrome trim,
as well as the painted surfaces. Loss of
wax on a painted surface leads to loss of
the original luster and also quickens the
deterioration of the surface. It is recom-
mended that a coat of wax be applied at
least once a month, or whenever the
surface no longer repels water.
If the appearance of the paint has dimin-
ished to the point where the luster or tone
cannot be restored, lightly polish the
surface with a fine-grained compound.
Never polish just the affected area, but
include the surrounding area as well.
Always polish in only one direction. A
No. 2000 grain compound is recom-
mended. Never use a coarse-grained
compound. Coarse-grained compounds have a smaller grain-size number and
could damage the paint. After polishing
with a compound, coat with wax to restore
the original luster. Frequent polishing with
acompoundoranincorrectpolishing
technique will result in removing the paint
layer and exposing the undercoat. When
in doubt, it is always best to contact your
SUBARU dealer or an auto paint specia-list.
NOTE
Be careful not to block the windshield
washer nozzles with wax when waxing
the vehicle. & Cleaning aluminum wheels
. Promptly wipe the aluminum wheels
clean of any kind of grime or agent. If dirt
is left on too long, it may be difficult to
clean off. . Do not use soap containing grit to
clean the wheels. Be sure to use a neutral
cleaning agent, and later rinse thoroughly
with water. Do not clean the wheels with a
stiff brush or expose them to a high-speed
washing device. . Clean the vehicle (including the alumi-
num wheels) with water as soon as
possible when it has been splashed with
sea water, exposed to sea breezes, or
driven on roads treated with salt or other agents.
Appearance care
10-3
Page 303 of 402

10-4Appearance care
Corrosion protection
Your SUBARU has been designed and
built to resist corrosion. Special materials
and protective finishes have been used on
most parts of the vehicle to help maintain
fine appearance, strength, and reliableoperation. &Most common causes of corrosion
The most common causes of corrosion are:
1. The accumulation of moisture retain-
ing dirt and debris in body panel sections,
cavities, and other areas.
2. Damage to paint and other protective
coatings caused by gravel and stone
chips or minor accidents.
Corrosion is accelerated on the vehicle when:
1. It is exposed to road salt or dust
control chemicals, or used in coastal
areas where there is more salt in the air,
or in areas where there is considerable
industrial pollution.
2. It is driven in areas of high humidity,
especially when temperatures range just
above freezing.
3. Dampness in certain parts of the
vehicle remains for a long time, even though other parts of the vehicle may be
dry.
4. High temperatures will cause corro-
sion to parts of the vehicle which cannot
dry quickly due to lack of proper ventila-tion.
& To help prevent corrosion
Wash the vehicle regularly to prevent
corrosion of the body and suspension
components. Also, wash the vehicle
promptly after driving on any of the
following surfaces. . roads that have been salted to prevent
them from freezing in winter. mud, sand, or gravel
. coastal roads
After the winter has ended, it is recom-
mended that the underbody be given a
very thorough washing.
Before the beginning of winter, check the
condition of underbody components, such
as the exhaust system, fuel and brake
lines, brake cables, suspension, steering
system, floor pan, and fenders. If any of
them are found to be rusted, they should
be given an appropriate rust prevention
treatment or should be replaced. Contact
your SUBARU dealer to perform this kind
of maintenance and treatment if you need assistance.
Repair chips and scratches in the paint as
soon as you find them.
Check the interior of the vehicle for water
and dirt accumulation under the floor mats
because that could cause corrosion.
Occasionally check under the mats to
make sure the area is dry.
Keep your garage dry. Do not park your
vehicle in a damp, poorly ventilated
garage. In such a garage, corrosion can
be caused by dampness. If you wash the
vehicle in the garage or put the vehicle
into the garage when wet or covered with
snow, that can cause dampness.
If your vehicle is operated in cold weather
and/or in areas where road salts and other
corrosive materials are used, the door
hinges and locks, and hood latch should
be inspected and lubricated periodically.
Page 310 of 402
Engine hood
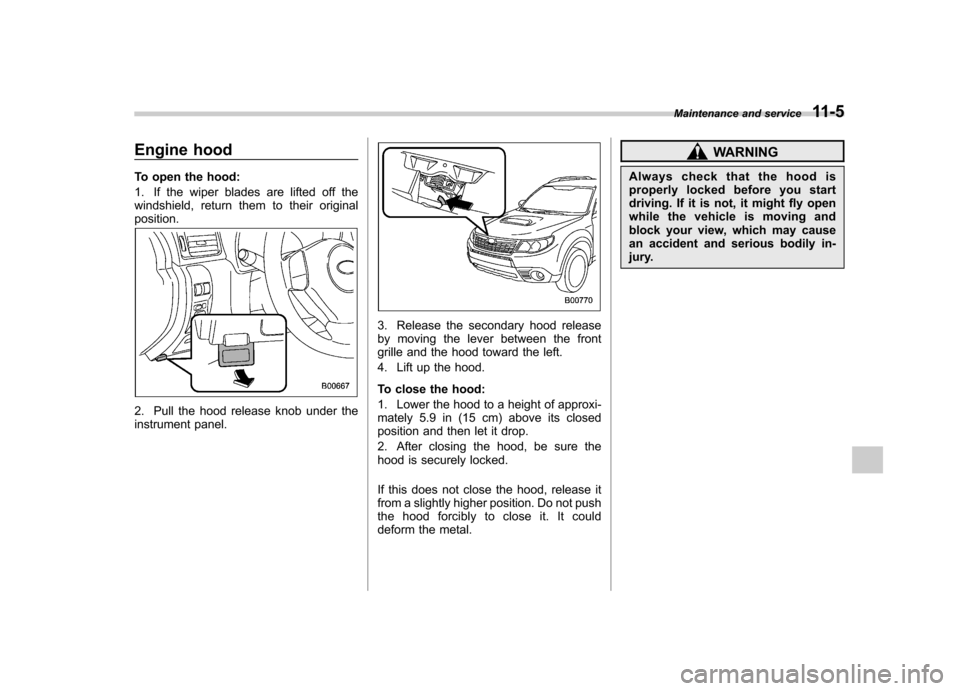
To open the hood:
1. If the wiper blades are lifted off the
windshield, return them to their originalposition.
2. Pull the hood release knob under the
instrument panel.
3. Release the secondary hood release
by moving the lever between the front
grille and the hood toward the left.
4. Lift up the hood.
To close the hood:
1. Lower the hood to a height of approxi-
mately 5.9 in (15 cm) above its closed
position and then let it drop.
2. After closing the hood, be sure the
hood is securely locked.
If this does not close the hood, release it
from a slightly higher position. Do not push
the hood forcibly to close it. It could
deform the metal.
WARNING
Always check that the hood is
properly locked before you start
driving. If it is not, it might fly open
while the vehicle is moving and
block your view, which may cause
an accident and serious bodily in-
jury. Maintenance and service
11-5
Page 334 of 402
result in the need for costly brake
rotor repair or replacement.
& Breaking-in of new brake
pads and linings
When replacing the brake pad or lining,
use only genuine SUBARU parts. After
replacement, the new parts must be
broken in as follows. ! Brake pad and lining
While maintaining a speed of 30 to 40
mph (50 to 65 km/h), step on the brake
pedal lightly. Repeat this five or moretimes. ! Parking brake lining
1.Drivethevehicleataspeedof
approximately 22 mph (35 km/h).
2. With the parking brake release button
pushed in, pull the parking brake lever
SLOWLY and GENTLY (pulling with a
force of approximately 33 lbf [147 N, 15kgf]).
3. Drive the vehicle for approximately
220 yards (200 meters) in this condition.
4. Wait 5 to 10 minutes for the parking
brake to cool down. Repeat this proce-dure.
5. Check the parking brake stroke. If the
parking brake stroke is out of the specified range, adjust it by turning the adjusting nut
located on the parking brake lever.
Parking brake stroke: 7–8 notches / 45 lbf (200 N, 20.4 kgf)
WARNING
A safe location and situation should
be selected for break-in driving.
CAUTION
Pulling the parking brake lever too
forcefully may cause the rear
wheels to lock. To avoid this, be
certain to pull the lever up slowly
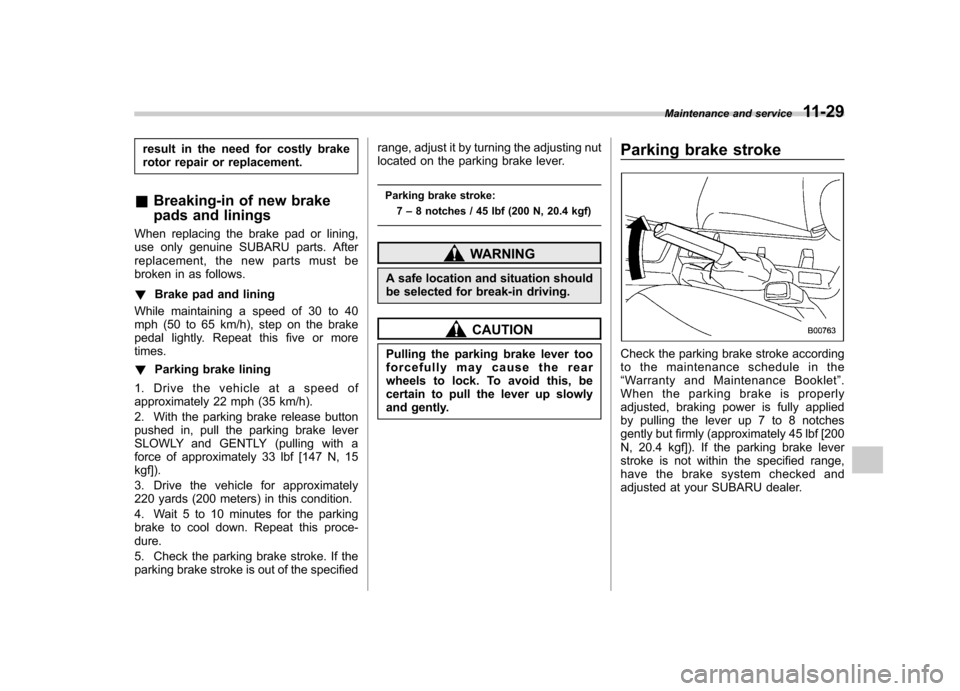
and gently. Parking brake stroke
Check the parking brake stroke according
to the maintenance schedule in the“
Warranty and Maintenance Booklet ”.
When the parking brake is properly
adjusted, braking power is fully applied
by pulling the lever up 7 to 8 notches
gently but firmly (approximately 45 lbf [200
N, 20.4 kgf]). If the parking brake lever
stroke is not within the specified range,
have the brake system checked and
adjusted at your SUBARU dealer. Maintenance and service
11-29
Page 344 of 402
a different concentration from the one
used previously, purge the old fluid from
the piping between the reservoir tank and
washer nozzles by operating the washer
for a certain period of time. Otherwise, if
the concentration of the fluid remaining in
thepipingistoolowfortheoutside
temperature, it may freeze and block thenozzles.
CAUTION
Adjust the washer fluid concentra-
tion appropriately for the outside
temperature. If the concentration is
inappropriate, sprayed washer fluid
may freeze on the windshield and
obstruct your view, and the fluid
may freeze in the reservoir tank. Replacement of wiper blades
Grease, wax, insects, or other material on
the windshield or the wiper blade results in
jerky wiper operation and streaking on the
glass. If you cannot remove the streaks
after operating the windshield washer or if
the wiper operation is jerky, clean the
outer surface of the windshield (or rear
window) and the wiper blades using a
sponge or soft cloth with a neutral
detergent or mild-abrasive cleaner. After
cleaning, rinse the windshield and wiper
blades with clean water. The windshield is
clean if beads do not form when you rinse
the windshield with water.
CAUTION
. Do not clean the wiper blades
with gasoline or a solvent, such
as paint thinner or benzine. This
will cause deterioration of the
wiper blades.
. While removing the wiper blades
from the wiper arms, do not
return the wiper arms to the
original positions. Otherwise,
the windshield surface may bescratched.
. When returning the raised wiper
arms to the original positions, carefully return the wiper arms
on the windshield while support-
ing them with your hands. You
should not return the wiper arms
to the windshield only by the
return spring. Otherwise, the wi-
per arms may be deformed and/
or the windshield surface may bescratched.
If you cannot eliminate the streaking even
after following this method, replace the
wiper blades using the following proce-dures. Maintenance and service
11-39
– CONTINUED –
Page 345 of 402
11-40Maintenance and service
& Windshield wiper blade as- sembly
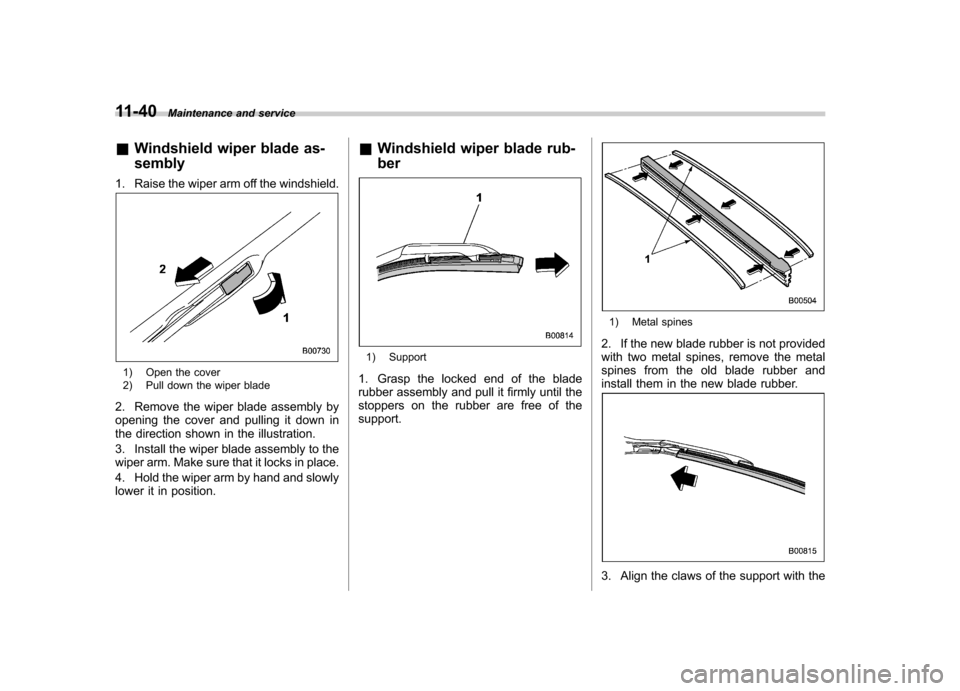
1. Raise the wiper arm off the windshield.
1) Open the cover
2) Pull down the wiper blade
2. Remove the wiper blade assembly by
opening the cover and pulling it down in
the direction shown in the illustration.
3. Install the wiper blade assembly to the
wiper arm. Make sure that it locks in place.
4. Hold the wiper arm by hand and slowly
lower it in position. &
Windshield wiper blade rub- ber
1) Support
1. Grasp the locked end of the blade
rubber assembly and pull it firmly until the
stoppers on the rubber are free of thesupport.
1) Metal spines
2. If the new blade rubber is not provided
with two metal spines, remove the metal
spines from the old blade rubber and
install them in the new blade rubber.
3. Align the claws of the support with the
Page 346 of 402
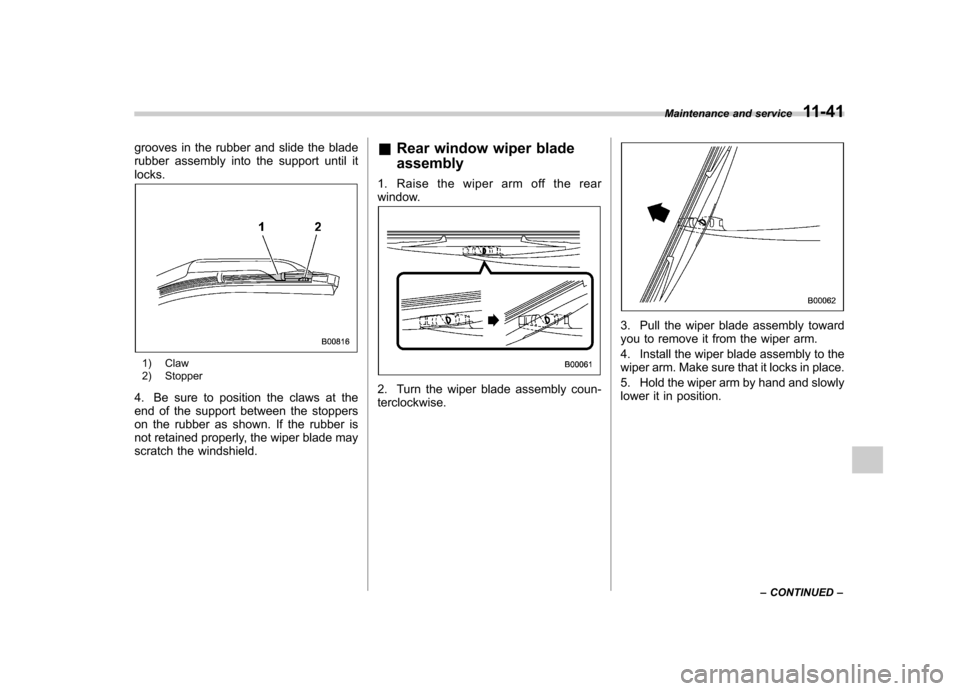
grooves in the rubber and slide the blade
rubber assembly into the support until itlocks.
1) Claw
2) Stopper
4. Be sure to position the claws at the
end of the support between the stoppers
on the rubber as shown. If the rubber is
not retained properly, the wiper blade may
scratch the windshield. &
Rear window wiper blade assembly
1. Raise the wiper arm off the rear
window.
2. Turn the wiper blade assembly coun- terclockwise.
3. Pull the wiper blade assembly toward
you to remove it from the wiper arm.
4. Install the wiper blade assembly to the
wiper arm. Make sure that it locks in place.
5. Hold the wiper arm by hand and slowly
lower it in position. Maintenance and service
11-41
– CONTINUED –