Page 174 of 402

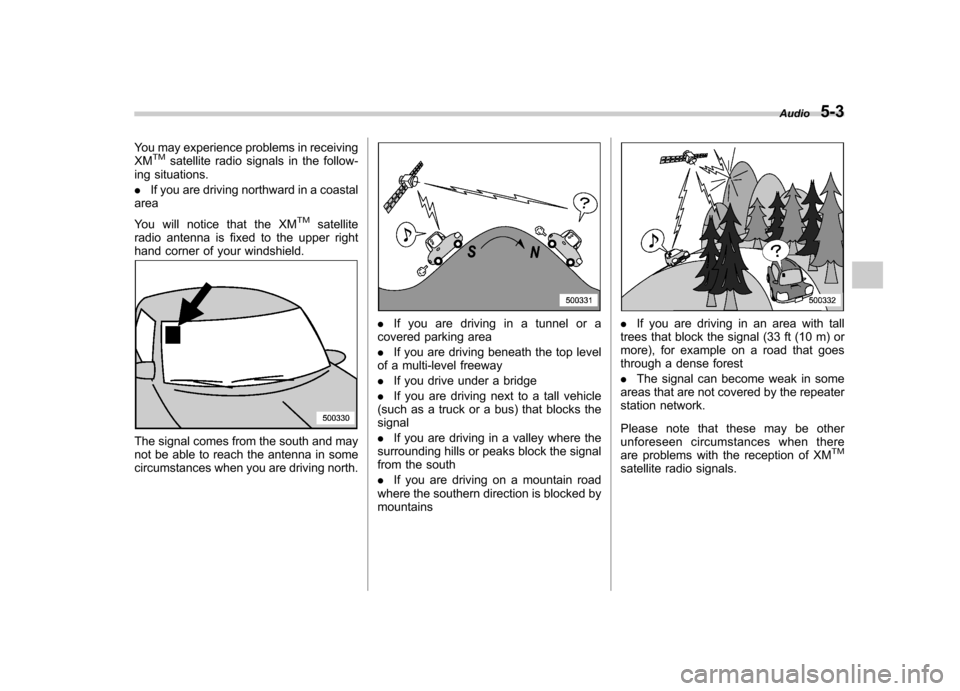
You may experience problems in receiving XMTMsatellite radio signals in the follow-
ing situations. . If you are driving northward in a coastal
area
You will notice that the XM
TMsatellite
radio antenna is fixed to the upper right
hand corner of your windshield.
The signal comes from the south and may
not be able to reach the antenna in some
circumstances when you are driving north.
. If you are driving in a tunnel or a
covered parking area . If you are driving beneath the top level
of a multi-level freeway. If you drive under a bridge
. If you are driving next to a tall vehicle
(such as a truck or a bus) that blocks the signal . If you are driving in a valley where the
surrounding hills or peaks block the signal
from the south . If you are driving on a mountain road
where the southern direction is blocked by mountains. If you are driving in an area with tall
trees that block the signal (33 ft (10 m) or
more), for example on a road that goes
through a dense forest . The signal can become weak in some
areas that are not covered by the repeater
station network.
Please note that these may be other
unforeseen circumstances when there
are problems with the reception of XM
TM
satellite radio signals. Audio
5-3
Page 180 of 402
&Adjustable level of each mode
Mode Range of levels (displayed)Initial setting Turn counterclockwise Turn clockwise
Volume Volume control 0 to 40 15 For less volume For more volume AUX volume control* 0 to 40 15 For less volume For more volume
Tone and balance Bass control �8 to +8 0 For less bass sound For more bass sound
Midrange control �8 to +8 0 For less midrange sound For more midrange sound
Treble control �8 to +8 0 For less treble sound For more treble sound
Balance L9 to R9 0 Right channel attenuated Left channel attenuated
Fader R9 to F9 0 Front attenuated Rear attenuated
Other settings SPEED VOLUME OFF to 2 OFF For less auto volume change For more auto volume change
BEEP OFF to ON ON OFF ON
CS Auto (type B audio) OFF to ON OFF OFF ON
*: Only when an AUX audio product is connected. Audio
5-9
Page 181 of 402

5-10Audio
FM/AM radio operation &FM/AM selection
Push the “FM AM ”button when the radio
is off to turn on the radio.
Push the “FM AM ”button when the radio
is on to select FM1, FM2, FM3 or AM reception.
Each brief press of the “FM AM ”button
changes the radio in the following se-
quence starting from the last radio band
with you selected.
& Tuning
! Manual tuning
Turn the TUNE dial clockwise to increase
the tuning frequency and turn the “TUNE ”
dial counterclockwise to decrease it.
Each time the dial is turned, the frequency
interval can be changed between 10 kHz
in the AM mode and 0.2 MHz in the FMmode. ! Stereo indicator
The stereo indicator “ST ”will illuminate
when an FM stereo broadcast is received. !
Seek tuning (SEEK)
If you press the “”or “”side of the
SEEK button briefly, the radio will auto-
matically search for a receivable station
and stop at the first one it finds. This
function may not be available, however,
when radio signals are weak. In such a
situation, perform manual tuning to select
the desired station.
Page 185 of 402
5-14Audio
you activate satellite radio and receive
satellite radio customer support.
The satellite radio ID can be found on the
audio display by tuning the channel to “0 ”.
Turn the “CH ”dial to select the satellite
radio channel.
NOTE
For Sirius, change the display to an
indication mode other than the channel
number after performing the aboveoperation. & Band selection
Push the “SAT ”button when the radio is
off to turn on the radio.
Push the “SAT ”button when the radio is
on to select SAT1, SAT2 or SAT3 recep- tion.
& Channel and category selec- tion
! Channel selection (type A)
Turn the “CH ”dial clockwise to select the
next channel and turn the “CH ”dial
counterclockwise to select the previous channel. !
Channel selection (type B)
When in the SAT mode, briefly press the “SEEK ”button “”or “”to select the
channel.
Page 190 of 402

start playback of the discs, beginning with
the one inserted first.
If you fail to insert any disc during each 15
seconds interval, the full disc loading
mode will be canceled, and the player will
start playback of the disc inserted first. &How to play back a CD
! When there is no CD inserted
Properly insert a CD. Refer to “How to
insert a CD (type A) ”F 5-17 / “How to
insert a CD(s) (type B) ”F 5-17.
When a CD is loaded, the player will start
playback of the CD, beginning with the
first track. ! When CD is in the player (type A)
When the “CD ”button is pressed, the
player will start playback. !
When there are CDs loaded (type B)
Press a desired one of the disc select
buttons the disc number indicator of which
steadily lights up. The player will then start
playback of the selected CD, beginning
with the first track.
If a disc that the player cannot read has
been loaded, the player will display themessage “CHECK DISC ”. &
To select a track from its beginning
! Forward direction
Turn the “TRACK ”dial clockwise to skip to
the beginning of the next track/file (track).
Each time the dial is turned, the indicated
track/file (track) number will increase.
NOTE
In an MP3 or WMA folder, skipping past
the last track/file (track) will take you
back to the first track/file (track) in the
folder. Audio
5-19
– CONTINUED –
Page 191 of 402

5-20Audio
! Backward direction
Turn the “TRACK ”dial counterclockwise
to skip to the beginning of the current
track/file (track). Each time the dial is
turned, the indicated track/file (track)
number will decrease.
NOTE
In an MP3 or WMA folder, skipping past
the first track/file (track) will take you to
the last track/file (track) in the folder. &
Fast-forwarding and fast-re- versing
! Fast-forwarding
Press the “”side of the “SEEK ”button
continuously to fast-forward the disc/
folder.
Release the button to stop fast-forwarding.
NOTE
If you fast-forward to the end of the last
track/file (track), fast-forwarding will
stop and the player will start playback
beginning with the first track/file(track). !
Fast-reversing
Press the “”side of the “SEEK ”button
continuously to fast- reverse the disc/
folder.
Release the button to stop fast-reversing. NOTE
If you fast-reverse to the beginning of
the first track/file (track), fast-reversing
will stop and the player will start play-back.
Page 193 of 402

5-22Audio
format CD is playing. . The “F-RDM ”indication refers to the
random playback in the folder. It ran-
domly repeats the tracks in the folder. It
is possible to select the function when
an MP3/WMA format track is playing.. The “D-RDM ”indication refers to the
random playback of a disc. It randomly
repeats the tracks in the CD. It is
possible to select the function when
an MP3/WMA format track is playing.
To cancel the random playback mode,
press the “RPT ”button again and select
CANCEL. The “RDM ”indication will turn off, and the
normal playback mode will be resumed. NOTE
Random playback will be cancelled if
you perform any of the following steps. . Press the “RPT ”button and select
CANCEL . Press the “
”button
. Press the disc select button
. Press the “SCAN ”button
. Press the “LOAD ”button when
there is free space in the CD magazine &
Scan
The scan mode lets you listen to the first
10 seconds of each track/file in succes-
sion. Press the “SCAN ”button to start
scanning upward beginning with the track/
file(s) following the currently selected one.
After all track/file(s) in the disk/folder have
been scanned, normal playback will be
resumed. To cancel the scan mode, pressthe “SCAN ”button again.
NOTE
The scan mode will be cancelled if you
perform any of the following steps. . Press the “RPT ”button
. Turn the “TRACK ”dial
. Press the “
”or “”side of the
“ FOLDER ”button
. Press the “
”button .
Press the disc select button
. Select the radio or AUX mode
. Press the “LOAD ”button when
there is free space in the CD magazine . Turn off the power of the audio
equipment. Turntheignitionswitchtothe
“ LOCK ”position
& Display selection
If you press the “TEXT ”button during
playback, the indication will change to the
next one in the following sequence.
Page 203 of 402

6-2Interior equipment
Interior lights
When leaving your vehicle, make sure the
light is turned off to avoid battery dis-charge. &Dome light
Type A
Type B
1) ON
2) DOOR
3) OFF
The dome light switch has the following
three positions. ON: The light remains on continuously.
OFF: The light remains off.
DOOR: The dome light illuminates auto-
matically in the following cases. . Any of the doors or the rear gate is
opened.. The doors or the rear gate are un-
locked using the remote keyless entry
transmitter. . The ignition switch is turned from the
“ Acc ”position to the “LOCK ”position. The automatically illuminated dome light
remains on for several seconds and then
gradually turns off after all doors and the
rear gate are closed.
While the light is illuminated, if any of the
following operations are performed, the
dome light turns off immediately. .
The ignition switch is turned from the
“ LOCK ”position to the “Acc ”or “ON ”
position.. All doors and the rear gate are locked
using the remote keyless entry transmitter.
The setting of the period for which the light
remains on (OFF delay timer) can be
changed as follows. . Models with genuine SUBARU navi-
gation system:
The setting can be changed using the
navigation monitor. For details, please
refer to the Owner ’s Manual supplement
for the navigation system. Also, the setting
can be changed by a SUBARU dealer.
Contact your SUBARU dealer for details. . Models without genuine SUBARU
navigation system:
The setting can be changed by a
SUBARU dealer. Contact your SUBARU
dealer for details.