2010 SKODA YETI child lock
[x] Cancel search: child lockPage 70 of 271

Seats and Stowage69
Using the system
Safety
Driving Tips
General Maintenance
Breakdown assistance
Technical Data
Seats and StowageFront seatsBasic informationThe front seats have a wide range of differ ent settings and can thus be matched to the
physical characteristics of the driver and front passenger. Correct adjustment of the
seats is particularly important for:
safely and quickly reaching the controls;
a relaxed, fatigue-free body position;
achieving the maximum protection offered by the seat belts and the airbag
system.
WARNING
Never transport more occupants than the maximum seating in the vehicle.
Each occupant must correctly fasten the seat belt belonging to the seat.
Children must be fastened page 156, “Transporting children safely” with a
suitable restraint system.
The front seats and the head restraints must always be adjusted to match
the body size of the seat occupant as well as the seat belts must always be
correctly fastened in order to provide an optimal protection for you and your
occupants.
Always keep your feet in the footwell when the vehicle is being driven -
never place your feet on the instrument panel, out of the window or on the
surfaces of the seats. This is particular ly important for the front seat passenger.
You will be exposed to increased risk of injury if it becomes necessary to apply
the brake or in the event of an accident. If an airbag is deployed, you may suffer
fatal injuries when adopting an incorrect seated position!
It is important for the driver and front passenger to maintain a distance of at
least 25 cm from the steering wheel or dash panel. Not maintaining this
minimum distance will mean that the airbag system will not be able to properly
protect you - hazard! The front seats and the head restraints must always also
be correctly adjusted to match the body size of the occupant.
Ensure that there are no objects in the footwell as any objects may get
behind the pedals during a driving or braking manoeuvre. You would then no
longer be able to operate the clutch, to brake or accelerate.
Do not transport any objects on the front passenger seat except those
provided for this purpose (e.g. child safety seat) - risk of accident!
Adjusting the front seatsAdjusting a seat in a forward/back direction–Pull the lever fig. 55 up and push the seat into the desired position.
– Release the lever and push the seat further until the lock is heard to engage.Adjusting height of seat– Lift the seat if required by pulling or pumping lever upwards.
– Lower the seat if required by pushing or pumping lever downwards.Adjust the angle of the seat backrest– Relieve any pressure on the seat backrest (do not lean on it) and turn the hand- wheel fig. 55 to adjust the desired angle of the backrest.
WARNING (continued)
Fig. 55 Controls at seat
A1A1
A2A2
A3
s2ug.6.book Page 69 Friday, April 9, 2010 2:24 PM
Page 74 of 271
Seats and Stowage73
Using the system
Safety
Driving Tips
General Maintenance
Breakdown assistance
Technical Data
– Move the head restraint downwards if required by pressing the locking button with
one hand in direction of arrow page 72, fig. 58 and by pressing with the other
hand the head restraint downwards.
Removing and installing a head restraint– Pull the head restraint out of the seat backrest as far as the stop.
– Press the locking button in the direction of arrow page 72, fig. 58 and pull the
head restraint out.
– To re-insert the head restraint, push it down into the seat backrest far enough until you hear the locking button engage.
The position of the front and rear outer head restraints is adjustable in height. The
middle rear head restraint is adjustable in two positions.
The head restraints must be adjusted to ma tch the size of the seat occupant. Correctly
adjusted head restraints together with the seat belts offer effective protection for the
occupants page 138, “Correct seated position”.
WARNING
The head restraints must be correctly adjusted in order to offer effective
protection for the occupants in the event of an accident.
Do not drive under any circumstance with removed head restraints - risk of
injury!
If the rear seats are occupied, the rear head restraint must not be in the
lower position.
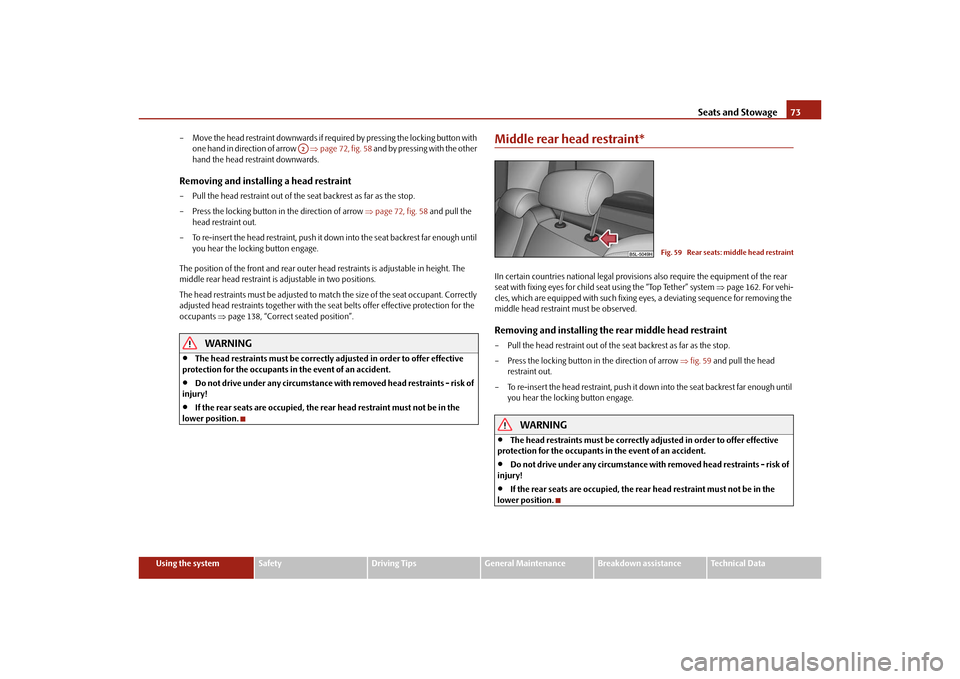
Middle rear head restraint*IIn certain countries national legal provisions also require the equipment of the rear
seat with fixing eyes for child seat using the “Top Tether” system page 162. For vehi-
cles, which are equipped with such fixing eyes, a deviating sequence for removing the
middle head restraint must be observed.Removing and installing the rear middle head restraint– Pull the head restraint out of the seat backrest as far as the stop.
– Press the locking button in the direction of arrow fig. 59 and pull the head
restraint out.
– To re-insert the head restraint, push it do wn into the seat backrest far enough until
you hear the locking button engage.
WARNING
The head restraints must be correctly adjusted in order to offer effective
protection for the occupants in the event of an accident.
Do not drive under any circumstance with removed head restraints - risk of
injury!
If the rear seats are occupied, the rear head restraint must not be in the
lower position.
A2
Fig. 59 Rear seats: middle head restraint
s2ug.6.book Page 73 Friday, April 9, 2010 2:24 PM
Page 78 of 271
Seats and Stowage77
Using the system
Safety
Driving Tips
General Maintenance
Breakdown assistance
Technical Data
– The middle seat backrest can be folded
page 74, “Folding rear seats forwards”
forwards and used as armres t or table with cup holder page 76, fig. 66 .
– You can place two cups or beverage cans into the recesses.
Note
If the middle rear seat backrest should be folded forward for lengthy periods, then
make sure that the belt locks are not located below it - this can result in permanent
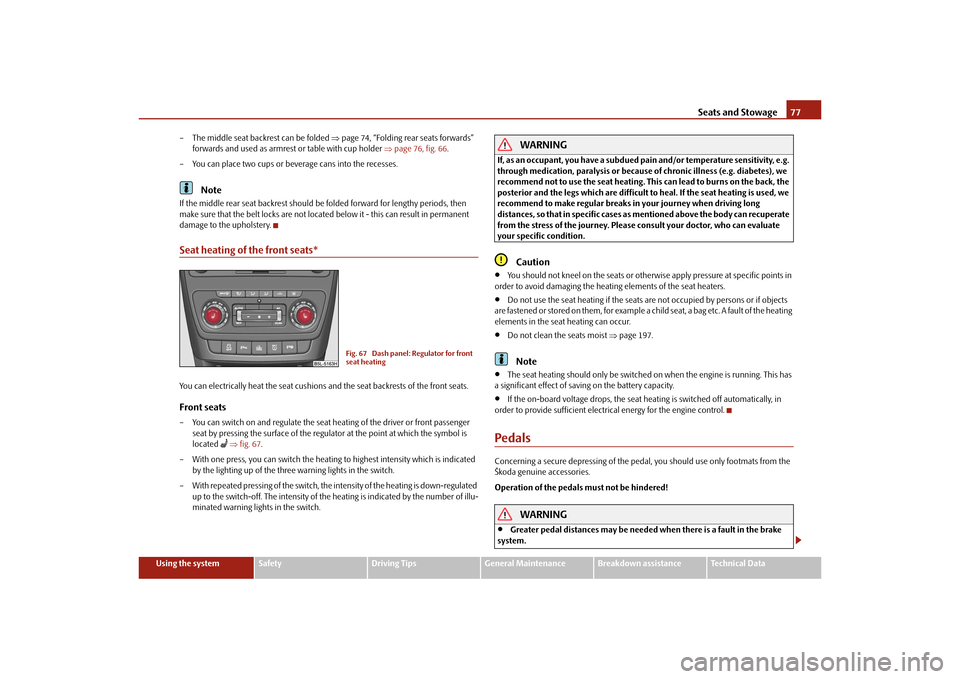
damage to the upholstery.Seat heating of the front seats*You can electrically heat the seat cushions and the seat backrests of the front seats.Front seats– You can switch on and regulate the seat heating of the driver or front passenger
seat by pressing the surface of the regulator at the point at which the symbol is
located
fig. 67 .
– With one press, you can switch the heating to highest intensity which is indicated by the lighting up of the three warning lights in the switch.
– With repeated pressing of the switch, the intensity of the heating is down-regulated up to the switch-off. The intensity of the heating is indicated by the number of illu-
minated warning lights in the switch.
WARNING
If, as an occupant, you have a subdued pain and/or temperature sensitivity, e.g.
through medication, paralysis or because of chronic illness (e.g. diabetes), we
recommend not to use the seat heating. This can lead to burns on the back, the
posterior and the legs which are difficult to heal. If the seat heating is used, we
recommend to make regular breaks in your journey when driving long
distances, so that in specific cases as mentioned above the body can recuperate
from the stress of the journey. Please consult your doctor, who can evaluate
your specific condition.
Caution
You should not kneel on the seats or otherwise apply pressure at specific points in
order to avoid damaging the heating elements of the seat heaters.
Do not use the seat heating if the seats ar e not occupied by persons or if objects
are fastened or stored on them, for example a child seat, a bag etc. A fault of the heating
elements in the seat heating can occur.
Do not clean the seats moist page 197.Note
The seat heating should only be switched on when the engine is running. This has
a significant effect of saving on the battery capacity.
If the on-board voltage drops, the seat heating is switched off automatically, in
order to provide sufficient electrical energy for the engine control.
PedalsConcerning a secure depressing of the peda l, you should use only footmats from the
Škoda genuine accessories.
Operation of the pedals must not be hindered!
WARNING
Greater pedal distances may be needed when there is a fault in the brake
system.
Fig. 67 Dash panel: Regulator for front
seat heating
s2ug.6.book Page 77 Friday, April 9, 2010 2:24 PM
Page 110 of 271

Starting-off and Driving109
Using the system
Safety
Driving Tips
General Maintenance
Breakdown assistance
Technical Data
You should not switch on any major elec trical components during the heating
period otherwise the vehicle battery will be drained unnecessarily.
- start engine
Applies to all models:
Position
To lock the steering , with the ignition key withdrawn, turn the steering wheel until the
steering locking pin is heard to engage. You should always lock the steering as a general
rule if you leave your vehicle. This acts as a deterrent against possible theft of your
vehicle .
Position
Move the steering wheel back and forward a little if the ignition key cannot, or cannot
easily be turned into this position, in order to release the steering lock.
Position
The engine is started in this position. At the same time, major electrical components
are switched off for short periods. The ignition key moves back into position when
one releases the key.
The ignition key must be turned back into position each time before starting the
engine again. The starter repeat lock in th e ignition lock prevents the starter being
engaged when the engine is r unning and thus getting damaged.
Ignition key withdrawal lock (automatic gearbox)
You can only withdraw the ignition key after switching off the ignition if the selector
lever is in position P.
WARNING
When driving, the ignition key must always be in the position (ignition
switched on) without the engine running. This position is indicated by the
warning lights coming on. If this is not the case, it could result in unexpected
locking of the steering wh eel - risk of accident!
Only remove the ignition key from the ignition lock when the vehicle has
come to a standstill (by applying the handbrake or moving the selector lever
into the position P). The steering lock can engage imme diately - risk of acci-
dent!
Always withdraw the ignition key if you are going to leave the vehicle, even
for a short time. This is particularly important if children are left in the vehicle.
The children might otherwise start the engi ne or switch on electrical equipment
(e.g. power windows) - risk of accident or injury!
Starting the engineGeneral
You can only start the engine only using an original ignition key.
Place the gearshift lever into neutral (or place the selector lever to the position P or
N in the case of an automatic gearbox) and put on the handbrake firmly before starting
the engine.
Before starting, it is necessary to depres s the clutch pedal and to hold it pressed
until the engine starts. If you start the engi ne without depressing the clutch pedal, the
engine does not start and a message is show n in the display of the instrument cluster
to remind you of th e necessity to depress the clutch pedal.
Let go of the key as soon as the engine starts otherwise there may be damage to
the starter.
The engine running noises may louder at first be louder for a short time after starting
the cold engine until oil pressure can be built up in the hydraulic valve clearance
compensation. This is quite normal and is not an operating problem.
If the engine does not start ...
You can use the battery of anothe r vehicle as a jump-start aid page 228.
It is only possible to tow-start vehicles fitt ed with a manual gearbox. The tow-starting
distance must not be more than 50 metres page 231.
WARNING
Never run the engine in non ventilated or enclosed areas. The exhaust gases
of the engine contain besides the odorless and colourless carbon monoxide a
A3
A1A2A3
A2
A1
A2
WARNING (continued)
s2ug.6.book Page 109 Friday, April 9, 2010 2:24 PM
Page 113 of 271

Starting-off and Driving
112
Releasing the handbrake
– Pull the handbrake lever up slightly and at the same time press in the locking
button fig. 108.
– Hold the button pressed and push the handbrake lever down fully .
The handbrake warning light
lights up when the handbrak e is applied, provided the
ignition is on.
A warning signal sounds and the following text appears in the display* if you have inad-
vertently driven off with the handbrake applied:
Release parking brake!
The handbrake warning is acti vated if you drive at a speed of more than 6 km/h for
more than 3 seconds.
WARNING
Please note that the handbrake must be fully released. A handbrake which
is only partially released can result in the rear brakes overheating which will
have a negative effect on the operation of the brake system - risk of accident! In
addition this can result in premature wear of the rear brake pads.
Never leave children unattended in the vehicle. The children might, for
example, release the handbrake or take the vehicle out of gear. The vehicle
might then move off - risk of accident!Caution
After the car has come to a stop, always firs t of all apply the handbrake firmly before
then additionally engaging a gear (manual gearbox) or moving the selector lever into
position P (automatic gearbox).
Rear parking aid*The parking aid provides a warning of obstacles behind the vehicle.The audible parking aid determines the di stance between the rear bumper and an
obstacle located behind the vehicle with the aid of ultrasound sensors. The tones of
the parking aid can be adapted in the menu of the information display* page 26.
The sensors are integrated in the rear bumper.
Range of sensors
The clearance warning begins at a distance of about 160 cm from the obstacle (area
fig. 109 ). The interval between the warning signals becomes shorter as the clear-
ance is reduced.
A continuous tone sounds from a distance of approx. 30 cm (area ) - danger area.
You should not reverse any further after this signal sounds! If the vehicle is
equipped with a factory-fitted towing device*, the border of the danger area starts -
continuous tone - 5 cm further behind th e vehicle. The vehicle can be extended
through an installed detachable towing device.
On vehicles equipped with a factory-fitted radio* or navigation system*, the distance
to the obstruction is shown graphically in the display. On vehicles with a factory-fitted
towing device, the sensors are deactivated when towing a trailer. The driver is informed
about this by a graphic display (vehicle towing a trailer) in the radio* or the navigation*
display. The radio* or navigation system*, wh ich is factory-fitted, can be set so that the
play function volume decreases when acti vating the parking aid, see Owner's Manual
radio* or navigation system*. This improves the audibility of the parking aid.
Fig. 109 Parking aid: Detection range of
rear sensors
AA
AB
s2ug.6.book Page 112 Friday, April 9, 2010 2:24 PM
Page 140 of 271

Passive Safety139
Using the system
Safety
Driving Tips
General Maintenance
Breakdown assistance
Technical Data
WARNING
The front seats and the head restraints must always be adjusted to match
the body size of the seat occupant as well as the seat belts must always be
correctly fastened in order to provide an optimal protection for you and your
occupants.
The driver must maintain a distance of at least 25 cm to the steering wheel
page 138, fig. 123 . Not maintaining this minimum distance will mean that
the airbag system will not be able to properly protect you - hazard!
When driving, hold the st eering wheel with both hands firmly on the outer
edge in the 9 o'clock and 3 o'clock po sition. Never hold the steering wheel
firmly in the 12 o'clock position or in another way (e.g. in the middle of the
steering wheel or at the inner steering wheel edge). In such cases, injuries to the
arms, the hands and the head can occur when the driver airbag is deployed.
The seat backrests must not be angled too far back when driving otherwise
this will affect proper operation of the se at belts and of the airbag system - risk
of injury!
Ensure that there are no objects in the footwell as any objects may get
behind the pedals during a driving or braking manoeuvre. You would then no
longer be able to operate the clutch, to brake or accelerate.
Correct seated position for the front passenger
The fro n t p assen ger must mai n tai n a d i stan ce of a t l ea st 25 c m from th e
dash panel so that the airbag offers him the greatest possible safety it is
deployed.For the safety of the front passenger and to reduce the risk of injury in the event of an
accident, we recommend the following setting.
Adjust the front passenger seat as far as possible to the rear.
Adjust the head restraint so that the top edge of the head restraint is at the same
level as the upper part of your head page 138, fig. 123 - right.
Fasten the seat belt correctly page 143, “How are seat belts correctly fastened?”.
In exceptional cases the front pass enger airbag can be deactivated page 154,
“Deactivating an airbag”. Manual front passenger adjustment
page 12, “Adjusting the front seats”.
Electrical front passenger seat adjustment page 70, “Adjusting front seats electri-
cally*”.
WARNING
The front seats and the head restraints must always be adjusted to match
the body size of the seat occupant as well as the seat belts must always be
correctly fastened in order to provide an optimal protection for you and your
occupants.
The front passenger must maintain a distance of at least 25 cm to the dash
panel. Not maintaining this minimum distance will mean that the airbag
system will not be able to properly protect you - hazard!
Always keep your feet in the footwel l when the vehicle is being driven -
never place your feet on the instrument panel, out of the window or on the
surfaces of the seats. You will be exposed to increased risk of injury if it becomes
necessary to apply the brake or in the ev ent of an accident. If an airbag is
deployed, you may suffer fatal injuries wh en adopting an incorrect seated posi-
tion!
The seat backrests must not be angled too far back when driving otherwise
this will affect proper operation of the se at belts and of the airbag system - risk
of injury!
Correct seated position for the occupants on the rear seats
Occupants on the rear seats must sit upright, keep the feet in the foot-
well and must have their se at belts correctly fastened.To reduce the risk of injury in the event of a sudden braking manoeuvre or an accident,
the occupants on the rear seats must observe the following:
Adjust the head restraints so that the top edge of the head restraints is at the same
level as the upper part of your head page 138, fig. 123 .
Fasten the seat belt correctly page 143, “How are seat belts correctly fastened?”.
If you are transporting page 156, “Transporting children safely” children in the
vehicle, please use a suitable child restraint system.
s2ug.6.book Page 139 Friday, April 9, 2010 2:24 PM
Page 143 of 271

Seat belts
142
The speed of the vehicle is, nevertheless, the most important factor. Doubling the
speed of the vehicle from 25 km/h up to 50 km/hour increases the kinetic energy four
times.
The common opinion that it is possible to su pport your body in a minor accident with
your hands, is incorrect. Even in a collision at only a low speed, the forces acting on the
body are such that it is no longer possible to support your body.
Even if you only drive at a speed within the range from 30 km/hour to 50 km/hour, the
forces which are produced on your body in the event of an accident can easily exceed
10.000 N (Newton). This equals a weight of one tonne (1 000 kg).
In the event of a frontal collision, occupant s of the car not wearing a seat belt, are
thrown forward and strike in an uncontrolled way parts of the interior of the car, such
as steering wheel, da sh panel, windscreen, page 141, fig. 125 . The occupants of a
vehicle who have not fastened their seat belts may even be thrown out of the vehicle.
This can result in fatal injuries.
It is also important that rear seat occupants fasten their seat belts as they will otherwise
be thrown through the vehicle in an uncontr olled manner in the event of an accident
A rear seat passenger who has not fastened the s eat bel t i s a dang er not o nl y to hims elf
but also for those seated at the front page 141, fig. 125 .Important safety information regarding the use of seat beltsThe correct use of the seat belts cons iderably reduces the risk of injury!
WARNING
The belt webbing must not be jammed in-between at any point or twisted,
or chafe against any sharp edges.
It is important that the belt webbing is properly routed if the seat belts are
to offer their maximum protection page 143.
No two persons (also not children) should ever use a single seat belt
together.
The maximum protection which seat belts can offer is only achieved if you
are correctly seated page 138, “Correct seated position”.
The belt webbing must not run across solid or fragile objects (e.g. specta-
cles, ball-point pens, keys etc.) as this may be a cause of injuries.
Bulky, loose clothing (e.g. a winter coat over a jacket) does not allow you to
be correctly seated and impairs proper operation of the seat belts.
It is prohibited to use clamps or other objects to adjust seat belts (e.g. for
shortening the belts for smaller persons).
The lock tongue should only be inserted into the lock which is the correct
one for your seat. Wrong use of the safety belt will reduce its capacity to protect
and the risk of injury increases.
The seat backrests of the front seats must not be tilted too far to the rear
otherwise the seatbelts can lose their effectiveness.
The belt webbing must always be ke pt clean. Soiled belt webbing may
impair proper operation of the inertia reel page 199, “Seat belts”.
The slot of the belt tongue must not be blocked by paper or similar objects
otherwise the belt tongue will not lock in place properly.
Inspect the seat belts regula rly to ensure they are in good condition. If you
find seat belts which have damage to the seat belt webbing, seat belt connec-
tions, to the inertia reels or to the lock, the relevant safety belt must be replaced
by a specialist garage.
The seat belts must not be removed or changed in any way. Do not make an
attempt to repair the seat belts yourself.
Damaged seat belts which have been subjected to stress in an accident and
were therefore stretched, must be replaced - this is best done by a specialist
garage. The anchorage points of the belts must also be inspected. The
anchorage points for the belts should also be checked.
In certain countries it is possible to use seat belts which differ in terms of
their operation from the seat belts which are described on the pages which
follow.WARNING (continued)
s2ug.6.book Page 142 Friday, April 9, 2010 2:24 PM
Page 162 of 271

Transporting children safely161
Using the system
Safety
Driving Tips
General Maintenance
Breakdown assistance
Technical Data
Child safety seats in Group 3For children of about 7 years of age weighing between 22 and 36 kg and of a height of
less than 150 cm, the optimal solution is a ch ild safety seat (seat bolster) in combina-
tion with the three-point seat belt fig. 143 .
Children of more than 150 cm in height may use the seat belts fitted to the vehicle
without a seat bolster.
WARNING
When transporting a child on the front passenger seat, please comply with
the appropriate national regu lations regarding the use of child safety seats. If
required, the airbag has to be deactivated,
in a specialist garage
or by using the switch for the front passenger airbag* page 154,
“Switch for the front passenger airbag”.
The shoulder part of the seat belt mu st run approximately across the middle
of the shoulder and fit snugly against the chest. It must on no account run
across the neck. The lap part of the seat belt must run across the pelvis and fits
snugly; it must not run over the belly. Tighten the belt webbing over your hip if
necessary.
Please comply with any differing nati onal legal regulations regarding the
use of child safety seats.
Attaching a child seat using the “ISOFIX” systemFig. 144 Locking eyes (ISOFIX system) / the IS OFIX child seat is pushed into the mounting
funnelsThere are two fixing eyes* between the seat backrest and the seat cushion of the front
passenger seat for fixing the “ISOFIX” system child seat in place. The locking eyes on
the rear outside seats are located below th e upholstery. The places are marked with
signs with the logo “ISOFIX” - left.Install child seat– Insert the mounting funnels onto the locking eyes between the seat back-
rest and the seat cushion fig. 144 .
– Push the notched arms of the child seat in to the locking eyes in direction of arrow
, until they are heard to lock in place fig. 144 - right.
– Pull on both sides of the child seat!
One can mount a child safety seat using the “ISOFIX” system quickly, easily and reliably.
Please pay close attention to instructions from the manufa cturer of the child safety
seat when installing and removing the seat.
Child seats fitted with the “ISOFIX” system can only be mounted and fixed in a vehicle
fitted with an “ISOFIX” system when these child seats have been released for this type
of vehicle according to the ECE-R 44 standard.
You can obtain child seats with the “ISOFIX” attachment system from specialist garages
who will also installed it as well.
Complete installation instructions are enclosed with the child safety seat.
Fig. 143 Child seat in Group 3 installed
on the rear seat facing the direction of
travel
AA
AB
A1
s2ug.6.book Page 161 Friday, April 9, 2010 2:24 PM