Page 69 of 231

Seats and Storage
68
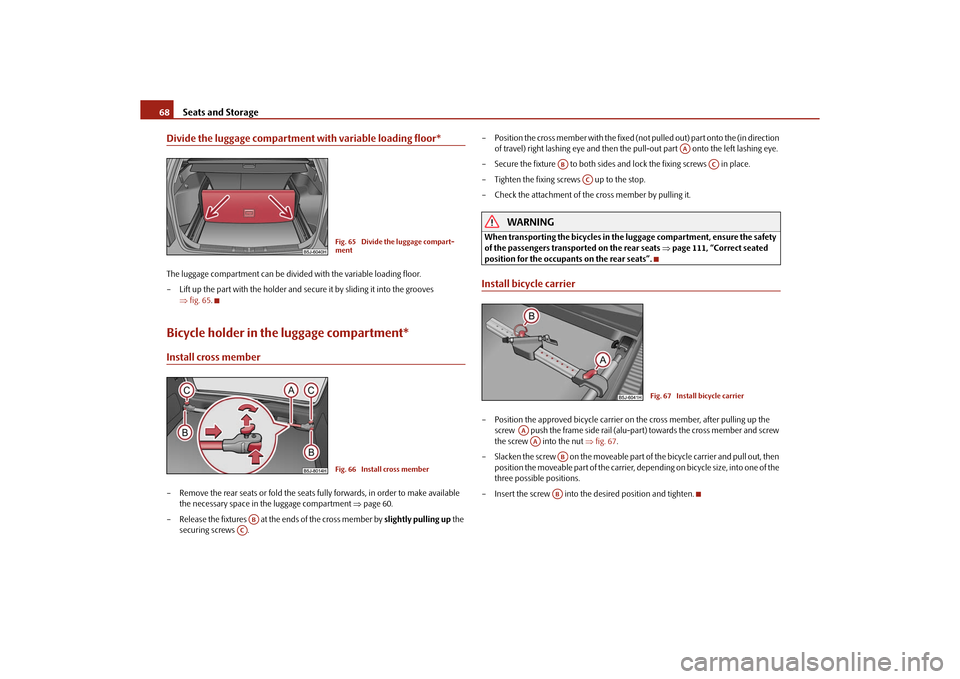
Divide the luggage compartment with variable loading floor*The luggage compartment can be divided with the variable loading floor.
– Lift up the part with the holder and secure it by sliding it into the grooves
fig. 65 .Bicycle holder in the luggage compartment*Install cross member– Remove the rear seats or fold the seats fully forwards, in order to make available
the necessary space in the luggage compartment page 60.
– Release the fixtures at the ends of the cross member by slightly pulling up the
securing screws . – Position the cross member with the fixed (not
pulled out) part onto the (in direction
of travel) right lashing eye and then the pull-out part onto the left lashing eye.
– Secure the fixture to both sides an d lock the fixing screws in place.
– Tighten the fixing screws up to the stop.
– Check the attachment of the cross member by pulling it.
WARNING
When transporting the bicycles in the luggage compartment, ensure the safety
of the passengers transported on the rear seats page 111, “Correct seated
position for the occupants on the rear seats”.Install bicycle carrier– Position the approved bicycle carrier on the cross member, after pulling up the
screw push the frame side rail (alu-part) towards the cross member and screw
the screw into the nut fig. 67 .
– Slacken the screw on the moveable part of the bicycle carrier and pull out, then
position the moveable part of the carrier, depending on bicycle size, into one of the
three possible positions.
– Insert the screw into the desired position and tighten.
Fig. 65 Divide the luggage compart-
mentFig. 66 Install cross member
AB
AC
AA
AB
AC
AC
Fig. 67 Install bicycle carrier
AAAA
ABAB
s16g.4.book Page 68 Wednesda y, February 10, 2010 3:53 PM
Page 70 of 231

Seats and Storage69
Using the system
Safety
Driving Tips
General Maintenance
Breakdown assistance
Praktik
Technical Data
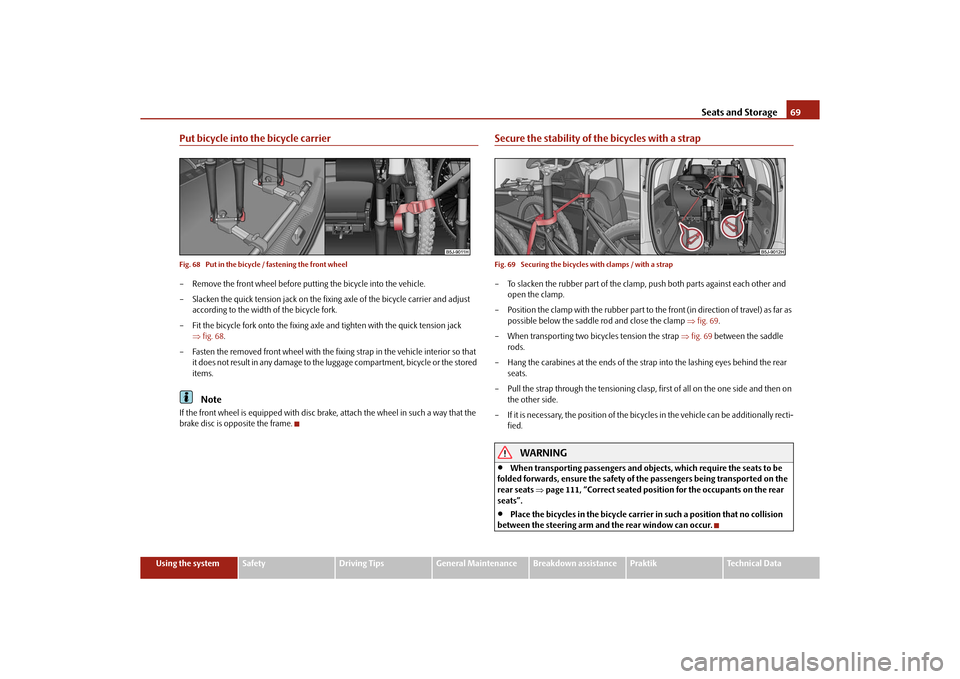
Put bicycle into the bicycle carrierFig. 68 Put in the bicycle / fastening the front wheel– Remove the front wheel before putti ng the bicycle into the vehicle.
– Slacken the quick tension jack on the fixi ng axle of the bicycle carrier and adjust
according to the width of the bicycle fork.
– Fit the bicycle fork onto the fixing axle and tighten with the quick tension jack
fig. 68 .
– Fasten the removed front wheel with the fixing strap in the vehicle interior so that it does not result in any damage to the luggage compartment, bicycle or the stored
items.
Note
If the front wheel is equipped with disc brak e, attach the wheel in such a way that the
brake disc is opposite the frame.
Secure the stability of the bicycles with a strapFig. 69 Securing the bicycles with clamps / with a strap– To slacken the rubber part of the clamp, push both parts against each other and
open the clamp.
– Position the clamp with the rubber part to the front (in direction of travel) as far as possible below the saddle rod and close the clamp fig. 69 .
– When transporting two bi cycles tension the strap fig. 69 between the saddle
rods.
– Hang the carabines at the ends of the strap into the lashing eyes behind the rear seats.
– Pull the strap through the tensioning clasp, first of all on the one side and then on the other side.
– If it is necessary, the position of the bicycles in the vehicle can be additionally recti- fied.
WARNING
When transporting passengers and objects, which require the seats to be
folded forwards, ensure the safety of the passengers being transported on the
rear seats page 111, “Correct seated position for the occupants on the rear
seats”.
Place the bicycles in the bicycle carrier in such a position that no collision
between the steering arm and the rear window can occur.
s16g.4.book Page 69 Wednesda y, February 10, 2010 3:53 PM
Page 73 of 231

Seats and Storage
72
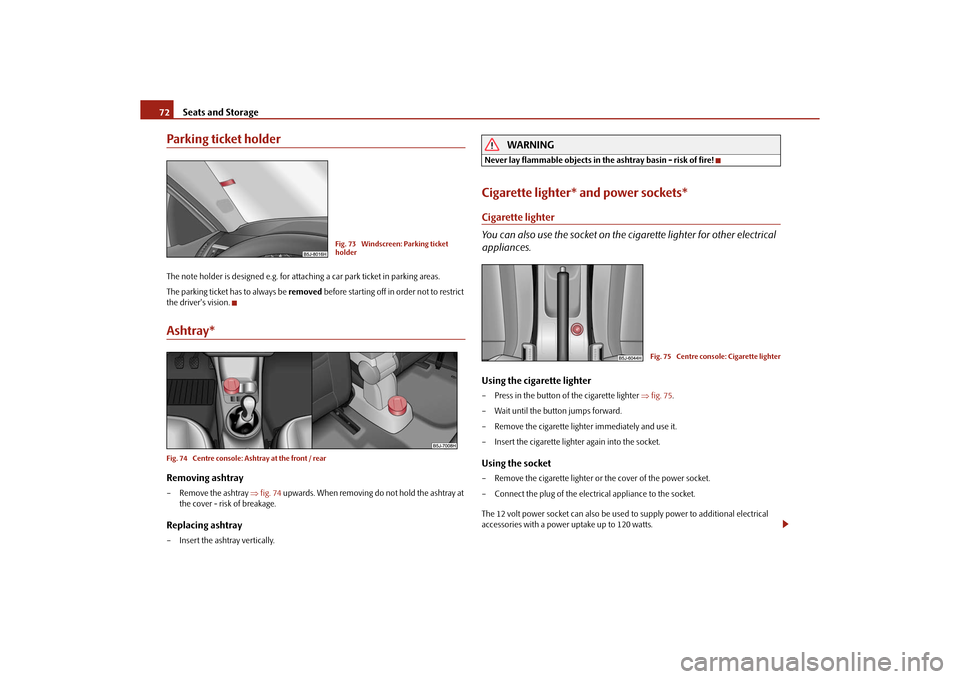
Parking ticket holderThe note holder is designed e.g. for atta ching a car park ticket in parking areas.
The parking ticket has to always be removed before starting off in order not to restrict
the driver's vision.Ashtray*Fig. 74 Centre console: Ashtray at the front / rearRemoving ashtray– Remove the ashtray fig. 74 upwards. When removing do not hold the ashtray at
the cover - risk of breakage.Replacing ashtray– Insert the ashtray vertically.
WARNING
Never lay flammable objects in the ashtray basin - risk of fire!Cigarette lighter* and power sockets*Cigarette lighter
You can also use the socket on the ci garette lighter for other electrical
appliances.Using the cigarette lighter– Press in the button of the cigarette lighter fig. 75 .
– Wait until the button jumps forward.
– Remove the cigarette lighter immediately and use it.
– Insert the cigarette lighter again into the socket.Using the socket– Remove the cigarette lighter or the cover of the power socket.
– Connect the plug of the electrical appliance to the socket.
The 12 volt power socket can also be used to supply power to additional electrical
accessories with a power uptake up to 120 watts.
Fig. 73 Windscreen: Parking ticket
holder
Fig. 75 Centre console: Cigarette lighter
s16g.4.book Page 72 Wednesda y, February 10, 2010 3:53 PM
Page 157 of 231

Taking care of your vehicle and cleaning the vehicle
156
Upholstery cloth and cloth trim on the d oors, luggage compartment cover, headliner
etc. are best treated with special cleaning products, using if necessary a dry foam and
a soft sponge or brush.
We recommend using a cleaning product from Škoda genuine accessories offered by
your Škoda dealer.
Caution
Solvent-free cleaners attack th e material and can damage it.Fabric covers of electrically heated seatsDo not clean the seat covers moist as this may re sult in damage to the seat heating
system.
Clean such covers using special agents, for example dry foam.Natural leather
Natural leather requires quite particular care and attention.Leather should be treated from time to time according the following guidelines
depending on how much it is used.Normal cleaning– Clean soiled areas of the leather with slightly moistened cotton or woollen cloth.Severe soiling– Clean severely soiled areas with a cloth dipped in a mild soapy solution (2 spoon-
fuls of natural soap to 1 litre of water).
– Ensure that the leather is not soaked through at any point and that no water gets into the stitching of the seams.
– Dry off the leather with a soft, dry cloth.
Removing stains– Remove fresh stains which are water-based (e.g. coffee, tea, juices, blood etc.)
with an absorbent cloth or household paper or use the cleaner from the care set
for a stain which has already dried in.
– Remove fresh stains on a fat base (e.g. butter, mayonnaise, chocolate etc.) with an
absorbent cloth or household cleaning paper or with the cleaner from the care set
if the stain has not yet pe netrated into the surface.
– Use a grease dissolver for grease stains which have dried in .
–Eliminate special stains (e.g. ball-point pens, felt pe n, nail varnish, dispersion
paint, shoe cream etc.) with a special stain remover suitable for leather.Leather care– Treat the leather every six months with the leather care product available from
specialist garages.
– Apply only a small amount of the care product.
– Dry the leather off with a soft cloth
We recommend that you consult a speciali st garage if you have any questions
regarding cleaning and care of the leather interior in your vehicle.
Caution
You must on no account treat the leather wi th solvents (e.g. gasoline, turpentine),
floor wax, shoe cream or such like.
Avoid leaving your vehicle for lengthy period s in bright sunlight in order to avoid
bleaching the leather. If you leave your vehicle parked in the open for lengthy periods,
protect the leather from the direct ra ys of the sun by covering it over.
Sharp-edged objects on items of clothing su ch as zip fasteners, rivets, sharp-edged
belts may leave permanent scratches or signs of rubbing on the surface.Note
Use a care cream with ligh t blocker and impregnation effect regularly and each
time after cleaning the leathe r. The cream nourishes the leather, allows it to breathe
and keeps it supple and also provides mois ture. It also creates surface protection.
s16g.4.book Page 156 Wednesday, February 10, 2010 3:53 PM