2010 SKODA FABIA air condition
[x] Cancel search: air conditionPage 85 of 244

Heating and air conditioning system
84 Setting temperature– Turn the control dial
fig. 91
to the right in order to increase the temperature.
– Turn the control dial to the left in order to increase the temperature.Controlling blower– Turn the blower switch into one of the po
sitions, 1 to 4, in order to switch the
blower on.
– Turn the blower switch into position 0 in order to switch the blower off.– If you wish to shut off the fresh air supp
ly, use the button - recirculated air
mode.
Control for air distribution– You can adjust the direction of the inlet air flow using control .switching cooling on and off– Press the button
fig. 91
. The warning light lights up in the button.
– When you again press the switch , the cooling system is switched off. The
warning light in the button goes out.
The set temperature will be automatically maintained other than when the control dial is on the extreme
right or extreme left position:
Extreme right position - full heating.Extreme left position - full cooling.The controls and can be set to
any desired intermediate position.
The blower should aways be on to prevent the windows from misting up.
Note
The whole heat output will be needed to
unfrost the windscreen and side windows.
No warm air will be fed to the footwell. Th
is can lead to restriction of the heating
comfort.
The used air streams out through the air removal openings in the luggage compart-
ment.
If the cooling system has not been switched on for a lengthy period, odours may
be produced at the evaporator because of de
posits. Switch the air conditioning system
on at least once a month for approximately 5 minutes at the highest blower stage - also during the cold season of the year - in order to remove such odours. Also open a window for a short time.
Please refer to the information regarding recirculated air mode
page 80.
Have the air conditioning system cleaned by a specialist workshop.
AAAAABAB
ADAC
AC
AE
AC
AA
AC
s3j8.a.book Page 84 Tuesday, April 20, 2010 1:10 PM
Page 86 of 244

Heating and air conditioning system
85
Using the system
Safety
Driving Tips
General Maintenance
Breakdown assistance
Technical Data
Set ClimaticRecommended settings of Climatic contro
ls for the respective operating modes:
Note
We recommend that you leave the air outlet vents
3 page 80, fig. 89
in the opened
position.
Setup
Setting of the control dial
Button
Air outlet vents 4
Defrosting the windscreen and side windows
Recommended
22°C
3
Do not switch on
Switched off
Open and align with the side
window
Free windscreen and side win- dows from mist
Desired tempera-
ture
2
Do not switch on
Switched on
Open and align with the side
window
The fastest heating
Recommended
22°C
3
Briefly switched on
Switched off
Opening
Comfortable heating
Desired tempera-
ture
2 or 3
Do not switch on
Switched off
Opening
The fastest cooling
Recommended
22°C
briefly4, then 2or
3
Briefly switched on
Switched on
Opening
Optimal cooling
Desired tempera-
ture
1, 2 or 3
Do not switch on
Switched on
Open and align to the roof
Fresh air mode - ventilation
To the left up to the
stop
Desired position
Do not switch on
Switched off
Opening
AA
AB
AC
AD
AE
s3j8.a.book Page 85 Tuesday, April 20, 2010 1:10 PM
Page 87 of 244
Heating and air conditioning system
86Using the air conditioning system economicallyThe compressor on the Climatic uses powe
r from the engine when in cooling mode
which will effect the fuel consumption. It recommended to open the windows or the
doors of a vehicle for which the interior
has been strongly heated through the effect
of direct sunlight in order to allow the
heated air to escape. The cooling system should not be switched
on while travelling when the window is
open. The desired interior temperature can also be achieved without switching in the cooling system just by switching to fresh air mode.
For the sake of the environment
When you economize on fuel, you also reduce pollutant emissions.Operational malfunctionsIf the cooling system does not operate at outside temperatures higher than +5 °C, there is a problem in the system. The reasons for this may be:
The fuse of the Climatic is defective. Check the fuse, replace it if necessary
page 195.
The cooling system has switched off automatically for a short time because the
coolant temperature of the engine is too hot
page 16.
If you are not able to rectify the operational
problem yourself, or if the cooling capacity
decreases, switch the cooling system off. Contact a specialist garage. If there is a fault at the Climatronic, all symbols on the display flash after switching on the ignition for 15 seconds. Contact a specialist garage.
Climatronic* (automatic air conditioning)Description The Climatronic system is a combinat
ion of an automatic heating, fresh
air and cooling system which provides optimal comfort for the occu- pants of the car.The Climatronic maintains a constant temperat
ure fully automatically, once it has been
set. This is achieved by automatically varying the temperature of the outflowing air, the blower stages and the air distribution. The system also takes into account sunlight which eliminates the need to
alter the settings manually. The
automatic mode
page 88 ensures maximum wellbeing of the
occupants at all times of the year.
Description of Climatronic system The cooling operates only if the following conditions are met:
engine running,
outside temperature above approx. +2°C,
switched on.
If the cooling system is switched on, th
e temperature and air humidity drops in the
vehicle. The wellbeing of the occupants of the car is enhanced as a result of this partic-ularly at high outside temperatures and a high air humidity. The system prevents the windows misting up during the cold season of the year. The heating effect is dependent upon the coolant temperature, thus full heat output only occurs when the engine has reached its operating temperature. It is possible to briefly activate recirculat
ed air mode in order to enhance the cooling
effect
.
The air inlet in front of the windscreen must be free of ice, snow or leaves in order to ensure that the heating and cooling systems operate properly. The AC compressor is switched off at a high
coolant temperature in order to provide
cooling at a high load of the engine. After switching on the cooling
Condensation
from the evaporator of the air condi-
tioning may drip down and form a puddle be
low the vehicle. This is quite normal and
not an indication of a leak!
AC
s3j8.a.book Page 86 Tuesday, April 20, 2010 1:10 PM
Page 88 of 244

Heating and air conditioning system
87
Using the system
Safety
Driving Tips
General Maintenance
Breakdown assistance
Technical Data
Recommended setting for all periods of the year:
Set the desired temperature, we recommend 22°C (72°F).
Press the button
fig. 92
.
Move the air outlet vents
3 and
4 so that the air flow is
directed slightly upwards.
Switching over between degrees
Celsius and degrees Fahrenheit
Press and hold the buttons and
fig. 92
at the same time. The information
in the desired temperature measuring unit appears in the display.
WARNING
For your own safety and that of other road users, ensure that all the
windows are free of ice, snow and mistin
g. Please familiarize yourself about
how to correctly operate th
e heating and ventilation systems, how to demist
and defrost the windows, as well as with the cooling mode.
You should not leave recirculated air mode on over a longer period of time,
as “stale” air may result in fatigue in the driver and occupants, divert your attention and also cause the windows to mist up. The risk of having an accident increases. Switch recirculated air mode off as soon as the windows begin misting up.
Note
If the cooling system has not been switched on for a lengthy period, odours may
be produced at the evaporator because of
deposits. Switch the cooling system on at
least once a month for approximately 5 minut
es at the highest blower stage - also
during the cold se aso n of the y ear - i n o rde
r to avoid such odours. Also open a window
for a short time.
We recommend that you do not smoke in the vehicle when the recirculating air
mode is operating since the smoke which is drawn at the evaporator from the interior of the vehicle forms deposits in the evapor
ator of the air conditioning system. This
produces a permanent odour when the air co
nditioning system is operating which can
only be eliminated through considerable
effort and expense (replacement of
compressor).
The used air streams out through the air
removal openings in the luggage compart-
ment.
Using the cooling economically
page 86.
Operational problems
page 86.
Overview of the control elementsFig. 92 Climatronic: Control elementsButtons / control dial
Setting the interior temperature
The displays
Selected interior temperature, e.g. +22°C (72°F) Degrees Celsius or FahrenheitAutomatic air conditioning mode De-mist or de-ice the windscreen Air flow to the windscreen, head, upper body and feet Recirculated air mode Air conditioning sy
stem switched on
Set blower speed
Buttons / control dial
Setting the blower speed Interior temperature sensorAutomatic mode
AUTO
AUTO
AC
A1A2A3A4A5A6A7A8A9A10A11A12
s3j8.a.book Page 87 Tuesday, April 20, 2010 1:10 PM
Page 89 of 244

Heating and air conditioning system
88
De-mist or de-ice the windscreen Air flow to the windows Air flow to head Air flow in the footwellRecirculated air mode Air conditioning system switched onNote
The interior temperature sensor is locate
d in the bottom part of the device. Do not
glue or cover over the sensor, otherwise it could have an unfavourable effect on the Climatronic.Automatic mode The automatic mode is used in order to maintain a constant tempera- ture and to demist the windows in the interior of the car.Switching automatic mode on– Set a temperature between +18°C (64 °F) and +29°C (86 °F). – Move the air outlet vents
3 and
4, so that the air flow is
directed slightly upwards.
– Press the button ,
AUTO
appears in the display.
The automatic mode is switched
off by pressing the button
for the air distribution or
increasing or decreasing
the blower speed. The temperature is nevertheless
regulated.Defrosting windscreenDefrosting windscreen - switching on– Press the button
page 87, fig. 92
.
Defrosting windscreen - switching off– Once again press the button or the button .
The temperature control is controlled automatically. More air flows out of the air outlet vents
1 and
2.
Setting temperature– You can set the desired interior temperature after switching on the ignition with the
control dial .
You can set the interior temperature betw
een +18°C (64°F) and +29°C (86 °F). The
interior temperature is regulated automatica
lly within this range. If you select the
temperature below +18°C (64°F), “LO” appears in the display. If you select the temper-ature higher than +29°C (86°F), “HI” appears
in the display. In both limit positions the
Climatronic operates at ma
ximum cooling or heating capacity, respectively. The
temperature is not controlled in this case. Lengthy and uneven distribution
of the air flow out of the vents (in particular at the leg
area) and large differences in temperature, for example when getting out of the vehicle, can result in chills in sensitive persons.Controlling blower There are a total of seven blower stages available.The Climatronic system controls the blower st
ages automatically in
line with the inte-
rior temperature. You can also, however, adap
t the blower stages manually to suit your
particular needs. – Turn the control dial
page 87, fig. 92
to the left (reduce blower speed) or right
(increase blower speed).
If you switch off the blower, th
e Climatronic is switched off.
WARNING
“Stale air” may result in fatigue in the driver and occupants, reduce atten-
tion levels and also cause the windows to mist up. The risk of having an accident increases.
Do not switch the Climatronic system off for longer than necessary.
Switch the Climatronic system on as soon as the windows mist up.
A13A14A15A16A17A18
A11
AUTO
AUTO
A1
A10
s3j8.a.book Page 88 Tuesday, April 20, 2010 1:10 PM
Page 115 of 244

Passive Safety
114
Ensure that all the windows offer
a good visibility to the outside.
Safely attach the items of luggage
page 63, “Loading the luggage compartment”.
Ensure that no objects can obstruct the pedal.
Adjust the mirror, the front seat and the head restraint to match your body size.
Point out to your occupants that the head
restraints must be adjusted to match
their body size.
Protect the children in suitable child seats with correctly fastened seat belts
page 130, “Transporting children safely”.
Adopt the correct seated position. Also in
form your occupants to adopt the correct
seated position.
Fasten the seat belt correctly. Also inform your occupants to properly fasten the
seat belts
page 119, “How are seat be
lts correctly fastened?”.
What influences the driving safety? The driving safety is primarily determined by the style of driving and the personal behaviour of all the occupants.The driver is fully responsible for himself an
d his occupants. If yo
ur driving safety is
effected, you place yourself and the oncomi
ng traffic at risk. Please refer to the
following guidelines.
Do not get distracted from concentrating on the traffic situation, e.g. by your occu-
pants or mobile phone calls.
Never drive when your driving ability is impaired, e.g. through medication, alcohol,
drugs.
Keep to the traffic regulations and the permissible speed limit.
Adjust the driving speed at all times to the road condition as well as to the traffic
and weather conditions.
Take regular breaks on long journe
ys - at the latest every two hours.
Correct seated positionCorrect seated position for the driver Correct seated position for the driver is important for safe and relaxed driving.Fig. 108 The correct distance of the driver from
the steering wheel / The
correct head restraint
adjustment for the driverFor your own safety and to reduce the risk of injury in the event of an accident, we recommend the following setting.
Adjust the steering wheel so that the distance between the steering wheel and your
chest is at least 25 cm
fig. 108
- left.
Position the driver seat in the forward/back direction so that you are able to fully
press the pedals with your legs at a slight angle.
Adjust the seat backrest so that you are able to reach the highest point of the
steering wheel with your arms at a slight angle.
Adjust the head restraint so that the top edge of the head restraint is at the same
level as the upper part of your head
fig. 108
- right.
Fasten the seat belt correctly
page 119, “How are seat belts correctly fastened?”.
Driver seat adjustment
page 59, “Adjusting the front seats”.
WARNING
The front seats and the head restraints must always be adjusted to match
the body size of the seat occupant as well as the seat belts must always be
s3j8.a.book Page 114 Tuesday, April 20, 2010 1:10 PM
Page 119 of 244

Seat belts
118
The speed of the vehicle is,
nevertheless, the most important factor. Doubling the
speed of the vehicle from 25 km/h up to 50 km/hour increases the kinetic energy four times. The common opinion that it is possible to su
pport your body in a minor accident with
your hands, is incorrect. Even in a collision at only a low speed, the forces acting on the body are such that it is no longer possible to support your body. Even if you only drive at a speed within the range from 30 km/hour to 50 km/hour, the forces which are produced on your body in
the event of an accident can easily exceed
10.000 N (Newton). This equals a weight of one tonne (1 000 kg). In the event of a frontal collision, occupants
of the vehicle not wearing a seat belt, are
thrown forward and strike in an uncontrolled
way parts of the interior of the vehicle,
such as steering wheel,
dash panel, windscreen,
page 117, fig. 110
- left. The occu-
pants of a vehicle who have not fastened their seat belts may even be thrown out of the vehicle. This can result in fatal injuries. It is also important that rear seat occupants fasten their seat belts as they will otherwise be thrown through the vehicle in an uncontr
olled manner in the event of an accident
A rear seat passenger who has not fastened the
s eat bel t i s a dang er not o nl y to hims elf
but also for those seated at the front
page 117, fig. 110
- right.
Important safety information regarding the use of seat beltsThe correct use of the seat belts cons
iderably reduces the risk of injury!
WARNING
The belt webbing must no
t be jammed in-between at any point or twisted,
or chafe against any sharp edges.
It is important that the belt webbing is properly routed if the seat belts are
to offer their maximum protection
page 119, “How are seat belts correctly
fastened?”.
No two persons (also not children) should ever use a single seat belt
together.
The maximum protection which seat belts can offer is only achieved if you
are correctly seated
page 114, “Correct seated position”.
The belt webbing must not run across solid or fragile objects (e.g. specta-
cles, ball-point pens, keys etc.) as this may be a cause of injuries.
Bulky, loose clothing (e.g. a winter coat over a jacket) does not allow you to
be correctly seated and impairs proper operation of the seat belts.
It is prohibited to use clamps or other objects to adjust seat belts (e.g. for
shortening the belts for smaller persons).
The lock tongue should only be inserted into the lock which is the correct
one for your seat. Wrong use of the safety
belt will reduce its capacity to protect
and the risk of injury increases.
The seat backrests must not be tilted too far to the rear otherwise the seat-
belts can lose their effectiveness.
The belt webbing must always be ke
pt clean. Soiled belt webbing may
impair proper operation of the inertia reel
page 161, “Seat belts”.
The slot of the belt tongue must not be blocked by paper or similar objects
otherwise the belt tongue will not lock in place properly.
Inspect the seat belts regula
rly to ensure they are in
good condition. If you
find seat belts which have damage to the seat belt webbing, seat belt connec- tions, to the inertia reels or to the lock,
the relevant safety belt must be replaced
by a specialist garage.
The seat belts must not be removed or changed in any way. Do not make an
attempt to repair the seat belts yourself.
Damaged seat belts which have been subjected to stress in an accident and
were therefore stretched, must be replaced - this is best done by a specialist garage. The anchorage points of the
belts must also be inspected. The
anchorage points for the belts should also be checked.
In certain countries it is possible to use seat belts which differ in terms of
their operation from the seat belts wh
ich are described on the pages which
follow.
WARNING (continued)
s3j8.a.book Page 118 Tuesday, April 20, 2010 1:10 PM
Page 124 of 244
Airbag system
123
Using the system
Safety
Driving Tips
General Maintenance
Breakdown assistance
Technical Data
When are the airbags deployed?The airbag system is designed in such a
way that the driver and the front passenger
airbag* are deployed in the event of a
frontal collision of major severity
.
In the case of a
violent side crash
, the side airbag* in the front seat and the head
airbag* on the side on which the collision occurs are deployed. It is also possible under certain special accident situations that the front as well as the side airbags and head airbags* are deployed at the same time. The airbags
are not deployed
in the case of
minor
frontal and side collisions, rear-end
collisions, tilting of the ve
hicle and vehicle rollover.
Deployment factors It is not possible to state globally which
deployment conditions apply to the airbag
system in every situation as the circumstances which exist in the case of accidents vary greatly. An important role in this case, for ex
ample, is played by factors such as the type
of object against which the vehicle impacts (h
ard, soft), the angle of impact, the vehicle
speed etc. A decisive factor for the deployment of the airbags is the deceleration which occurs during a collision. The control unit analyses
the nature of the collision and activates the
relevant restraint system. If the vehicle deceleration which occurs and is measured during the collision remains below the prescribed reference values specified in the control unit, the airbags are no
t deployed although the vehicle may well suffer severe
damage to the bodywork as a consequence of the accident. The airbags are not deployed if:
ignition is switched off;
a minor frontal collision;
a minor side collision;
a rear-end collision;
Rollover of the vehicle.Note
A grey white or red, non harmful gas is released when airbag is inflated. This is
perfectly normal and is not an indi
cation of a fire in the vehicle.
In the event of an accident in which the airbags are deployed: the interior lighting comes on (if the swit
ch for the interior light is in the door
contact position), the hazard warning li
ght is switched on;
All the doors are unlocked.
Front airbagsDescription of the front airbags The airbag system is not a su
bstitute for the seat belt!
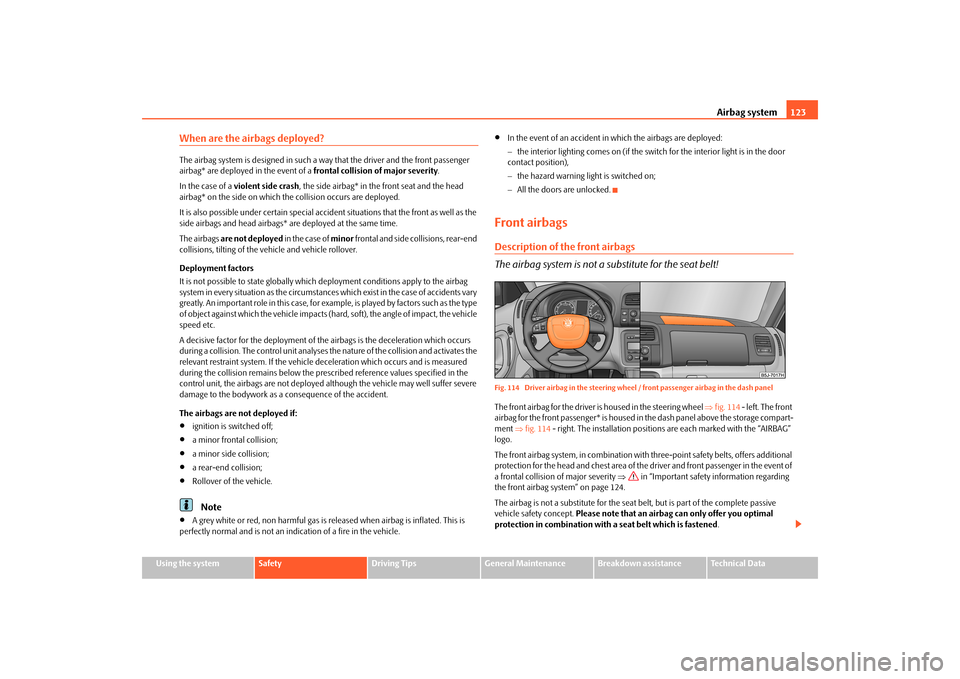
Fig. 114 Driver airbag in the steering wheel
/ front passenger airbag in the dash panel
The front airbag for the driver is housed in the steering wheel
fig. 114
- left. The front
airbag for the front passenger* is housed in the dash panel above the storage compart- ment
fig. 114
- right. The installation positions are each marked with the “AIRBAG”
logo. The front airbag system, in combination with
three-point safety belts, offers additional
protection for the head and chest area of the driver and front passenger in the event of a frontal collision of major severity
in “Important safety information regarding
the front airbag system” on page 124. The airbag is not a substitute for the seat
belt, but is part of the complete passive
vehicle safety concept.
Please note that an airbag can only offer you optimal
protection in combination with a seat belt which is fastened
.
s3j8.a.book Page 123 Tuesday, April 20, 2010 1:10 PM