2010 SATURN VUE turn signal
[x] Cancel search: turn signalPage 9 of 398

In Brief 1-3
A.Air Vents on page 8‑9.
B. Instrument Panel Illumination
Control on page 6‑5.
C. Turn and Lane-Change Signals
on page 6‑4.
D. Instrument Cluster
on
page 5‑10.
E. Windshield Wiper/Washer
on
page 5‑3.
F. AM-FM Radio on page 7‑4.
G. Auxiliary Input Jack. See Auxiliary Devices on page 7‑17.
H. Exterior Lamp Controls
on
page 6‑1.
I. Driver Information Center (DIC) Buttons. See Driver Information
Center (DIC) on page 5‑25.
J. Instrument Panel Storage
on
page 4‑1.
K. Hood Release. See Hood
on
page 10‑5.
L. Cruise Control on page 9‑42. M.
Steering Wheel Adjustment
on
page 5‑2.
N. Horn on page 5‑3.
O. Steering Wheel Controls
on
page 5‑3.
P. Rear Window Wiper/Washer
on
page 5‑5.
Q. Traction Control System (TCS)
on page 9‑40.
R. Shift Lever. See Automatic
Transmission on page 9‑35.
S. Climate Control Systems
on
page 8‑1or Automatic Climate
Control Systemon page 8‑5(If Equipped).
T. Hazard Warning Flashers
on
page 6‑3.
U. Passenger Airbag Status Indicator. See Passenger
Sensing System on page 3‑34.
V. Passenger Safety Belt Reminder. See Safety Belt
Reminders on page 5‑12.
W. Glove Box on page 4‑1.
Initial Drive
Information
This section provides a brief
overview about some of the
important features that may or may
not be on your specific vehicle.
For more detailed information, refer
to each of the features which can be
found later in this owner manual.
Remote Keyless Entry
(RKE) System
The RKE transmitter is used to
remotely lock and unlock the doors
from up to 60 m (195 feet) away
from the vehicle.
ProCarManuals.com
Page 27 of 398

In Brief 1-21
Crisis Assist, Stolen Vehicle
Assistance, Vehicle Diagnostics,
Remote Door Unlock, Roadside
Assistance, Turn‐by‐Turn Navigation
and Hands‐Free Calling are
available on most vehicles. Not all
OnStar services are available on all
vehicles. For more information
see the OnStar Owner's Guide or
visit www.onstar.com (U.S.) or
www.onstar.ca (Canada), contact
OnStar at 1-888-4-ONSTAR
(1‐888‐466‐7827) or TTY
1‐877‐248‐2080, or press
Qto
speak with an OnStar advisor
24 hours a day, 7 days a week.
For a full description of OnStar
services and system limitations, see
the OnStar Owner's Guide in the
glove box.
OnStar service is subject to the
OnStar terms and conditions
included in the OnStar Subscriber
Information. OnStar service cannot work unless
the vehicle is in a place where
OnStar has an agreement with a
wireless service provider for service
in that area. OnStar service also
cannot work unless the vehicle is in
a place where the wireless service
provider OnStar has hired for that
area has coverage, network
capacity and reception when the
service is needed, and technology
that is compatible with the OnStar
service. Not all services are
available everywhere, particularly in
remote or enclosed areas, or at all
times.
The OnStar system can record and
transmit vehicle information. This
information is automatically sent to
an OnStar call center when
Qis
pressed,
]is pressed, or if the
airbags or ACR system deploy.
This information usually includes the
vehicle's GPS location and, in the
event of a crash, additional information regarding the crash that
the vehicle was involved in (e.g. the
direction from which the vehicle was
hit). When the virtual advisor feature
of OnStar hands-free calling is
used, the vehicle also sends OnStar
the vehicle's GPS location so they
can provide services where it is
located.
Location information about the
vehicle is only available if the GPS
satellite signals are unobstructed
and available.
The vehicle must have a working
electrical system, including
adequate battery power, for the
OnStar equipment to operate. There
are other problems OnStar cannot
control that may prevent OnStar
from providing OnStar service at
any particular time or place. Some
examples are damage to important
parts of the vehicle in a crash, hills,
tall buildings, tunnels, weather or
wireless phone network congestion.
ProCarManuals.com
Page 31 of 398

Keys, Doors and Windows 2-3
.Check the transmitter's battery.
See“Battery Replacement” later
in this section.
.If the transmitter is still not
working correctly, see your
dealer/retailer or a qualified
technician for service.
Remote Keyless Entry
(RKE) System Operation
The Remote Keyless Entry (RKE)
transmitter functions work up to
195 feet (60 m) away from the
vehicle.
There are other conditions which
can affect the performance of the
transmitter. See Remote Keyless
Entry (RKE) System on page 2‑2.
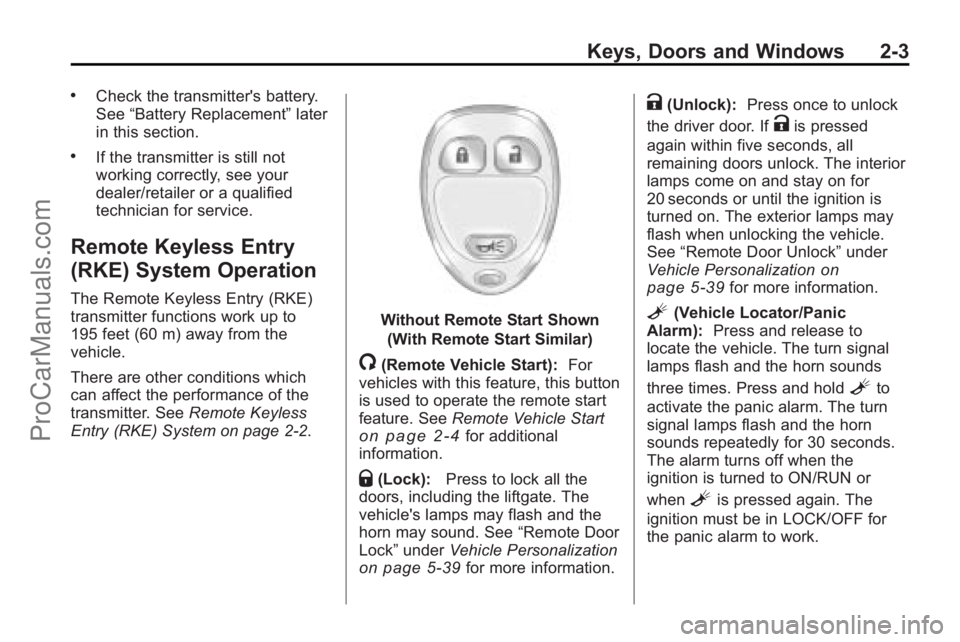
Without Remote Start Shown
(With Remote Start Similar)
/(Remote Vehicle Start): For
vehicles with this feature, this button
is used to operate the remote start
feature. See Remote Vehicle Start
on page 2‑4for additional
information.
Q(Lock): Press to lock all the
doors, including the liftgate. The
vehicle's lamps may flash and the
horn may sound. See “Remote Door
Lock” under Vehicle Personalization
on page 5‑39for more information.
K(Unlock): Press once to unlock
the driver door. If
Kis pressed
again within five seconds, all
remaining doors unlock. The interior
lamps come on and stay on for
20 seconds or until the ignition is
turned on. The exterior lamps may
flash when unlocking the vehicle.
See “Remote Door Unlock” under
Vehicle Personalization
on
page 5‑39for more information.
L(Vehicle Locator/Panic
Alarm): Press and release to
locate the vehicle. The turn signal
lamps flash and the horn sounds
three times. Press and hold
Lto
activate the panic alarm. The turn
signal lamps flash and the horn
sounds repeatedly for 30 seconds.
The alarm turns off when the
ignition is turned to ON/RUN or
when
Lis pressed again. The
ignition must be in LOCK/OFF for
the panic alarm to work.
ProCarManuals.com
Page 114 of 398

5-4 Instruments and Controls
&(Adjustable Interval Wipes):
Sets a delay between wipes. Move
the switch on top of the lever left for
less frequent wipes or right for more
frequent wipes.
a(Low): Slow wipes.
1(High): Fast wipes.
Clear ice and snow from the wiper
blades before using them. If frozen
to the windshield, carefully loosen or
thaw them. Damaged wiper blades
should be replaced. See Wiper
Blade Replacement on page 10‑29.
Heavy snow or ice can overload the
wiper motor. A circuit breaker will
stop the motor until it cools down.
Rainsense™
Notice: Going through an
automatic car wash with the
wipers on can damage them. Turn
the wipers off when going
through an automatic car wash.
For vehicles with Rainsense™
windshield wipers, the moisture
sensor is located next to the inside
rearview mirror and is mounted on
the windshield. When active, these
sensors are able to detect moisture
on the windshield and automatically
turn on the wipers.
To turn on the Rainsense feature,
the wipers must be set to one
of the five delay settings on the
multifunction lever. Each of the five
settings adjusts the sensitivity of the
sensor. Since different drivers have
different setting preferences, it is
recommended that the mid-range
setting (position 3) be used initially.
For more wipes, select the higher
settings; for fewer wipes, select the
lower settings located closer to the
off position on the turn signal/lane
change lever.
The sensor automatically controls
the frequency of the wipes from the
off setting to the high speed setting
according to the weather conditions.
The wipers can be left in a
rainsense mode even when it is not
raining.
When Rainsense is active, the
headlamps turn on automatically if
the exterior lamp control is in the
AUTO position and the wipers are
active.
ProCarManuals.com
Page 149 of 398

Instruments and Controls 5-39
Vehicle Reminder
Messages
ICE POSSIBLE DRIVE
WITH CARE
This message displays when the
outside air temperature is cold
enough to create icy road
conditions. Adjust your driving
accordingly.
TURN SIGNAL ON
This message displays and a
chime sounds as a reminder to
turn off the turn signal if you drive
your vehicle for more than about
1.2 km (3/4 mile) with a turn signal
on. SeeTurn and Lane-Change
Signals
on page 6‑4for more
information.
Vehicle
Personalization
Your vehicle may have
customization capabilities that allow
you to program certain features to
one preferred setting. Customization
features can only be programmed to
one setting on the vehicle and
cannot be programmed to a
preferred setting for two different
drivers.
All of the customization options may
not be available on your vehicle.
Only the options available will be
displayed on the DIC.
The default settings for the
customization features were set
when your vehicle left the factory,
but may have been changed from
their default state since then.
The customization preferences are
automatically recalled.
To change customization
preferences, use the following
procedure.
Entering the Feature
Settings Menu
1. Turn the ignition on and place the vehicle in P (Park).
To avoid excessive drain on the
battery, it is recommended that
the headlamps are turned off.
2. Press the customization button to scroll through the available
customizable options.
Feature Settings Menu Items
The following are customization
features that allow you to program
settings to the vehicle:
DISPLAY IN ENGLISH
This feature will only display if a
language other than English has
been set. This feature allows you to
change the language in which the
DIC messages appear to English.
ProCarManuals.com
Page 157 of 398

Instruments and Controls 5-47
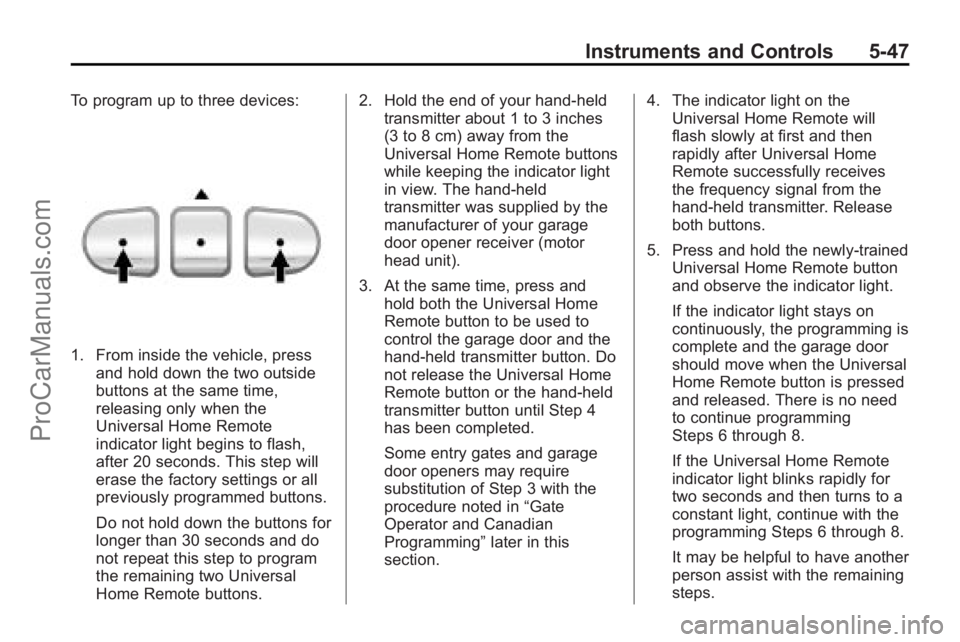
To program up to three devices:
1. From inside the vehicle, pressand hold down the two outside
buttons at the same time,
releasing only when the
Universal Home Remote
indicator light begins to flash,
after 20 seconds. This step will
erase the factory settings or all
previously programmed buttons.
Do not hold down the buttons for
longer than 30 seconds and do
not repeat this step to program
the remaining two Universal
Home Remote buttons. 2. Hold the end of your hand-held
transmitter about 1 to 3 inches
(3 to 8 cm) away from the
Universal Home Remote buttons
while keeping the indicator light
in view. The hand-held
transmitter was supplied by the
manufacturer of your garage
door opener receiver (motor
head unit).
3. At the same time, press and hold both the Universal Home
Remote button to be used to
control the garage door and the
hand-held transmitter button. Do
not release the Universal Home
Remote button or the hand-held
transmitter button until Step 4
has been completed.
Some entry gates and garage
door openers may require
substitution of Step 3 with the
procedure noted in “Gate
Operator and Canadian
Programming” later in this
section. 4. The indicator light on the
Universal Home Remote will
flash slowly at first and then
rapidly after Universal Home
Remote successfully receives
the frequency signal from the
hand-held transmitter. Release
both buttons.
5. Press and hold the newly-trained Universal Home Remote button
and observe the indicator light.
If the indicator light stays on
continuously, the programming is
complete and the garage door
should move when the Universal
Home Remote button is pressed
and released. There is no need
to continue programming
Steps 6 through 8.
If the Universal Home Remote
indicator light blinks rapidly for
two seconds and then turns to a
constant light, continue with the
programming Steps 6 through 8.
It may be helpful to have another
person assist with the remaining
steps.
ProCarManuals.com
Page 158 of 398

5-48 Instruments and Controls
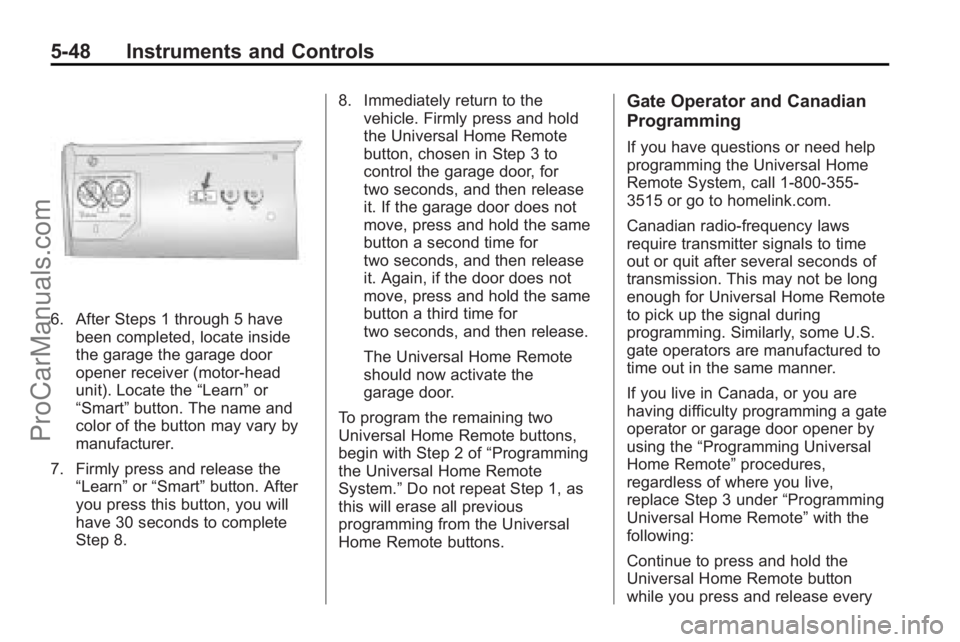
6. After Steps 1 through 5 havebeen completed, locate inside
the garage the garage door
opener receiver (motor-head
unit). Locate the “Learn”or
“Smart” button. The name and
color of the button may vary by
manufacturer.
7. Firmly press and release the “Learn” or“Smart” button. After
you press this button, you will
have 30 seconds to complete
Step 8. 8. Immediately return to the
vehicle. Firmly press and hold
the Universal Home Remote
button, chosen in Step 3 to
control the garage door, for
two seconds, and then release
it. If the garage door does not
move, press and hold the same
button a second time for
two seconds, and then release
it. Again, if the door does not
move, press and hold the same
button a third time for
two seconds, and then release.
The Universal Home Remote
should now activate the
garage door.
To program the remaining two
Universal Home Remote buttons,
begin with Step 2 of “Programming
the Universal Home Remote
System.” Do not repeat Step 1, as
this will erase all previous
programming from the Universal
Home Remote buttons.
Gate Operator and Canadian
Programming
If you have questions or need help
programming the Universal Home
Remote System, call 1‐800‐355‐
3515 or go to homelink.com.
Canadian radio-frequency laws
require transmitter signals to time
out or quit after several seconds of
transmission. This may not be long
enough for Universal Home Remote
to pick up the signal during
programming. Similarly, some U.S.
gate operators are manufactured to
time out in the same manner.
If you live in Canada, or you are
having difficulty programming a gate
operator or garage door opener by
using the “Programming Universal
Home Remote” procedures,
regardless of where you live,
replace Step 3 under “Programming
Universal Home Remote” with the
following:
Continue to press and hold the
Universal Home Remote button
while you press and release every
ProCarManuals.com
Page 161 of 398

Lighting 6-1
Lighting
Exterior Lighting
Exterior Lamp Controls . . . . . . . . 6-1
Headlamp High/Low-BeamChanger . . . . . . . . . . . . . . . . . . . . . 6-2
Flash-to-Pass . . . . . . . . . . . . . . . . . 6-2
Daytime Running Lamps (DRL) . . . . . . . . . . . . . . . . 6-2
Automatic Headlamp System . . . . . . . . . . . . . . . . . . . . . . 6-3
Hazard Warning Flashers . . . . . 6-3
Turn and Lane-Change Signals . . . . . . . . . . . . . . . . . . . . . . 6-4
Fog Lamps . . . . . . . . . . . . . . . . . . . . 6-4
Interior Lighting
Instrument Panel Illumination Control . . . . . . . . . . . . . . . . . . . . . . 6-5
Dome Lamps . . . . . . . . . . . . . . . . . 6-5
Reading Lamps . . . . . . . . . . . . . . . 6-5
Lighting Features
Entry Lighting . . . . . . . . . . . . . . . . . 6-5
Battery Load Management . . . . 6-6
Battery Power Protection . . . . . . 6-6
Exterior Lighting
Exterior Lamp Controls
The exterior lamp control is on the
instrument panel to the left of the
steering wheel. Turn the control to the following
positions:
9(Off):
Turns off the exterior
lamps. The knob returns to the
AUTO position after it is released.
AUTO (Automatic): Automatically
turns the exterior lamps on and off,
depending on outside lighting.
; (Parking Lamps): Turns on the
parking lamps together with the
following:
.Sidemarker Lamps
.Taillamps
.License Plate Lamps
.Instrument Panel Lights
2(Headlamps): Turns on the
headlamps, together with the
previously listed lamps and lights.
ProCarManuals.com