Page 161 of 343

Instrument Panel and Multi-Function Display
159
Fault PDCCVehicle handling may be affected. Adapt your speed to the
changed conditions.
Have the fault corrected at a q ualified specialist workshop.*PDCC failure The lateral inclination of the vehicle is significantly greater when
cornering. Drive carefully at an appropriate speed to the nearest
qualified specialist workshop.*PDCC fault
PSM activated Vehicle handling may be affect
ed. Adapt your speed to the
changed conditions.
Have the fault corrected at a q ualified specialist workshop.*Fault Differential lock Have the fault corrected at a qualified sp ecialist workshop.*Tire pressure Tire Pressure Monitoring detects a pressure loss of more
than 7 psi (0.5 bar) below 100 mph (160 km/h) and more
than 6 psi (0.4 bar) above 100 mph (160 km/h).
Stop in a suitable place and check the tires indicated for
damage. If necessary, fill in ti re sealant and set the correct
tire pressure.Inflate! Tire Pressure Monitoring detects a pressure loss of more
than 4 psi (0.3 bar).
Correct the tire pressure at the next opportunity.Restricted monitoring Fault on one or both wheel transmitters.
Have the fault corrected at a q ualified specialist workshop.*No monitoring System is learning Tire Pressure Mo nitoring requires a certain amount of time to
learn the wheels. During this time , the current tire pressures are
not available on the on-board computer.System not active Fault in Tire Pressure Monitoring system. Tire pressure is not
monitored. Have the fault corrected at a qualified specialist
workshop.*
Light in
instrument
panel
Warning message on multi-function
display Meaning/Action required
Page 162 of 343

160
Instrument Panel and Multi-Function Display
System not active
Temporary faultTemporary fault in the Tire Pressure Monitoring system.
Tire pressure is not monitored.Tire Pressure too low for speeds
greater xxx
Top speed for the preset co
mfort pressure exceeded.Tire change?
Update settings The tire settings on the multi-f
unction display must be updated
after changing a wheel.Fault Tire pressure check Fault in Tire Pressu re Monitoring system. Tire pressure is not
monitored. Have the fault corrected at a qualified specialist
workshop.*Driving light on Driving light/side light on.Parking light on Left/right parking light on.Example:
Check front left direction
indicator The reported light is faulty.
Check bulb.
Have the fault corrected at
a qualified specialist workshop.*
flashesDynamic cornering light defective Have the faul t corrected at a qualified specialist workshop.*
lights upAuto driving light control
defective Have the fault corrected at
a qualified specialist workshop.*Check static cornering light,
left/right The reported light is faulty.
Check bulb.
Have the fault corrected at
a qualified specialist workshop.*Headlight beam adjust. defective Adjust your speed and driving style. Have the fault corrected at
a qualified specialist workshop.*Rain/light sensor defective Switch on wipers/ light manually. Have the fault corrected at
a qualified specialist workshop.*
Light in
instrument
panel
Warning message on multi-function
display Meaning/Action required
Page 163 of 343

Instrument Panel and Multi-Function Display
161
flashes
Fault Headlight controlHave the fault corrected at a qualified sp ecialist workshop.*Headlights adapted for
LHD/RHD Headlights have been changed for
countries with left/right-hand
trafficWiper defective Have the fault corrected at a qualified specialist workshop.*Tailgate Close the tailgate
Example:
Door open
Also:
Doors, engine compartment lidClose door/lid indicatedLaunch Control activated Lau
nch Control is activated.Distance! Please brake!Insufficient distance from vehicle in front.Fault ACC Adjust your speed and driving style.
Have the fault on the adaptive Cruise Control corrected at
a qualified specialist workshop.*Fault ACC sensor Adaptive cruise control: Sensor in the front of the vehicle may
be covered with dirt, snow, ice or affected by adverse weather
conditions.System fault One or more electrical systems may have failed.
Adjust your speed and driving style.
Have the fault corrected at a q ualified specialist workshop.*Fault
Instrument cluster/
ParkAssist sound Turn signal tones, acoustic
warning and distance signals
(e.g. for ParkAssist) are not available.
Please note this when parking. Have the fault corrected at
a qualified specialist workshop.*
Light in
instrument
panel
Warning message on multi-function
display Meaning/Action required
Page 164 of 343
162
Instrument Panel and Multi-Function Display
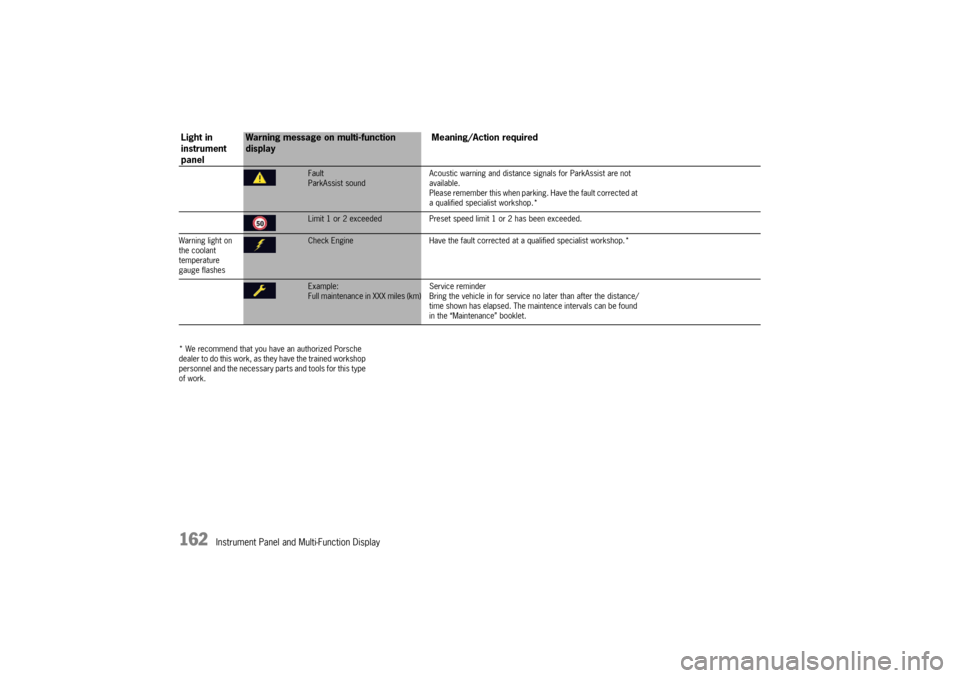
* We recommend that you have an authorized Porsche
d e a l e r t o d o t h i s w o r k , a s t h e y h a v e t h e t r a i n e d w o r k s h o p
personnel and the necessary parts and tools for this type
of work.
Fault
ParkAssist sound Acoustic warning and distance signals for ParkAssist are not
available.
Please remember this
when parking. Have the fault corrected at
a qualified specialist workshop.*Limit 1 or 2 exceeded Preset speed limit 1 or 2 has been exceeded.
Warning light on
the coolant
temperature
gauge flashesCheck Engine Have the fault corrected at a qualified specialist workshop.*Example:
Full maintenance in XXX miles (km) Service reminder
Bring the vehicle in for service no
later than after the distance/
time shown has elapsed. The maintence intervals can be found
in the “Maintenance” booklet.
Light in
instrument
panel
Warning message on multi-function
display Meaning/Action required
Page 165 of 343

Driving and Driving Safety
163
Driving and Driving Safety
Ignition Lock, Steering
Lock ........................ 164
Starting and Stopping the Engine ................ 167
Auto Start Stop Func tion ............................. 169
Electric Parking Brak e ................................ 171
Brakes ........................ .............................. 172
Cruise Control......... ................................... 176
Adaptive Cruise Contr ol .............................. 178
Car Audio Operation/Ti ps............................ 189
Porsche Communication Management
(PCM) .......................... .............................. 191
iPod
®, USB and AUX ........ .......................... 192
Voice Control ............... .............................. 192
Porsche Doppelkupplung (PDK) ................... 193
Selector-Lever Positi ons ............................. 195
Porsche Traction Management (PTM) ........... 202
Porsche Stability Management (PSM) ........... 202
ABS Brake System (Anti-Lock Brake
System)....................... .............................. 207
Porsche Active Suspension Management
(PASM) ............................................ .......... 208
Porsche Active Suspension Management
(PASM) with Air Suspension and Level
Control ............................................ .......... 209
Porsche Dynamic Chassis Control (PDCC) ... 211
“Sport” and “Sport Plus ” Mode ................... 212
Sports Exhaust Syst em .............................. 214
Retractable Rear Spoiler ............................. 214
Page 166 of 343

164
Driving and Driving Safety
Ignition Lock, Steering LockThe ignition key is inserted into the ignition lock
underneath the light swit ch at the left of the
steering wheel.
On vehicles with Porsche Entry & Drive, you no
longer have to insert the key into the ignition lock,
but merely keep it with yo u. The ignition key is
replaced by a control unit in the ignition lock,
which always remains in the ignition lock, unless
the vehicle is being towed.
The ignition lock has three key positions.
The steering column can be actively locked in
a fourth key position on vehicles with Porsche
Entry & Drive.
Key positions
0 - Initial position
1 - Ignition on
2 -Start engineNote on operation
The vehicle battery discharges if the ignition key is
left inserted.
If the vehicle battery is dead, the key can only be
removed from the ignition lock if the emergency
operation is performed:
f Please see the chapter “EMERGENCY
OPERATION – UNLOCKING THE IGNITION KEY”
on page 166.
Key positions with Porsche Entry & Drive
0-Initial position
1 - Ignition on
2 -Start engine
3 -Activate steeri ng column lockIgnition lock position 0 – Initial positionThe ignition key cannot be removed when the
ignition is switched on or when the engine has
been started.
Page 167 of 343

Driving and Driving Safety
165
To remove the ignition key:
fStop the vehicle.
f Move PDK selector lever to position P.
f Switch ignition off.
f Remove the ignition key.Ignition lock position 1 – Ignition onfTurn ignition key to position 1.
All electrical equipment can be switched on. The
warning lights on the inst rument panel light up for
alamp check.
f Please see the chapter “INSTRUMENT PANEL
USA MODELS” on page 107.
If an electrical consumer is not switched on for
10 minutes after switching on the ignition, the
ignition must be switched off then on again.
Ignition lock position 2 – Start enginef Turn ignition key to ignition lock position 2.
The car key is reset automa tically from position 2
to position 1 when you start the engine.Ignition lock position 3 – Activate
steering column lock on vehicles with
Porsche Entry & Drivef Please see the chapter “Manually locking the
steering column on vehicles with Porsche
Entry & Drive” on page 165.Steering column lockVehicles without Porsche Entry & Drive
The steering column is locked automatically
when the ignition key is removed from the ignition
lock and unlocked automatically when the
ignition key is inserted into the ignition lock.
Vehicles with Porsche Entry & Drive
The steering column is locked automatically
when the driver’s door is opened when the ignition
is switched off. Manually locking the steering column on
vehicles with Porsche Entry & Drive
f
Once the ignition is switched off, turn the
control unit to ignition lock position 3 again
and hold it there for 2seconds.
The steering column is locked when you hear
a clicking noise.
The steering column can be unlocked
automatically by turning the control unit to
ignition lock position 1.
Emergency operation with Porsche
Entry & DriveInterference in radio tr ansmission between the
vehicle and ignition lock or a discharged ignition
lock battery can disable the Porsche Entry & Drive
comfort function.
If this happens, the control unit can be removed
from the ignition lock and the vehicle can be
started using the standard ignition key.
Removing the control unit from the
ignition lock
1. Turn the control unit to ignition lock position 3
and hold it there for about 10 seconds.
Once you hear the clicking sound, you can remove
the control unit in ignition lock position 0.
Page 168 of 343
166
Driving and Driving Safety
Emergency operation – unlocking the
ignition keyIf the vehicle battery is dead, the ignition key can
be removed only if the emergency operation is
performed.
1. Carefully lever off the fuse box cover on the driver’s side with a screwdriver and remove it.
2. Unclip metal hook A on the inside of the fuse
box cover. 3. Use metal hook A
to remove the plastic
cover B from the ignition lock.
Make sure that plastic cover B is not lost. 4. Turn ignition key to ignition lock position
0
(initial position).
5. Press metal hook A into opening C.
You will hear an unlocking noise.
6. Remove the ignition key in initial position 0.
7. Re-fit the plastic cover B .