Page 319 of 448
4. Remove the two nuts that hold the taillamp
assembly.
5. Remove the taillamp assembly.
6. Turn the bulb socket counterclockwise to remove.
7. Pull the bulb straight out of the socket.
8. Push the new bulb straight in until it clicks.
9. Turn the bulb socket clockwise to reinstall.
10. Reinstall the taillamp assembly and the two nuts
that hold the taillamp assembly.
11. Reinstall the wing nuts holding the trunk trim.
Taillamps, Turn Signal, Sidemarker,
Stoplamps and Back-up Lamps
(Coupe)
A. Sidemarker Lamp
B. Stoplamp/Taillamp/Turn Signal Lamp
C. Back-up Lamp
6-51
Page 320 of 448
To replace one of these bulbs:
1. Open the trunk. SeeTrunk on page 3-11.
2. Remove the convenience net.
3. Remove the two wing nuts from the trunk trim and
pull back the trunk trim to expose the hex nuts.4. Remove the three hex nuts retaining the taillamp
assembly.
5. Pull the assembly off to the side to release it from
the rear of the vehicle.
6. Turn the bulb socket counterclockwise to remove
from the taillamp assembly.
7. Pull the bulb from the socket.
8. Push the new bulb into the socket until it clicks.
9. Turn the bulb socket clockwise to reinstall into the
taillamp assembly.
10. Push the taillamp assembly back into the rear of
the vehicle.
11. Reinstall the three hex nuts retaining the taillamp
assembly.
12. Reinstall the trunk trim and the two wing nuts.
6-52
Page 321 of 448
Taillamps, Turn Signal, Sidemarker,
Stoplamps and Back-up Lamps
(Retractable Hardtop)
A. Sidemarker Lamp
B. Stoplamp/Taillamp/Turn Signal Lamp
C. Back-up LampTo replace one of these bulbs:
1. Open the trunk. SeeTrunk on page 3-11.
2. Locate the three rubber covers in the trunk trim,
near the taillamp assembly and remove them.
3. Remove the two nuts and one bolt retaining the
taillamp assembly.
4. Pull off the taillamp assembly to the side to release
it from the vehicle.
5. Turn the bulb socket counterclockwise to remove.
6. Pull the bulb from the bulb socket.
7. Push the new bulb straight in until it clicks.
8. Turn the bulb socket clockwise to reinstall.
9. Push the taillamp assembly back into place.
10. Reinstall the two nuts and one bolt retaining the
taillamp assembly.
11. Reinstall the trunk trim and three rubber covers.
6-53
Page 322 of 448

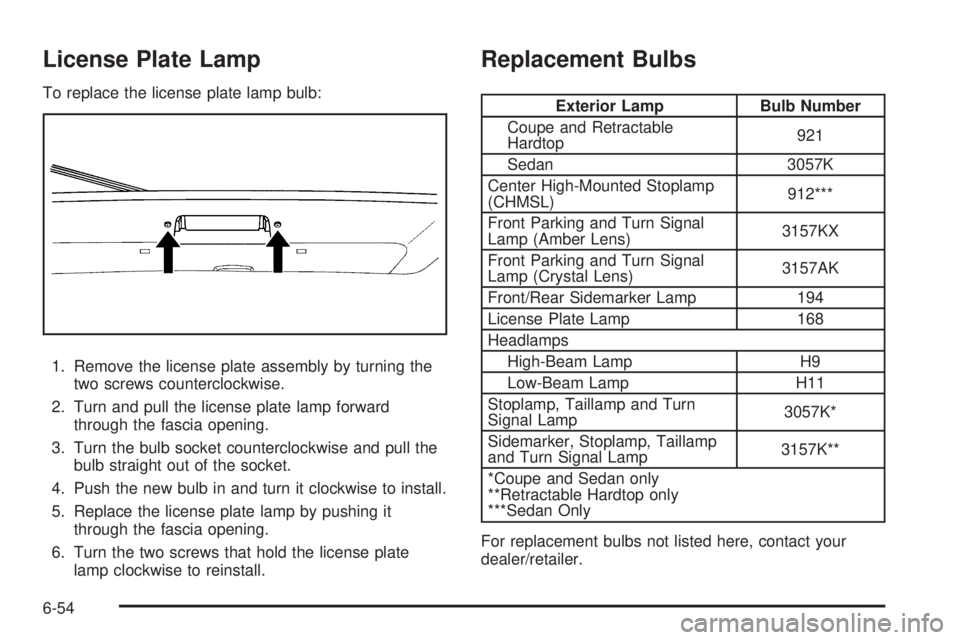
License Plate Lamp
To replace the license plate lamp bulb:
1. Remove the license plate assembly by turning the
two screws counterclockwise.
2. Turn and pull the license plate lamp forward
through the fascia opening.
3. Turn the bulb socket counterclockwise and pull the
bulb straight out of the socket.
4. Push the new bulb in and turn it clockwise to install.
5. Replace the license plate lamp by pushing it
through the fascia opening.
6. Turn the two screws that hold the license plate
lamp clockwise to reinstall.
Replacement Bulbs
Exterior Lamp Bulb Number
Coupe and Retractable
Hardtop921
Sedan 3057K
Center High-Mounted Stoplamp
(CHMSL)912***
Front Parking and Turn Signal
Lamp (Amber Lens)3157KX
Front Parking and Turn Signal
Lamp (Crystal Lens)3157AK
Front/Rear Sidemarker Lamp 194
License Plate Lamp 168
Headlamps
High-Beam Lamp H9
Low-Beam Lamp H11
Stoplamp, Taillamp and Turn
Signal Lamp3057K*
Sidemarker, Stoplamp, Taillamp
and Turn Signal Lamp3157K**
*Coupe and Sedan only
**Retractable Hardtop only
***Sedan Only
For replacement bulbs not listed here, contact your
dealer/retailer.
6-54
Page 353 of 448

Always do a safety check first. SeeIf a Tire Goes Flat
on page 6-81. Do not remove any objects that have
penetrated the tire.
1. Remove the tire sealant and compressor kit from its
storage location. SeeTire Sealant and Compressor
Kit Storage on page 6-89.
2. Unwrap the sealant/air hose (F) and the power
plug (G).
3. Place the kit on the ground.
Make sure the tire valve stem is positioned close to
the ground so the hose will reach it.
4. Remove the valve stem cap from the flat tire by
turning it counterclockwise.
5. Attach the sealant/air hose (F) onto the tire valve
stem. Turn it clockwise until it is tight.
6. Plug the power plug (G) into the accessory power
outlet in the vehicle. Unplug all items from other
accessory power outlets. SeeAccessory Power
Outlet(s) on page 4-15.If the vehicle has an accessory power outlet, do not
use the cigarette lighter.
If the vehicle only has a cigarette lighter, use the
cigarette lighter.
Do not pinch the power plug cord in the door or
window.
7. Start the vehicle. The vehicle must be running while
using the air compressor.
8. Turn the selector switch (B) clockwise to the
Sealant + Air position.
9. Press the on/off (A) button to turn the tire sealant
and compressor kit on.
The compressor will inject sealant and air into
the tire.
The pressure gage (D) will initially show a high
pressure while the compressor pushes the sealant
into the tire. Once the sealant is completely
dispersed into the tire, the pressure will quickly drop
and start to rise again as the tire inflates with air only.
6-85
Page 354 of 448

10. Inflate the tire to the recommended inflation pressure
using the pressure gage (D). The recommended
inflation pressure can be found on the Tire and
Loading Information label. SeeIn�ation - Tire
Pressure on page 6-64.
The pressure gage (D) may read higher than the
actual tire pressure while the compressor is on.
Turn the compressor off to get an accurate pressure
reading. The compressor may be turned on/off
until the correct pressure is reached.
Notice:If the recommended pressure cannot be
reached after approximately 25 minutes, the vehicle
should not be driven farther. The tire is too severely
damaged and the tire sealant and compressor kit
cannot in�ate the tire. Remove the power plug from
the accessory power outlet and unscrew the in�ating
hose from the tire valve. SeeRoadside Assistance
Program on page 8-7.
11. Press the on/off button (A) to turn the tire sealant
and compressor kit off.
The tire is not sealed and will continue to leak air until
the vehicle is driven and the sealant is distributed in
the tire, therefore, Steps 12 through 18 must be done
immediately after Step 11.
Be careful while handling the tire sealant and
compressor kit as it could be warm after usage.12. Unplug the power plug (G) from the accessory
power outlet in the vehicle.
13. Turn the sealant/air hose (F) counterclockwise to
remove it from the tire valve stem.
14. Replace the tire valve stem cap.
15. Replace the sealant/air hose (F), and the power
plug (G) back in their original location.
16. If the flat tire was able
to inflate to the
recommended inflation
pressure, remove the
maximum speed label
from the sealant
canister and place it in
a highly visible location.
The label is a reminder
not to exceed 55 mph
(90 km/h) until the
damaged tire is
repaired or replaced.
17. Return the equipment to its original storage location
in the vehicle.
18. Immediately drive the vehicle 5 miles (8 km) to
distribute the sealant in the tire.
6-86
Page 356 of 448

3. Place the kit on the ground.
Make sure the tire valve stem is positioned close to
the ground so the hose will reach it.
4. Remove the tire valve stem cap from the flat tire by
turning it counterclockwise.
5. Attach the air only hose (E) onto the tire valve stem
by turning it clockwise until it is tight.
6. Plug the power plug (G) into the accessory power
outlet in the vehicle. Unplug all items from other
accessory power outlets. SeeAccessory Power
Outlet(s) on page 4-15.
If the vehicle has an accessory power outlet, do not
use the cigarette lighter.
If the vehicle only has a cigarette lighter, use the
cigarette lighter.
Do not pinch the power plug cord in the door or
window.
7. Start the vehicle. The vehicle must be running while
using the air compressor.
8. Turn the selector switch (B) counterclockwise to the
Air Only position.
9. Press the on/off (A) button to turn the
compressor on.
The compressor will inflate the tire with air only.10. Inflate the tire to the recommended inflation pressure
using the pressure gage (D). The recommended
inflation pressure can be found on the Tire and
Loading Information label. SeeIn�ation - Tire
Pressure on page 6-64.
The pressure gage (D) may read higher than the
actual tire pressure while the compressor is on.
Turn the compressor off to get an accurate reading.
The compressor may be turned on/off until the
correct pressure is reached.
11. Press the on/off button (A) to turn the tire sealant
and compressor kit off.
Be careful while handling the tire sealant and
compressor kit as it could be warm after usage.
12. Unplug the power plug (G) from the accessory
power outlet in the vehicle.
13. Disconnect the air only hose (E) from the tire valve
stem, by turning it counterclockwise, and replace
the tire valve stem cap.
14. Replace the air only hose (E) and the power
plug (G) and cord back in its original location.
15. Place the equipment in the original storage location
in the vehicle.
6-88
Page 357 of 448
Removal and Installation of the Sealant
Canister
To remove the sealant canister:
1. Remove the plastic cover.
2. Unscrew the connector (B) from the canister (A).
3. Pull up on the canister (A) to remove it.
4. Replace with a new canister which is available from
your dealer/retailer.
5. Push the new canister into place.
6. Screw the connector (B) to the canister (A).
7. Slide the plastic cover back on.
Tire Sealant and Compressor Kit
Storage
The tire sealant and compressor kit is located in the
trunk.
1. Open the trunk. SeeTrunk on page 3-11.
2. Lift the cover.
3. Turn the retainer clockwise and remove the tire
sealant and compressor kit.
To store the tire sealant and compressor kit, reverse the
steps.
6-89