2010 Peugeot 407 Dag USB
[x] Cancel search: USBPage 6 of 249

FAMILIARISATION
INSTRUMENTS AND CONTROLS
1. Multifunction screen.
2. Audio and telematics system.
3. Automatic air conditioning controls.
4. Deactivation of the audible parking
sensors.
Central locking from the inside.
Alarm control.
Hazard warning lamps.
SPORT suspension control.
Deactivation of the ESP system.
Child lock.
5. Ashtray/Front cigar lighter
(100 W max).
6. Gear lever.
7. Parking brake.
8. Retractable cup holder.
9. Armrest with storage compartment
and USB port.
10. 12 volt accessories socket
(100 W max).
11. Rear ashtray.
� 139
� 213
Peugeot Connect Media
Peugeot Connect Navigation
� 184
Peugeot Connect Sound
Page 148 of 249

1010PRACTICAL INFORMATION
128
ACCESSORIES
A wide range of accessories recom-
mended by PEUGEOT and original
parts are offered by the dealer net-
work.
� �T�h�e�y� �a�l�l� �b�e�n�e�fi� �t� �f�r�o�m� �P�E�U�G�E�O�T� �r�e�c�-
ommendation.
These accessories and parts, having
been tested and approved for reliabil-
ity and safety, are all adapted to your
PEUGEOT vehicle.
The product range offered by PEU-
GEOT Accessories is structured
around 5 categories: PROTECTION -
TOURING - IN-CAR TECHNOLOGY -
STYLING - UNIVERSAL. Anti-theft alarm, parking sen-
sors, etched windows, wheel
�s�e�c�u�r�i�t�y� �b�o�l�t�s�,� �fi� �r�s�t� �a�i�d� �k�i�t�,�
warning triangle, high vis-
ibility safety jacket, snow
chains, anti-slip covers, dog
guard, etc.
"Protection": Seat covers compatible with
lateral airbags, mats, boot
tray.
For leisure pursuits: roof
bars, transport accessories
(bicycle carrier, ski carrier),
roof box, child seats and booster cush-
ions, rear screen blind, audio/tele-
phone console, side blinds, cool box.
� �T�r�a�i�l�e�r� �t�o�w�b�a�r� �w�h�i�c�h� �m�u�s�t� �b�e� �fi� �t�t�e�d� �b�y�
the PEUGEOT Network.
"Touring":
Telephone, Bluetooth sys-
tem, satellite navigation, CD
changer, multimedia, connec-
tion for portable MP3 player
(in the glove box), USB Box.
"In-Car Technology": Alloy wheels, wheel trims,
spoiler, leather steering
wheel, styling strips, door
spoilers, stainless steel sill
protectors.
"Styling":
� �W�i�n�d�s�c�r�e�e�n� �w�a�s�h� �fl� �u�i�d�,� �i�n�t�e�-
rior and exterior cleaning and
maintenance products.
"Universal":
� � �T�h�e� �fi� �t�t�i�n�g� �o�f� �e�l�e�c�t�r�i�c�a�l� �e�q�u�i�p�m�e�n�t�
or accessories which are not rec-
ommended by PEUGEOT may
result in a failure of your vehicle's
electronic system.
� �P�l�e�a�s�e� �n�o�t�e� �t�h�i�s� �s�p�e�c�i�fi� �c� �w�a�r�n�i�n�g�.� �Y�o�u�
are advised to contact a representa-
tive of the Marque to be shown the
range of recommended equipment
and accessories.
Note
To avoid any jamming under the pedals:
- ensure that the mat is positioned and secured correctly,
- never place one mat on top of an- other.
Depending on the country in
which the vehicle is sold, it
may be compulsory to have
a high visibility safety jacket,
warning triangle and spare
bulbs available in the vehicle.
Installation of radiocommunication
transmitters
It is advisable to contact a representa-
tive of the PEUGEOT marque before
installing accessory radiocommunica-
tion transmitters with external aerial
on your vehicle. The PEUGEOT network will inform
�y�o�u� �o�f� �t�h�e� �s�p�e�c�i�fi� �c�a�t�i�o�n�s� �(�f�r�e�q�u�e�n�c�y�
waveband, maximum output power,
�a�e�r�i�a�l� �p�o�s�i�t�i�o�n�,� �s�p�e�c�i�fi� �c� �i�n�s�t�a�l�l�a�t�i�o�n�
conditions) of the transmitters which
�c�a�n� �b�e� �fi� �t�t�e�d�,� �i�n� �a�c�c�o�r�d�a�n�c�e� �w�i�t�h� �t�h�e�
Motor Vehicle Electromagnetic Com-
patibility Directive (2004/104/EC).
407SW: you can obtain "Van" conver-
sion kits to convert from a private ve-
hicle to a van.
Page 159 of 249

140
01
11
�2�0�2�0
�8�8
�9�9
�5�5
�4�4
�3�3�2�2
�1�9�1�9
�1�6�1�61111
1010�1�8�1�8
�1�2�1�2
�6�6�7�7
�1�3�1�3
�1�5�1�5
�1�4�1�4
�1�7�1�7
FIRST STEPS
� � � �1�.� � On/Off and Volume adjustment.
� �2�.� � Selection of the source: radio, Jukebox, CD/DVD, CD �c�h�a�n�g�e�r� �a�n�d� �a�u�x�i�l�i�a�r�y� �(�A�U�X�,� �i�f� �a�c�t�i�v�a�t�e�d� �o�n� �t�h�e� �C�o�n�fi� �g�u�r�a�t�i�o�n� menu). Long press: CD copy to hard disc.
� �3�.� � Audio option adjustments: front/rear, left/right balance, loudness, sound ambiences.
� �4�.� � Display the list of local radio stations, the tracks on the CD/DVD or the MP3/USB/Jukebox directories. Long press: update the local radio stations.
� �5�.� � Automatic search for a lower/higher frequency. Sele ction of the previous/next CD/DVD, MP3, USB or Jukebox track . Long press: fast forward and backward play.
� � �6�.� Selection of the wavebands FM1, FM2, FMast, AM.
� � �7�.� � �T�A� �(�T�r�a�f�fi� �c� �A�n�n�o�u�n�c�e�m�e�n�t�)� �f�u�n�c�t�i�o�n� �o�n�/�o�f�f�.� � Long press: access to the PTY mode (radio Programme TYpes).
� � �8�.� � Ejection of the CD/DVD.
� � �9�.� SIM card slot.
� � �1�0�.� Keypad for entering descriptions by successive presses.
� � �1�1�.� Access to the "PEUGEOT" services menu.
� � �1�2�.� � �S�e�l�e�c�t�i�o�n� �a�n�d� �c�o�n�fi� �r�m�a�t�i�o�n�.�
� � �1�3�.� Selection of the previous/next CD/DVD. Selection o f the previous/next MP3/USB/Jukebox directory.
� � �1�4�.� Selection of a lower/higher frequency.
�1�5�.� Cancellation of the current operation. Long press: return to the current application.
� � �1�6�.� Display the main menu.
� � �1�7�.� Deletion of the last character entered or of the entire line.
� � �1�8�.� � �M�o�d�i�fi� �c�a�t�i�o�n� �o�f� �t�h�e� �s�c�r�e�e�n� �d�i�s�p�l�a�y�.� � Long press: reinitialisation of the Peugeot Connec t Media system.
� � �1�9�.� Selection of the display on the screen from the modes: TRIP, TEL, CLIM, NAV and AUDIO.
� � �2�0�.� Long press on the SOS button: emergency call.
Page 160 of 249

141
�0�2 VOICE COMMANDS AND STEERING MOUNTED CONTROLS
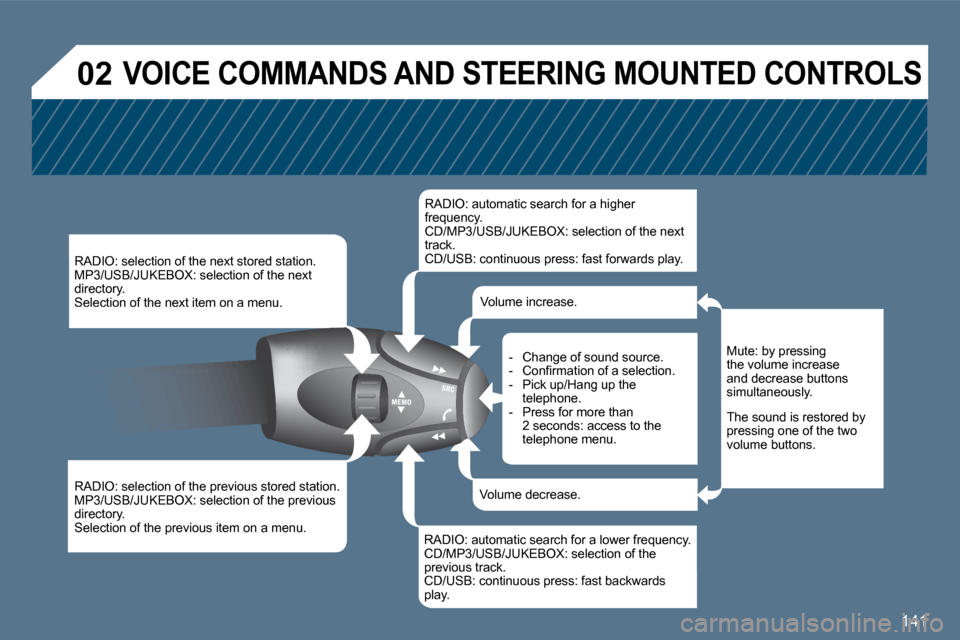
RADIO: selection of the next stored station. MP3/USB/JUKEBOX: selection of the next directory. Selection of the next item on a menu.
RADIO: selection of the previous stored station. MP3/USB/JUKEBOX: selection of the previous directory. Selection of the previous item on a menu.
RADIO: automatic search for a higher frequency. CD/MP3/USB/JUKEBOX: selection of the next track. CD/USB: continuous press: fast forwards play.
RADIO: automatic search for a lower frequency. CD/MP3/USB/JUKEBOX: selection of the previous track. CD/USB: continuous press: fast backwards play.
- Change of sound source. � � �-� � �C�o�n�fi� �r�m�a�t�i�o�n� �o�f� �a� �s�e�l�e�c�t�i�o�n�.� - Pick up/Hang up the telephone. - Press for more than 2 seconds: access to the telephone menu.
Volume increase.
Volume decrease.
Mute: by pressing the volume increase and decrease buttons simultaneously.
The sound is restored by pressing one of the two volume buttons.
Page 161 of 249

142
�2�2
11
�0�2
Press the end of the lights stalk to start the voice recognition. Say the words one by one and wait for the audible �c�o�n�fi� �r�m�a�t�i�o�n� �s�i�g�n�a�l� �b�e�t�w�e�e�n� �e�a�c�h� �w�o�r�d�.� The list which follows is exhaustive.
To display the list of available voice commands, p ress the end of the lights stalk to start the voice recognition, then say HELP or WHAT CAN I SAY.
For the same operation, press and hold the MENU button and select the function VOICE COMMANDS LIST.
VOICE COMMANDS LIST
VOICE COMMANDS
DISPLAYING THE LIST AND USING THEM
LEVEL 1 � �L�E�V�E�L� �2� � �L�E�V�E�L� �3�
radio memory autostore previous/next list
1 to 6/*
cd player Jukebox (if activated) USB
previous/next track track number/track scan random play
directory (CD-MP3 inserted) list
1 to 250/* previous/next repeat help/what can I say/cancel
call/guide to "Pre-recorded description"
telephone last number voice box voice mail directory
"Pre-recorded description"
message display read directory
"Pre-recorded description"
navigation stop/resume zoom in/out view
* destination vehicle
� �t�r�a�f�fi� �c� �i�n�f�o� display read
display audio telephone trip computer Navigation air conditioning
previous/next stop delete yes/no
for all level 1 and 2
* help/what can I say/cancel for all level 1, 2 or *
VOICE COMMANDS AND STEERING MOUNTED CONTROLS
Page 164 of 249

145
1
1
1
1
1
1
1
1
1
1
1
1
1
1
1
1
1
1
1
1
1
1
1
1
1
1
1
1
1
1
1
1
1
1
1
1
1
1
1
�0�3 SCREEN AND MAIN MENU
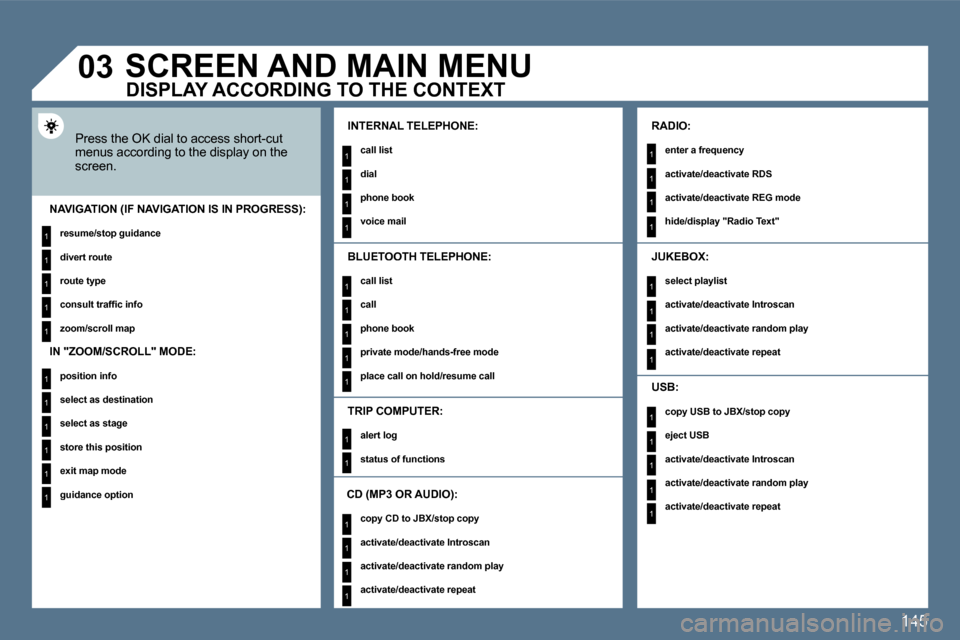
Press the OK dial to access short-cut menus according to the display on the screen.
INTERNAL TELEPHONE:
� � �c�a�l�l� �l�i�s�t� �
� � �d�i�a�l� �
� � �p�h�o�n�e� �b�o�o�k� �
� � �v�o�i�c�e� �m�a�i�l� � � NAVIGATION (IF NAVIGATION IS IN PROGRESS):
� � �r�e�s�u�m�e�/�s�t�o�p� �g�u�i�d�a�n�c�e� �
� � �d�i�v�e�r�t� �r�o�u�t�e� �
� � �r�o�u�t�e� �t�y�p�e� �
� � �c�o�n�s�u�l�t� �t�r�a�f�fi� �c� �i�n�f�o� �
� � �z�o�o�m�/�s�c�r�o�l�l� �m�a�p� � �
TRIP COMPUTER:
� � �a�l�e�r�t� �l�o�g� �
� � �s�t�a�t�u�s� �o�f� �f�u�n�c�t�i�o�n�s� � �
BLUETOOTH TELEPHONE:
� � �c�a�l�l� �l�i�s�t� �
� � �c�a�l�l� �
� � �p�h�o�n�e� �b�o�o�k� �
� � �p�r�i�v�a�t�e� �m�o�d�e�/�h�a�n�d�s�-�f�r�e�e� �m�o�d�e� �
� � �p�l�a�c�e� �c�a�l�l� �o�n� �h�o�l�d�/�r�e�s�u�m�e� �c�a�l�l� � �
� � �C�D� �(�M�P�3� �O�R� �A�U�D�I�O�)�:�
� � �c�o�p�y� �C�D� �t�o� �J�B�X�/�s�t�o�p� �c�o�p�y� �
� � �a�c�t�i�v�a�t�e�/�d�e�a�c�t�i�v�a�t�e� �I�n�t�r�o�s�c�a�n� �
� � �a�c�t�i�v�a�t�e�/�d�e�a�c�t�i�v�a�t�e� �r�a�n�d�o�m� �p�l�a�y� �
� � �a�c�t�i�v�a�t�e�/�d�e�a�c�t�i�v�a�t�e� �r�e�p�e�a�t� � �
RADIO:
� � �e�n�t�e�r� �a� �f�r�e�q�u�e�n�c�y� �
� � �a�c�t�i�v�a�t�e�/�d�e�a�c�t�i�v�a�t�e� �R�D�S� �
� � �a�c�t�i�v�a�t�e�/�d�e�a�c�t�i�v�a�t�e� �R�E�G� �m�o�d�e� �
� � �h�i�d�e�/�d�i�s�p�l�a�y� �"�R�a�d�i�o� �T�e�x�t�"� � �
JUKEBOX:
� � �s�e�l�e�c�t� �p�l�a�y�l�i�s�t� �
� � �a�c�t�i�v�a�t�e�/�d�e�a�c�t�i�v�a�t�e� �I�n�t�r�o�s�c�a�n� �
� � �a�c�t�i�v�a�t�e�/�d�e�a�c�t�i�v�a�t�e� �r�a�n�d�o�m� �p�l�a�y� �
� � �a�c�t�i�v�a�t�e�/�d�e�a�c�t�i�v�a�t�e� �r�e�p�e�a�t� � �
USB:
� � �c�o�p�y� �U�S�B� �t�o� �J�B�X�/�s�t�o�p� �c�o�p�y� �
eject USB
� � �a�c�t�i�v�a�t�e�/�d�e�a�c�t�i�v�a�t�e� �I�n�t�r�o�s�c�a�n� �
� � �a�c�t�i�v�a�t�e�/�d�e�a�c�t�i�v�a�t�e� �r�a�n�d�o�m� �p�l�a�y� �
� � �a�c�t�i�v�a�t�e�/�d�e�a�c�t�i�v�a�t�e� �r�e�p�e�a�t� � � �
DISPLAY ACCORDING TO THE CONTEXT
� � �I�N� �"�Z�O�O�M�/�S�C�R�O�L�L�"� �M�O�D�E�:�
� � �p�o�s�i�t�i�o�n� �i�n�f�o� �
� � �s�e�l�e�c�t� �a�s� �d�e�s�t�i�n�a�t�i�o�n� �
� � �s�e�l�e�c�t� �a�s� �s�t�a�g�e� �
� � �s�t�o�r�e� �t�h�i�s� �p�o�s�i�t�i�o�n� �
� � �e�x�i�t� �m�a�p� �m�o�d�e� �
� � �g�u�i�d�a�n�c�e� �o�p�t�i�o�n� � �
Page 170 of 249

151
�0�4
�3
1
�2
�2
1
�3
�4
�5
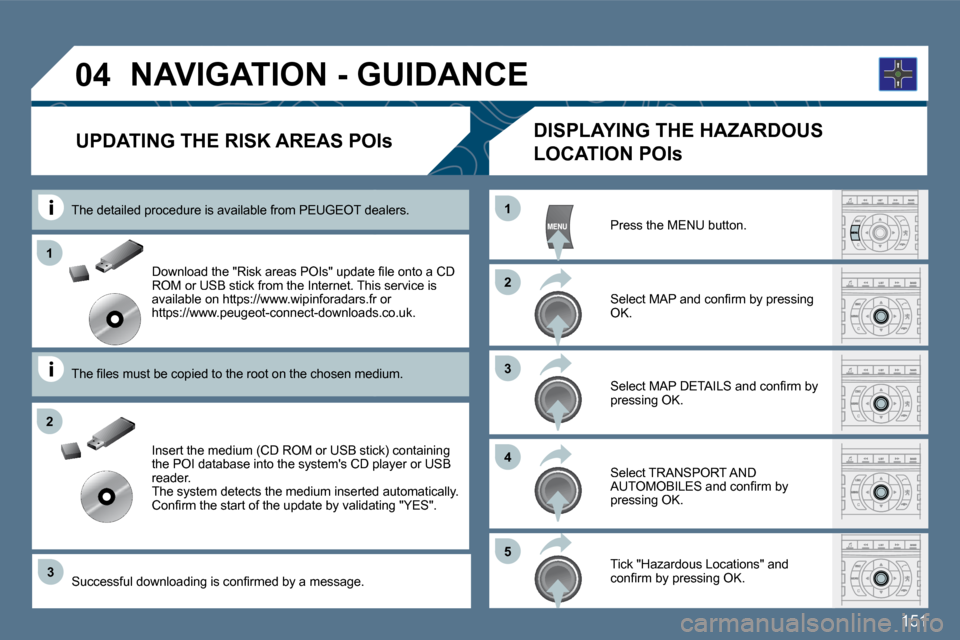
� � �D�o�w�n�l�o�a�d� �t�h�e� �"�R�i�s�k� �a�r�e�a�s� �P�O�I�s�"� �u�p�d�a�t�e� �fi� �l�e� �o�n�t�o� �a� �C�D� ROM or USB stick from the Internet. This service is available on https://www.wipinforadars.fr or https://www.peugeot-connect-downloads.co.uk.
� � �T�h�e� �fi� �l�e�s� �m�u�s�t� �b�e� �c�o�p�i�e�d� �t�o� �t�h�e� �r�o�o�t� �o�n� �t�h�e� �c�h�o�s�e�n� �m�e�d�i�u�m�.� � � � �T�h�e� �fi� �l�e�s� �m�u�s�t� �b�e� �c�o�p�i�e�d� �t�o� �t�h�e� �r�o�o�t� �o�n� �t�h�e� �c�h�o�s�e�n� �m�e�d�i�u�m�.� �
Insert the medium (CD ROM or USB stick) containin g the POI database into the system's CD player or USB reader. The system detects the medium inserted automatical ly. �C�o�n�fi� �r�m� �t�h�e� �s�t�a�r�t� �o�f� �t�h�e� �u�p�d�a�t�e� �b�y� �v�a�l�i�d�a�t�i�n�g� �"�Y�E�S�"�.� �
UPDATING THE RISK AREAS POIs
� �N�A�V�I�G�A�T�I�O�N� �-� �G�U�I�D�A�N�C�E�
The detailed procedure is available from PEUGEOT deaT dealers.
� � �S�u�c�c�e�s�s�f�u�l� �d�o�w�n�l�o�a�d�i�n�g� �i�s� �c�o�n�fi� �r�m�e�d� �b�y� �a� �m�e�s�s�a�g�e�.� � �
� � �D�I�S�P�L�A�Y�I�N�G� �T�H�E� �H�A�Z�A�R�D�O�U�S�
LOCATION POIs
Press the MENU button.
� � �S�e�l�e�c�t� �M�A�P� �a�n�d� �c�o�n�fi� �r�m� �b�y� �p�r�e�s�s�i�n�g� OK.
� � �S�e�l�e�c�t� �M�A�P� �D�E�T�A�I�L�S� �a�n�d� �c�o�n�fi� �r�m� �b�y� pressing OK.
Select TRANSPORT AND �A�U�T�O�M�O�B�I�L�E�S� �a�n�d� �c�o�n�fi� �r�m� �b�y� pressing OK.
Tick "Hazardous Locations" and �c�o�n�fi� �r�m� �b�y� �p�r�e�s�s�i�n�g� �O�K�.� � �
Page 181 of 249

162
11
11
�2�2
�0�6
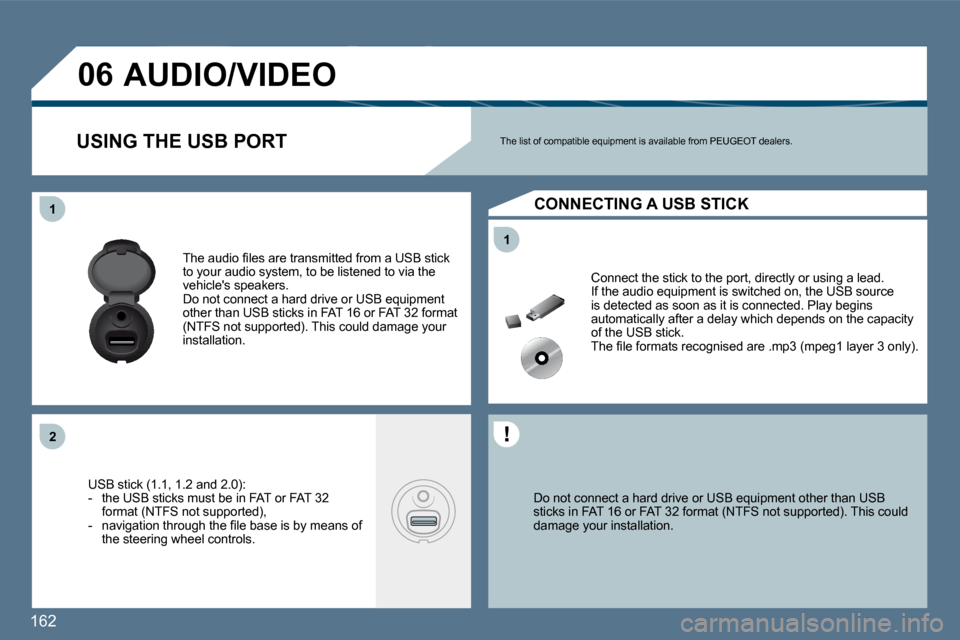
Do not connect a hard drive or USB equipment other than USB sticks in FAT 16 or FAT 32 format (NTFS not support ed). This could damage your installation.
Connect the stick to the port, directly or using a lead. If the audio equipment is switched on, the USB sour ce is detected as soon as it is connected. Play begins automatically after a delay which depends on the capacity of the USB stick. � �T�h�e� �fi� �l�e� �f�o�r�m�a�t�s� �r�e�c�o�g�n�i�s�e�d� �a�r�e� �.�m�p�3� �(�m�p�e�g�1� �l�a�y�e�r� �3� �o�n�l�y�)�.� �
The list of compatible equipment is available from PEUGEOT dealers. USING THE USB PORT
CONNECTING A USB STICK
� � �T�h�e� �a�u�d�i�o� �fi� �l�e�s� �a�r�e� �t�r�a�n�s�m�i�t�t�e�d� �f�r�o�m� �a� �U�S�B� �s�t�i�c�k� to your audio system, to be listened to via the vehicle's speakers. Do not connect a hard drive or USB equipment other than USB sticks in FAT 16 or FAT 32 format (NTFS not supported). This could damage your installation.
USB stick (1.1, 1.2 and 2.0): - the USB sticks must be in FAT or FAT 32 format (NTFS not supported), � � �-� � �n�a�v�i�g�a�t�i�o�n� �t�h�r�o�u�g�h� �t�h�e� �fi� �l�e� �b�a�s�e� �i�s� �b�y� �m�e�a�n�s� �o �f� the steering wheel controls.
AUDIO/VIDEO