2010 NISSAN VERSA HATCHBACK check engine light
[x] Cancel search: check engine lightPage 229 of 338
3. Remove the shift lock release cover asshown.
4. Insert a small screwdriver in the shift lock release slot and push downward.
5. Move the shift selector to the N (Neutral) position while holding down the shift lock
release.
6. Now the vehicle may be moved to the de- sired location.
If the shift selector lever cannot be moved out of
P (Park) , have a NISSAN dealer check the CVT
system as soon as possible.
WARNING
If the shift selector cannot be moved from
the P (Park) position while the engine is
running and the brake pedal is depressed,
the stop lights may not work. Malfunction-
ing stop lights could cause an accident
injuring yourself and others.Overdrive (O/D) OFF switch
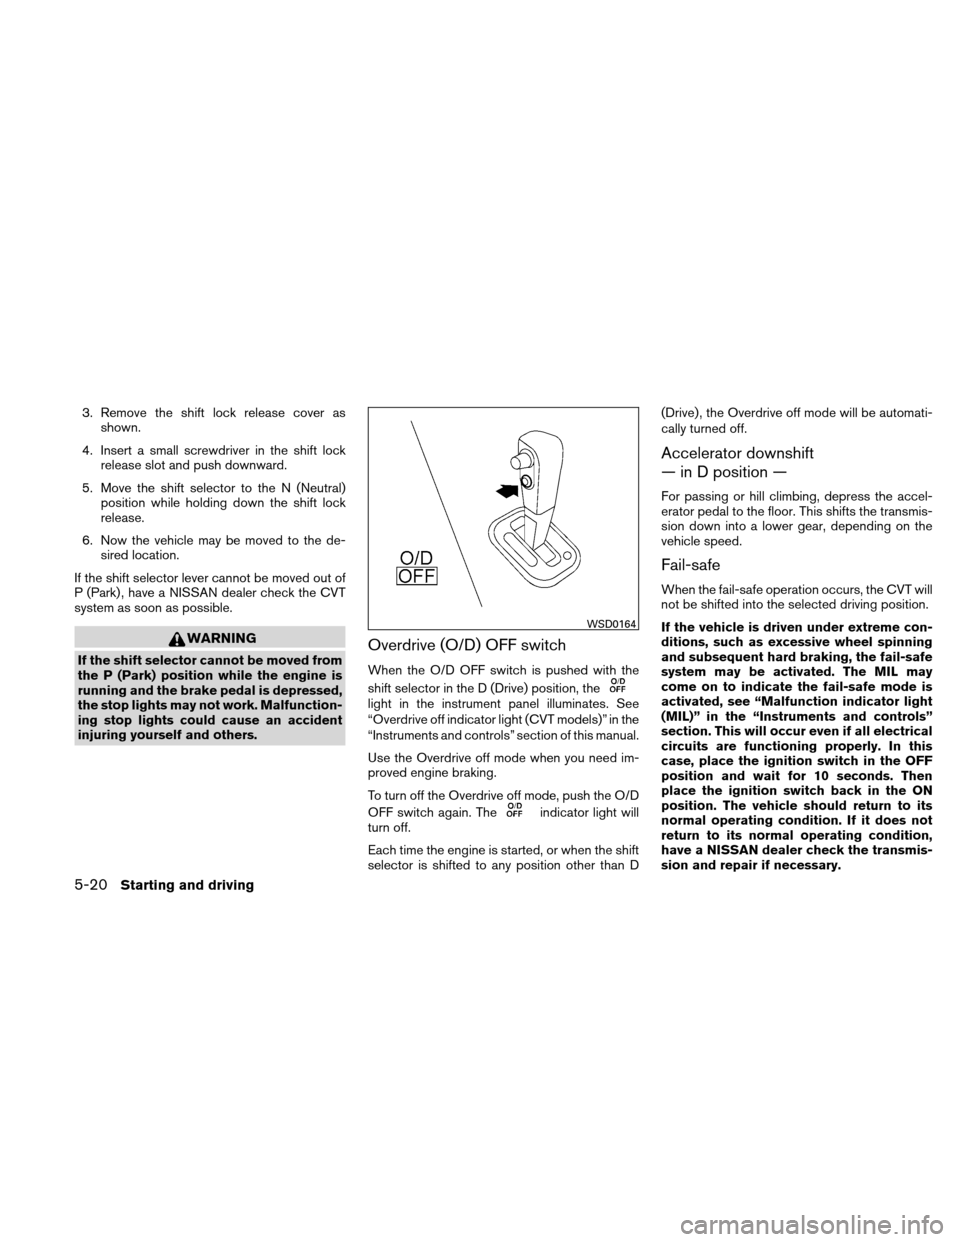
When the O/D OFF switch is pushed with the
shift selector in the D (Drive) position, the
light in the instrument panel illuminates. See
“Overdrive off indicator light (CVT models)” in the
“Instruments and controls” section of this manual.
Use the Overdrive off mode when you need im-
proved engine braking.
To turn off the Overdrive off mode, push the O/D
OFF switch again. The
indicator light will
turn off.
Each time the engine is started, or when the shift
selector is shifted to any position other than D (Drive) , the Overdrive off mode will be automati-
cally turned off.
Accelerator downshift
— in D position —
For passing or hill climbing, depress the accel-
erator pedal to the floor. This shifts the transmis-
sion down into a lower gear, depending on the
vehicle speed.
Fail-safe
When the fail-safe operation occurs, the CVT will
not be shifted into the selected driving position.
If the vehicle is driven under extreme con-
ditions, such as excessive wheel spinning
and subsequent hard braking, the fail-safe
system may be activated. The MIL may
come on to indicate the fail-safe mode is
activated, see “Malfunction indicator light
(MIL)” in the “Instruments and controls”
section. This will occur even if all electrical
circuits are functioning properly. In this
case, place the ignition switch in the OFF
position and wait for 10 seconds. Then
place the ignition switch back in the ON
position. The vehicle should return to its
normal operating condition. If it does not
return to its normal operating condition,
have a NISSAN dealer check the transmis-
sion and repair if necessary.
WSD0164
5-20Starting and driving
Page 233 of 338
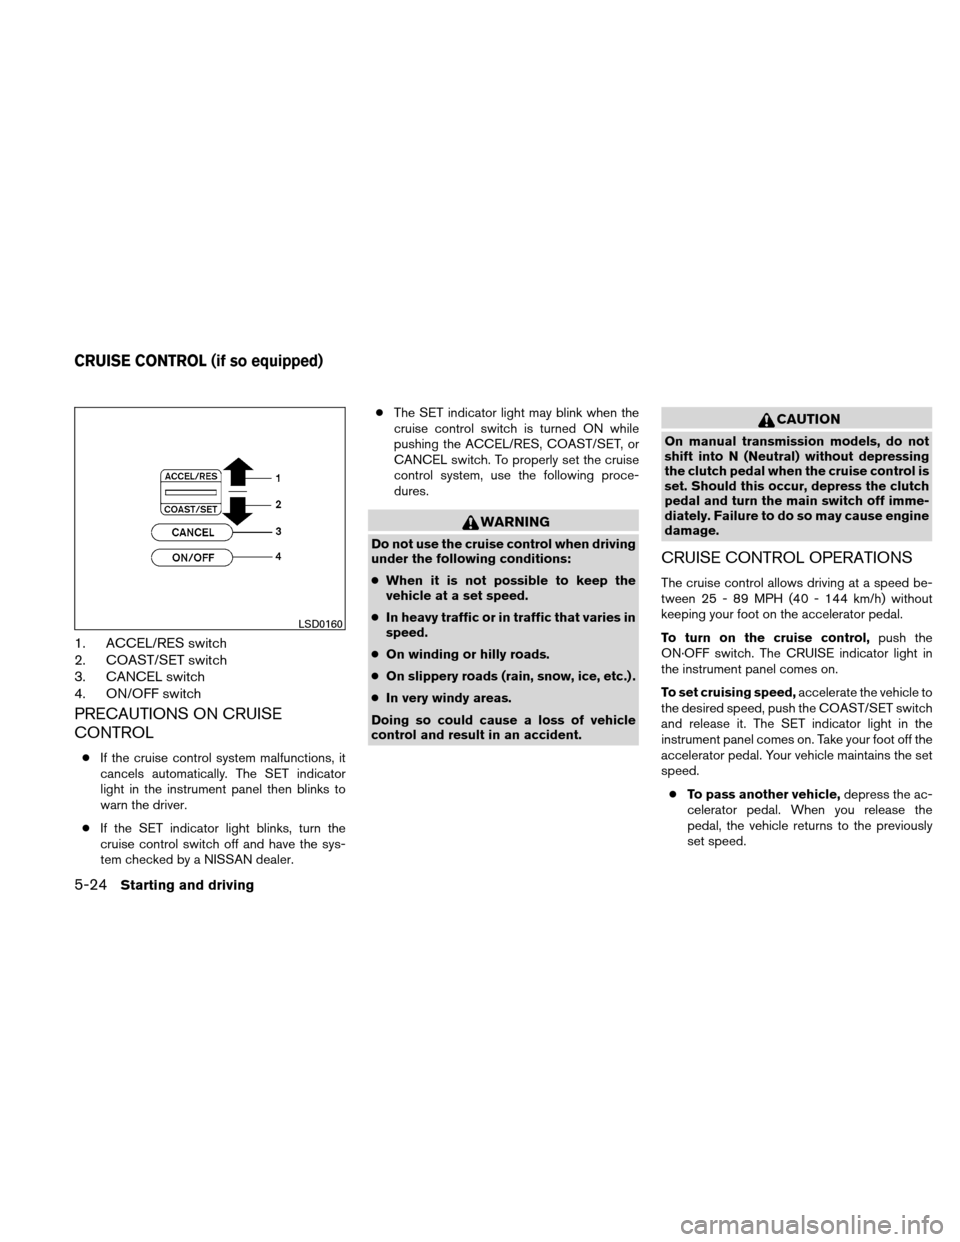
1. ACCEL/RES switch
2. COAST/SET switch
3. CANCEL switch
4. ON/OFF switch
PRECAUTIONS ON CRUISE
CONTROL
●If the cruise control system malfunctions, it
cancels automatically. The SET indicator
light in the instrument panel then blinks to
warn the driver.
● If the SET indicator light blinks, turn the
cruise control switch off and have the sys-
tem checked by a NISSAN dealer. ●
The SET indicator light may blink when the
cruise control switch is turned ON while
pushing the ACCEL/RES, COAST/SET, or
CANCEL switch. To properly set the cruise
control system, use the following proce-
dures.
WARNING
Do not use the cruise control when driving
under the following conditions:
●When it is not possible to keep the
vehicle at a set speed.
● In heavy traffic or in traffic that varies in
speed.
● On winding or hilly roads.
● On slippery roads (rain, snow, ice, etc.) .
● In very windy areas.
Doing so could cause a loss of vehicle
control and result in an accident.
CAUTION
On manual transmission models, do not
shift into N (Neutral) without depressing
the clutch pedal when the cruise control is
set. Should this occur, depress the clutch
pedal and turn the main switch off imme-
diately. Failure to do so may cause engine
damage.
CRUISE CONTROL OPERATIONS
The cruise control allows driving at a speed be-
tween 25 - 89 MPH (40 - 144 km/h) without
keeping your foot on the accelerator pedal.
To turn on the cruise control, push the
ON·OFF switch. The CRUISE indicator light in
the instrument panel comes on.
To set cruising speed, accelerate the vehicle to
the desired speed, push the COAST/SET switch
and release it. The SET indicator light in the
instrument panel comes on. Take your foot off the
accelerator pedal. Your vehicle maintains the set
speed.
● To pass another vehicle, depress the ac-
celerator pedal. When you release the
pedal, the vehicle returns to the previously
set speed.
LSD0160
CRUISE CONTROL (if so equipped)
5-24Starting and driving
Page 237 of 338
WARNING
●If the engine is not running or is turned
off while driving, the power assist for
the steering will not work. Steering will
be harder to operate.
● When the power steering warning light
illuminates with the engine running,
there will be no power assist for the
steering. You will still have control of
the vehicle but the steering will be
harder to operate. Have the power
steering system checked by a NISSAN
dealer.
The power steering system is designed to pro-
vide power assist while driving to operate the
steering wheel with light force.
When the steering wheel is operated repeatedly
or continuously while parking or driving at a very
low speed, the power assist for the steering
wheel will be reduced. This is to prevent over-
heating of the power steering system and protect
it from getting damaged. While the power assist
is reduced, steering wheel operation will become
heavy. When the temperature of the power steer-
ing system goes down, the power assist level will
return to normal. Avoid repeating such steering
wheel operations that could cause the power
steering system to overheat. You may hear a sound when the steering wheel is
operated quickly. However, this is not a malfunc-
tion.
If the electric power steering warning light
PS
illuminates while the engine is running, it may
indicate the power steering system is not func-
tioning properly and may need servicing. Have
the power steering system checked by a
NISSAN dealer.
When the electric power steering warning light
illuminates with the engine running, there will be
no power assist for the steering but you will still
have control of the vehicle. At this time, greater
steering effort is required to operate the steering
wheel, especially in sharp turns and at low
speeds.
For additional information see “Electric power
steering warning light” in the “Instruments and
controls” section. The brake system has two separate hydraulic
circuits. If one circuit malfunctions, you will still
have braking at 2 wheels.
BRAKE PRECAUTIONS
Vacuum assisted brakes
The brake booster aids braking by using engine
vacuum. If the engine stops, you can stop the
vehicle by depressing the brake pedal. However,
greater foot pressure on the brake pedal will be
required to stop the vehicle and stopping dis-
tance will be longer.
Using the brakes
Avoid resting your foot on the brake pedal while
driving. This will overheat the brakes, wear out the
brake pads faster, and reduce gas mileage.
To help reduce brake wear and to prevent the
brakes from overheating, reduce speed and
downshift to a lower gear before going down a
slope or long grade. Overheated brakes may
reduce braking performance and could result in
loss of vehicle control.
POWER STEERING
BRAKE SYSTEM
5-28Starting and driving
Page 239 of 338
WARNING
Do not pump the brake pedal. Doing so
may result in increased stopping
distances.
Self-test feature
The ABS includes electronic sensors, electric
pumps, hydraulic solenoids and a computer. The
computer has a built-in diagnostic feature that
tests the system each time you start the engine
and move the vehicle at a low speed in forward or
reverse. When the self-test occurs, you may hear
a “clunk” noise and/or feel a pulsation in the brake
pedal. This is normal and does not indicate a
malfunction. If the computer senses a malfunc-
tion, it switches the ABS off and illuminates the
ABS warning light on the instrument panel. The
brake system then operates normally, but without
anti-lock assistance.
If the ABS warning light illuminates during the
self-test or while driving, have the vehicle
checked by a NISSAN dealer.
Normal operation
The ABS operates at speeds above3-6MPH(5
- 10 km/h) . The speed varies according to road
conditions.
When the ABS senses that 1 or more wheels are
close to locking up, the actuator rapidly applies
and releases hydraulic pressure. This action is
similar to pumping the brakes very quickly. You
may feel a pulsation in the brake pedal and hear a
noise from under the hood or feel a vibration from
the actuator when it is operating. This is normal
and indicates that the ABS is operating properly.
However, the pulsation may indicate that road
conditions are hazardous and extra care is re-
quired while driving.The Vehicle Dynamic Control (VDC) system uses
various sensors to monitor driver inputs and ve-
hicle motion. Under certain driving situations, the
system will control braking and engine output to
help keep the vehicle on its steered path.
● When the Vehicle Dynamic Control (VDC)
system is operating, the slip indicator in the
instrument panel blinks.
● If the slip indicator blinks, the road condi-
tions may be slippery. Be sure to adjust your
speed and driving to these conditions. See
“Slip indicator light” and “Vehicle Dynamic
Control (VDC) off indicator light” in the “In-
struments and controls” section.
● Indicator light
– If a malfunction occurs in the system, the
andindicator lights
come on in the instrument panel.
– As long as these indicator lights are on, the traction control function is canceled.
If the vehicle is operated with the Vehicle Dy-
namic Control system off using the VDC off
switch, most VDC and Traction Control System
(TCS) functions will be turned off. The slip
indicator
will flash if wheel spin is de-
tected. The ABS will still operate with the VDC
system off.
VEHICLE DYNAMIC CONTROL (VDC)
SYSTEM (if so equipped)
5-30Starting and driving
Page 245 of 338
TIRE PRESSURE MONITORING
SYSTEM (TPMS) (if so equipped)
This vehicle is equipped with the Tire Pressure
Monitoring System (TPMS) . It monitors tire pres-
sure of all tires except the spare. When the low
tire pressure warning light is lit, one or more of
your tires is significantly under-inflated. If the
vehicle is being driven with low tire pressure, the
TPMS will activate and warn you of it by the low
tire pressure warning light. This system will acti-
vate only when the vehicle is driven at speeds
above 16 MPH (25 km/h) . For more details, refer
to “Warning/indicator lights and audible remind-
ers” in the “Instruments and controls” section,
and “Tire Pressure Monitoring System (TPMS)”
in the “Starting and driving” section.
WARNING
●If the low tire pressure warning light
illuminates while driving, avoid sudden
steering maneuvers or abrupt braking,
reduce vehicle speed, pull off the road
to a safe location and stop the vehicle
as soon as possible. Driving with under-
inflated tires may permanently damage
the tires and increase the likelihood of
tire failure. Serious vehicle damage
could occur and may lead to an acci-
dent and could result in serious per-
sonal injury. Check the tire pressure for
all four tires. Adjust the tire pressure to
the recommended COLD tire pressure
shown on the Tire and Loading Informa-
tion label to turn the low tire pressure
warning light OFF. If you have a flat tire,
replace it with a spare tire as soon as
possible.
● When a spare tire is mounted or a wheel
is replaced, the TPMS will not function
and the low tire pressure warning light
will flash for approximately 1 minute.
The light will remain on after 1 minute.
Contact your NISSAN dealer as soon as
possible for tire replacement and/or
system resetting. ●
Replacing tires with those not originally
specified by NISSAN could affect the
proper operation of the TPMS.
● Do not inject any tire liquid or aerosol
tire sealant into the tires, as this may
cause a malfunction of the tire pressure
sensors.
CHANGING A FLAT TIRE
If you have a flat tire, follow the instructions be-
low:
Stopping the vehicle
1. Safely move the vehicle off the road and
away from traffic.
2. Turn on the hazard warning flashers.
3. Park on a level surface and apply the parking brake. Shift the transmission into P (Park) or
the manual transmission into R (Reverse) .
4. Turn off the engine.
5. Raise the hood to warn other traffic and to signal professional road assistance person-
nel that you need assistance.
6. Have all passengers get out of the vehicle and stand in a safe place, away from traffic
and clear of the vehicle.
FLAT TIRE
6-2In case of emergency
Page 253 of 338
CAUTION
●Do not push start this vehicle. The
three-way catalyst may be damaged.
● Automatic Transmission (AT) or Con-
tinuously Variable Transmission (CVT)
models cannot be push-started or tow-
started. Attempting to do so may cause
transmission damage.
● For manual transmission models, never
try to start the vehicle by towing it.
When the engine starts, the forward
surge could cause the vehicle to collide
with the tow vehicle. If your vehicle is overheating (indicated by a red
high temperature warning light) , or if you
feel a lack of engine power, detect abnormal
noise, etc. take the following steps.
WARNING
● Do not continue to drive if your vehicle
overheats. Doing so could cause engine
damage or a vehicle fire.
● To avoid the danger of being scalded,
never remove the radiator cap while the
engine is still hot. When the radiator
cap is removed, pressurized hot water
will spurt out, possibly causing serious
injury.
● Do not open the hood if steam is com-
ing out.
1. Move the vehicle safely off the road, apply the parking brake and move the shift selector
to N (Neutral) (manual transmission) or to P
(Park) (AT or CVT) .
Do not stop the engine.
2. Turn off the air conditioner (if so equipped) . Open all the windows, move the heater or air
conditioner temperature control to maximum
hot and fan control to high speed. 3. Get out of the vehicle. Look and listen for
steam or coolant escaping from the radiator
before opening the hood. (If steam or cool-
ant is escaping, turn off the engine.) Do not
open the hood further until no steam or
coolant can be seen.
4. Open the engine hood.
WARNING
If steam or water is coming from the en-
gine, stand clear to prevent getting
burned.
5. Visually check drive belts for damage or looseness. Also check if the cooling fan is
running. The radiator hoses and radiator
should not leak water. If coolant is leaking,
the water pump belt is missing or loose, or
the cooling fan does not run, stop the en-
gine.
WARNING
Be careful not to allow your hands, hair,
jewelry or clothing to come into contact
with, or get caught in, engine belts or the
engine cooling fan. The engine cooling
fan can start at any time.
PUSH STARTING IF YOUR VEHICLE OVERHEATS
6-10In case of emergency
Page 264 of 338
8 Maintenance and do-it-yourself
Maintenance requirements..........................8-2
General maintenance ..............................8-2
Explanation of general maintenance items .........8-2
Maintenance precautions . . .........................8-5
Engine compartment check locations ................8-6
Engine cooling system .............................8-8
Checking engine coolant level ...................8-8
Changing engine coolant ........................8-9
Engine oil .........................................8-9
Checking engine oil level ........................8-9
Changing engine oil ........................... 8-10
Changing engine oil filter .......................8-12
Continuously Variable Transmission (CVT) fluid ......8-13
4-speed automatic transmission fluid ...............8-13
Temperature conditions for checking .............8-13
Brake and clutch fluid ............................. 8-15
Brake fluid .................................... 8-15
Clutch fluid ................................... 8-15
Windshield-washer fluid ........................... 8-16
Windshield-washer fluid reservoir ...............8-16
Battery .......................................... 8-16
Jump starting ................................. 8-18
Drive belt ........................................ 8-18Spark plugs .
..................................... 8-19
Replacing spark plugs ......................... 8-19
Air cleaner ....................................... 8-20
In-cabin microfilter (if so equipped) ..............8-20
Windshield wiper blades .......................... 8-21
Cleaning ..................................... 8-21
Replacing .................................... 8-21
Brakes .......................................... 8-22
Fuses ........................................... 8-23
Engine compartment ........................... 8-24
Passenger compartment .......................8-25
Battery replacement .............................. 8-26
Keyfob (if so equipped) ........................ 8-27
NISSAN Intelligent Key™ (if so equipped) ........8-28
Lights ........................................... 8-29
Headlights .................................... 8-29
Exterior and interior
lights....................... 8-30
Wheels and tires ................................. 8-34
Tire pressure .................................. 8-34
Tire labeling ................................... 8-38
Types of tires .................................. 8-40
Tire chains .................................... 8-41
Changing wheels and tires .....................8-41
Page 267 of 338
Seat beltsCheck that all parts of the seat belt
system (for example, buckles, anchors, adjusters
and retractors) operate properly and smoothly,
and are installed securely. Check the belt web-
bing for cuts, fraying, wear or damage.
Steering wheel Check for changes in the steer-
ing system, such as excessive freeplay, hard
steering or strange noises.
Warning lights and chimes Make sure all
warning lights and chimes are operating properly.
Windshield wiper and washer* Check that
the wipers and washer operate properly and that
the wipers do not streak.
Windshield defroster Check that the air
comes out of the defroster outlets properly and in
sufficient quantity when operating the heater or
air conditioner.
Under the hood and vehicle
The maintenance items listed here should be
checked periodically (for example, each time you
check the engine oil or refuel) .
Battery* Check the fluid level in each cell. It
should be between the MAX and MIN lines. Ve-
hicles operated in high temperatures or under
severe conditions require frequent checks of the
battery fluid level. Brake and clutch fluid levels*
Make sure that
the brake and clutch fluid level is between the
MIN and MAX lines on the reservoir.
Engine coolant level* Check the coolant level
when the engine is cold.
Engine drive belts* Make sure the drive belts
are not frayed, worn, cracked or oily.
Engine oil level* Check the level after parking
the vehicle on a level surface with the engine off.
Wait more than 10 minutes for the oil to drain
back into the oil pan.
Exhaust system Make sure there are no loose
supports, cracks or holes. If the sound of the
exhaust seems unusual or there is a smell of
exhaust fumes, immediately have the exhaust
system inspected by a NISSAN dealer. See the
carbon monoxide warning in the “Starting and
driving” section of this manual.
Fluid leaks Check under the vehicle for fuel, oil,
water or other fluid leaks after the vehicle has
been parked for a while. Water dripping from the
air conditioner after use is normal. If you should
notice any leaks or if gasoline fumes are evident,
check for the cause and have it corrected imme-
diately. Radiator and hoses
Check the front of the
radiator and clean off any dirt, insects, leaves,
etc., that may have accumulated. Make sure the
hoses have no cracks, deformation, rot or loose
connections.
Underbody The underbody is frequently ex-
posed to corrosive substances such as those
used on icy roads or to control dust. It is very
important to remove these substances from the
underbody, otherwise rust may form on the floor
pan, frame, fuel lines and exhaust system. At the
end of winter, the underbody should be thor-
oughly flushed with plain water, in those areas
where mud and dirt may have accumulated. See
the “Appearance and care” section of this
manual.
Windshield–washer fluid* Check that there is
adequate fluid in the reservoir.
8-4Maintenance and do-it-yourself