Page 8 of 407
1. 2nd row seat belts (P. 1-16)
2. Roof-mounted curtain side-impact androllover supplemental air bag (P. 1-47)
3. Front seat belts (P. 1-16)
4. Front-seat Active Head Restraints
5. Supplemental front-impact air bags
(P. 1-47)
6. Seats (P. 1-2)
7. Occupant classification sensor
(pressure sensor) (P. 1-56)
8. Seat belt with pretensioner (P. 1-60)
9. Front seat-mounted side-impact
supplemental air bag (P. 1-47)
10. LATCH (Lower Anchors and Tethers for
Children) (P. 1-29)
11. Top tether strap anchor point (P. 1-31)
See the page number indicated in paren-
theses for operating details.
Page 11 of 407
1. DVD entertainment system(if so equipped) (P. 4-56)
2. Moonroof (if so equipped) (P. 2-51)
3. Map lights (if so equipped) (P. 2-55)
4. Sun visors (P. 3-15)
5. HomeLink� (if so equipped) (P. 2-55)
6. Glove box (P. 2-42)
7. Cup holders (P. 2-44)
8. Front seats (P. 1-2)
9. Folding rear bench seat (P. 1-14)
See the page number indicated in paren-
theses for operating details.
Page 30 of 407
Folding the rear bench seat
To fold the rear bench seat up for storage capac-
ity behind the front seats or to remove the jacking
tools from the storage area:
�1Lift up on the lever, located on the side of the
seat, while lifting the front of the seat cushion
up.
�2Fold the bottom of the seat cushion toward
the back of the vehicle until it locks in place.�3Repeat this process to raise and secure the
seat cushion on the other side of the vehicle
for maximum storage capacity.
To return the rear bench seat to a seating posi-
tion, reverse the process. Make sure to prop-
erly push the seat cushion down into place.
Page 31 of 407

WARNING
●When the vehicle is being used to carry
cargo, properly secure all cargo to help
prevent it from sliding or shifting. Do
not place cargo higher than the seat-
backs. In a sudden stop or collision,
unsecured cargo could cause personal
injury.
● Do not allow people to ride in any area
of your vehicle that is not equipped with
seats and seat belts. Be sure everyone
in your vehicle is in a seat and using a
seat belt properly. Never ride in the rear
seat unless the seat bottom cushions
are in place and latched.
● When returning the seatbacks to the
upright position, be certain they are
completely secured in the latched posi-
tion. If they are not completely secured,
passengers may be injured in an acci-
dent or sudden stop.
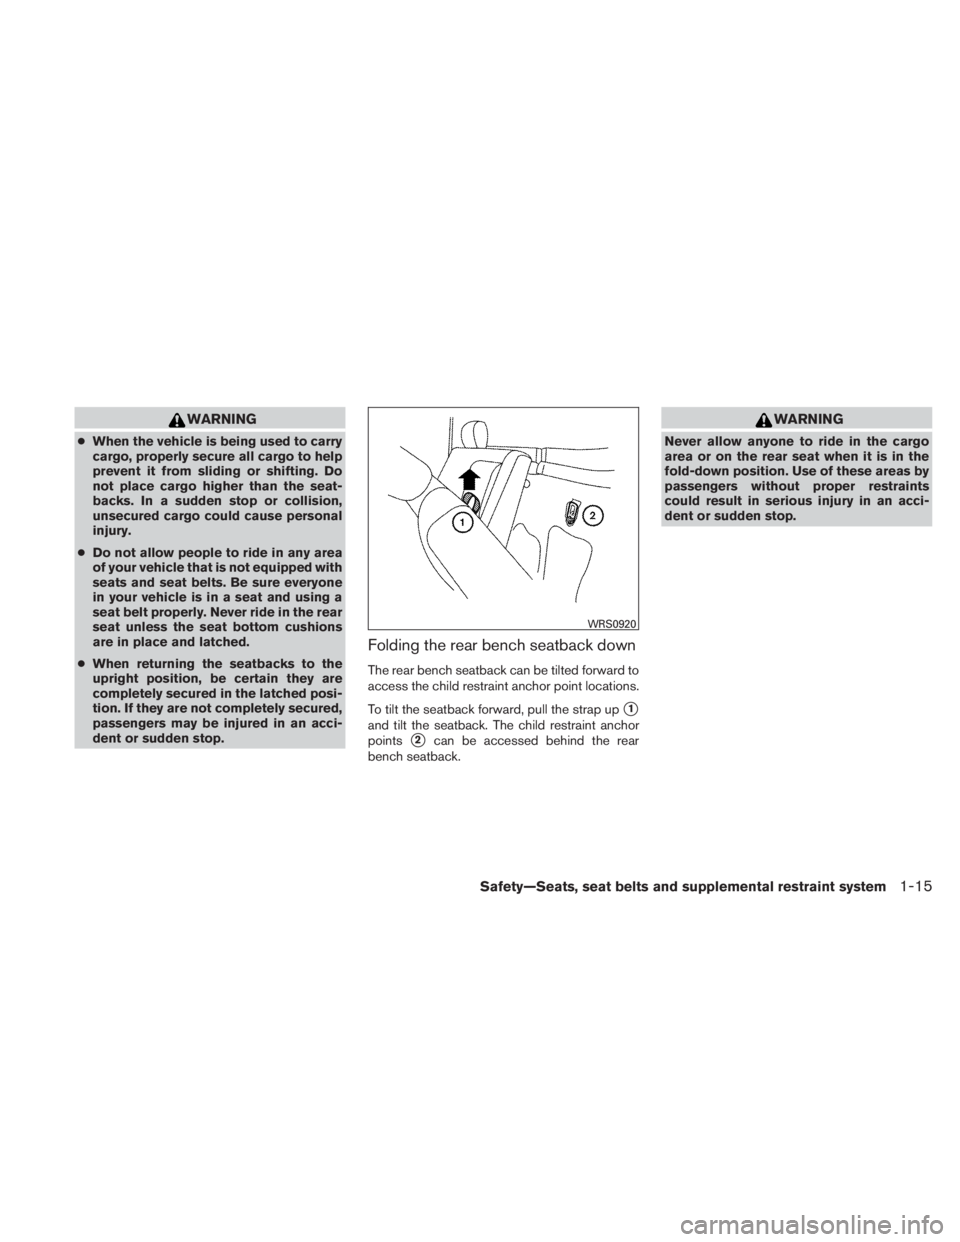
Folding the rear bench seatback down
The rear bench seatback can be tilted forward to
access the child restraint anchor point locations.
To tilt the seatback forward, pull the strap up
�1
and tilt the seatback. The child restraint anchor
points
�2can be accessed behind the rear
bench seatback.
Page 38 of 407
Shoulder belt height adjustment (front
outboard seats)
The shoulder belt anchor height should be ad-
justed to the position best for you. (See “Precau-
tions on seat belt usage” earlier in this section.)
To adjust, pull out
�1the adjustment button and
move the shoulder belt anchor
�2to the desired
position, so the belt passes over the center of the
shoulder. The belt should be away from your face
and neck, but not falling off your shoulder. Re-
lease the adjustment button to lock the shoulder
belt anchor into position.
Page 41 of 407

●Periodically check to see that the seat
belt and the metal components, such as
buckles, tongues, retractors, flexible wires
and anchors work properly. If loose parts,
deterioration, cuts or other damage on the
webbing is found, the entire seat belt as-
sembly should be replaced. Children need adults to help protect them.
They need to be properly restrained.
In addition to the general information in this
manual, child safety information is available from
many other sources, including doctors, teachers,
government traffic safety offices, and community
organizations. Every child is different, so be sure
to learn the best way to transport your child.
There are three basic types of child restraint
systems:
● Rear-facing child restraint
● Forward-facing child restraint
● Booster seat
The proper restraint depends on the child’s size.
Generally, infants up to about 1 year and less
than 20 lbs (9 kg) should be placed in rear-facing
child restraints. Forward-facing child restraints
are available for children who outgrow rear-
facing child restraints and are at least 1 year old.
Booster seats are used to help position a vehicle
lap/shoulder belt on a child who can no longer
use a forward-facing child restraint.
Page 47 of 407
Top tether anchor point locations
Anchor points are located under the rear window
behind the rear bench seat.
REAR-FACING CHILD RESTRAINT
INSTALLATION USING LATCH
Refer to all Warnings and Cautions in the “Child
Safety” and “Child Restraint” sections before in-
stalling a child restraint.
Follow these steps to install a rear-facing child
restraint in the 2nd row seats using the LATCH
system:1. Position the child restraint on the seat. Al- ways follow the child restraint manufactur-
er’s instructions.
2. Secure the child restraint anchor attach-ments to the LATCH lower anchors. Check
to make sure the LATCH attachment is prop-
erly attached to the lower anchors.
Page 50 of 407
Refer to all Warnings and Cautions in the “Child
Safety” and “Child Restraint” sections before in-
stalling a child restraint.
Follow these steps to install a rear-facing child
restraint using the vehicle seat belts in the rear
seats:1. Child restraints for infants must be
used in the rear-facing direction and
therefore must not be used in the front
seat. Position the child restraint on the seat.
Always follow the restraint manufacturer’s
instructions. 2. Route the seat belt tongue through the child
restraint and insert it into the buckle until you
hear and feel the latch engage. Be sure to
follow the child restraint manufacturer’s in-
structions for belt routing. 3. Pull the shoulder belt until the belt is fully
extended. At this time, the seat belt retractor
is in the Automatic Locking Retractor (ALR)
mode (child restraint mode) . It reverts to the
Emergency Locking Retractor (ELR) mode
when the seat belt is fully retracted.