Page 362 of 3745

ASSEMBLYAT-345
< SERVICE INFORMATION >
DE
F
G H
I
J
K L
M A
B
AT
N
O P
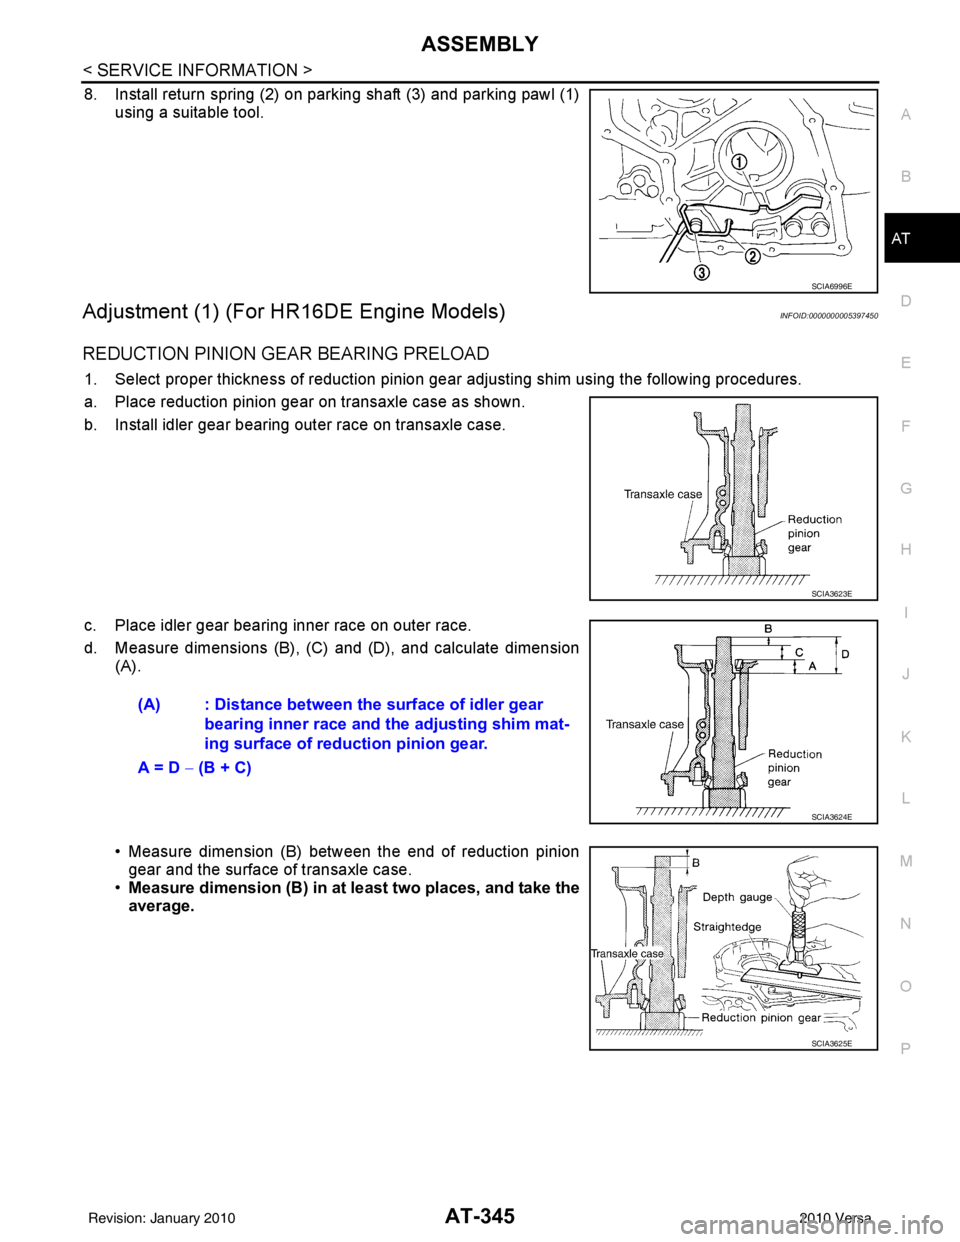
8. Install return spring (2) on parking shaft (3) and parking pawl (1) using a suitable tool.
Adjustment (1) (For HR16DE Engine Models)INFOID:0000000005397450
REDUCTION PINION GEAR BEARING PRELOAD
1. Select proper thickness of reduction pinion gear adjusting shim using the following procedures.
a. Place reduction pinion gear on transaxle case as shown.
b. Install idler gear bearing outer race on transaxle case.
c. Place idler gear bearing inner race on outer race.
d. Measure dimensions (B), (C) and (D), and calculate dimension (A).
• Measure dimension (B) between the end of reduction piniongear and the surface of transaxle case.
• Measure dimension (B) in at least two places, and take the
average.
SCIA6996E
SCIA3623E
(A) : Distance between the surface of idler gear
bearing inner race and th e adjusting shim mat-
ing surface of reduction pinion gear.
A = D − (B + C)
SCIA3624E
SCIA3625E
Revision: January 20102010 Versa
Page 364 of 3745

ASSEMBLYAT-347
< SERVICE INFORMATION >
DE
F
G H
I
J
K L
M A
B
AT
N
O P
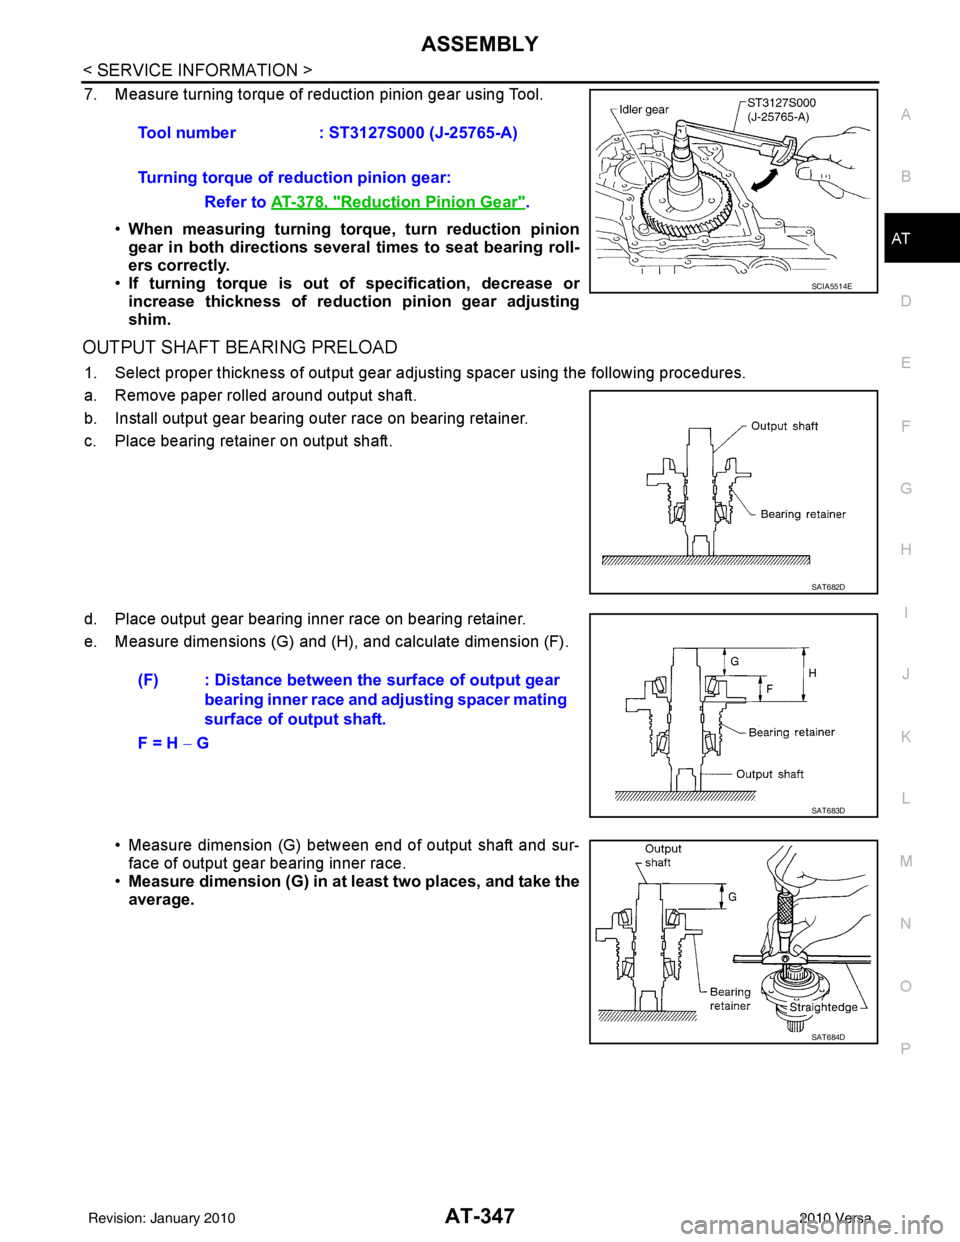
7. Measure turning torque of reduction pinion gear using Tool.
•When measuring turning torq ue, turn reduction pinion
gear in both directions several times to seat bearing roll-
ers correctly.
• If turning torque is out of specification, decrease or
increase thickness of reductio n pinion gear adjusting
shim.
OUTPUT SHAFT BEARING PRELOAD
1. Select proper thickness of output gear adjusting spacer using the following procedures.
a. Remove paper rolled around output shaft.
b. Install output gear bearing outer race on bearing retainer.
c. Place bearing retainer on output shaft.
d. Place output gear bearing inner race on bearing retainer.
e. Measure dimensions (G) and (H ), and calculate dimension (F).
• Measure dimension (G) betw een end of output shaft and sur-
face of output gear bearing inner race.
• Measure dimension (G) in at least two places, and take the
average.Tool number
: ST3127S000 (J-25765-A)
Turning torque of reduction pinion gear: Refer to AT-378, "
Reduction Pinion Gear".
SCIA5514E
SAT682D
(F) : Distance between the surface of output gear bearing inner race and adjusting spacer mating
surface of output shaft.
F = H − G
SAT683D
SAT684D
Revision: January 20102010 Versa
Page 368 of 3745

ASSEMBLYAT-351
< SERVICE INFORMATION >
DE
F
G H
I
J
K L
M A
B
AT
N
O P
m. Reinstall converter housing on transaxle case and ti ghten converter housing bolts to the specified torque.
Refer to AT-237, "
Component".
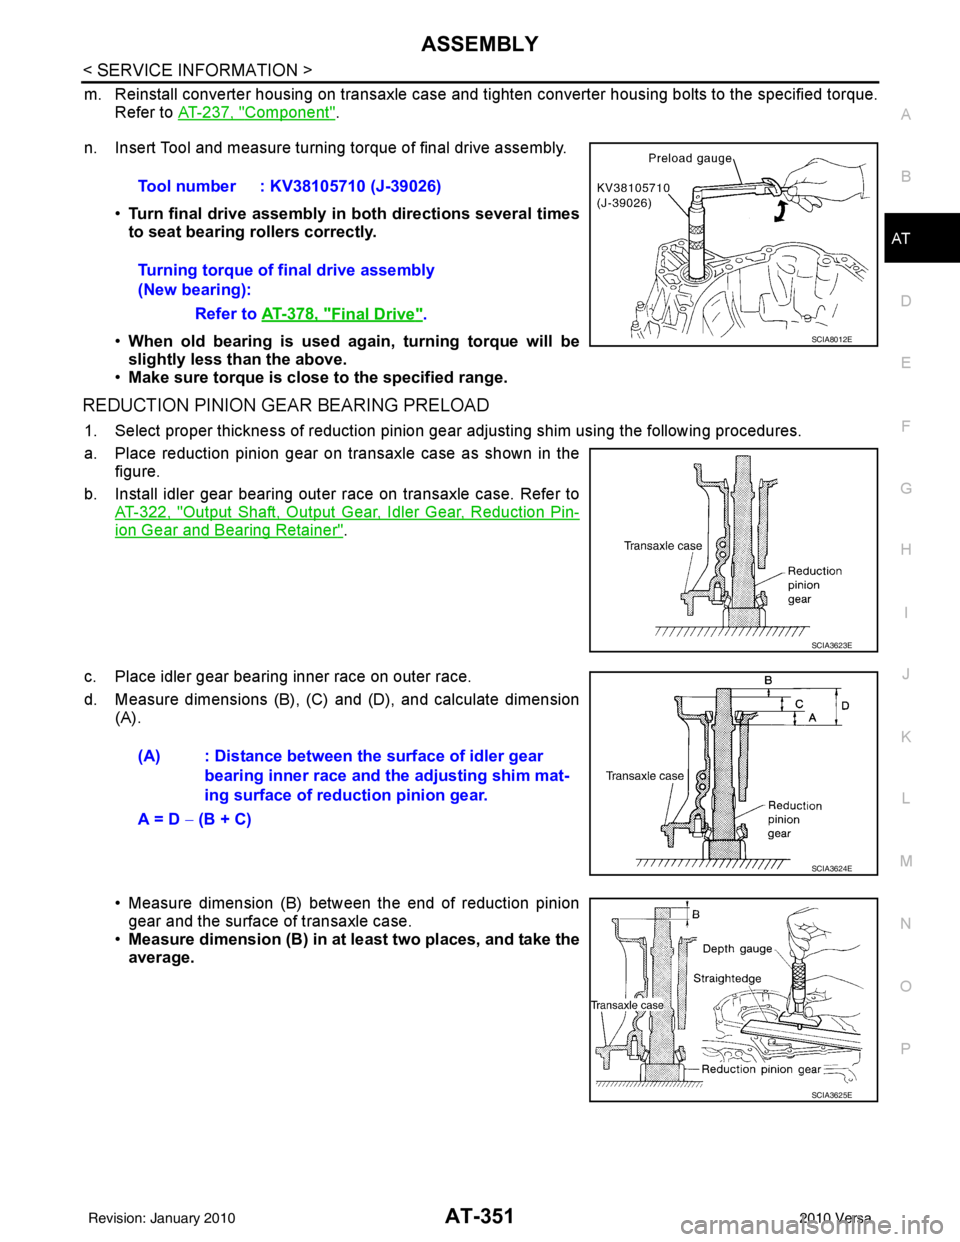
n. Insert Tool and measure turning torque of final drive assembly.
•Turn final drive assembly in both directions several times
to seat bearing rollers correctly.
• When old bearing is used ag ain, turning torque will be
slightly less than the above.
• Make sure torque is close to the specified range.
REDUCTION PINION GEAR BEARING PRELOAD
1. Select proper thickness of reduction pinion gear adjusting shim using the following procedures.
a. Place reduction pinion gear on transaxle case as shown in the figure.
b. Install idler gear bearing outer race on transaxle case. Refer to AT-322, "
Output Shaft, Output Gear, Idler Gear, Reduction Pin-
ion Gear and Bearing Retainer".
c. Place idler gear bearing inner race on outer race.
d. Measure dimensions (B), (C) and (D), and calculate dimension (A).
• Measure dimension (B) between the end of reduction pinion
gear and the surface of transaxle case.
• Measure dimension (B) in at least two places, and take the
average.Tool number : KV38105710 (J-39026)
Turning torque of final drive assembly
(New bearing):
Refer to AT-378, "
Final Drive".
SCIA8012E
SCIA3623E
(A) : Distance between the surface of idler gear
bearing inner race and th e adjusting shim mat-
ing surface of reduction pinion gear.
A = D − (B + C)
SCIA3624E
SCIA3625E
Revision: January 20102010 Versa
Page 371 of 3745

AT-354
< SERVICE INFORMATION >
ASSEMBLY
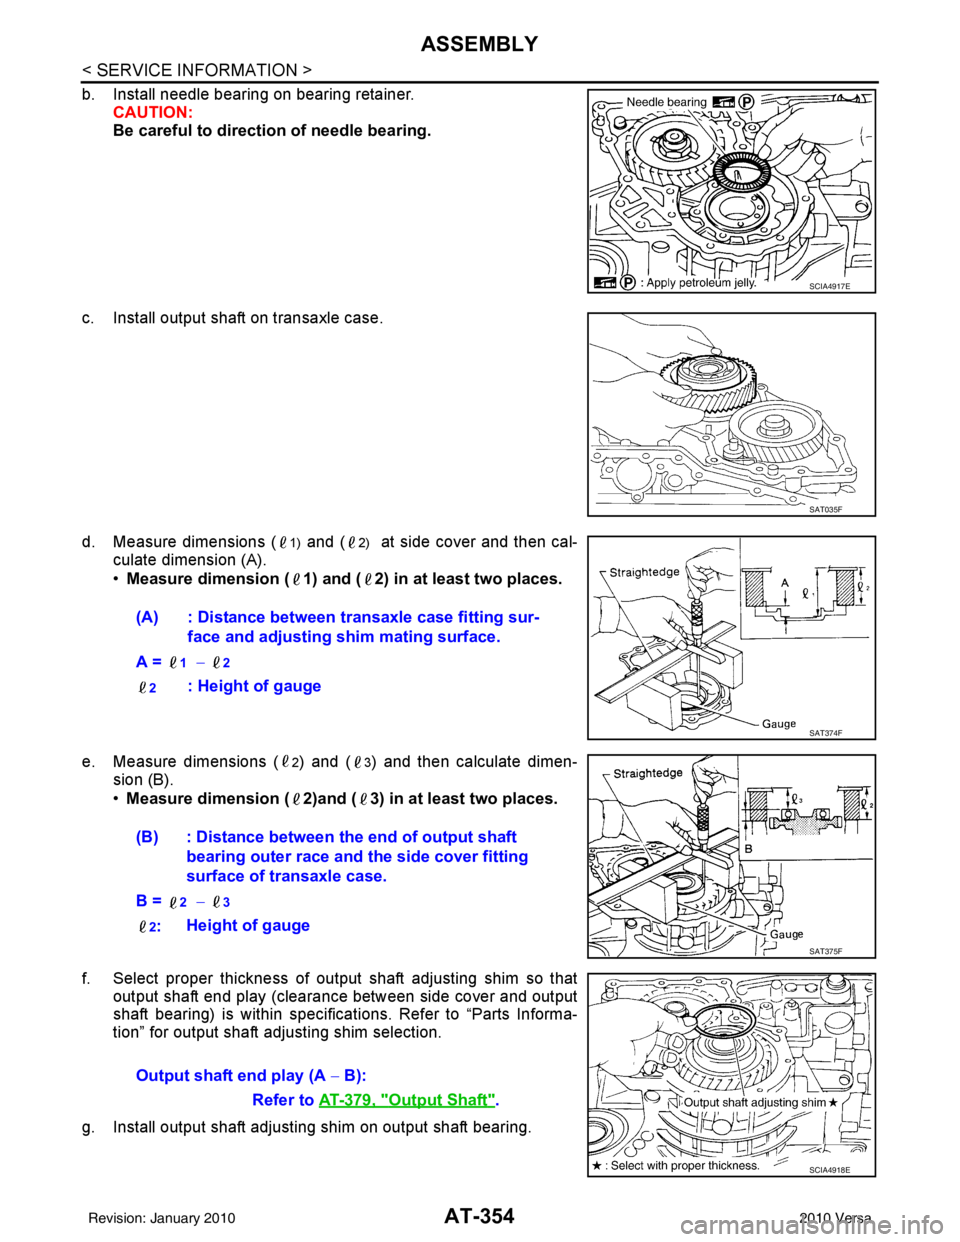
b. Install needle bearing on bearing retainer.CAUTION:
Be careful to direction of needle bearing.
c. Install output shaft on transaxle case.
d. Measure dimensions (
1) and (2) at side cover and then cal-
culate dimension (A).
• Measure dimension ( 1) and ( 2) in at least two places.
e. Measure dimensions (
2) and (3) and then calculate dimen-
sion (B).
• Measure dimension ( 2)and ( 3) in at least two places.
f. Select proper thickness of output shaft adjusting shim so that output shaft end play (clearance between side cover and output
shaft bearing) is within specifications. Refer to “Parts Informa-
tion” for output shaft adjusting shim selection.
g. Install output shaft adjusting shim on output shaft bearing.
SCIA4917E
SAT035F
(A) : Distance between transaxle case fitting sur- face and adjusting shim mating surface.
A =
1 − 2
2
: Height of gauge
SAT374F
(B) : Distance between the end of output shaft bearing outer race and the side cover fitting
surface of transaxle case.
B =
2 − 3
2
: Height of gauge
SAT375F
Output shaft end play (A
− B):
Refer to AT-379, "
Output Shaft".
SCIA4918E
Revision: January 20102010 Versa
Page 377 of 3745
AT-360
< SERVICE INFORMATION >
ASSEMBLY
25. Install reverse clutch assembly.CAUTION:
Align teeth of reverse clutch dr ive plates before installing.
Adjustment (2)INFOID:0000000005397453
When any parts listed below are replaced, adjust total end play and reverse clutch end play.
TOTAL END PLAY
• Measure clearance between reverse clutch drum and needle bear-
ing for oil pump cover.
• Select proper thickness of bearing race so that end play is within specifications.
1. Measure dimensions (K) and (L ), and then calculate dimension
(J).
SAT373D
Part name Total end playReverse clutch end play
Transaxle case �z�z
Overrun clutch hub �z�z
Rear internal gear �z�z
Rear planetary carrier �z�z
Rear sun gear �z�z
Front planetary carrier �z�z
Front sun gear �z�z
High clutch hub �z�z
Input shaft assembly (high clutch drum) �z�z
Oil pump cover �z�z
Reverse clutch drum —�z
SCIA3661E
SCIA3662E
Revision: January 20102010 Versa
Page 379 of 3745
AT-362
< SERVICE INFORMATION >
ASSEMBLY
• Select proper thickness of bearing race so that total end play is within specifications. Refer to “PartsInformation” for bearing race selection.
REVERSE CLUTCH END PLAY
• Measure clearance between oil pump cover and thrust washer forreverse clutch drum.
• Select proper thickness of thrust washer so that end play is within
specification.
1. Measure dimensions O and P), and then calculate dimension N).
a. Place thrust washer on reverse clutch drum.
b. Measure dimension (O).
c. Measure dimension (P).
d. Calculate dimension (N).
SCIA3665E
SCIA3666E
SCIA3667E
(N) : Distance between oi l pump fitting surface of
transaxle case and thrust washer on reverse
clutch drum.
N = O – P
SCIA3668E
Revision: January 20102010 Versa
Page 380 of 3745
ASSEMBLYAT-363
< SERVICE INFORMATION >
DE
F
G H
I
J
K L
M A
B
AT
N
O P
2. Measure dimensions (R) and (S), and then calculate dimension (Q).
a. Measure dimension (R).
b. Measure dimension (S).
c. Calculate dimension (Q).
3. Adjust reverse clutch end play (T
2).
• Select proper thickness of thrust washer so that reve rse clutch end play is within specifications. Refer to
“Parts Information” for thrust washer selection.
Assembly (3)INFOID:0000000005397454
1. Remove reverse clutch assembly.
2. Install needle bearing on input shaft assembly (high clutch drum).
CAUTION:
Be careful with the dir ection of needle bearing.
3. Install reverse clutch assembly. CAUTION:
Align teeth of reverse clutch dr ive plates before installing.
SAT384D
SAT385D
(Q) : Distance between transaxle case fitting sur-
face and thrust washer mating surface.
Q = R – S
SAT386D
T2 = N – Q
Reverse clutch end play: Refer to AT-379, "
Reverse Clutch End Play".
SAT387D
Revision: January 20102010 Versa
Page 799 of 3745
BL-290
< SERVICE INFORMATION >
BODY REPAIR
Sedan
DESCRIPTION
• All dimensions indicated in the figures are actual.
• When using a tracking gauge, adjust both pointers to equal length. Then check the pointers and gauge itself
to make sure there is no free play.
• When a measuring tape is used, check to be sure there is no elongation, twisting or bending.
• Measurements should be taken at the center of the mounting holes.
• An asterisk (*) following the value at the measuring point indicates that the measuring point on the other side
is symmetrically the same value.
• The coordinates of the measurement points are the distances measured from the standard line of ″ X″, ″Y ″
and ″Z ″.
LIIA2882E
Revision: January 20102010 Versa