Page 2640 of 3745
FL-10
< SERVICE INFORMATION >
FUEL LEVEL SENSOR UNIT, FUEL FILTER AND FUEL PUMP ASSEMBLY
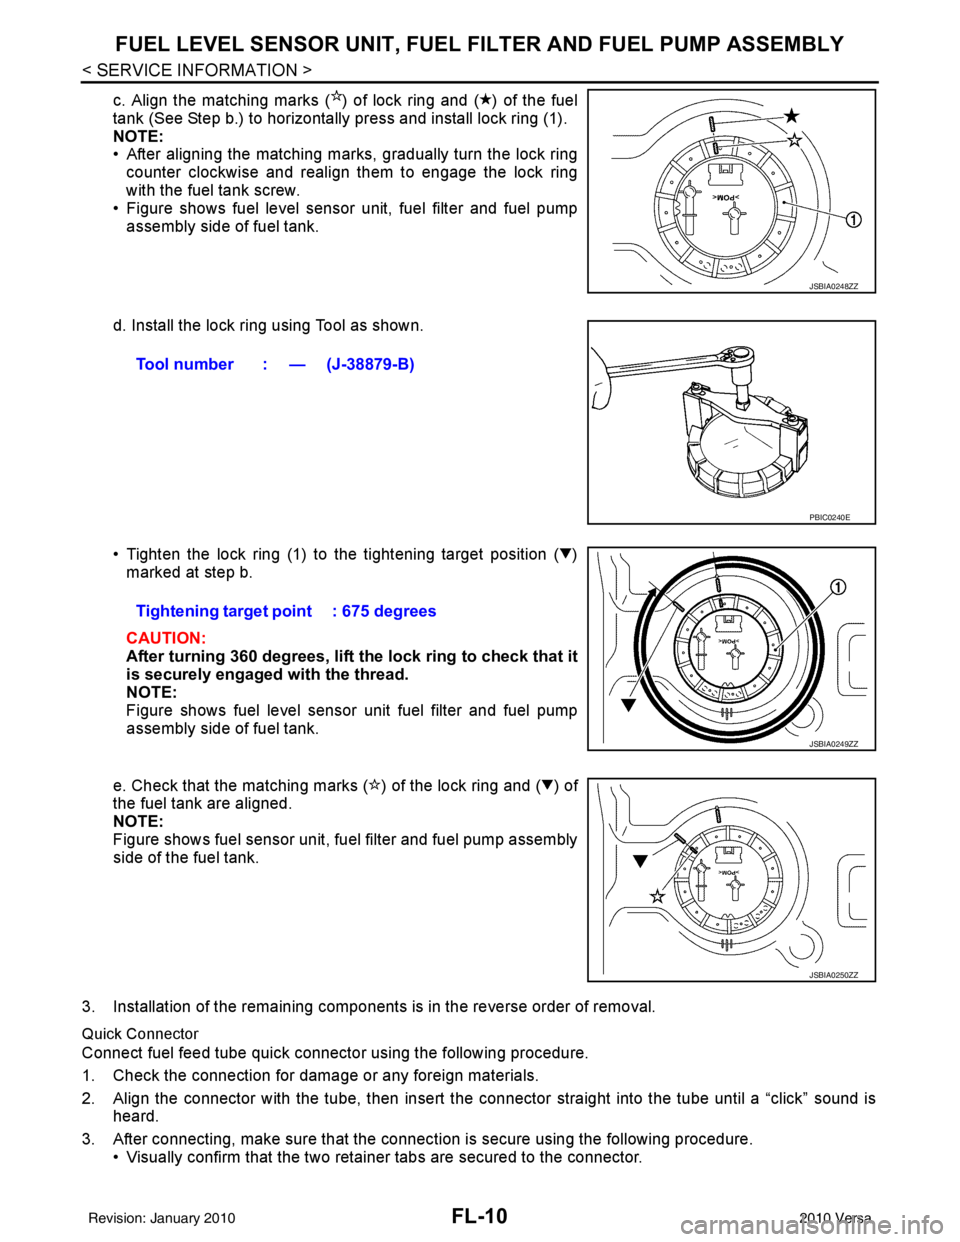
c. Align the matching marks ( ) of lock ring and ( ) of the fuel
tank (See Step b.) to horizontally press and install lock ring (1).
NOTE:
• After aligning the matching marks, gradually turn the lock ring
counter clockwise and realign them to engage the lock ring
with the fuel tank screw.
• Figure shows fuel level sensor unit, fuel filter and fuel pump
assembly side of fuel tank.
d. Install the lock ring using Tool as shown.
• Tighten the lock ring (1) to the tightening target position ( ) marked at step b.
CAUTION:
After turning 360 degrees, lift the lock ring to check that it
is securely engaged with the thread.
NOTE:
Figure shows fuel level sensor unit fuel filter and fuel pump
assembly side of fuel tank.
e. Check that the matching marks ( ) of the lock ring and ( ) of
the fuel tank are aligned.
NOTE:
Figure shows fuel sensor unit, fuel filter and fuel pump assembly
side of the fuel tank.
3. Installation of the remaining components is in the reverse order of removal.
Quick Connector
Connect fuel feed tube quick connector using the following procedure.
1. Check the connection for damage or any foreign materials.
2. Align the connector with the tube, then insert the connector straight into the tube until a “click” sound is heard.
3. After connecting, make sure that the connec tion is secure using the following procedure.
• Visually confirm that the two retainer tabs are secured to the connector.
JSBIA0248ZZ
Tool number : — (J-38879-B)
PBIC0240E
Tightening target point : 675 degrees
JSBIA0249ZZ
JSBIA0250ZZ
Revision: January 20102010 Versa
Page 2642 of 3745
FL-12
< SERVICE INFORMATION >
FUEL TANK
FUEL TANK
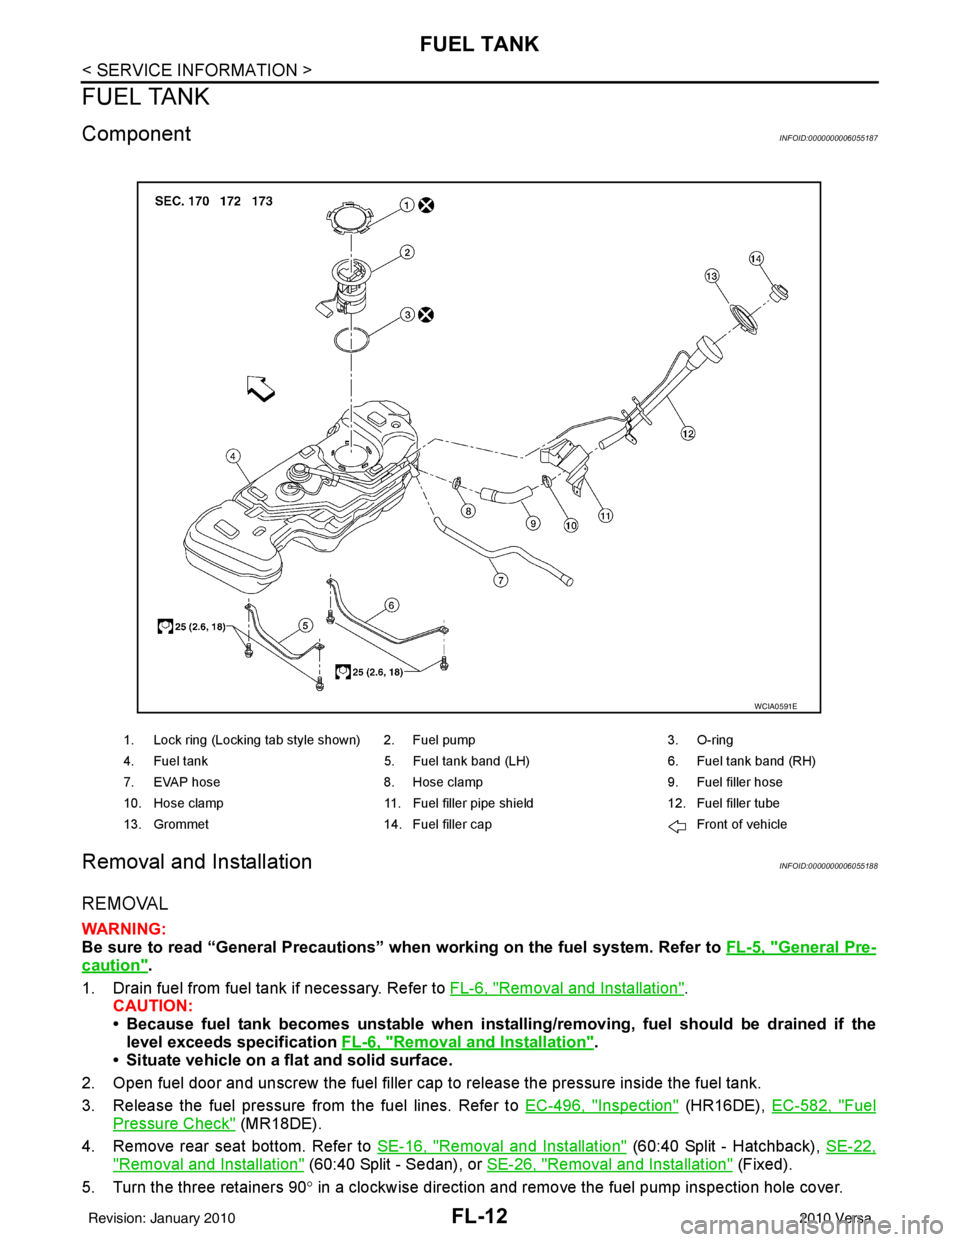
ComponentINFOID:0000000006055187
Removal and InstallationINFOID:0000000006055188
REMOVAL
WARNING:
Be sure to read “General Precautions” when working on the fuel system. Refer to FL-5, "
General Pre-
caution".
1. Drain fuel from fuel tank if necessary. Refer to FL-6, "
Removal and Installation".
CAUTION:
• Because fuel tank becomes unstable when installing/removing, fuel should be drained if the
level exceeds specification FL-6, "
Removal and Installation".
• Situate vehicle on a flat and solid surface.
2. Open fuel door and unscrew the fuel filler cap to release the pressure inside the fuel tank.
3. Release the fuel pressure from the fuel lines. Refer to EC-496, "
Inspection" (HR16DE), EC-582, "Fuel
Pressure Check" (MR18DE).
4. Remove rear seat bottom. Refer to SE-16, "
Removal and Installation" (60:40 Split - Hatchback), SE-22,
"Removal and Installation" (60:40 Split - Sedan), or SE-26, "Removal and Installation" (Fixed).
5. Turn the three retainers 90 ° in a clockwise direction and remove the fuel pump inspection hole cover.
1. Lock ring (Locking tab style shown) 2. Fuel pump 3. O-ring
4. Fuel tank 5. Fuel tank band (LH) 6. Fuel tank band (RH)
7. EVAP hose 8. Hose clamp 9. Fuel filler hose
10. Hose clamp 11. Fuel filler pipe shield 12. Fuel filler tube
13. Grommet 14. Fuel filler cap Front of vehicle
WCIA0591E
Revision: January 20102010 Versa
Page 2643 of 3745
FUEL TANKFL-13
< SERVICE INFORMATION >
C
DE
F
G H
I
J
K L
M A
FL
NP
O
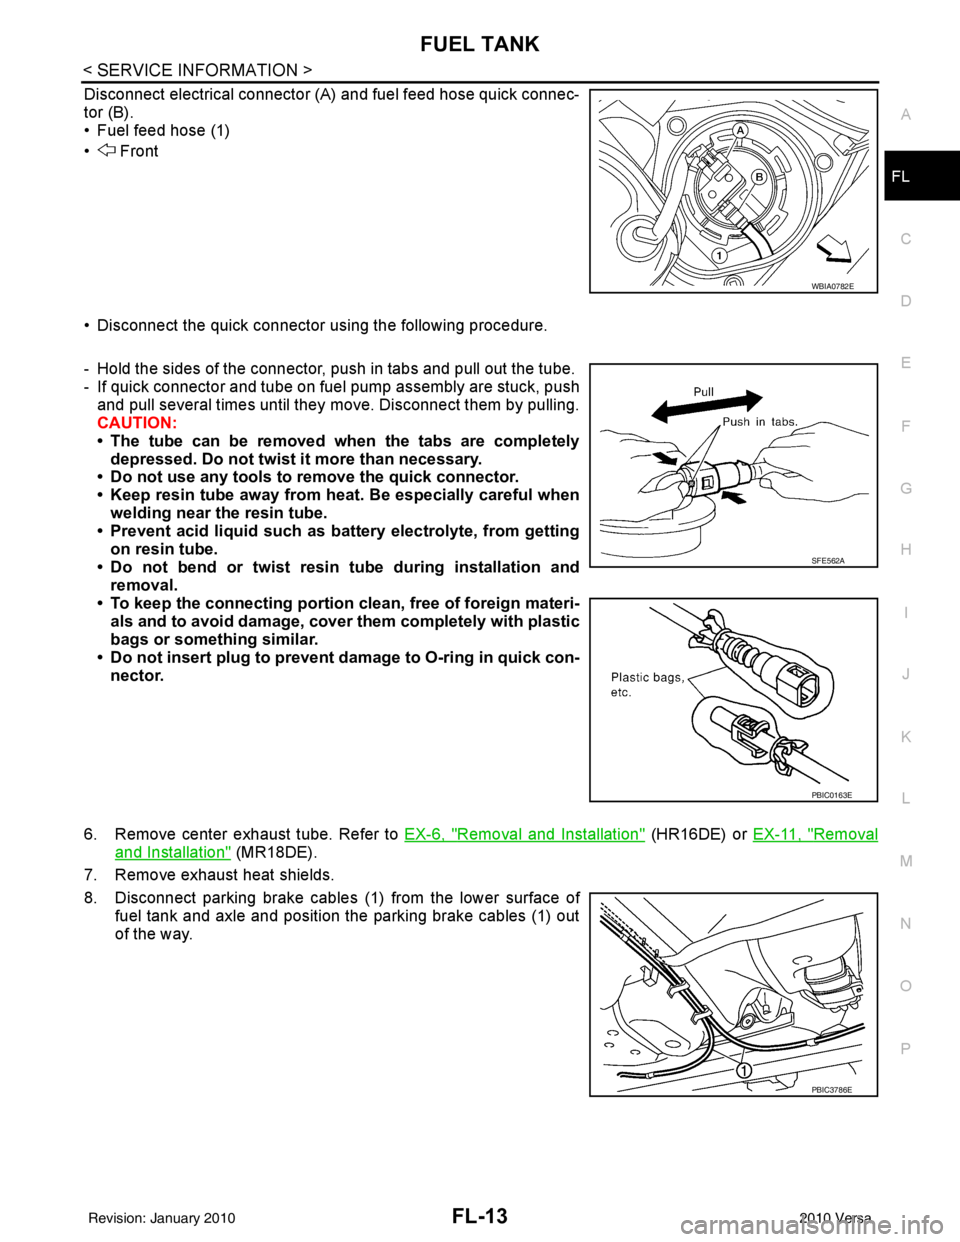
Disconnect electrical connector (A
) and fuel feed hose quick connec-
tor (B).
• Fuel feed hose (1)
• Front
• Disconnect the quick connector using the following procedure.
- Hold the sides of the connector, push in tabs and pull out the tube.
- If quick connector and tube on fuel pump assembly are stuck, push and pull several times until they move. Disconnect them by pulling.
CAUTION:
• The tube can be removed when the tabs are completely depressed. Do not twist it more than necessary.
• Do not use any tools to remove the quick connector.
• Keep resin tube away from heat. Be especially careful when welding near the resin tube.
• Prevent acid liquid such as ba ttery electrolyte, from getting
on resin tube.
• Do not bend or twist resin tube during installation and removal.
• To keep the connecting portion clean, free of foreign materi- als and to avoid damage, cover them completely with plastic
bags or something similar.
• Do not insert plug to prevent damage to O-ring in quick con-
nector.
6. Remove center exhaust tube. Refer to EX-6, "
Removal and Installation" (HR16DE) or EX-11, "Removal
and Installation" (MR18DE).
7. Remove exhaust heat shields.
8. Disconnect parking brake cables (1) from the lower surface of
fuel tank and axle and position the parking brake cables (1) out
of the way.
WBIA0782E
SFE562A
PBIC0163E
PBIC3786E
Revision: January 20102010 Versa
Page 2644 of 3745
FL-14
< SERVICE INFORMATION >
FUEL TANK
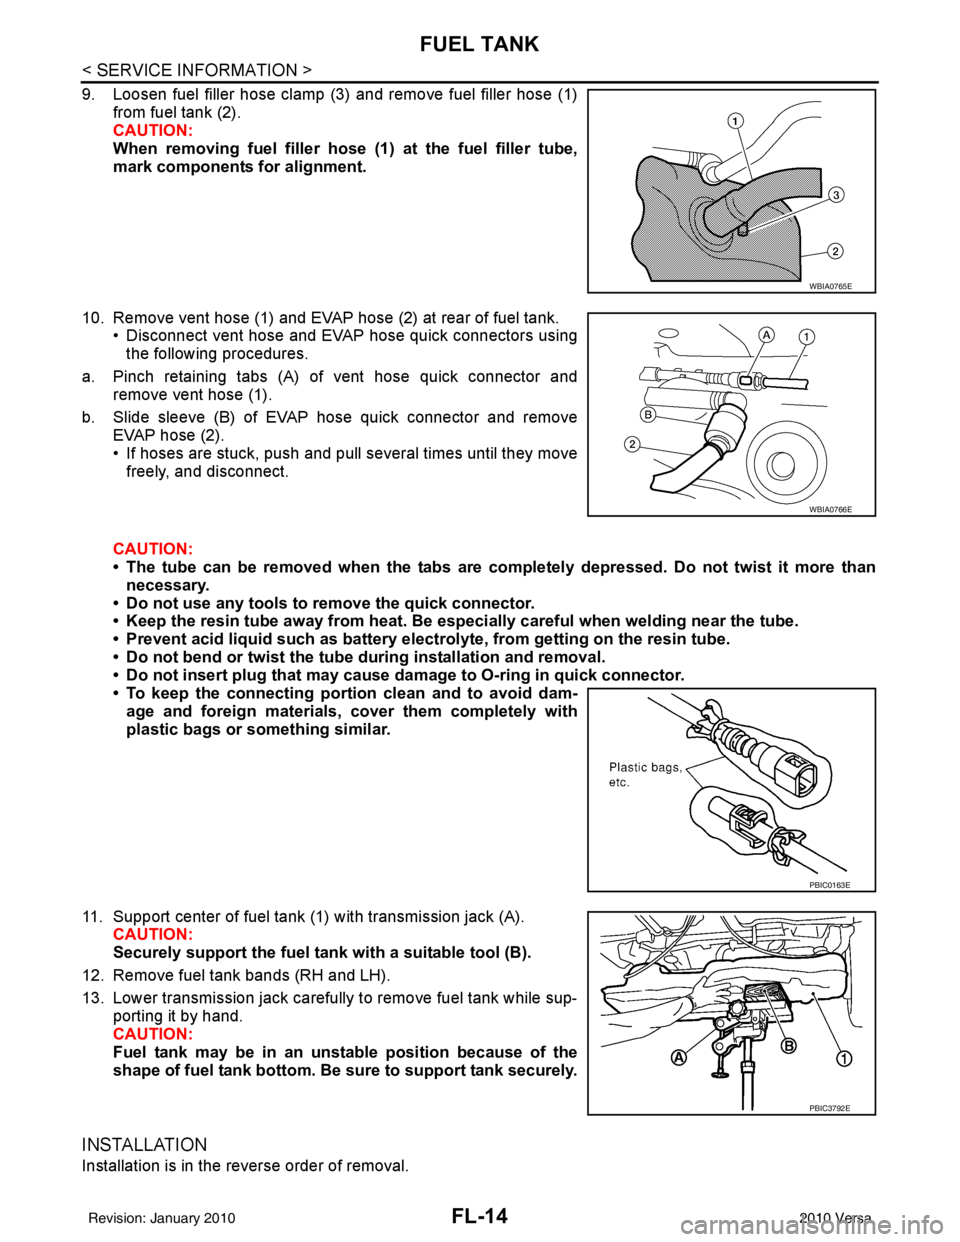
9. Loosen fuel filler hose clamp (3) and remove fuel filler hose (1)from fuel tank (2).
CAUTION:
When removing fuel filler hose (1) at the fuel filler tube,
mark components for alignment.
10. Remove vent hose (1) and EVAP hose (2) at rear of fuel tank. • Disconnect vent hose and EVAP hose quick connectors using
the following procedures.
a. Pinch retaining tabs (A) of vent hose quick connector and remove vent hose (1).
b. Slide sleeve (B) of EVAP hose quick connector and remove EVAP hose (2).
• If hoses are stuck, push and pull several times until they movefreely, and disconnect.
CAUTION:
• The tube can be removed when the tabs are completely depressed. Do not twist it more than necessary.
• Do not use any tools to remove the quick connector.
• Keep the resin tube away from heat. Be especially careful when we lding near the tube.
• Prevent acid liquid such as battery electro lyte, from getting on the resin tube.
• Do not bend or twist the tube during installation and removal.
• Do not insert plug that may cause da mage to O-ring in quick connector.
• To keep the connecting portio n clean and to avoid dam-
age and foreign materials, cover them completely with
plastic bags or something similar.
11. Support center of fuel tank (1) with transmission jack (A). CAUTION:
Securely support the fuel tank with a suitable tool (B).
12. Remove fuel tank bands (RH and LH).
13. Lower transmission jack carefully to remove fuel tank while sup- porting it by hand.
CAUTION:
Fuel tank may be in an unst able position because of the
shape of fuel tank bottom. Be sure to support tank securely.
INSTALLATION
Installation is in the reverse order of removal.
WBIA0765E
WBIA0766E
PBIC0163E
PBIC3792E
Revision: January 20102010 Versa
Page 3044 of 3745
FRONT FOG LAMPLT-49
< SERVICE INFORMATION >
C
DE
F
G H
I
J
L
M A
B
LT
N
O P
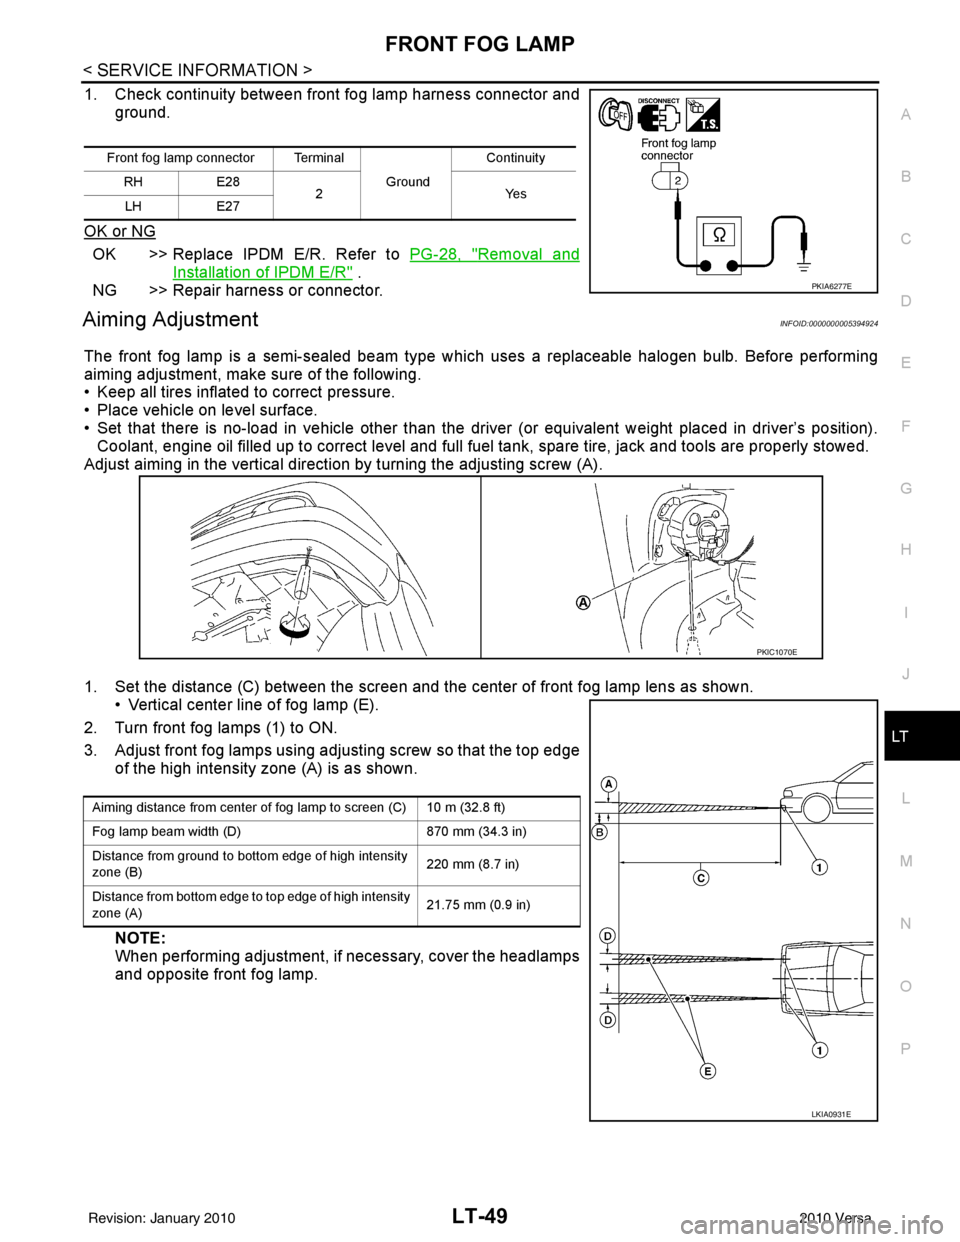
1. Check continuity between front fog lamp harness connector and ground.
OK or NG
OK >> Replace IPDM E/R. Refer to PG-28, "Removal and
Installation of IPDM E/R" .
NG >> Repair harness or connector.
Aiming AdjustmentINFOID:0000000005394924
The front fog lamp is a semi-sealed beam type whic h uses a replaceable halogen bulb. Before performing
aiming adjustment, make sure of the following.
• Keep all tires inflated to correct pressure.
• Place vehicle on level surface.
• Set that there is no-load in vehicle other than the driver (or equivalent weight placed in driver’s position). Coolant, engine oil filled up to correct level and full fuel tank, spare tire, jack and tools are properly stowed.
Adjust aiming in the vertical direction by turning the adjusting screw (A).
1. Set the distance (C) between the screen and the c enter of front fog lamp lens as shown.
• Vertical center line of fog lamp (E).
2. Turn front fog lamps (1) to ON.
3. Adjust front fog lamps using adjusting screw so that the top edge of the high intensity zone (A) is as shown.
NOTE:
When performing adjustment, if necessary, cover the headlamps
and opposite front fog lamp.
Front fog lamp connector Terminal
Ground Continuity
RH E28
2Y es
LH E27
PKIA6277E
PKIC1070E
Aiming distance from center of fog lamp to screen (C) 10 m (32.8 ft)
Fog lamp beam width (D) 870 mm (34.3 in)
Distance from ground to bottom edge of high intensity
zone (B) 220 mm (8.7 in)
Distance from bottom edge to top edge of high intensity
zone (A) 21.75 mm (0.9 in)
LKIA0931E
Revision: January 20102010 Versa
Page 3160 of 3745
ENGINE MAINTENANCE (HR16DE)MA-25
< SERVICE INFORMATION >
C
DE
F
G H
I
J
K
M A
B
MA
N
O P
• Checking and adjusting plug gap is not required between
change intervals.
INSTALLATION
Installation is in the reverse order of removal.
EVAP VAPOR LINES
EVAP VAPOR LINES : Checking EVAP Vapor LineINFOID:0000000005394813
1. Visually inspect EVAP vapor lines for improper attachment and for cracks, damage, loose connections,
chafing and deterioration.
2. Inspect fuel tank filler cap vacuum relief valve for clogging, sticking, etc.
Refer to EC-68, "
System Diagram".
JPBIA0031ZZ
Make : Denso
Part number : FXE20HE-11
Gap (nominal) : 1.1 mm (0.043 in)
Revision: January 20102010 Versa
Page:
< prev 1-8 9-16 17-24