2010 NISSAN MURANO battery
[x] Cancel search: batteryPage 362 of 425
Black plate (362,1)
Model "Z51-D" EDITED: 2009/ 8/ 3
DI0137MA
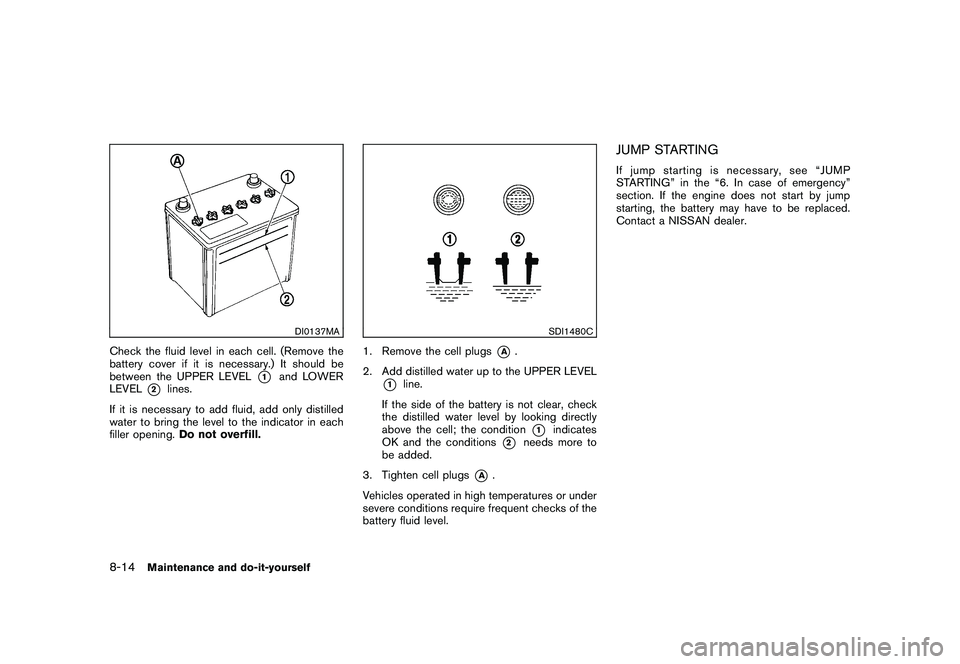
Check the fluid level in each cell. (Remove the
battery cover if it is necessary.) It should be
between the UPPER LEVEL
*1
and LOWER
LEVEL
*2
lines.
If it is necessary to add fluid, add only distilled
water to bring the level to the indicator in each
filler opening. Do not overfill.
SDI1480C
1. Remove the cell plugs
*A
.
2. Add distilled water up to the UPPER LEVEL
*1
line.
If the side of the battery is not clear, check
the distilled water level by looking directly
above the cell; the condition
*1
indicates
OK and the conditions
*2
needs more to
be added.
3. Tighten cell plugs
*A
.
Vehicles operated in high temperatures or under
severe conditions require frequent checks of the
battery fluid level.
JUMP STARTINGIf jump starting is necessary, see “JUMP
STARTING” in the “6. In case of emergency”
section. If the engine does not start by jump
starting, the battery may have to be replaced.
Contact a NISSAN dealer.
8-14
Maintenance and do-it-yourself
Page 363 of 425

Black plate (363,1)
Model "Z51-D" EDITED: 2009/ 8/ 3
CAUTION
.Do not ground accessories directly
to the battery terminal. Doing so will
bypass the variable voltage control
system and the vehicle battery may
not charge completely.
. Use electrical accessories with the
engine running to avoid discharging
the vehicle battery.
The variable voltage control system measures
the amount of electrical discharge from the
battery and controls voltage generated by the
generator.
SDI2186
1. Power steering oil pump
2. Alternator
3. Drive belt auto-tensioner
4. Crankshaft pulley
5. Air conditioner compressor
WARNING
Be sure the ignition switch is in the OFF
or LOCK position before servicing drive
belt. The engine could rotate unexpect-
edly.
1. Visually inspect the belt for signs of unusual wear, cuts, fraying or looseness. If the belt is
in poor condition or loose, have it replaced or adjusted by a NISSAN dealer.
2. Have the belt condition checked regularly.
VARIABLE VOLTAGE CONTROL
SYSTEM (if so equipped) DRIVE BELT
Maintenance and do-it-yourself
8-15
Page 369 of 425

Black plate (369,1)
Model "Z51-D" EDITED: 2009/ 8/ 3
SDI2196
PASSENGER COMPARTMENT
CAUTION
Never use a fuse of a higher or lower
amperage rating than that specified on
the fuse box cover. This could damage
the electrical system or cause a fire.
If any electrical equipment does not operate,
check for an open fuse.
1. Be sure the ignition switch and the headlight switch are turned off.
2. Pull to remove the fuse box cover
*1. 3. Remove the fuse with the fuse puller
*2.
4. If the fuse is open, replace it with a new fuse.
5. If a new fuse also opens, have the electrical system checked and repaired by a NISSAN
dealer.
CAUTION
Be careful not to allow children to
swallow the battery and removed parts.BATTERY REPLACEMENT
Maintenance and do-it-yourself
8-21
Page 370 of 425
Black plate (370,1)
Model "Z51-D" EDITED: 2009/ 8/ 3
SDI2135
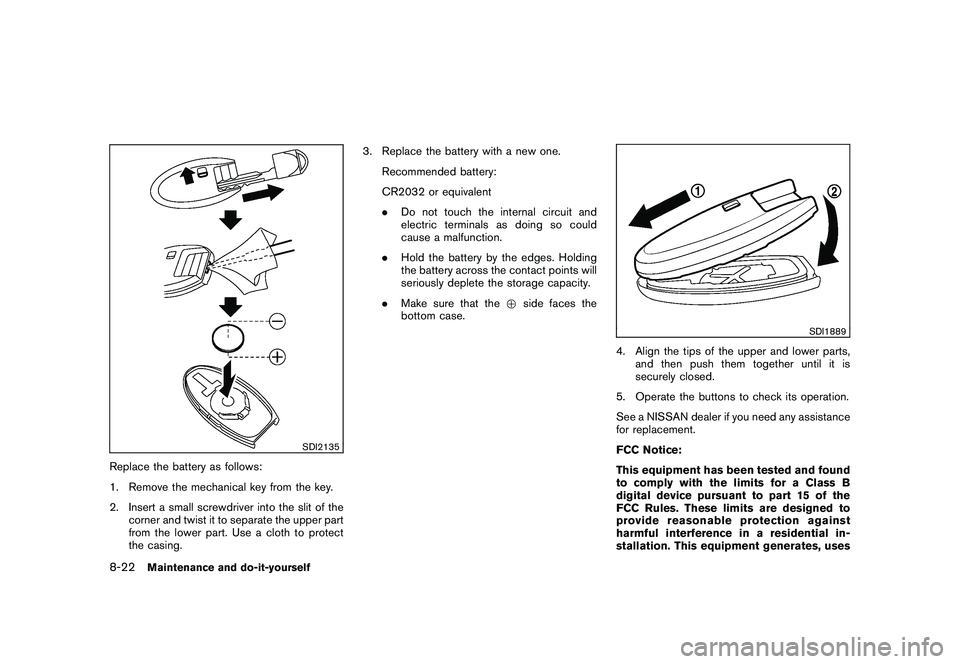
Replace the battery as follows:
1. Remove the mechanical key from the key.
2. Insert a small screwdriver into the slit of thecorner and twist it to separate the upper part
from the lower part. Use a cloth to protect
the casing. 3. Replace the battery with a new one.
Recommended battery:
CR2032 or equivalent
.Do not touch the internal circuit and
electric terminals as doing so could
cause a malfunction.
. Hold the battery by the edges. Holding
the battery across the contact points will
seriously deplete the storage capacity.
. Make sure that the +side faces the
bottom case.
SDI1889
4. Align the tips of the upper and lower parts, and then push them together until it is
securely closed.
5. Operate the buttons to check its operation.
See a NISSAN dealer if you need any assistance
for replacement.
FCC Notice:
This equipment has been tested and found
to comply with the limits for a Class B
digital device pursuant to part 15 of the
FCC Rules. These limits are designed to
provide reasonable protection against
harmful interference in a residential in-
stallation. This equipment generates, uses
8-22
Maintenance and do-it-yourself
Page 374 of 425
Black plate (374,1)
Model "Z51-D" EDITED: 2009/ 8/ 3
SDI2183
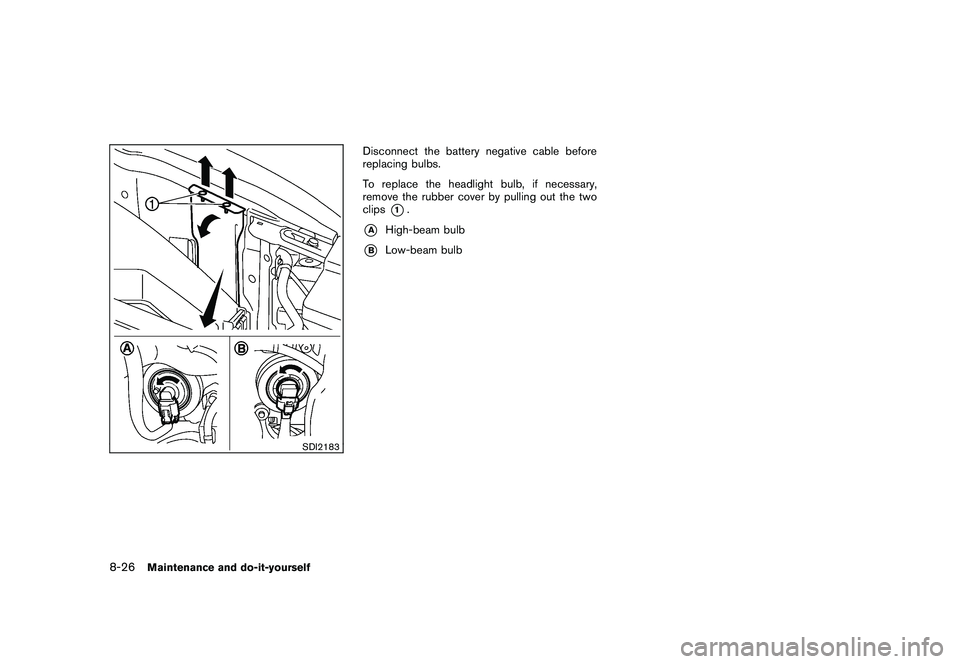
Disconnect the battery negative cable before
replacing bulbs.
To replace the headlight bulb, if necessary,
remove the rubber cover by pulling out the two
clips
*1.
*A
High-beam bulb
*B
Low-beam bulb
8-26
Maintenance and do-it-yourself
Page 409 of 425

Black plate (409,1)
Model "Z51-D" EDITED: 2009/ 8/ 3
Tire pressures.
When towing a trailer, inflate the vehicle
tires to the recommended cold tire
pressure indicated on the Tire and
Loading Information label.
.
Trailer tire condition, size, load rating
and proper inflation pressure should be
in accordance with the trailer and tire
manufacturers’ specifications.
Safety chainsAlways use a suitable chain between your
vehicle and the trailer. The safety chains should
be crossed and should be attached to the hitch,
not to the vehicle bumper or axle. The safety
chains can be attached to the bumper if the
hitch ball is mounted to the bumper. Be sure to
leave enough slack in the chains to permit
turning corners.Trailer lights
CAUTION
When splicing into the vehicle electrical
system, a commercially available
power-type module/converter must be
used to provide power for all trailer
lighting. This unit uses the vehicle
battery as a direct power source for alltrailer lights while using the vehicle tail
light, stoplight and turn signal circuits
as a signal source. The module/con-
verter must draw no more than 15
milliamps from the stop and tail lamp
circuits. Using a module/converter that
exceeds these power requirements may
damage the vehicle’s electrical system.
See a reputable trailer dealer to obtain
the proper equipment and to have it
installed.
Trailer lights should comply with federal and/or
local regulations. For assistance in hooking up
trailer lights, contact a NISSAN dealer or
reputable trailer dealer.
Trailer brakesIf your trailer is equipped with a braking system,
make sure it conforms to federal and/or local
regulations and that it is properly installed.
WARNING
Never connect a trailer brake system
directly to the vehicle brake system.Pre-towing tips. Be certain your vehicle maintains a level
position when a loaded or unloaded trailer is
hitched. Do not drive the vehicle if it has an abnormal nose-up or nose-down condition;
check for improper tongue load, overload,
worn suspension or other possible causes
of either condition.
. Always secure items in the trailer to prevent
load shift while driving.
. Keep the cargo load as low as possible in
the trailer to keep the trailer center of gravity
low.
. Load the trailer so approximately 60% of the
trailer load is in the front half and 40% is in
the back half. Also make sure the load is
balanced side to side.
. Check your hitch, trailer tire pressure,
vehicle tire pressure, trailer light operation,
and trailer wheel lug nuts every time you
attach a trailer to the vehicle.
. Be certain your rearview mirrors conform to
all federal, state or local regulations. If not,
install any mirrors required for towing before
driving the vehicle.
. Determine the overall height of the vehicle
and trailer so the required clearance is
known.
Trailer towing tipsIn order to gain skill and an understanding of the
vehicle’s behavior, you should practice turning,
stopping and backing up in an area which is freeTechnical and consumer information
9-21
Page 414 of 425
Black plate (414,1)
Model "Z51-D" EDITED: 2009/ 8/ 3
A vehicle equipped with All-Wheel Drive (AWD)
should never be tested using a two wheel
dynamometer (such as the dynamometers used
by some states for emissions testing) , or similar
equipment. Make sure you inform test facility
personnel that your vehicle is equipped with
AWD before it is placed on a dynamometer.
Using the wrong test equipment may result in
transmission damage or unexpected vehicle
movement which could result in serious vehicle
damage or personal injury.
Due to legal requirements in some states/areas
or provinces, your vehicle may be required to be
in what is called the “ready condition” for an
Inspection/Maintenance (I/M) test of the emis-
sion control system.
The vehicle is set to the “ready condition” when
it is driven through certain driving patterns.
Usually, the “ready condition” can be obtained
by ordinary usage of the vehicle.
If a powertrain system component is repaired or
the battery is disconnected, the vehicle may be
reset to a “not ready condition”. Before taking
the I/M test, check the vehicle’s inspection/
maintenance test readiness condition. Turn the
ignition switch to the ON position without
starting the engine. If the Malfunction Indicator
Light (MIL) comes on steady for 20 seconds and
then blinks for 10 seconds, the I/M test
condition is “not ready”. If the MIL does not
blink after 20 seconds, the I/M test condition is“ready”.
If the MIL indicates the vehicle is in a “not ready”
condition, drive the vehicle through the following
pattern to set the vehicle to the “ready condi-
tion”. If you cannot or do not want to perform the
driving pattern, a NISSAN dealer can conduct it
for you.
WARNING
Always drive the vehicle in a safe and
prudent manner according to traffic
conditions and obey all traffic laws.
1. Start the engine. Allow the engine to idle until the engine coolant temperature gauge
needle points between the C and H (normal
operating temperature) .
2. Accelerate the vehicle to 55 MPH (88 km/h) , then quickly release the accelerator
pedal completely and keep it released for at
least 10 seconds.
3. Quickly depress the accelerator pedal for a moment, then drive the vehicle at a speed of
53 to 60 MPH (86 to 96 km/h) for at least 9
minutes.
4. Stop the vehicle. Leave the engine running.
5. Accelerate the vehicle to 35 MPH (55 km/h) and maintain the speed for 20 seconds. 6. Repeat steps 4 and 5 at least 10 times.
7. Accelerate the vehicle to 55 MPH (88 km/h)
and maintain the speed for at least 3
minutes.
8. Stop the vehicle. Place the transmission selector lever in the P (Park) or N (Neutral)
position.
9. Turn the engine off.
10. Repeat steps 1 through 8 at least one more time.
If step 1 through 7 is interrupted, repeat the
preceding step. Any safe driving mode is
acceptable between steps. Do not stop the
engine until step 7 is completed.
READINESS FOR INSPECTION/
MAINTENANCE (I/M) TEST9-26
Technical and consumer information
Page 417 of 425
Black plate (1,1)
10 Index
A
ABS (Anti-lock Braking System) .................. 5-26
Advanced air bag system ......................... 1-51
Air bag system Advanced air bag system ..................... 1-51
Front passenger air bag and status light .... 1-52
Front-seat mounted side-impact
supplemental air bag system .................. 1-55
Roof-mounted curtain side-impact and
rollover supplemental air bag system ......... 1-55
Air bag warning labels ............................. 1-58
Air bag warning light ....................... 1-58, 2-14
Air cleaner housing filter .......................... 8-16
Air conditioner Air conditioner operation ...................... 4-26
Air conditioner service ......................... 4-30
Air conditioner specification label ............ 9-10
Air conditioning system refrigerant and
lubricant recommendations .............. 4-30, 9-6
In-cabin microfilter ............................. 4-30
Alarm, How to stop alarm
(see vehicle security system) ..................... 2-27
Alcohol, drugs and driving .......................... 5-7
All-wheel drive (AWD) ............................. 5-21
All-wheel drive (AWD) warning light ............. 2-10
Antenna ............................................. 4-62
Anti-lock Braking System (ABS) .................. 5-26
Anti-lock braking system (ABS) warning light . . . 2-11
Appearance care Exterior appearance care ........................ 7-2
Interior appearance care ........................ 7-4
Armrest ............................................. 1-14 Ashtray (See cigarette lighter and ashtray)
...... 2-40
Audible reminders ................................. 2-16
Audio operation precautions ...................... 4-31
Audio system ....................................... 4-31
Steering wheel audio controls ................ 4-61
Auto closure ........................................ 3-22
Autochanger, Compact Disc (CD) ............... 4-41
Autolight system ................................... 2-33
Automatic Door locks ........................................ 3-6
Drive positioner ................................ 3-30
Seat positioner ................................. 3-30
Avoiding collision and rollover ...................... 5-5
B
Back door (See lift gate) .......................... 3-19
Battery .............................................. 8-13
Battery saver system .......................... 2-34
Keyfob battery replacement ................... 8-21
Variable voltage control system ............... 8-15
Before starting the engine ........................ 5-12
Bluetooth
®Hands-Free Phone System
(with navigation system) ........................... 4-75
Bluetooth®Hands-Free Phone System
(without navigation system) ....................... 4-85
Booster seats ...................................... 1-41
Brake Anti-lock Braking System (ABS) .............. 5-26
Brake fluid ...................................... 8-12
Brake system ................................... 5-25
Parking brake operation ....................... 5-17
Warning light ................................... 2-11 Break-in schedule
.................................. 5-20
Brightness control Display ON/OFF button ......................... 4-8
Instrument panel ............................... 2-35
Bulb check/instrument panel ...................... 2-10
Bulb replacement .................................. 8-24
C
Cabin air filter ...................................... 4-30
Capacities and recommended fuel/lubricants ..... 9-2
Car phone or CB radio ............................ 4-74
Cargo cover ........................................ 2-45
Cargo floor box .................................... 2-45
Cargo lights ........................................ 2-55
Catalytic converter, Three way catalyst ............ 5-2
CD/CF care and cleaning ......................... 4-59
Center multi-function control panel ................. 4-2
Child restraints ..................................... 1-26
Booster seats .................................. 1-41
Installation using LATCH ...................... 1-31
Installation using the seat belts ............... 1-35
LATCH system ................................. 1-28
Precautions on child restraints ................ 1-26
Top tether strap ................................ 1-29
Child safety ......................................... 1-17
Child safety rear door lock .......................... 3-7
Chimes, Audible reminders ....................... 2-16
Cigarette lighter and ashtray ...................... 2-40
Circuit breaker, Fusible link ....................... 8-20
Cleaning exterior and interior ................. 7-2, 7-4
Clock ............................................... 2-38
Coat hooks ......................................... 2-48
Model "Z51-D" EDITED: 2009/ 8/ 3