Page 3103 of 3745
LT-108
< SERVICE INFORMATION >
INTERIOR ROOM LAMP
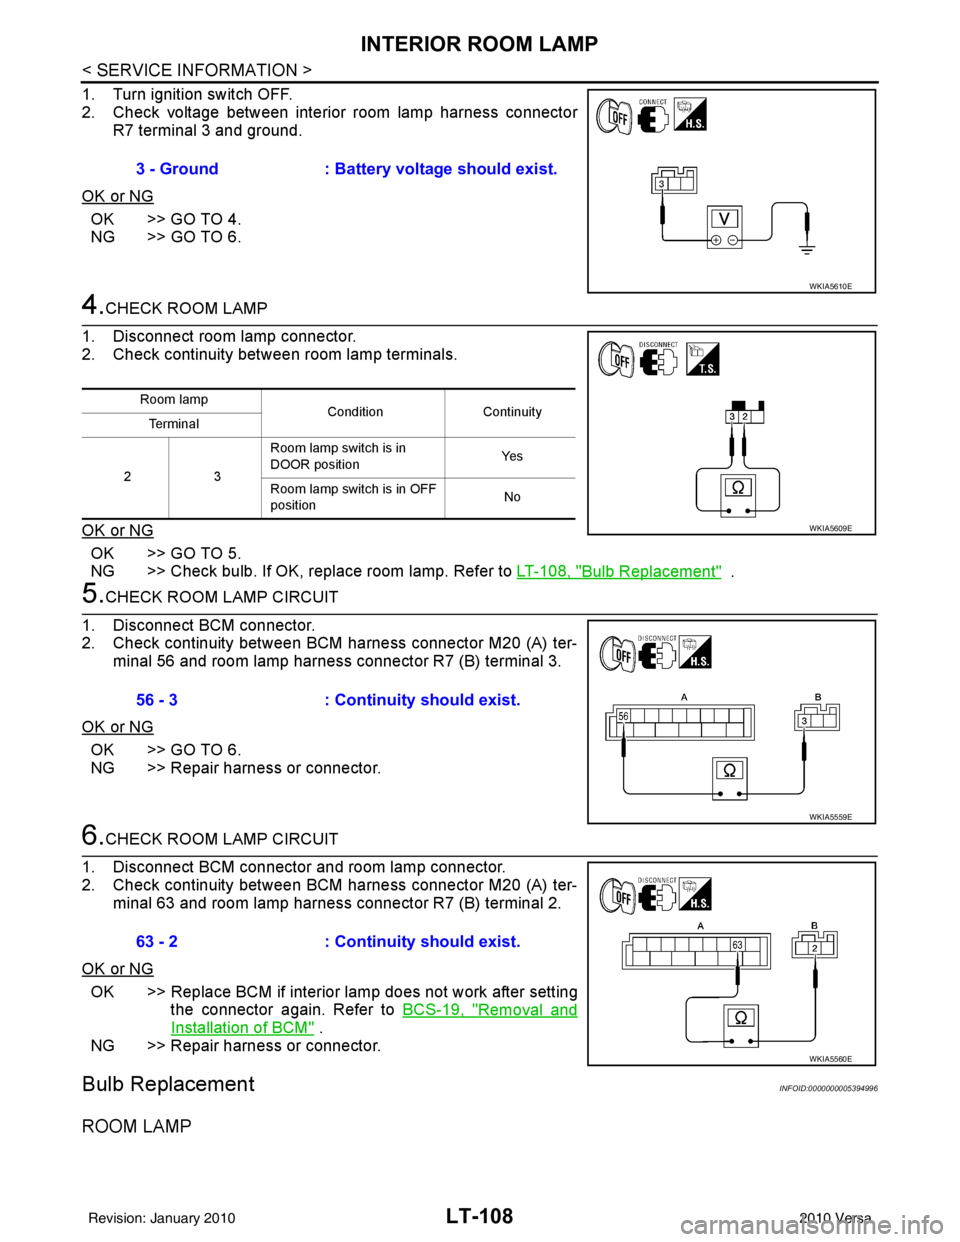
1. Turn ignition switch OFF.
2. Check voltage between interior room lamp harness connectorR7 terminal 3 and ground.
OK or NG
OK >> GO TO 4.
NG >> GO TO 6.
4.CHECK ROOM LAMP
1. Disconnect room lamp connector.
2. Check continuity betw een room lamp terminals.
OK or NG
OK >> GO TO 5.
NG >> Check bulb. If OK, replace room lamp. Refer to LT-108, "
Bulb Replacement" .
5.CHECK ROOM LAMP CIRCUIT
1. Disconnect BCM connector.
2. Check continuity between BCM harness connector M20 (A) ter- minal 56 and room lamp harness connector R7 (B) terminal 3.
OK or NG
OK >> GO TO 6.
NG >> Repair harness or connector.
6.CHECK ROOM LAMP CIRCUIT
1. Disconnect BCM connector and room lamp connector.
2. Check continuity between BCM harness connector M20 (A) ter- minal 63 and room lamp harness connector R7 (B) terminal 2.
OK or NG
OK >> Replace BCM if interior lamp does not work after setting the connector again. Refer to BCS-19, "
Removal and
Installation of BCM" .
NG >> Repair harness or connector.
Bulb ReplacementINFOID:0000000005394996
ROOM LAMP
3 - Ground : Battery voltage should exist.
WKIA5610E
Room lamp
ConditionContinuity
Te r m i n a l
23 Room lamp switch is in
DOOR position
Ye s
Room lamp switch is in OFF
position No
WKIA5609E
56 - 3
: Continuity should exist.
WKIA5559E
63 - 2: Continuity should exist.
WKIA5560E
Revision: January 20102010 Versa
Page 3104 of 3745
INTERIOR ROOM LAMPLT-109
< SERVICE INFORMATION >
C
DE
F
G H
I
J
L
M A
B
LT
N
O P
1. Remove lens (1) by inserting suitable tool and releasing LH (switch side first).
2. Remove bulb (2).
3. Installation is in the reverse order of removal. NOTE:
Insert the lens hook end RH side first to install lens.
Removal and InstallationINFOID:0000000005394997
ROOM LAMP
Removal
1. Remove lens (1) and remove the room lamp by pulling down torelease the room lamp metal clips (A).
2. Disconnect connector and remove room lamp.
Installation
Installation is in the reverse order of removal.
PKIC1048E
PKIC1049E
Revision: January 20102010 Versa
Page 3112 of 3745
BULB SPECIFICATIONSLT-117
< SERVICE INFORMATION >
C
DE
F
G H
I
J
L
M A
B
LT
N
O P
BULB SPECIFICATIONS
HeadlampINFOID:0000000005395003
Exterior LampINFOID:0000000005395004
Interior Lamp/IlluminationINFOID:0000000005395005
* Always check with the parts department for the latest parts information. Item Wattage (W)
High/Low (Halogen type) 60/55
ItemWattage (W)
Front combination lamp Turn signal lamp
21 (amber)
Parking (clearance) lamp 5
Rear combination lamp Stop/Tail lamp
21/5
Turn signal lamp 21 (amber)
Back-up lamp 21
Front fog lamp 35 (H8)
License plate lamp 5
High-mounted stop lamp Hatchback
LED
Sedan, rear window 18
Sedan, rear spoiler LED
ItemWattage (W)
Map lamp 8
Room lamp 8
Luggage room lamp (Hatchback) 5
Trunk room lamp (Sedan) 5
Vanity mirror lamp *
Revision: January 20102010 Versa
Page 3336 of 3745
CONTROLLERMTC-57
< SERVICE INFORMATION >
C
DE
F
G H
I
K L
M A
B
MTC
N
O P
Disassembly and AssemblyINFOID:0000000005396507
CAUTION:
Install inner cable of each do or cable to the corresponding
lever, as shown in the figure. Pr ess outer cable until it hooks on
the tabs and becomes secure.
1. Air mix door cable 2. Intake door cable3. Mode door cable
4. A/C controller assembly 5. Mode control dial6. Rear DEF button
7. A/C button 8. Temperature control dial9. Illumination bulb
10. Intake door lever knob 11. Fan control dial
ZJIA0106J
MJIA0038E
Revision: January 20102010 Versa


