2010 NISSAN CUBE seat adjustment
[x] Cancel search: seat adjustmentPage 26 of 329
Black plate (24,1)
Model "Z12-D" EDITED: 2009/ 9/ 17
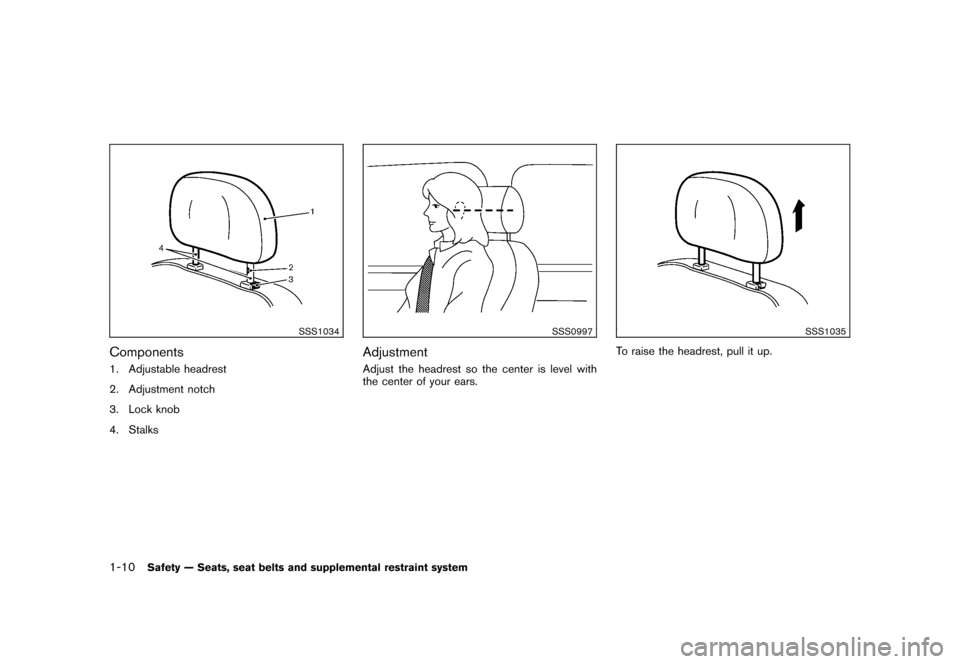
SSS1034
Components1. Adjustable headrest
2. Adjustment notch
3. Lock knob
4. Stalks
SSS0997
AdjustmentAdjust the headrest so the center is level with
the center of your ears.
SSS1035
To raise the headrest, pull it up.
1-10
Safety — Seats, seat belts and supplemental restraint system
Page 27 of 329
Black plate (25,1)
Model "Z12-D" EDITED: 2009/ 9/ 17
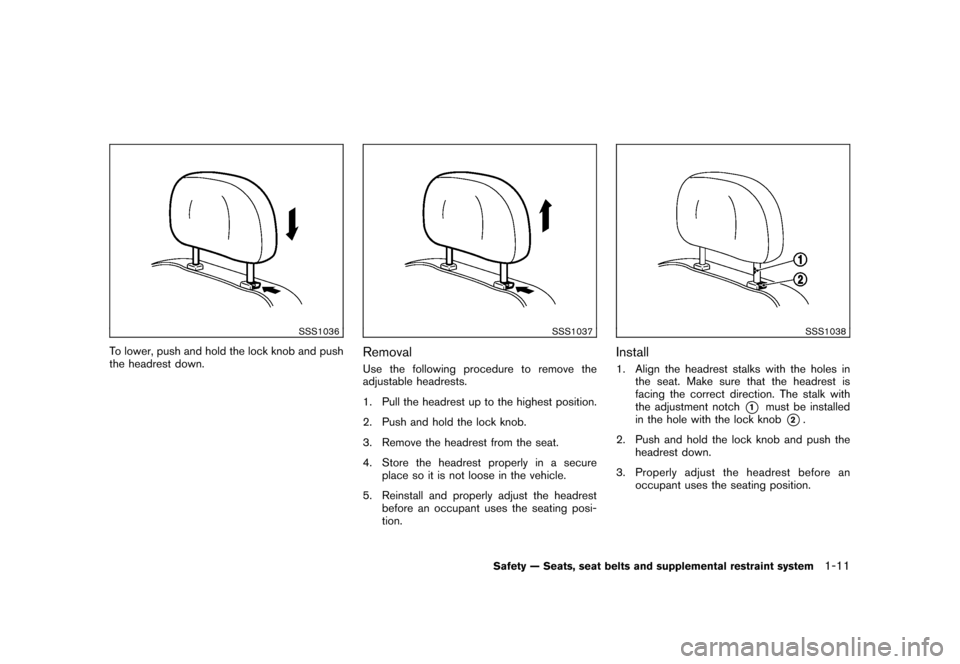
SSS1036
To lower, push and hold the lock knob and push
the headrest down.
SSS1037
RemovalUse the following procedure to remove the
adjustable headrests.
1. Pull the headrest up to the highest position.
2. Push and hold the lock knob.
3. Remove the headrest from the seat.
4. Store the headrest properly in a secureplace so it is not loose in the vehicle.
5. Reinstall and properly adjust the headrest before an occupant uses the seating posi-
tion.
SSS1038
Install1. Align the headrest stalks with the holes inthe seat. Make sure that the headrest is
facing the correct direction. The stalk with
the adjustment notch
*1
must be installed
in the hole with the lock knob
*2.
2. Push and hold the lock knob and push the headrest down.
3. Properly adjust the headrest before an occupant uses the seating position.
Safety — Seats, seat belts and supplemental restraint system
1-11
Page 35 of 329
Black plate (33,1)
Model "Z12-D" EDITED: 2009/ 9/ 17
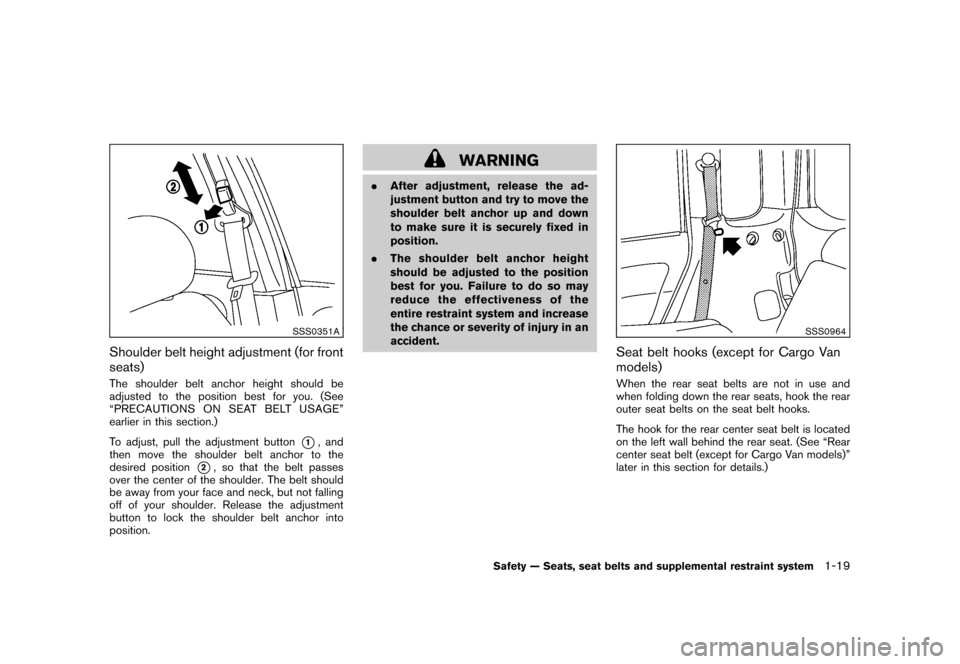
SSS0351A
Shoulder belt height adjustment (for front
seats)The shoulder belt anchor height should be
adjusted to the position best for you. (See
“PRECAUTIONS ON SEAT BELT USAGE”
earlier in this section.)
To adjust, pull the adjustment button
*1, and
then move the shoulder belt anchor to the
desired position
*2, so that the belt passes
over the center of the shoulder. The belt should
be away from your face and neck, but not falling
off of your shoulder. Release the adjustment
button to lock the shoulder belt anchor into
position.
WARNING
. After adjustment, release the ad-
justment button and try to move the
shoulder belt anchor up and down
to make sure it is securely fixed in
position.
. The shoulder belt anchor height
should be adjusted to the position
best for you. Failure to do so may
reduce the effectiveness of the
entire restraint system and increase
the chance or severity of injury in an
accident.
SSS0964
Seat belt hooks (except for Cargo Van
models)When the rear seat belts are not in use and
when folding down the rear seats, hook the rear
outer seat belts on the seat belt hooks.
The hook for the rear center seat belt is located
on the left wall behind the rear seat. (See “Rear
center seat belt (except for Cargo Van models)”
later in this section for details.)
Safety — Seats, seat belts and supplemental restraint system
1-19
Page 40 of 329
Black plate (38,1)
Model "Z12-D" EDITED: 2009/ 9/ 17
loads imposed by correctly fitted
child restraints. Under no circum-
stances are they to be used for adult
seat belts or harnesses.
. Adjustable seatbacks should be
positioned to fit the child restraint,
but as upright as possible.
. After attaching the child restraint,
test it before you place the child in
it. Push it from side to side while
holding the seat near the LATCH
attachment or near the seat belt
path. The child restraint should not
move more than 1 inch (25 mm) from
side to side. Try to tug it forward and
check to see if the belt holds the
restraint in place. If the restraint is
not secure, tighten the belt as
necessary, or put the restraint in
another seat and test it again. You
may need to try a different child
restraint. Not all child restraints fit
in all types of vehicles.
. When your child restraint is not in
use, keep it secured with the LATCH
system or a seat belt to prevent it
from being thrown around in case of
a sudden stop or accident.
CAUTION
Remember that a child restraint left in a
closed vehicle can become very hot.
Check the seating surface and buckles
before placing your child in the child
restraint.
This vehicle is equipped with a universal child
restraint lower anchor system, referred to as the
Lower Anchors and Tethers for CHildren System
or LATCH. Some child restraints include two
rigid or webbing-mounted attachments that can
be connected to these lower anchors. For
details, see “Lower Anchors and Tethers for
CHildren System (LATCH) (except for Cargo
Van models)” later in this section.
If you do not have a LATCH compatible child
restraint, the vehicle seat belts can be used.
(See “CHILD RESTRAINT INSTALLATION
USING THE SEAT BELTS” later in this section.)
In general, child restraints are also designed to
be installed with a lap/shoulder seat belt.
Several manufacturers offer child restraints for
infants and small children of various sizes. When
selecting any child restraint, keep the following
points in mind:
. Choose only a restraint with a label certifying
that it complies with Federal Motor Vehicle
Safety Standard 213 or Canadian Motor Vehicle Safety Standard 213.
. Check the child restraint in your vehicle to
be sure it is compatible with the vehicle’s
seat and seat belt system.
. If the child restraint is compatible with your
vehicle, place your child in the child restraint
and check the various adjustments to be
sure the child restraint is compatible with
your child. Choose a child restraint that is
designed for your child’s height and weight.
Always follow all recommended procedures.
All U.S. states and Canadian provinces or
territories require that infants and small
children be restrained in an approved child
restraint at all times while the vehicle is
being operated. Canadian law requires the
top tether strap on front-facing child
restraints be secured to the designated
anchor point on the vehicle.
Lower Anchors and Tethers for CHildren
System (LATCH) (except for Cargo Van
models)Your vehicle is equipped with special anchor
points that are used with Lower Anchors and
Tethers for CHildren System (LATCH) compa-
tible child restraints. This system may also be
referred to as the ISOFIX or ISOFIX compatible
system. With this system, you do not have to use
a vehicle seat belt to secure the child restraint.
1-24
Safety — Seats, seat belts and supplemental restraint system
Page 57 of 329
Black plate (55,1)
Model "Z12-D" EDITED: 2009/ 9/ 17
LRS0453
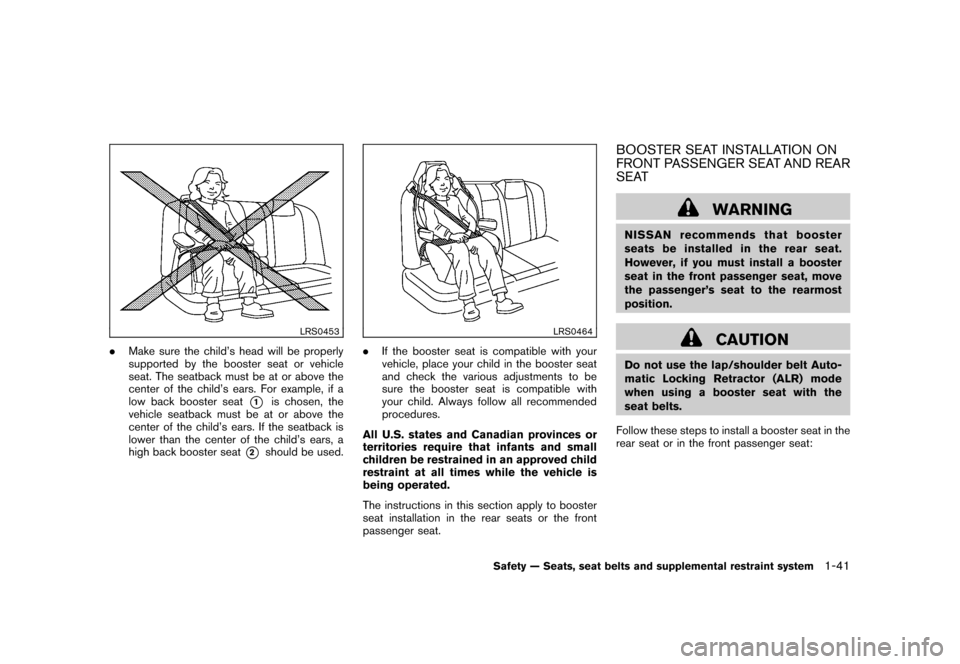
.Make sure the child’s head will be properly
supported by the booster seat or vehicle
seat. The seatback must be at or above the
center of the child’s ears. For example, if a
low back booster seat
*1
is chosen, the
vehicle seatback must be at or above the
center of the child’s ears. If the seatback is
lower than the center of the child’s ears, a
high back booster seat
*2
should be used.
LRS0464
. If the booster seat is compatible with your
vehicle, place your child in the booster seat
and check the various adjustments to be
sure the booster seat is compatible with
your child. Always follow all recommended
procedures.
All U.S. states and Canadian provinces or
territories require that infants and small
children be restrained in an approved child
restraint at all times while the vehicle is
being operated.
The instructions in this section apply to booster
seat installation in the rear seats or the front
passenger seat.
BOOSTER SEAT INSTALLATION ON
FRONT PASSENGER SEAT AND REAR
SEAT
WARNING
NISSAN recommends that booster
seats be installed in the rear seat.
However, if you must install a booster
seat in the front passenger seat, move
the passenger’s seat to the rearmost
position.
CAUTION
Do not use the lap/shoulder belt Auto-
matic Locking Retractor (ALR) mode
when using a booster seat with the
seat belts.
Follow these steps to install a booster seat in the
rear seat or in the front passenger seat:
Safety — Seats, seat belts and supplemental restraint system
1-41
Page 88 of 329
Black plate (88,1)
Model "Z12-D" EDITED: 2009/ 9/ 17
CAUTION
.The TPMS is not a substitute for the
regular tire pressure check. Be sure
to check the tire pressure regularly.
. If the vehicle is being driven at
speeds of less than 16 MPH (25
km/h) , the TPMS may not operate
correctly.
. Be sure to install the specified size
of tires to the four wheels correctly.
Low washer fluid warning light
(Canada only)
This light illuminates when the washer fluid is at
a low level. Add washer fluid as necessary. (See
“WINDOW WASHER FLUID” in the “8. Main-
tenance and do-it-yourself” section.)
P position selecting warning light
(if so equipped)
The warning light blinks in red when the ignition
switch is pushed to stop the engine with the
selector lever in any position except the P (Park)
position.
If this warning appears, move the selector lever to the P (Park) position or push the ignition
switch to the ON position.
An inside warning chime will also sound.
See “INTELLIGENT KEY SYSTEM” in the “3.
Pre-driving checks and adjustments” section.
Seat belt warning light
The light and chime remind you to fasten seat
belts. The light illuminates whenever the ignition
switch is placed in the ON position, and will
remain illuminated until the driver’s seat belt is
fastened. At the same time, the chime will sound
for about 6 seconds unless the driver’s seat belt
is securely fastened.
The seat belt warning light for the front
passenger will illuminate if the seat belt is not
fastened when the front passenger’s seat is
occupied. For 5 seconds after the ignition
switch is in the ON position, the system does
not activate the warning light for the front
passenger.
See “SEAT BELTS” in the “1. Safety — Seats,
seat belts and supplemental restraint system”
section for precautions on seat belt usage.
Supplemental air bag warning light
After turning the ignition switch to the ON
position, the supplemental air bag warning light
will illuminate. The supplemental air bag warning
light will turn off after about 7 seconds if the
supplemental front air bag and supplemental
side air bag, curtain side-impact air bag systems
and/or pretensioner seat belt are operational.
If any of the following conditions occur, the front
air bag, side air bag, curtain air bag and
pretensioner systems need servicing and your
vehicle must be taken to your nearest NISSAN
dealer.
.
The supplemental air bag warning light
remains on after approximately 7 seconds.
. The supplemental air bag warning light
flashes intermittently.
. The supplemental air bag warning light does
not illuminate at all.
Unless checked and repaired, the Supplemental
Restraint Systems and/or the pretensioners may
not function properly.
For additional information, see “SUPPLEMEN-
TAL RESTRAINT SYSTEM” in the “1. Safety —
Seats, seat belts and supplemental restraint
system” section.
2-14
Instruments and controls
Page 118 of 329
Black plate (120,1)
Model "Z12-D" EDITED: 2009/ 9/ 17
SPA2033
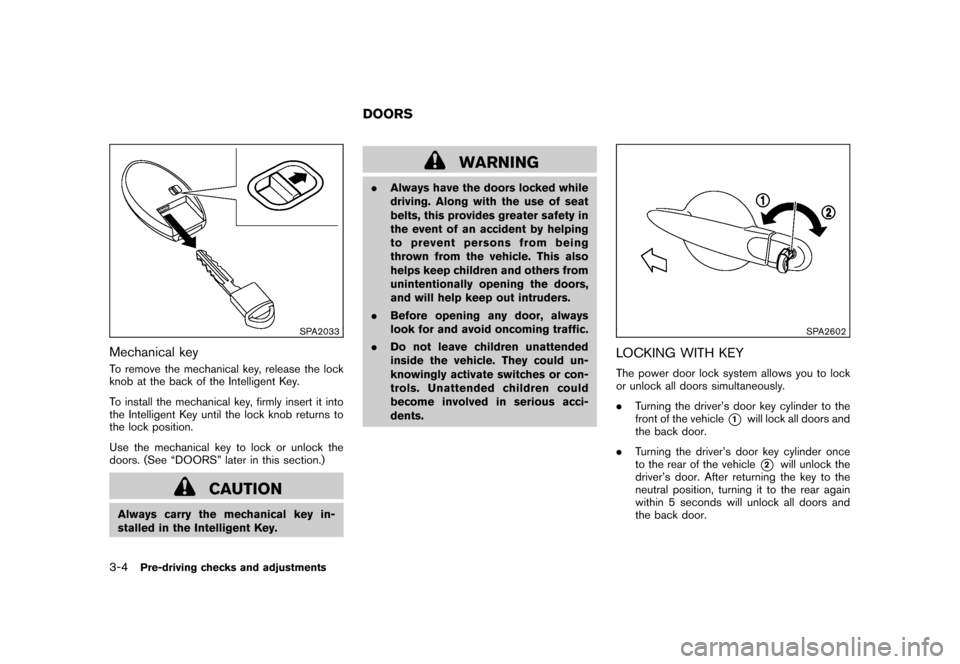
Mechanical keyTo remove the mechanical key, release the lock
knob at the back of the Intelligent Key.
To install the mechanical key, firmly insert it into
the Intelligent Key until the lock knob returns to
the lock position.
Use the mechanical key to lock or unlock the
doors. (See “DOORS” later in this section.)
CAUTION
Always carry the mechanical key in-
stalled in the Intelligent Key.
WARNING
.Always have the doors locked while
driving. Along with the use of seat
belts, this provides greater safety in
the event of an accident by helping
to prevent persons from being
thrown from the vehicle. This also
helps keep children and others from
unintentionally opening the doors,
and will help keep out intruders.
. Before opening any door, always
look for and avoid oncoming traffic.
. Do not leave children unattended
inside the vehicle. They could un-
knowingly activate switches or con-
trols. Unattended children could
become involved in serious acci-
dents.
SPA2602
LOCKING WITH KEYThe power door lock system allows you to lock
or unlock all doors simultaneously.
.Turning the driver’s door key cylinder to the
front of the vehicle
*1
will lock all doors and
the back door.
. Turning the driver’s door key cylinder once
to the rear of the vehicle*2
will unlock the
driver’s door. After returning the key to the
neutral position, turning it to the rear again
within 5 seconds will unlock all doors and
the back door.
DOORS
3-4
Pre-driving checks and adjustments
Page 322 of 329
Black plate (2,1)
10-2CoolantCapacities and recommended fuel/
lubricants ......................................... 9-2
Changing engine coolant ........................ 8-8
Checking engine coolant level .................. 8-8
Corrosion protection ................................. 7-7
Cruise control ...................................... 5-20
Cup holders ........................................ 2-31
CVT, Driving with CVT
(Continuously Variable Transmission) ........ 5-7, 5-14
D
Daytime running light system ..................... 2-25
Defroster switch, Rear window and outside
mirror defroster switch ............................ 2-23
Dimensions and weights ............................ 9-8
Door open warning light ........................... 2-11
Drive belt ........................................... 8-15
Driving Cold weather driving .......................... 5-29
Driving with CVT
(Continuously Variable Transmission) .... 5-7, 5-14
Driving with manual transmission ........ 5-8, 5-18
Precautions when starting and driving ......... 5-2
E
Economy, Fuel ..................................... 5-23
Electric power steering system ................... 5-25
Electric power steering warning light ............ 2-12
Emission control information label ................ 9-10
Emission control system warranty ................ 9-20
Engine
Before starting the engine .................... 5-12
Break-in schedule .............................. 5-22 Capacities and recommended fuel/lubricants . 9-2
Changing engine coolant
........................ 8-8
Changing engine oil and filter ................... 8-9
Checking engine coolant level .................. 8-8
Checking engine oil level ........................ 8-9
Coolant temperature gauge ..................... 2-6
Engine block heater ........................... 5-30
Engine compartment check locations .......... 8-6
Engine cooling system .......................... 8-7
Engine oil ......................................... 8-9
Engine oil and oil filter recommendation ....... 9-5
Engine oil viscosity .............................. 9-5
Engine serial number ............................ 9-9
Engine specifications ............................ 9-7
If your vehicle overheats ....................... 6-11
Starting the engine ............................ 5-12
Event Data Recorders (EDR) ..................... 9-21
Exhaust gas (carbon monoxide) .................... 5-2
F
F.M.V.S.S./C.M.V.S.S. certification label. ........... 9-9
Filter Air cleaner housing filter ...................... 8-16
Changing engine oil and filter ................... 8-9
Flashers (See hazard warning flasher switch) . . . 2-27
Flat tire ................................................ 6-2
Flat towing .......................................... 9-18
Floor mat cleaning ................................... 7-5
Fluid Brake and clutch fluid ......................... 8-11
Capacities and recommended fuel/
lubricants ......................................... 9-2
Continuously Variable Transmission (CVT)
fluid ............................................. 8-11 Engine coolant
................................... 8-7
Engine oil ......................................... 8-9
Window washer fluid .......................... 8-12
FM-AM radio with Compact Disc (CD)
player ............................................... 4-25
FM-AM-SAT radio with Compact Disc (CD)
player ............................................... 4-35
Fog light switch .................................... 2-27
Front manual seat adjustment. ...................... 1-3
Front passenger air bag and status light ........ 1-51
Front seat, Front seat adjustment .................. 1-3
Front-seat active head restraints ................... 1-9
Fuel Capacities and recommended fuel/
lubricants ......................................... 9-2
Distance to empty ............................... 2-8
Fuel economy .................................. 5-23
Fuel octane rating ................................ 9-3
Fuel recommendation ............................ 9-3
Fuel-filler cap ................................... 3-24
Fuel-filler door .................................. 3-24
Gauge ............................................ 2-7
Fuses ............................................... 8-20
Fusible links ........................................ 8-21
G
Gas cap ............................................ 3-24
Gauge ................................................ 2-4
Engine coolant temperature gauge ............. 2-6
Fuel gauge ....................................... 2-7
Odometer ......................................... 2-5
Speedometer ..................................... 2-5
Tachometer ....................................... 2-6
Trip computer .................................... 2-8
Model "Z12-D" EDITED: 2010/ 4/ 14