2010 NISSAN CUBE automatic transmission
[x] Cancel search: automatic transmissionPage 82 of 329
Black plate (82,1)
Model "Z12-D" EDITED: 2009/ 9/ 17
When the outside air temperature becomes
378F(3 8C) or lower, the outside air temperature
display blinks to give a warning. The display will
stop blinking after 1 minute or when the outside
air temperature becomes 39 8F(4 8C) or above.
The display may differ from the actual outside
temperature displayed on various signs or bill-
boards.CONTINUOUSLY VARIABLE TRANS-
MISSION (CVT) POSITION INDICATOR
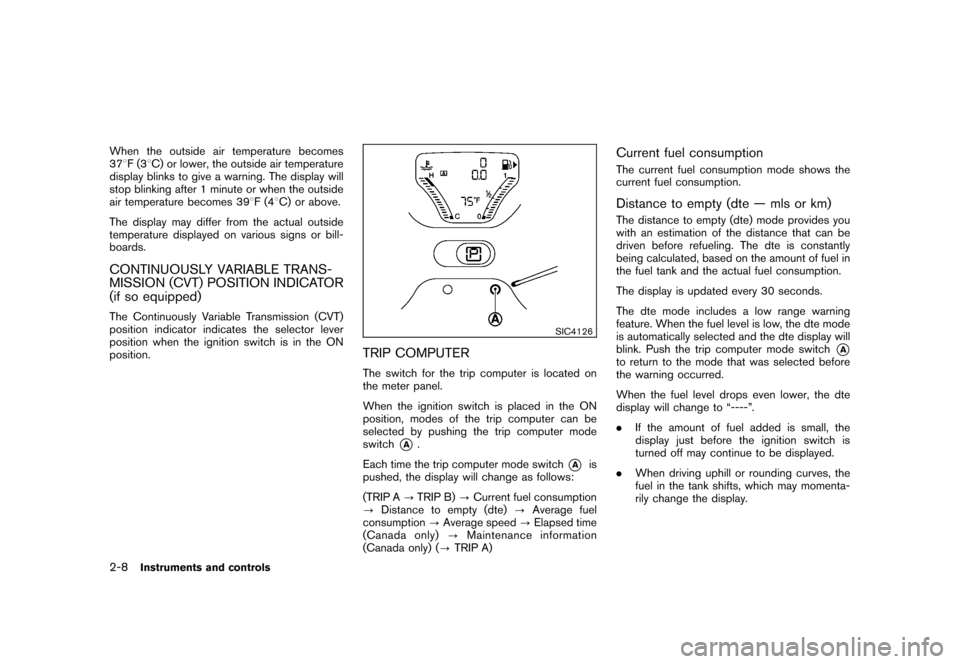
(if so equipped)The Continuously Variable Transmission (CVT)
position indicator indicates the selector lever
position when the ignition switch is in the ON
position.
SIC4126
TRIP COMPUTERThe switch for the trip computer is located on
the meter panel.
When the ignition switch is placed in the ON
position, modes of the trip computer can be
selected by pushing the trip computer mode
switch
*A
.
Each time the trip computer mode switch
*A
is
pushed, the display will change as follows:
(TRIP A ?TRIP B) ?Current fuel consumption
? Distance to empty (dte) ?Average fuel
consumption ?Average speed ?Elapsed time
(Canada only) ?Maintenance information
(Canada only) ( ?TRIP A)
Current fuel consumptionThe current fuel consumption mode shows the
current fuel consumption.Distance to empty (dte — mls or km)The distance to empty (dte) mode provides you
with an estimation of the distance that can be
driven before refueling. The dte is constantly
being calculated, based on the amount of fuel in
the fuel tank and the actual fuel consumption.
The display is updated every 30 seconds.
The dte mode includes a low range warning
feature. When the fuel level is low, the dte mode
is automatically selected and the dte display will
blink. Push the trip computer mode switch
*A
to return to the mode that was selected before
the warning occurred.
When the fuel level drops even lower, the dte
display will change to “----”.
. If the amount of fuel added is small, the
display just before the ignition switch is
turned off may continue to be displayed.
. When driving uphill or rounding curves, the
fuel in the tank shifts, which may momenta-
rily change the display.
2-8
Instruments and controls
Page 208 of 329
Black plate (212,1)
Model "Z12-D" EDITED: 2009/ 9/ 17
When the ignition switch cannot be turned to
the LOCK position:
1. Move the selector lever to the P (Park)position.
2. Turn the ignition switch slightly in the ON direction.
3. TurntheignitionswitchtotheLOCK position.
4. Remove the key.
If the ignition switch is turned to the LOCK
position, the selector lever cannot be moved
from the P (Park) position. The selector lever can
be moved if the ignition switch is in the ON
position with the foot brake pedal depressed.
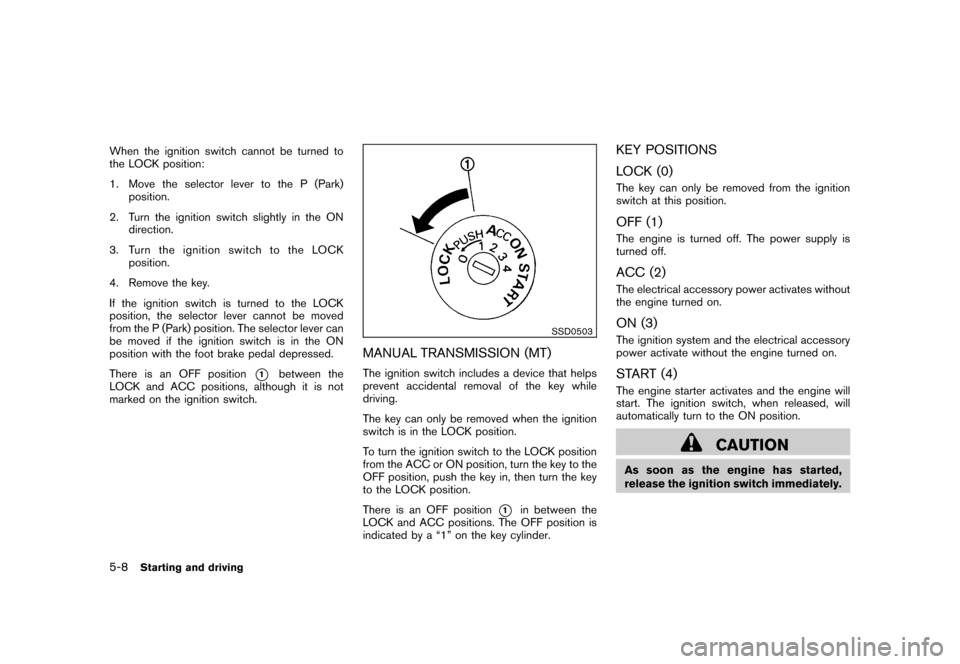
There is an OFF position
*1
between the
LOCK and ACC positions, although it is not
marked on the ignition switch.
SSD0503
MANUAL TRANSMISSION (MT)The ignition switch includes a device that helps
prevent accidental removal of the key while
driving.
The key can only be removed when the ignition
switch is in the LOCK position.
To turn the ignition switch to the LOCK position
from the ACC or ON position, turn the key to the
OFF position, push the key in, then turn the key
to the LOCK position.
There is an OFF position
*1
in between the
LOCK and ACC positions. The OFF position is
indicated by a “1” on the key cylinder.
KEY POSITIONS
LOCK (0)The key can only be removed from the ignition
switch at this position.OFF (1)The engine is turned off. The power supply is
turned off.ACC (2)The electrical accessory power activates without
the engine turned on.ON (3)The ignition system and the electrical accessory
power activate without the engine turned on.START (4)The engine starter activates and the engine will
start. The ignition switch, when released, will
automatically turn to the ON position.
CAUTION
As soon as the engine has started,
release the ignition switch immediately.
5-8
Starting and driving
Page 214 of 329
Black plate (218,1)
Model "Z12-D" EDITED: 2009/ 9/ 17
CONTINUOUSLY VARIABLE TRANS-
MISSION (CVT)The Continuously Variable Transmission (CVT)
in your vehicle is electronically controlled to
produce maximum power and smooth operation.
The recommended operating procedures for this
transmission are shown on the following pages.
Follow these procedures for maximum vehicle
performance and driving enjoyment.
Engine power may be automatically re-
duced to protect the CVT if the engine
speed increases quickly when driving on
slippery roads or while being tested on
some dynamometers.Starting the vehicle1. After starting the engine, fully depress thefoot brake pedal before moving the selector
lever out of the P (Park) position.
This CVT is designed so that the foot
brake pedal must be depressed before
shifting from P (Park) to any driving
position while the ignition switch is in
the ON position.
The selector lever cannot be moved out
of the P (Park) position and into any of
the other positions if the ignition
switch is placed in the LOCK, OFF or
ACC position or if the key is removed. 2. Keep the foot brake pedal depressed, push
the selector lever button and move the
selector lever to a driving position.
3. Release the parking brake and foot brake pedal, and then gradually start the vehicle in
motion.
WARNING
.Do not depress the accelerator
pedal while shifting from P (Park)
or N (Neutral) to R (Reverse) , D
(Drive) or L (Low) . Always depress
the brake pedal until shifting is
completed. Failure to do so could
cause you to lose control and have
an accident.
. Cold engine idle speed is high, so
use caution when shifting into a
forward or reverse gear before the
engine has warmed up.
. Never shift to P (Park) or R (Re-
verse) while vehicle is moving. Fail-
ure to do so could cause you to lose
control and have an accident.
CAUTION
.When stopping the vehicle on an
uphill grade, do not hold the vehicle
by depressing the accelerator pedal.
The foot brake should be used for
this purpose.
. Do not downshift abruptly on slip-
pery roads. This may cause a loss of
control.
DRIVING THE VEHICLE5-14
Starting and driving
Page 216 of 329
Black plate (220,1)
Model "Z12-D" EDITED: 2009/ 9/ 17
N (Neutral):
Neither forward nor reverse gear is engaged.
The engine can be started in this position. You
may shift to N (Neutral) and restart a stalled
engine while the vehicle is moving.
D (Drive):
Use this position for all normal forward driving.
L (Low):
Use this position for maximum engine braking on
steep downhill gradients/climbing steep slopes
and whenever approaching sharp bends. Do not
use the L (Low) position in any other circum-
stances.
SSD0863
Overdrive (O/D) OFF switch (if so
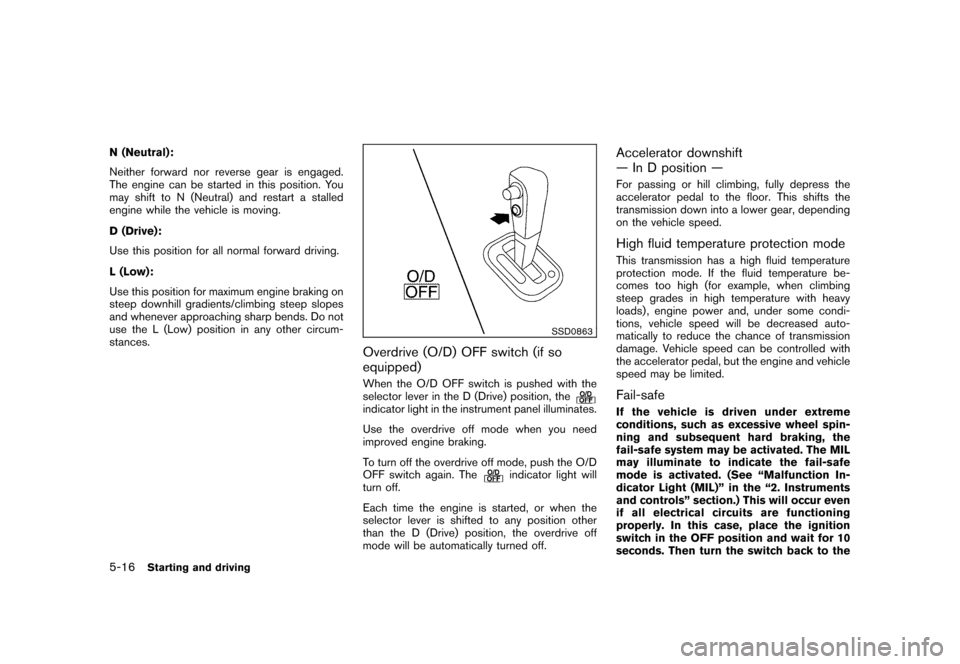
equipped)When the O/D OFF switch is pushed with the
selector lever in the D (Drive) position, theindicator light in the instrument panel illuminates.
Use the overdrive off mode when you need
improved engine braking.
To turn off the overdrive off mode, push the O/D
OFF switch again. The
indicator light will
turn off.
Each time the engine is started, or when the
selector lever is shifted to any position other
than the D (Drive) position, the overdrive off
mode will be automatically turned off.
Accelerator downshift
— In D position —For passing or hill climbing, fully depress the
accelerator pedal to the floor. This shifts the
transmission down into a lower gear, depending
on the vehicle speed.High fluid temperature protection modeThis transmission has a high fluid temperature
protection mode. If the fluid temperature be-
comes too high (for example, when climbing
steep grades in high temperature with heavy
loads) , engine power and, under some condi-
tions, vehicle speed will be decreased auto-
matically to reduce the chance of transmission
damage. Vehicle speed can be controlled with
the accelerator pedal, but the engine and vehicle
speed may be limited.Fail-safeIf the vehicle is driven under extreme
conditions, such as excessive wheel spin-
ning and subsequent hard braking, the
fail-safe system may be activated. The MIL
may illuminate to indicate the fail-safe
mode is activated. (See “Malfunction In-
dicator Light (MIL)” in the “2. Instruments
and controls” section.) This will occur even
if all electrical circuits are functioning
properly. In this case, place the ignition
switch in the OFF position and wait for 10
seconds. Then turn the switch back to the
5-16
Starting and driving
Page 221 of 329
Black plate (225,1)
Model "Z12-D" EDITED: 2009/ 9/ 17
.on slippery roads (rain, snow, ice,
etc.)
. in very windy areas
Doing so could cause a loss of vehicle
control and result in an accident.
CAUTION
On Manual Transmission (MT) models,
do not shift into N (Neutral) without
depressing the clutch pedal when the
cruise control is set. Should this occur,
depress the clutch pedal and turn the
MAIN switch off immediately. Failure to
do so may cause engine damage.
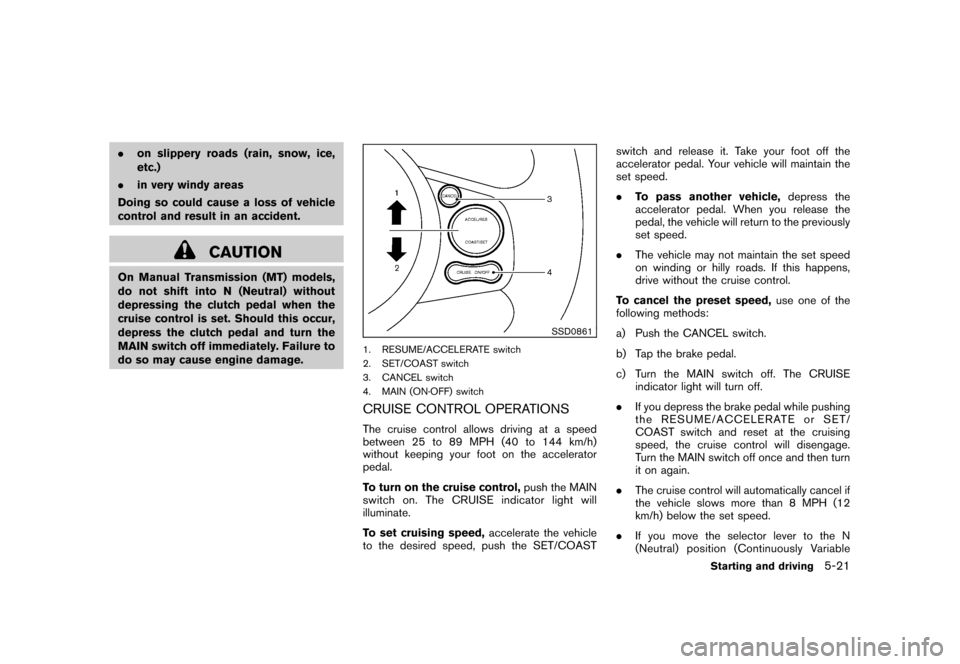
SSD0861
1. RESUME/ACCELERATE switch
2. SET/COAST switch
3. CANCEL switch
4. MAIN (ON·OFF) switchCRUISE CONTROL OPERATIONSThe cruise control allows driving at a speed
between 25 to 89 MPH (40 to 144 km/h)
without keeping your foot on the accelerator
pedal.
To turn on the cruise control, push the MAIN
switch on. The CRUISE indicator light will
illuminate.
To set cruising speed, accelerate the vehicle
to the desired speed, push the SET/COAST switch and release it. Take your foot off the
accelerator pedal. Your vehicle will maintain the
set speed.
.
To pass another vehicle, depress the
accelerator pedal. When you release the
pedal, the vehicle will return to the previously
set speed.
. The vehicle may not maintain the set speed
on winding or hilly roads. If this happens,
drive without the cruise control.
To cancel the preset speed, use one of the
following methods:
a) Push the CANCEL switch.
b) Tap the brake pedal.
c) Turn the MAIN switch off. The CRUISE indicator light will turn off.
. If you depress the brake pedal while pushing
the RESUME/ACCELERATE or SET/
COAST switch and reset at the cruising
speed, the cruise control will disengage.
Turn the MAIN switch off once and then turn
it on again.
. The cruise control will automatically cancel if
the vehicle slows more than 8 MPH (12
km/h) below the set speed.
. If you move the selector lever to the N
(Neutral) position (Continuously Variable
Starting and driving
5-21
Page 241 of 329
Black plate (245,1)
Model "Z12-D" EDITED: 2009/ 9/ 17
protectors (for example, goggles or
industrial safetyspectacles) and
remove rings, metal bands, or any
other jewelry. Do not lean over the
battery when jump starting.
. Do not attempt to jump start a
frozen battery. It could explode
and cause serious injury.
. Your vehicle has an automatic en-
gine cooling fan. It could come on at
any time. Keep hands and other
objects away from it.
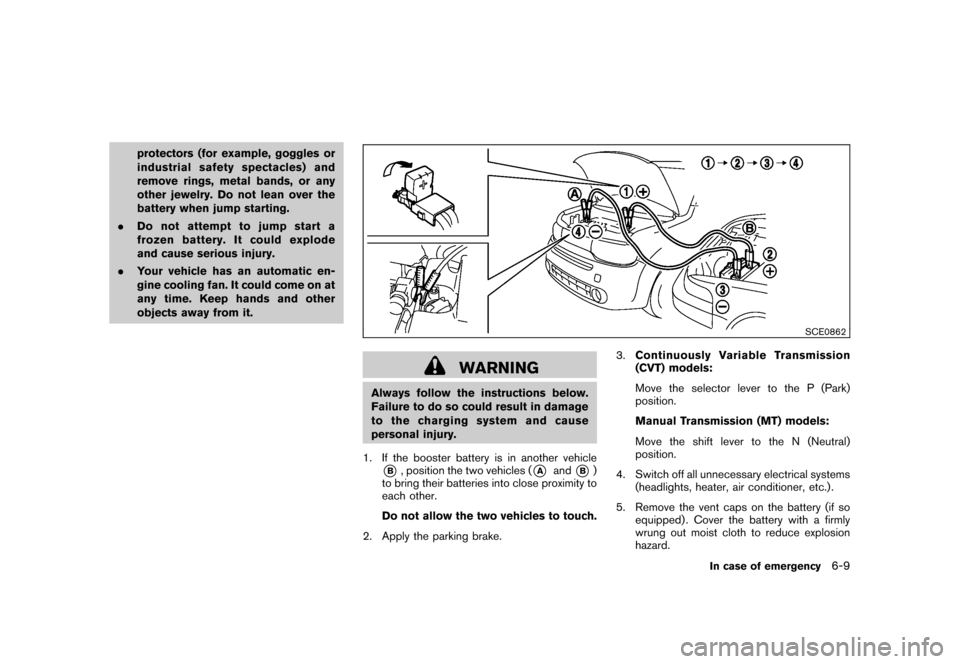
SCE0862
WARNING
Always follow the instructions below.
Failure to do so could result in damage
to the charging system and cause
personal injury.
1. If the booster battery is in another vehicle*B, position the two vehicles (
*A
and
*B)
to bring their batteries into close proximity to
each other.
Do not allow the two vehicles to touch.
2. Apply the parking brake. 3.
Continuously Variable Transmission
(CVT) models:
Move the selector lever to the P (Park)
position.
Manual Transmission (MT) models:
Move the shift lever to the N (Neutral)
position.
4. Switch off all unnecessary electrical systems (headlights, heater, air conditioner, etc.) .
5. Remove the vent caps on the battery (if so equipped) . Cover the battery with a firmly
wrung out moist cloth to reduce explosion
hazard.
In case of emergency
6-9
Page 321 of 329
Black plate (1,1)
10 Index
A
ABS (Anti-lock Braking System) .................. 5-26
Advanced air bag system ......................... 1-50
Air bag system Advanced air bag system ..................... 1-50
Front passenger air bag and status light .... 1-51
Front-seat mounted side-impact
supplemental air bag system .................. 1-54
Roof-mounted curtain side-impact
supplemental air bag system .................. 1-54
Air bag warning labels ............................. 1-57
Air bag warning light ....................... 1-57, 2-14
Air cleaner housing filter .......................... 8-16
Air conditioner Air conditioner operation ........................ 4-6
Air conditioner service ......................... 4-12
Air conditioner specification label ............ 9-10
Air conditioning system refrigerant and
lubricant recommendations .............. 4-12, 9-6
In-cabin microfilter ............................. 4-12
Alarm, How to stop alarm
(see vehicle security system) ..................... 2-19
Alcohol, drugs and driving .......................... 5-6
Antenna ............................................. 4-42
Anti-lock Braking System (ABS) .................. 5-26
Anti-lock braking system (ABS) warning light . . . 2-10
Appearance care Exterior appearance care ........................ 7-2
Interior appearance care ........................ 7-5
Armrest ............................................. 1-12
Audible reminders ................................. 2-17
Audio operation precautions ...................... 4-13 Audio system
....................................... 4-13
Steering wheel audio controls ................ 4-41
Autolight system ................................... 2-24
Automatic Air conditioner. ................................. 4-10
Door locks ........................................ 3-5
Average fuel consumption ........................... 2-9
Average speed ....................................... 2-9
Avoiding collision and rollover ...................... 5-5
B
Back door .......................................... 3-22
Battery .............................................. 8-13
Battery replacement, Intelligent Key .......... 8-23
Battery replacement, Keyfob .................. 8-22
Battery saver system .......................... 2-25
Variable voltage control system ............... 8-15
Before starting the engine ........................ 5-12
Bluetooth
®Hands-Free Phone System .......... 4-44
Booster seats ...................................... 1-39
Brake Anti-lock Braking System (ABS) .............. 5-26
Brake and clutch fluid ......................... 8-11
Brake system ................................... 5-26
Parking brake operation ....................... 5-20
Warning light ................................... 2-11
Break-in schedule .................................. 5-22
Brightness control, Instrument panel ............. 2-26
Bulb check/instrument panel ...................... 2-10
Bulb replacement .................................. 8-25 C
Cabin air filter ...................................... 4-12
Capacities and recommended fuel/lubricants ..... 9-2
Car phone or CB radio ............................ 4-44
Cargo light ......................................... 2-40
Catalytic converter, Three way catalyst ............ 5-2
CD care and cleaning ............................. 4-41
Ceiling light ......................................... 2-39
Child restraints ..................................... 1-23
Booster seats .................................. 1-39
Installation using LATCH ...................... 1-28
Installation using the seat belts ............... 1-33
Precautions on child restraints ................ 1-23
Top tether strap ................................ 1-26
Child safety ......................................... 1-15
Child safety rear door lock .......................... 3-6
Chimes, Audible reminders ....................... 2-17
Circuit breaker, Fusible link ....................... 8-21
Cleaning exterior and interior ................. 7-2, 7-5
Clock ............................................... 2-28
Clutch fluid ......................................... 8-11
Cockpit ............................................... 2-2
Cold weather driving .............................. 5-29
Command
(See Bluetooth
®Hands-Free Phone System) . . . 4-50
Compact Disc (CD) player
(See audio system) .................. 4-26, 4-31, 4-37
Continuously Variable Transmission (CVT)
fluid ................................................. 8-11
Controls, Steering wheel audio controls ......... 4-41
Model "Z12-D" EDITED: 2009/ 9/ 17