2010 NISSAN CUBE display
[x] Cancel search: displayPage 100 of 329
Black plate (100,1)
Model "Z12-D" EDITED: 2009/ 9/ 17
SIC4128SIC4129
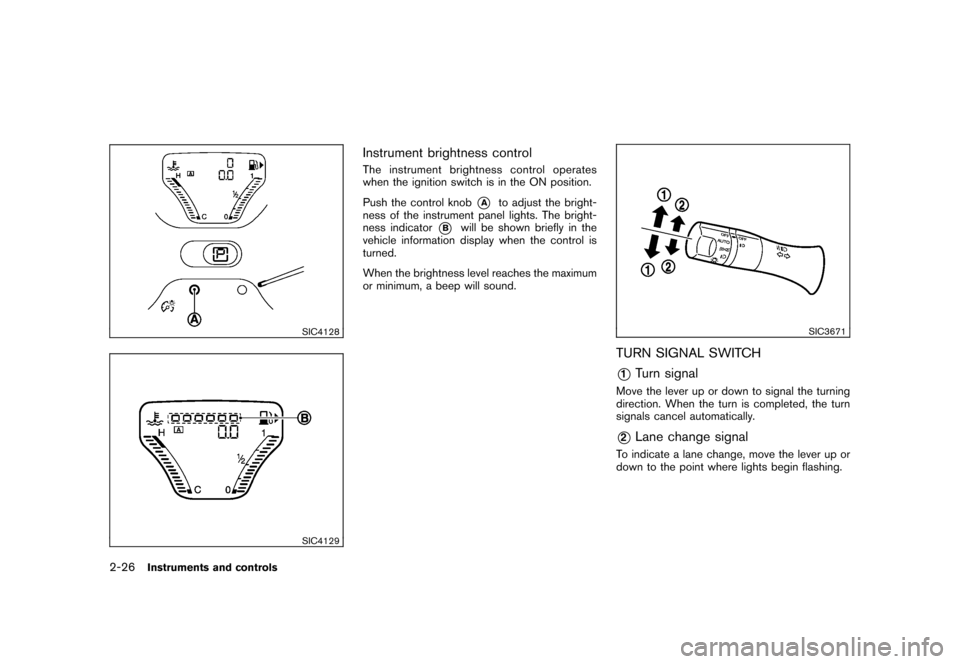
Instrument brightness controlThe instrument brightness control operates
when the ignition switch is in the ON position.
Push the control knob
*A
to adjust the bright-
ness of the instrument panel lights. The bright-
ness indicator
*B
will be shown briefly in the
vehicle information display when the control is
turned.
When the brightness level reaches the maximum
or minimum, a beep will sound.
SIC3671
TURN SIGNAL SWITCH*1
Turn signal
Move the lever up or down to signal the turning
direction. When the turn is completed, the turn
signals cancel automatically.*2
Lane change signal
To indicate a lane change, move the lever up or
down to the point where lights begin flashing.
2-26
Instruments and controls
Page 102 of 329
Black plate (102,1)
Model "Z12-D" EDITED: 2009/ 9/ 17
SIC4130
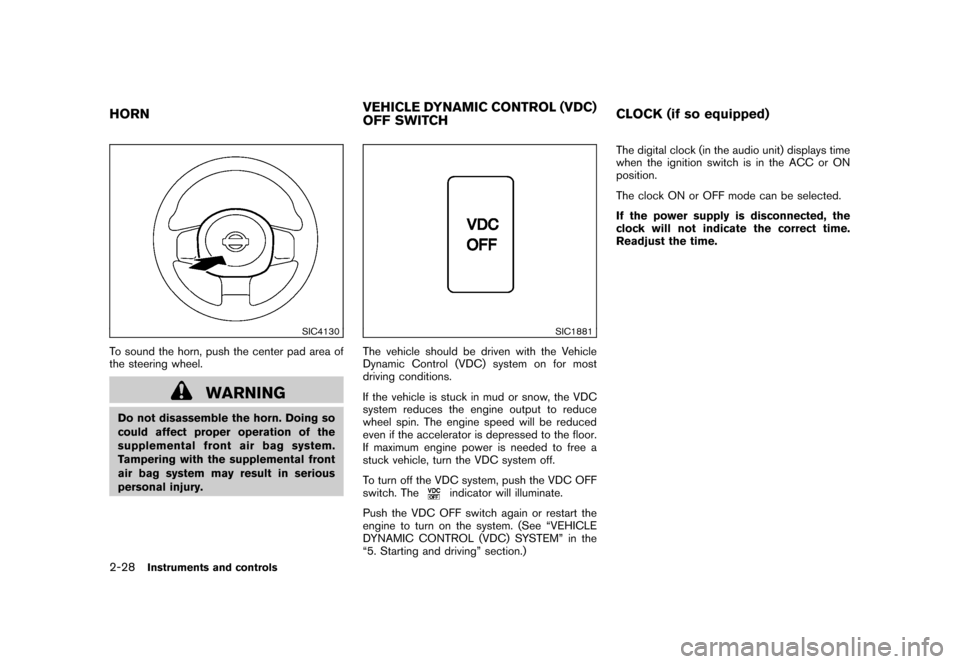
To sound the horn, push the center pad area of
the steering wheel.
WARNING
Do not disassemble the horn. Doing so
could affect proper operation of the
supplemental front air bag system.
Tampering with the supplemental front
air bag system may result in serious
personal injury.
SIC1881
The vehicle should be driven with the Vehicle
Dynamic Control (VDC) system on for most
driving conditions.
If the vehicle is stuck in mud or snow, the VDC
system reduces the engine output to reduce
wheel spin. The engine speed will be reduced
even if the accelerator is depressed to the floor.
If maximum engine power is needed to free a
stuck vehicle, turn the VDC system off.
To turn off the VDC system, push the VDC OFF
switch. The
indicator will illuminate.
Push the VDC OFF switch again or restart the
engine to turn on the system. (See “VEHICLE
DYNAMIC CONTROL (VDC) SYSTEM” in the
“5. Starting and driving” section.) The digital clock (in the audio unit) displays time
when the ignition switch is in the ACC or ON
position.
The clock ON or OFF mode can be selected.
If the power supply is disconnected, the
clock will not indicate the correct time.
Readjust the time.
HORN
VEHICLE DYNAMIC CONTROL (VDC)
OFF SWITCHCLOCK (if so equipped)2-28
Instruments and controls
Page 103 of 329
Black plate (103,1)
Model "Z12-D" EDITED: 2009/ 9/ 17
SIC4131
Type A
ADJUSTING THE TIME
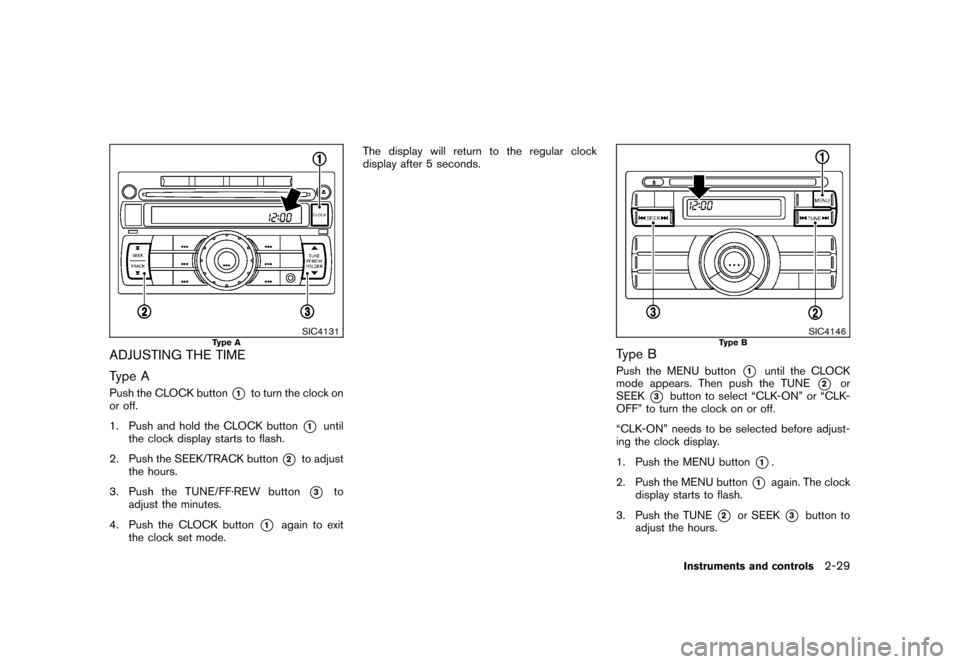
Type APush the CLOCK button
*1
to turn the clock on
or off.
1. Push and hold the CLOCK button
*1
until
the clock display starts to flash.
2. Push the SEEK/TRACK button
*2
to adjust
the hours.
3. Push the TUNE/ FF·REW button*3
to
adjust the minutes.
4. Push the CLOCK button
*1
again to exit
the clock set mode. The display will return to the regular clock
display after 5 seconds.
SIC4146
Type B
Type BPush the MENU button
*1
until the CLOCK
mode appears. Then push the TUNE
*2
or
SEEK
*3
button to select “CLK-ON” or “CLK-
OFF” to turn the clock on or off.
“CLK-ON” needs to be selected before adjust-
ing the clock display.
1. Push the MENU button
*1.
2. Push the MENU button
*1
again. The clock
display starts to flash.
3. Push the TUNE
*2
or SEEK
*3
button to
adjust the hours.
Instruments and controls
2-29
Page 104 of 329
Black plate (104,1)
Model "Z12-D" EDITED: 2009/ 9/ 17
4. Push the MENU button
*1
again. The
display will switch to the minute adjustment
mode.
5. Push the TUNE or SEEK button to adjust the minutes.
6. Push the MENU button again to exit the clock mode.
The display will return to the regular clock
display after 5 seconds.
SIC4275
Type C
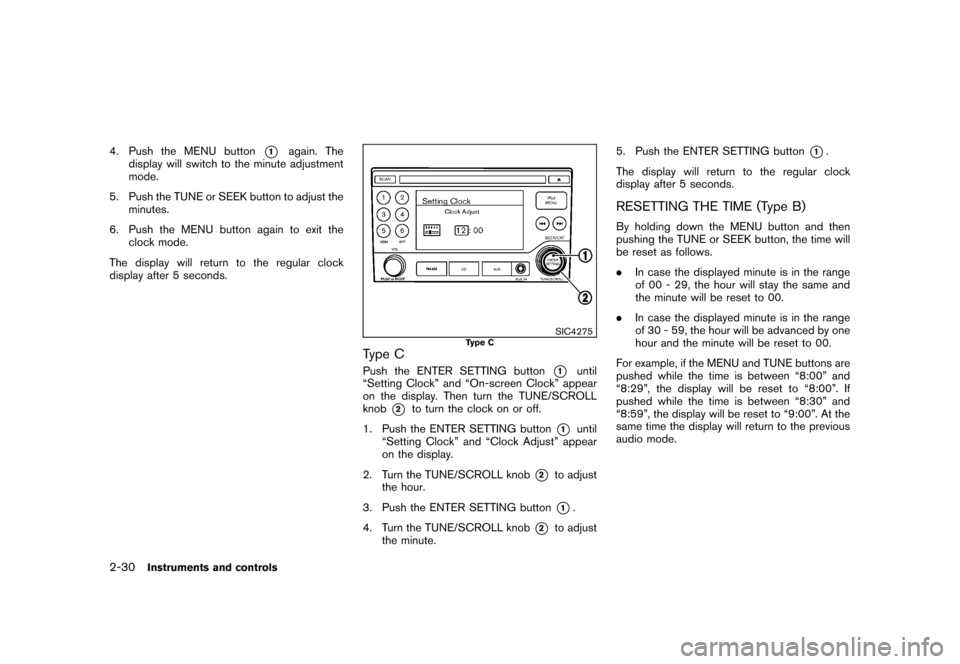
Type CPush the ENTER SETTING button
*1
until
“Setting Clock” and “On-screen Clock” appear
on the display. Then turn the TUNE/SCROLL
knob
*2
to turn the clock on or off.
1. Push the ENTER SETTING button
*1
until
“Setting Clock” and “Clock Adjust” appear
on the display.
2. Turn the TUNE/SCROLL knob
*2
to adjust
the hour.
3. Push the ENTER SETTING button*1.
4. Turn the TUNE/SCROLL knob
*2
to adjust
the minute. 5. Push the ENTER SETTING button
*1.
The display will return to the regular clock
display after 5 seconds.
RESETTING THE TIME (Type B)By holding down the MENU button and then
pushing the TUNE or SEEK button, the time will
be reset as follows.
. In case the displayed minute is in the range
of 00 - 29, the hour will stay the same and
the minute will be reset to 00.
. In case the displayed minute is in the range
of 30 - 59, the hour will be advanced by one
hour and the minute will be reset to 00.
For example, if the MENU and TUNE buttons are
pushed while the time is between “8:00” and
“8:29”, the display will be reset to “8:00”. If
pushed while the time is between “8:30” and
“8:59”, the display will be reset to “9:00”. At the
same time the display will return to the previous
audio mode.
2-30
Instruments and controls
Page 143 of 329
Black plate (13,1)
4 Heater, air conditioner, audio and phonesystems
Model "Z12-D" EDITED: 2009/ 9/ 17
Safety note ....................................................... 4-2
RearView monitor (if so equipped) ......................... 4-2
How to read the displayed lines ......................... 4-3
How to adjust the screen ................................. 4-4
Operating tips ............................................... 4-4
Ventilators ........................................................ 4-5
Center ventilators ........................................... 4-5
Side ventilators .............................................. 4-5
Heater and air conditioner .................................... 4-6
Manual air conditioner (if so equipped) ................ 4-6
Automatic air conditioner (if so equipped) .......... 4-10
Operating tips ............................................. 4-12
In-cabin microfilter ........................................ 4-12
Servicing air conditioner ................................ 4-12
Audio system .................................................. 4-13
Audio operation precautions ........................... 4-13
FM-AM radio with Compact Disc (CD) player
(Type A)..................................................... 4-25 FM-AM radio with Compact Disc (CD) player
(Type B)..................................................... 4-29
FM-AM-SAT radio with Compact Disc (CD)
player
........................................................ 4-35
CD care and cleaning ................................... 4-41
Steering wheel switch for audio control
(if so equipped) ........................................... 4-41
Antenna ..................................................... 4-42
Car phone or CB radio ...................................... 4-44
Bluetooth
®Hands-Free Phone System
(if so equipped) ............................................... 4-44
Regulatory information ................................... 4-46
Using the system ......................................... 4-46
Control buttons ........................................... 4-48
Getting started ............................................ 4-49
List of voice commands ................................. 4-50
Speaker Adaptation (SA) mode ....................... 4-54
Troubleshooting guide ................................... 4-56
Page 144 of 329
Black plate (148,1)
Model "Z12-D" EDITED: 2009/ 9/ 17
WARNING
.Do not disassemble or modify this
system. If you do, it may result in
accidents, fire, or electric shock.
. Do not use this system if you notice
any abnormality, such as a frozen
screen or lack of sound. Continued
use of the system may result in
accident, fire or electric shock.
. In case you notice any foreign
object in the system hardware, spill
liquid on it, or notice smoke or smell
coming from it, stop using the
system immediately and contact
your nearest NISSAN dealer. Ignor-
ing such conditions may lead to
accidents, fire, or electric shock.
Do not attempt to operate the system in
extreme temperature conditions [below
� 48F( �208 C) and above 158 8F(70 8C)].
Operating this system under these condi-
tions may result in system malfunctions. When the selector lever is shifted into the R
(Reverse) position, the monitor display shows
the view to the rear of the vehicle.
The system is designed as an aid to the driver in
detecting large stationary objects to help avoid
damaging the vehicle. The system will not detect
small objects below the bumper and may not
detect objects close to the bumper or on the
ground.
WARNING
.
The rear view camera is a conve-
nience but it is not a substitute for
proper backing up. Always turn and
check that it is safe to do so before
backing up. Always back up slowly.
. Objects viewed in the RearView
Monitor differ from actual distance
because a wide-angle lens is used.
Objects in the RearView Monitor
will appear visually opposite than
when viewed in the rear view and
outside mirrors.
. Make sure that the back door is
securely closed when backing up.
. Underneath the bumper and the
corner areas of the bumper cannot
be viewed on the RearView Monitor because of its monitoring range
limitation.
. Do not put anything on the rear view
camera.
. When washing the vehicle with
high-pressure water, be sure not to
spray it around the camera. Other-
wise, water may enter the camera
unit causing water condensation on
the lens, a malfunction, fire or an
electric shock.
. Do not strike the camera. It is a
precision instrument. Otherwise, it
may malfunction or cause damage
resulting in a fire or an electric
shock.
CAUTION
Do not scratch the camera lens when
cleaning dirt or snow from the lens.
SAFETY NOTE REARVIEW MONITOR (if so
equipped)4-2
Heater, air conditioner, audio and phone systems
Page 145 of 329
Black plate (149,1)
Model "Z12-D" EDITED: 2009/ 9/ 17
SAA2776
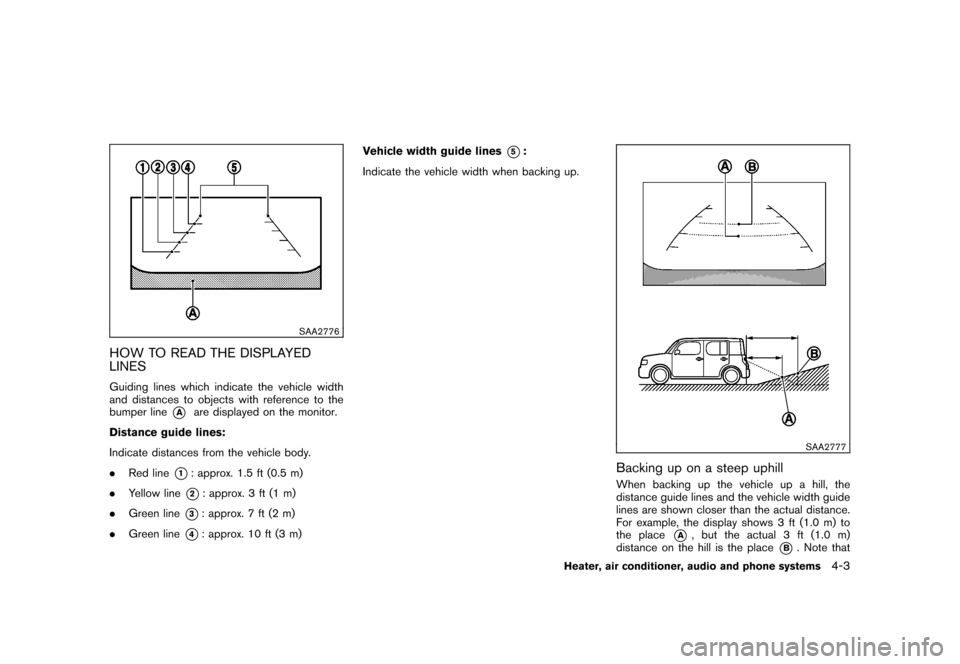
HOW TO READ THE DISPLAYED
LINESGuiding lines which indicate the vehicle width
and distances to objects with reference to the
bumper line
*A
are displayed on the monitor.
Distance guide lines:
Indicate distances from the vehicle body.
. Red line
*1: approx. 1.5 ft (0.5 m)
. Yellow line*2: approx. 3 ft (1 m)
. Green line
*3: approx. 7 ft (2 m)
. Green line
*4: approx. 10 ft (3 m) Vehicle width guide lines
*5:
Indicate the vehicle width when backing up.
SAA2777
Backing up on a steep uphillWhen backing up the vehicle up a hill, the
distance guide lines and the vehicle width guide
lines are shown closer than the actual distance.
For example, the display shows 3 ft (1.0 m) to
the place
*A
, but the actual 3 ft (1.0 m)
distance on the hill is the place
*B. Note that
Heater, air conditioner, audio and phone systems
4-3
Page 146 of 329
Black plate (150,1)
Model "Z12-D" EDITED: 2009/ 9/ 17
any object on the hill is viewed in the monitor
further than it appears.
SAA2778
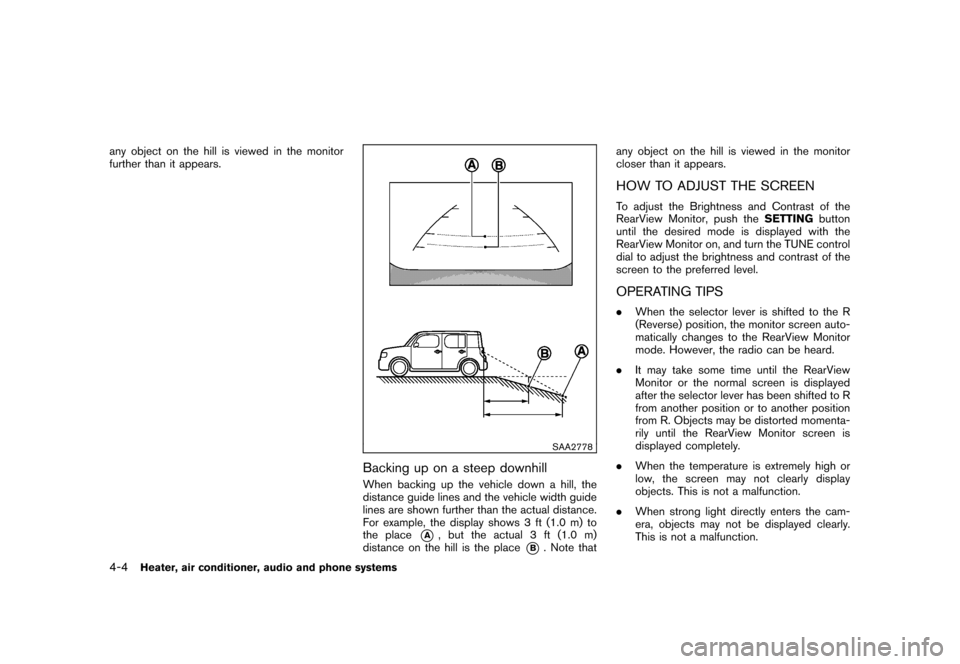
Backing up on a steep downhillWhen backing up the vehicle down a hill, the
distance guide lines and the vehicle width guide
lines are shown further than the actual distance.
For example, the display shows 3 ft (1.0 m) to
the place
*A
, but the actual 3 ft (1.0 m)
distance on the hill is the place
*B. Note that any object on the hill is viewed in the monitor
closer than it appears.
HOW TO ADJUST THE SCREENTo adjust the Brightness and Contrast of the
RearView Monitor, push the
SETTINGbutton
until the desired mode is displayed with the
RearView Monitor on, and turn the TUNE control
dial to adjust the brightness and contrast of the
screen to the preferred level.OPERATING TIPS. When the selector lever is shifted to the R
(Reverse) position, the monitor screen auto-
matically changes to the RearView Monitor
mode. However, the radio can be heard.
. It may take some time until the RearView
Monitor or the normal screen is displayed
after the selector lever has been shifted to R
from another position or to another position
from R. Objects may be distorted momenta-
rily until the RearView Monitor screen is
displayed completely.
. When the temperature is extremely high or
low, the screen may not clearly display
objects. This is not a malfunction.
. When strong light directly enters the cam-
era, objects may not be displayed clearly.
This is not a malfunction.
4-4
Heater, air conditioner, audio and phone systems