Page 201 of 472
Daylight Savings Time:
When this item is enabled (indicator light illumi-
nated) , daylight savings time is on. To turn off the
daylight savings time, touch the “ON” key; the
amber indicator light will disappear.Time Zone:
Select the “Time Zone” key; the Time Zone
screen will appear.
Select one of the following zones, depending on
the current location, by selecting the correct time
zone key and pressing the ENTER button to
enable that time zone (indicator light will illumi-
nate for that location) .● Pacific
● Mountain
● Central
● Eastern ●
Atlantic
● Newfoundland
● Aleutian
● Hawaii
● Alaska
Page 202 of 472

Clock Adjust:
Adjust the time by manually inputting the correct
time.● 0–9:
Select to change the number in the display.
● Modify:
Select to change the number at the cursor
position.
● >:
Select to move the cursor position to the
right.
● <:
Select to move the cursor position to the left. ●
OK:
Select to accept the changes made and
return to the clock setting display.
After selection/settings, press the BACK button
or any other mode button to accept the changes.Comfort & Convenience settings (if so
equipped)
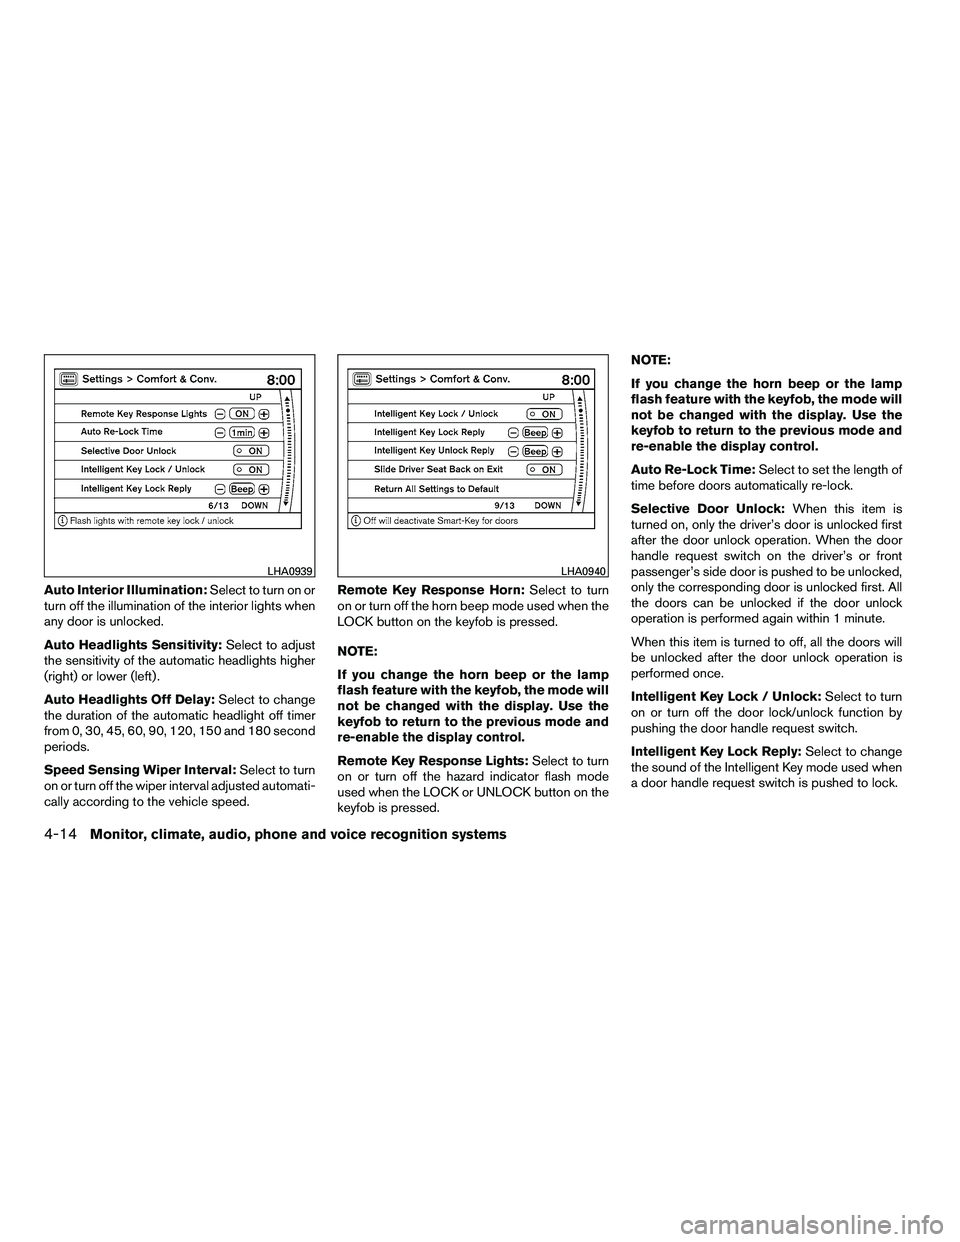
Select the “Comfort & Conv.” key by using the
NISSAN controller and pressing the ENTER but-
ton. The comfort and convenience option screen
will be displayed.
You can set the following operating conditions by
selecting the desired item using the NISSAN
controller, then pressing the ENTER button. The
indicator light (box at the right of the selected
item) alternately turns on and off each time the
ENTER button is pressed.
Indicator light is illuminated — ON
Indicator light is not illuminated — OFF
Page 203 of 472

Auto Interior Illumination:Select to turn on or
turn off the illumination of the interior lights when
any door is unlocked.
Auto Headlights Sensitivity: Select to adjust
the sensitivity of the automatic headlights higher
(right) or lower (left) .
Auto Headlights Off Delay: Select to change
the duration of the automatic headlight off timer
from 0, 30, 45, 60, 90, 120, 150 and 180 second
periods.
Speed Sensing Wiper Interval: Select to turn
on or turn off the wiper interval adjusted automati-
cally according to the vehicle speed. Remote Key Response Horn:
Select to turn
on or turn off the horn beep mode used when the
LOCK button on the keyfob is pressed.
NOTE:
If you change the horn beep or the lamp
flash feature with the keyfob, the mode will
not be changed with the display. Use the
keyfob to return to the previous mode and
re-enable the display control.
Remote Key Response Lights: Select to turn
on or turn off the hazard indicator flash mode
used when the LOCK or UNLOCK button on the
keyfob is pressed. NOTE:
If you change the horn beep or the lamp
flash feature with the keyfob, the mode will
not be changed with the display. Use the
keyfob to return to the previous mode and
re-enable the display control.
Auto Re-Lock Time:
Select to set the length of
time before doors automatically re-lock.
Selective Door Unlock: When this item is
turned on, only the driver’s door is unlocked first
after the door unlock operation. When the door
handle request switch on the driver’s or front
passenger’s side door is pushed to be unlocked,
only the corresponding door is unlocked first. All
the doors can be unlocked if the door unlock
operation is performed again within 1 minute.
When this item is turned to off, all the doors will
be unlocked after the door unlock operation is
performed once.
Intelligent Key Lock / Unlock: Select to turn
on or turn off the door lock/unlock function by
pushing the door handle request switch.
Intelligent Key Lock Reply: Select to change
the sound of the Intelligent Key mode used when
a door handle request switch is pushed to lock.
Page 209 of 472

●Symbols:
Shows symbols such as the question mark
(?) .
● Delete:
Deletes the last inputted character with one
touch. Touch and hold the “Delete” key to
delete all of the characters.
● OK:
Completes the character input.
Touch screen maintenance
If you clean the display screen, use a dry, soft
cloth. If additional cleaning is necessary, use a
small amount of neutral detergent with a soft
cloth. Never spray the screen with water or de-
tergent. Dampen the cloth first, and then wipe the
screen.
START-UP SCREEN
When you place the ignition switch in the ACC or
ON position, the SYSTEM START-UP warning is
displayed on the screen. When you read and
agree with the warning, press the ENTER button.
If you do not push the ENTER button, you will not
be able to use the navigation system.
To proceed to the next step, refer to the separate
Navigation System Owner’s Manual.
HOW TO SELECT MENUS ON THE
SCREEN
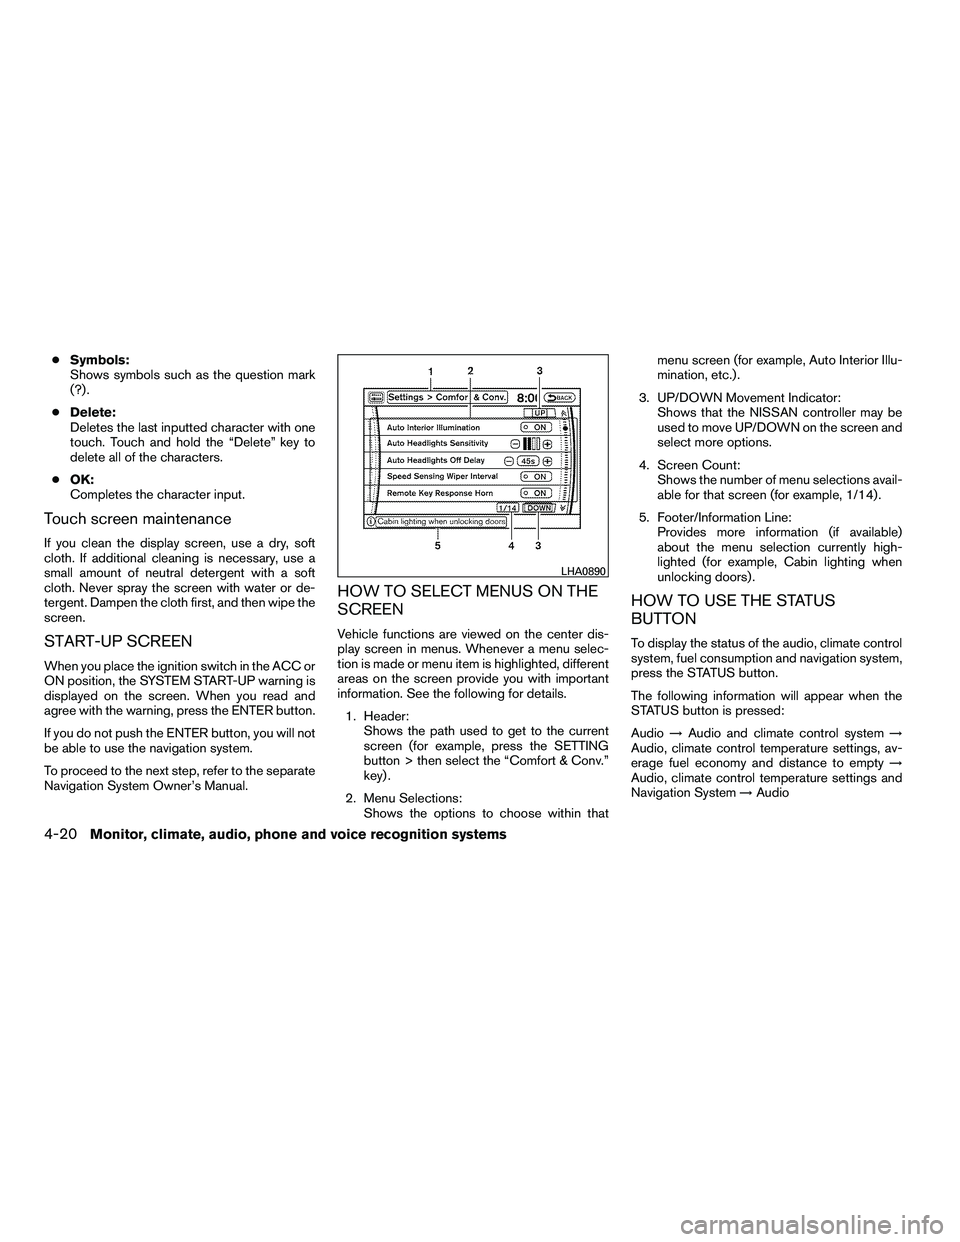
Vehicle functions are viewed on the center dis-
play screen in menus. Whenever a menu selec-
tion is made or menu item is highlighted, different
areas on the screen provide you with important
information. See the following for details.
1. Header: Shows the path used to get to the current
screen (for example, press the SETTING
button > then select the “Comfort & Conv.”
key) .
2. Menu Selections: Shows the options to choose within that menu screen (for example, Auto Interior Illu-
mination, etc.) .
3. UP/DOWN Movement Indicator: Shows that the NISSAN controller may be
used to move UP/DOWN on the screen and
select more options.
4. Screen Count: Shows the number of menu selections avail-
able for that screen (for example, 1/14) .
5. Footer/Information Line: Provides more information (if available)
about the menu selection currently high-
lighted (for example, Cabin lighting when
unlocking doors) .
HOW TO USE THE STATUS
BUTTON
To display the status of the audio, climate control
system, fuel consumption and navigation system,
press the STATUS button.
The following information will appear when the
STATUS button is pressed:
Audio →Audio and climate control system →
Audio, climate control temperature settings, av-
erage fuel economy and distance to empty →
Audio, climate control temperature settings and
Navigation System →Audio
Page 213 of 472

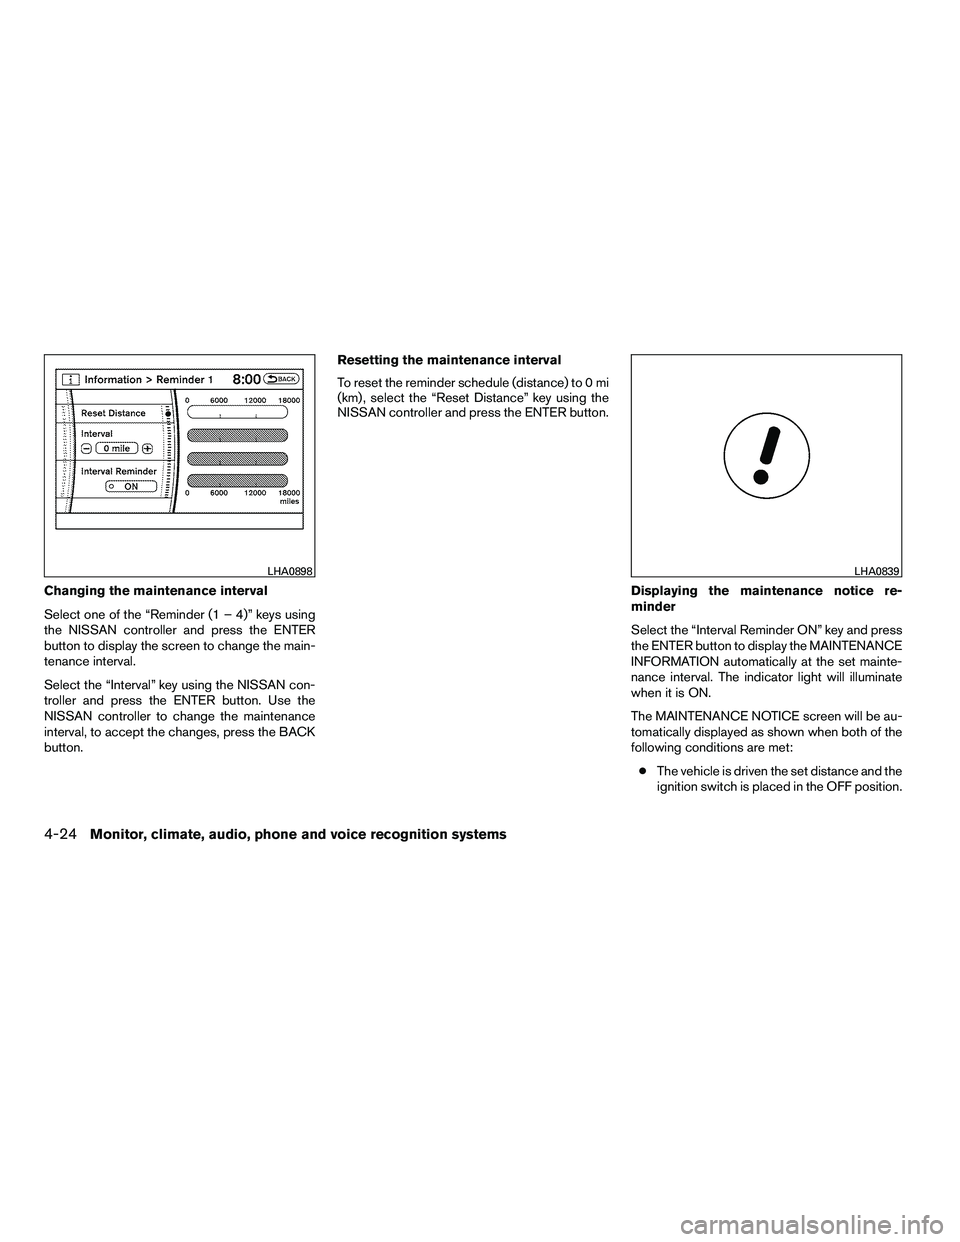
Changing the maintenance interval
Select one of the “Reminder (1 – 4)” keys using
the NISSAN controller and press the ENTER
button to display the screen to change the main-
tenance interval.
Select the “Interval” key using the NISSAN con-
troller and press the ENTER button. Use the
NISSAN controller to change the maintenance
interval, to accept the changes, press the BACK
button.Resetting the maintenance interval
To reset the reminder schedule (distance) to 0 mi
(km) , select the “Reset Distance” key using the
NISSAN controller and press the ENTER button.
Displaying the maintenance notice re-
minder
Select the “Interval Reminder ON” key and press
the ENTER button to display the MAINTENANCE
INFORMATION automatically at the set mainte-
nance interval. The indicator light will illuminate
when it is ON.
The MAINTENANCE NOTICE screen will be au-
tomatically displayed as shown when both of the
following conditions are met:● The vehicle is driven the set distance and the
ignition switch is placed in the OFF position.
Page 214 of 472

●The ignition switch is placed in the ON po-
sition the next time the vehicle will be driven.
To return to the previous display after the MAIN-
TENANCE NOTICE screen is displayed, press
the BACK button.
The MAINTENANCE NOTICE screen displays
each time the key is turned ON until one of the
following conditions are met: ● The “Reset” key is selected.
● The “Interval Reminder ON” key is set to
OFF (indicator light not illuminated) .
● The maintenance interval is set again.
Other items
Press the INFO button and select the “Others”
key using the NISSAN controller and press the
ENTER button to view information on the naviga-
tion and voice recognition systems.
Voice recognition
For Voice Recognition settings, refer to “NISSAN
Voice Recognition system (if so equipped)” later
in this section.
Navigation version
Refer to the separate Navigation System Own-
er’s Manual for information regarding this item.
Traffic Info.
Refer to the separate Navigation System Own-
er’s Manual for information regarding this item.
Where am I?
Refer to the separate Navigation System Own-
er’s Manual for information regarding this item.
GPS Satellite Info.
Refer to the separate Navigation System Own-
er’s Manual for information regarding this item.
Page 217 of 472
Clock Format:
Choose either the 12h (12–hour) clock display or
the 24h (24–hour) clock display.
Offset Adjust:
Adjust the time by increasing or decreasing per
minute.
Daylight Saving Time:
When this item is enabled (indicator light illumi-
nated) , daylight saving time is on. To turn off the
daylight saving time, touch the “ON” key; the
amber indicator light will disappear.Time Zone:
Select the “Time Zone” key; the Time Zone
screen will appear.
Select one of the following zones, depending on
the current location, by selecting the correct time
zone key and pressing the ENTER button to
enable that time zone (indicator light will illumi-
nate for that location) .● Pacific
● Mountain
● Central
● Eastern ●
Atlantic
● Newfoundland
● Hawaii
● Alaska
After selection/settings, press the BACK button
or any other mode button to accept the changes.
Page 218 of 472

Comfort & Convenience settings
Select the “Comfort & Conv.” key by using the
NISSAN controller and pressing the ENTER but-
ton. The comfort and convenience option screen
will be displayed.
You can set the following operating conditions by
selecting the desired item using the NISSAN
controller, then pressing the ENTER button. The
indicator light (box at the right of the selected
item) alternately turns on and off each time the
ENTER button is pressed.
Indicator light is illuminated — ON
Indicator light is not illuminated — OFFAuto Interior Illumination:
Select to turn on or
turn off the illumination of the interior lights when
any door is unlocked.
Auto Headlights Sensitivity: Select to adjust
the sensitivity of the automatic headlights higher
(right) or lower (left) .
Auto Headlights Off Delay: Select to change
the duration of the automatic headlight off timer
from 0, 30, 45, 60, 90, 120, 150 and 180 second
periods.
Speed Sensing Wiper Interval: Select to turn
on or turn off the wiper interval adjusted automati-
cally according to the vehicle speed. Remote Key Response Horn:
Select to turn
on or turn off the horn chirp mode used when the
LOCK button on the keyfob is pressed.
NOTE:
If you change the horn beep or the lamp
flash feature with the keyfob, the mode will
not be changed with the display. Use the
keyfob to return to the previous mode and
re-enable the display control.