Page 12 of 472
1. Rear ventilators (P. 4-35)
2. Storage (P. 2-40)
3. DVD entertainment system(if so equipped) (P. 4-76)
4. Moonroof (if so equipped) (P. 2-54)
5. Map lights (P. 2-57)
6. Sun visors (P. 3-31)
7. HomeLink� (P. 2-58)
8. Glove box (P. 2-41)
9. Seats (P. 1-2)
10. Cup holders (P. 2-44)
11. Luggage storage (P. 2-47)
See the page number indicated in paren-
theses for operating details.
Page 13 of 472
1. Vents (P. 4-35)
2. Headlight/fog light (if so equipped)/turnsignal switch (P. 2-30)
3. Instrument brightness control (P. 2-33)
4. Steering wheel switch for audio
control/hands-free Bluetooth� phone
(if so equipped) (P. 4-73)
5. Driver supplemental air bag/horn
(P. 1-53, P. 2-34)
6. Meters, gauges and warning/indicator
lights (P. 2-4, 2-13)
7. Cruise control main/set switches
(P. 5-18)
8. Windshield wiper/washer switch and
rear window wiper/washer switch
(P. 2-28, P. 2-29)
9. Ignition switch (P. 5-9)
10. Display screen/Display screen with
navigation system* (if so equipped)
(P. 4-2, P. 4-17)
11. Navigation system* controls
(if so equipped) (P. 4-17)
12. Audio system controls (P. 4-39)
13. Front passenger supplemental air bag
(P. 1-53)
14. Glove box (P. 2-41)
15. Hazard lights (P. 2-34)
Page 78 of 472

NISSAN Advanced Air Bag System
(front seats)
This vehicle is equipped with the NISSAN Ad-
vanced Air Bag System for the driver and front
passenger seats. This system is designed to
meet certification requirements under U.S. regu-
lations. It is also permitted in Canada.However,
all of the information, cautions and warn-
ings in this manual still apply and must be
followed.
The driver supplemental front-impact air bag is
located in the center of the steering wheel. The
passenger supplemental front-impact air bag is
mounted in the dashboard above the glove box.
The front air bags are designed to inflate in higher
severity frontal collisions, although they may in-
flate if the forces in another type of collision are
similar to those of a higher severity frontal impact.
They may not inflate in certain frontal collisions.
Vehicle damage (or lack of it) is not always an
indication of proper front air bag system opera-
tion.
The NISSAN Advanced Air Bag System has dual
stage inflators. It also monitors information from
the crash zone sensor, the Air bag Control Unit
(ACU) , seat belt buckle sensors, occupant clas-
sification sensor (pressure sensor) and passen-
ger seat belt tension sensor. Inflator operation is
based on the severity of a collision and seat belt usage for the driver. For the front passenger, it
additionally monitors the weight of an occupant
or object on the seat and seat belt tension. Based
on information from the sensors, only one front air
bag may inflate in a crash, depending on the
crash severity and whether the front occupants
are belted or unbelted. Additionally, the front
passenger air bag may be automatically turned
OFF under some conditions, depending on the
weight detected on the passenger seat and how
the seat belt is used. If the front passenger air bag
is OFF, the passenger air bag status light will be
illuminated (if the seat is unoccupied, the light will
not be illuminated, but the air bag will be off) . See
“Front passenger air bag and status light” later in
this section for further details. One front air bag
inflating does not indicate improper performance
of the system.
If you have any questions about your air bag
system, please contact NISSAN or your NISSAN
dealer. If you are considering modification of your
vehicle due to a disability, you may also contact
NISSAN. Contact information is contained in the
front of this Owner’s Manual.
When a front air bag inflates, a fairly loud noise
may be heard, followed by the release of smoke.
This smoke is not harmful and does not indicate a
fire. Care should be taken to not inhale it, as it may
cause irritation and choking. Those with a history
of a breathing condition should get fresh air
promptly.
Front air bags, along with the use of seat belts,
help to cushion the impact force on the face and
chest of the front occupants. They can help save
lives and reduce serious injuries. However, an
inflating front air bag may cause facial abrasions
or other injuries. Front air bags do not provide
restraint to the lower body.
Even with NISSAN Advanced Air Bags, seat belts
should be correctly worn and the driver and pas-
senger seated upright as far as practical away
from the steering wheel or instrument panel. The
front air bags inflate quickly in order to help pro-
tect the front occupants. Because of this, the
force of the front air bag inflating can increase the
risk of injury if the occupant is too close to, or is
against, the front air bag module during inflation.
The front air bags deflate quickly after a collision.
The front air bags operate only when the
ignition switch is placed in the ON or
START position.
After placing the ignition switch in the ON
position, the supplemental air bag warning
light illuminates. The supplemental air bag
warning light will turn off after about 7
seconds if the system is operational.
Safety—Seats, seat belts and supplemental restraint system1-61
�REVIEW COPY—2010 Armada
(wzw)
Owners Manual (owners)—USA_English (nna)
02/17/09—debbie
�
Page 89 of 472
1. Vents (P. 4-35)
2. Headlight/fog light (if so equipped)/turnsignal switch (P. 2-30)
3. Instrument brightness control (P. 2-33)
4. Steering wheel switch for audio
control/hands-free Bluetooth� phone
(if so equipped) (P. 4-73)
5. Driver supplemental air bag/horn
(P. 1-53, P. 2-34)
6. Meters, gauges and warning/indicator
lights (P. 2-4, 2-13)
7. Cruise control main/set switches
(P. 5-18)
8. Windshield wiper/washer switch and
rear window wiper/washer switch
(P. 2-28, P. 2-29)
9. Ignition switch (P. 5-9)
10. Display screen/Display screen with
navigation system* (if so equipped)
(P. 4-2, P. 4-17)
11. Navigation system* controls
(if so equipped) (P. 4-17)
12. Audio system controls (P. 4-39)
13. Front passenger supplemental air bag
(P. 1-53)
14. Glove box (P. 2-41)
15. Hazard lights (P. 2-34)
Page 128 of 472
Console box lock
Use the master key to lock�1or unlock�2the
console box.
GLOVE BOX
Open the glove box by pulling the handle. Use the
master key when locking
�1or unlocking�2the
glove box.
Page 153 of 472

CAUTION
Always carry the mechanical key installed
in the Intelligent Key slot.
See “Doors” in this section and “Storage” in the
“Instruments and Controls” section of this
manual.
Valet hand-off
When you have to leave a key with a valet, give
them the Intelligent Key itself and keep the me-
chanical key with you to protect your belongings.
To prevent the glove box or console box from
being opened during valet hand-off, follow the
procedure below. 1. Remove the mechanical key from the Intelli- gent Key.
2. Lock the glove box or console box with the mechanical key.
3. Hand the Intelligent Key to the valet and keep the mechanical key with you.
See “Storage” in the “Instruments and controls”
section of this manual.
NISSAN VEHICLE IMMOBILIZER
SYSTEM KEYS
You can only drive your vehicle using the master
or valet keys which are registered to the NISSAN
Vehicle Immobilizer System components in your
vehicle. These keys have a transponder chip in
the key head.
The master key can be used for all the locks.
The valet key cannot be used for the console box
lock.
To protect belongings when you leave a key with
someone, give them the valet key only.
Never leave these keys in the vehicle.
Additional or replacement keys:
If you still have a key, the key number is not
necessary when you need extra NISSAN Vehicle
Immobilizer System keys. Your dealer can dupli-
cate your existing key. As many as five NISSAN
Vehicle Immobilizer System keys can be used
with one vehicle. You should bring all NISSAN
Vehicle Immobilizer System keys that you have to
your NISSAN dealer for registration. This is be-
cause the registration process will erase the
memory of all key codes previously registered
into the NISSAN Vehicle Immobilizer System.
After the registration process, these components
will only recognize keys coded into the NISSAN Vehicle Immobilizer System during registration.
Any key that is not given to your dealer at the time
of registration will no longer be able to start your
vehicle.
Do not allow the immobilizer system key, which
contains an electrical transponder, to come into
contact with salt water. This could affect system
function.
3-4Pre-driving checks and adjustments
�REVIEW COPY—2010 Armada
(wzw)
Owners Manual (owners)—USA_English (nna)
02/17/09—debbie
�
Page 403 of 472
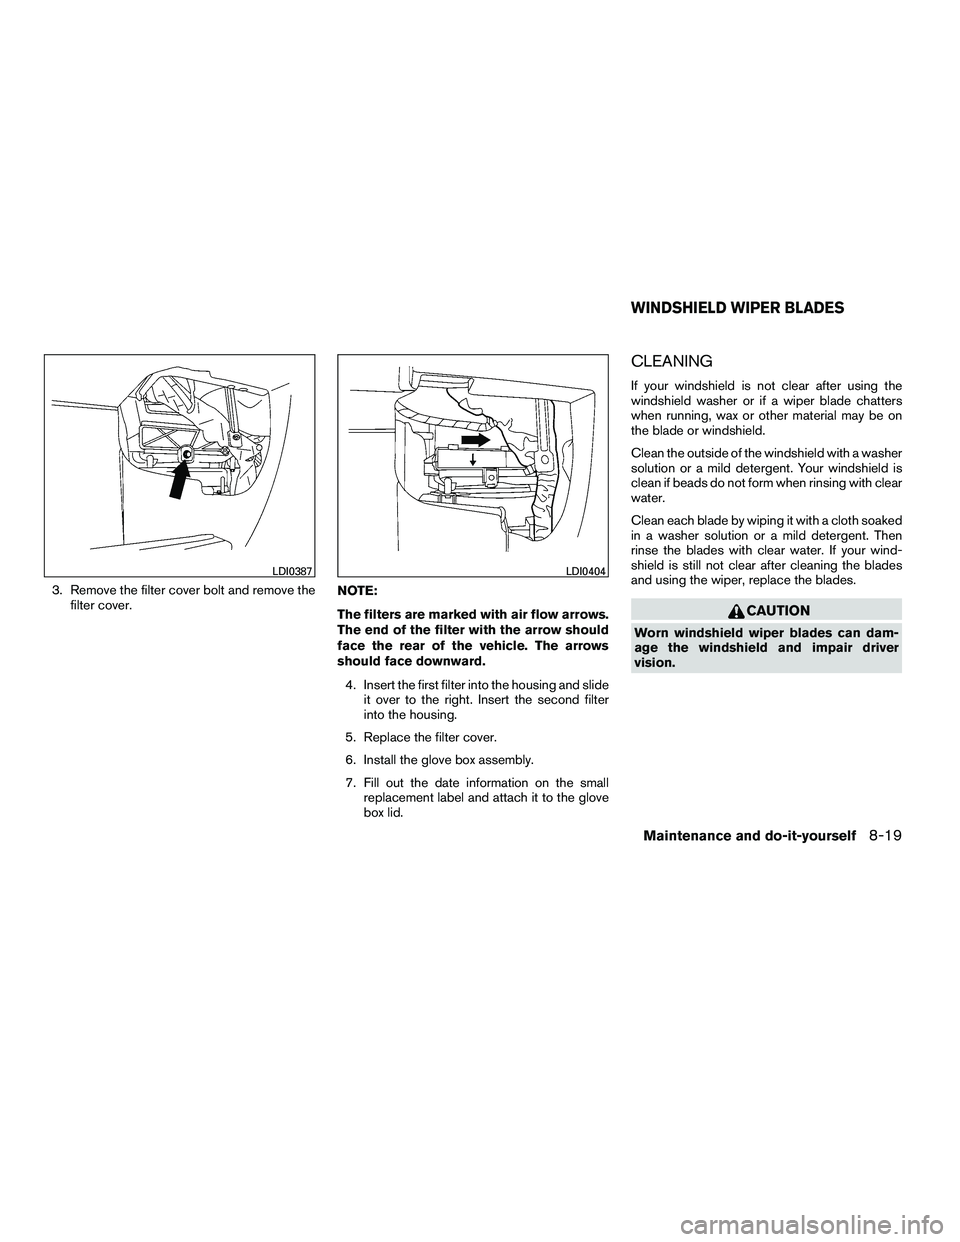
To replace the filter, perform the following proce-
dure:1. Remove the 2 lower glove box screws. 2. Open the glove box, then remove the three upper glove box screws. Remove the glove
box assembly from the instrument panel to
access the in-cabin microfilter cover.
Page 404 of 472

3. Remove the filter cover bolt and remove thefilter cover. NOTE:
The filters are marked with air flow arrows.
The end of the filter with the arrow should
face the rear of the vehicle. The arrows
should face downward.
4. Insert the first filter into the housing and slide it over to the right. Insert the second filter
into the housing.
5. Replace the filter cover.
6. Install the glove box assembly.
7. Fill out the date information on the small replacement label and attach it to the glove
box lid.
CLEANING
If your windshield is not clear after using the
windshield washer or if a wiper blade chatters
when running, wax or other material may be on
the blade or windshield.
Clean the outside of the windshield with a washer
solution or a mild detergent. Your windshield is
clean if beads do not form when rinsing with clear
water.
Clean each blade by wiping it with a cloth soaked
in a washer solution or a mild detergent. Then
rinse the blades with clear water. If your wind-
shield is still not clear after cleaning the blades
and using the wiper, replace the blades.