Page 140 of 472
POWER VENT WINDOWS (if so
equipped)
Use the vent window switch located on the driv-
er’s side of the instrument panel to open and
close the power vent windows. The windows
cannot be operated separately.
To open the power vent windows press and hold
the switch.
To close the windows pull up and hold the switch.The power vent windows operate when the igni-
tion switch is placed in the ON position, or for
about 45 seconds after the ignition switch is
placed in the OFF position. If the driver’s or
passenger’s door is opened during this 45 sec-
ond period, power to the vent windows is can-
celled.
MANUAL VENT WINDOWS (if so
equipped)
To open a manual vent window, pull the latch
handle toward you until it releases.
To lock the window in the open position, push the
latch handle rearward until it locks.
To close a manual vent window, pull the latch
handle toward you and push the rear portion of
the latch toward the rear of the vehicle until it
locks.
Page 172 of 472
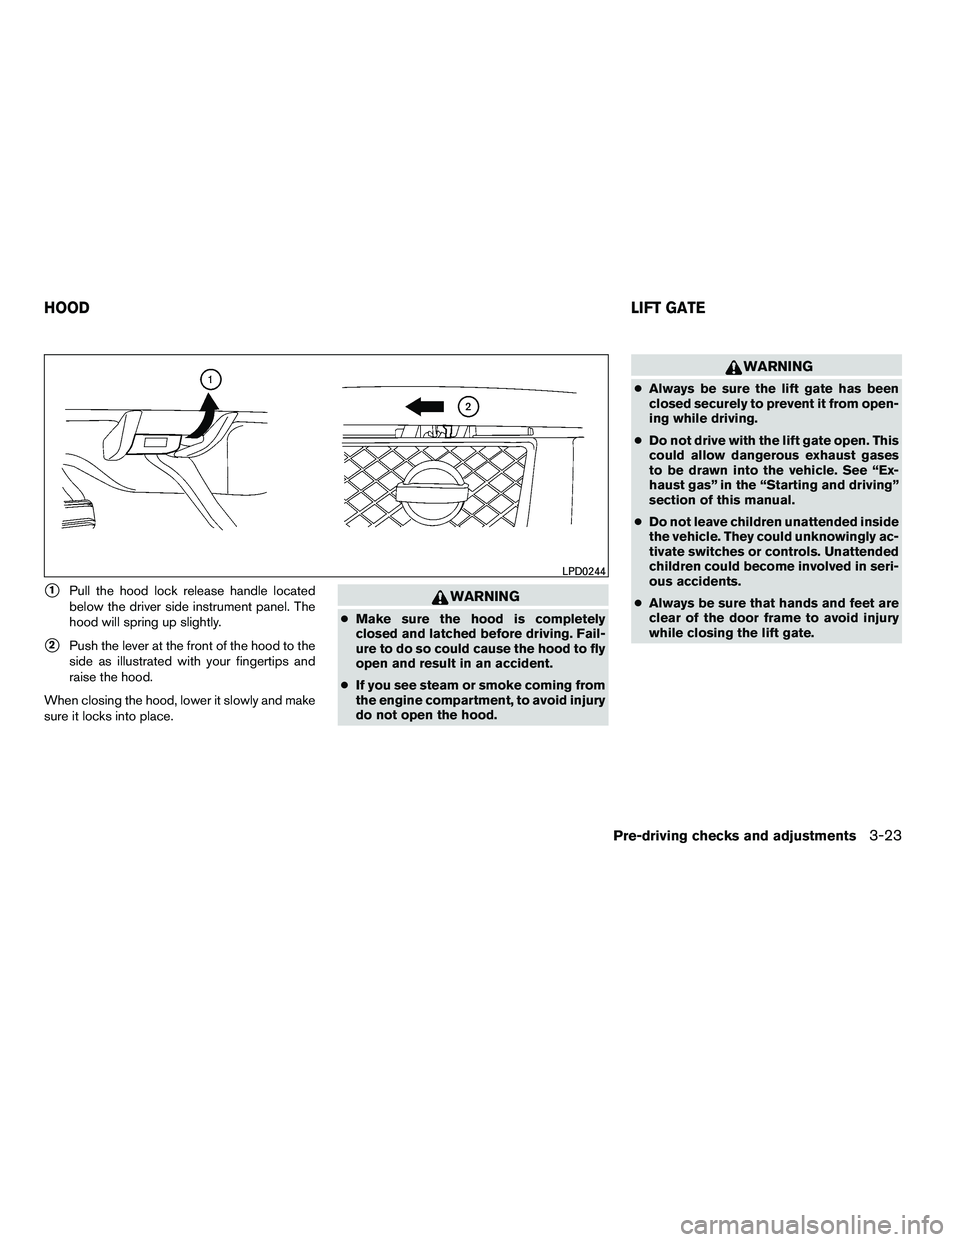
�1Pull the hood lock release handle located
below the driver side instrument panel. The
hood will spring up slightly.
�2Push the lever at the front of the hood to the
side as illustrated with your fingertips and
raise the hood.
When closing the hood, lower it slowly and make
sure it locks into place.
Page 173 of 472
OPERATING THE MANUAL LIFT
GATE (if so equipped)
The power door lock system allows you to lock or
unlock all doors including the lift gate simulta-
neously.
To open the lift gate, pull up on the handle.
To close, lower and push the lift gate down se-
curely.
OPERATING THE POWER LIFT
GATE (if so equipped)
NOTE:
To open, close or reverse the power lift
gate, the shift selector must be in P (Park) .
Also, the power lift gate will not operate if
battery voltage is low. Additionally, the
glass hatch must be fully closed in order to
open, close or reverse the power liftgate.Power Open:
The power lift gate automatically moves from the
fully closed position to the fully open position in
approximately5–8seconds. The power open
feature can be activated by the switch on the
keyfob, the instrument panel switch and by the
outside opener handle. The hazard lights flash
and a chime sounds to indicate the power open
sequence has been started.
Page 174 of 472

●The lift gate can be opened by the instru-
ment panel switch and the keyfob even if the
vehicle is locked. The lift gate will individually
unlock and open. Once the lift gate is
closed, its lock will align to the vehicle’s lock
or unlock status.
● The keyfob button must be held for 0.5 sec-
ond before the lift gate opens.
● The lift gate must be unlocked to open it with
the outside opener handle.
● The switch on the rear pillar cannot be used
to open the lift gate.
A warning chime will sound if the shift selector is
moved out of P (Park) during a power open
operation.
Power Close:
The power lift gate automatically moves from the
fully open position to the secondary position.
When the lift gate reaches the secondary posi-
tion, the cinching motor engages and pulls the lift
gate to its primary latch position. Power close
takes approximately7–10seconds. The power
close feature can be activated by the switch on
the keyfob, the instrument panel and the rear
pillar. The hazard lights flash and a chime sounds
to indicate the power close sequence has been
started. ●
If the outside opener handle is activated
while the cinching motor is engaged, the
cinching motor will disengage and release
the latch.
● The keyfob button must be held for 0.5 sec-
ond before the lift gate closes.
● The switch on the rear pillar can only be used
to close the lift gate if the cancel switch is
not in the on position.
Reverse:
The power lift gate will reverse direction immedi-
ately during power open or power close if the
keyfob, instrument panel or rear pillar switch is
pushed or if the outside handle is lifted. A chime
will sound to announce the reversal.
Auto Reverse:
If an obstacle is detected during power open or
power close, a warning chime will sound and the
lift gate will reverse direction and return to the full
open or full close position. If a second obstacle is
detected, the lift gate motion will stop and the
drive motor will disengage. The lift gate will enter
manual mode.
A pinch strip is mounted on each side of the lift
gate. If an obstacle is detected by a pinch strip
during power close, the lift gate will reverse di-
rection and return to the full open position. NOTE:
If the pinch strip is damaged or removed,
the power close function will not operate.
Page 227 of 472
The sunload sensor�1, located on the top center
of the instrument panel, helps the system main-
tain a constant temperature. Do not put anything
on or around this sensor. Rear seat temperature and fan speed can be
controlled from both the front seat overhead con-
sole controls
�Aor the rear seat overhead con-
sole controls
�B.
Press the REAR CTRL button to transfer control
of the rear climate functions to the rear passen-
gers.
To operate the rear air conditioner, the engine
must be running.
If the rear seat fan control dial is set to (0) , the air
conditioner is turned off. If it is set to any of the fan
speed positions, air is discharged from the rear
vents at the corresponding speed.
1. Rear fan speed control dial
2. Rear airflow mode buttons
3. Rear temperature control dial
Page 301 of 472

There are different methods to input a phone
number. Select one of the following options for
Step 4 above.
Enter Data by Keypad:
Input the name and phone number manually us-
ing the keypad displayed on the screen. For in-
formation on how to use the touch screen, see
“How to use the touch screen” earlier in this
section.Copy from Downloaded Phonebook:
Copy a phonebook from the Bluetooth�
cellular
phone. The availability of this function depends
on each cellular phone. The copying procedure
from the cellular phone also varies according to
each cellular phone. See the cellular phone own-
er’s manual for more details.
Copy from Outgoing Call Logs:
Store the name and phone number from the
outgoing call list.
Copy from Incoming Call Logs:
Store the name and phone number from the
incoming call list.
Transfer via Bluetooth:
Transfer a contact from the Bluetooth� cellular
phone. Availability of this function depends on
each cellular phone. The transferring procedure
from the cellular phone also varies according to
each cellular phone. See the cellular phone own-
er’s manual for more details.
Delete:
Delete a contact that is registered in the phone-
book.MAKING A CALL
To make a call, follow the procedure below:
1. Press the PHONE button on the instrument panel or the
Page 303 of 472
Answer:
Accept an incoming call to talk.
On Hold:
Put an incoming call on hold.
Reject Call:
Reject an incoming call.
To finish the call, follow one of the procedures
listed below:
a. Touch the “Reject Call” key on the display.
b. Press the PHONE button on the instrumentpanel.
c. Press and hold the phone
Page 306 of 472

●Paired Phone List:
Up to 5 registered cellular phones are
shown on the list. If you select a cellular
phone that is different from the one currently
being connected, the newly selected phone
will be connected to the system.
● Edit Phone Name:
If you would like to change the way your
phone’s name is displayed, select this key; a
character input screen will be displayed.
CALL VOLUME
Adjusting the incoming or outgoing call volume
may improve clarity if reception between callers is
unclear.
● Incoming call — adjusting this setting allows
you to hear a difference in volume.
● Outgoing call — adjusting this setting allows
the person you are talking with to hear a
difference in volume. To access the settings, press the SETTING but-
ton, then highlight “Volume and Beeps” using the
NISSAN controller and press the ENTER button.
You can also adjust the volume of an incoming
voice during a call by pushing the volume control
switch on the steering wheel or by turning the
volume control knob on the instrument panel.

Use the vent window switch located on the driv-
er’s side of the instrument panel to open and
close the power vent windows. The windows
cannot be operated separat")

The power door lock system allows you to lock or
unlock all doors including the lift gate simulta-
neously.
To open the lift gate, pull up on the handle")

