2010 NISSAN ALTIMA HYBRID key
[x] Cancel search: keyPage 2 of 36
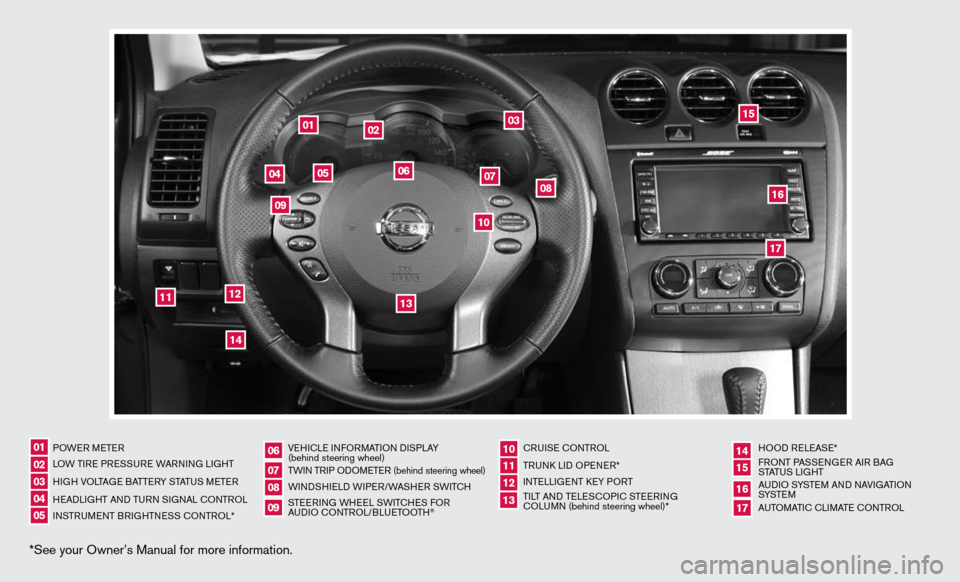
*See your Owner’s Manual for more information.
POWeR M eTeR
LOW Ti Re PR eSS uRe WAR ninG Li GHT
H iGH VOLTAG e BATTeRy STATu S MeTeR
H eAd LiGHT And Tu Rn S iG nAL c OnTROL
in STR uM enT BR iGHTne SS cOnTROL* Ve
Hic Le infORMATi On di SPLA y
(behind steering wheel)
TW in TR iP O dOM eTe R (behind steering wheel)
W ind SHieLd W iP eR/WASH eR SW iTc H
STee Rin G WH eeL SW iTc HeS fOR
A udi O c OnTROL/BLueTOOTH
® c
Rui Se c OnTROL
TR unk Lid OP eneR*
inTe LLiGenT key PORT
Ti LT And Te LeSc OP ic STee Rin G
c OLu Mn (behind steering wheel)* HOO
d ReLeAS e*
f RO nT PASS enGeR Ai R BAG
STATu S LiGHT
A udi O SySTe M And nAVi GATiOn
S ySTe M
A uTOMATic c LiMATe c OnTROL
01
17
09
141516
10111312
060708
02030405
10
09
11
13
12
07
05
04
01
02
03
06
08
15
1617
14
Page 5 of 36
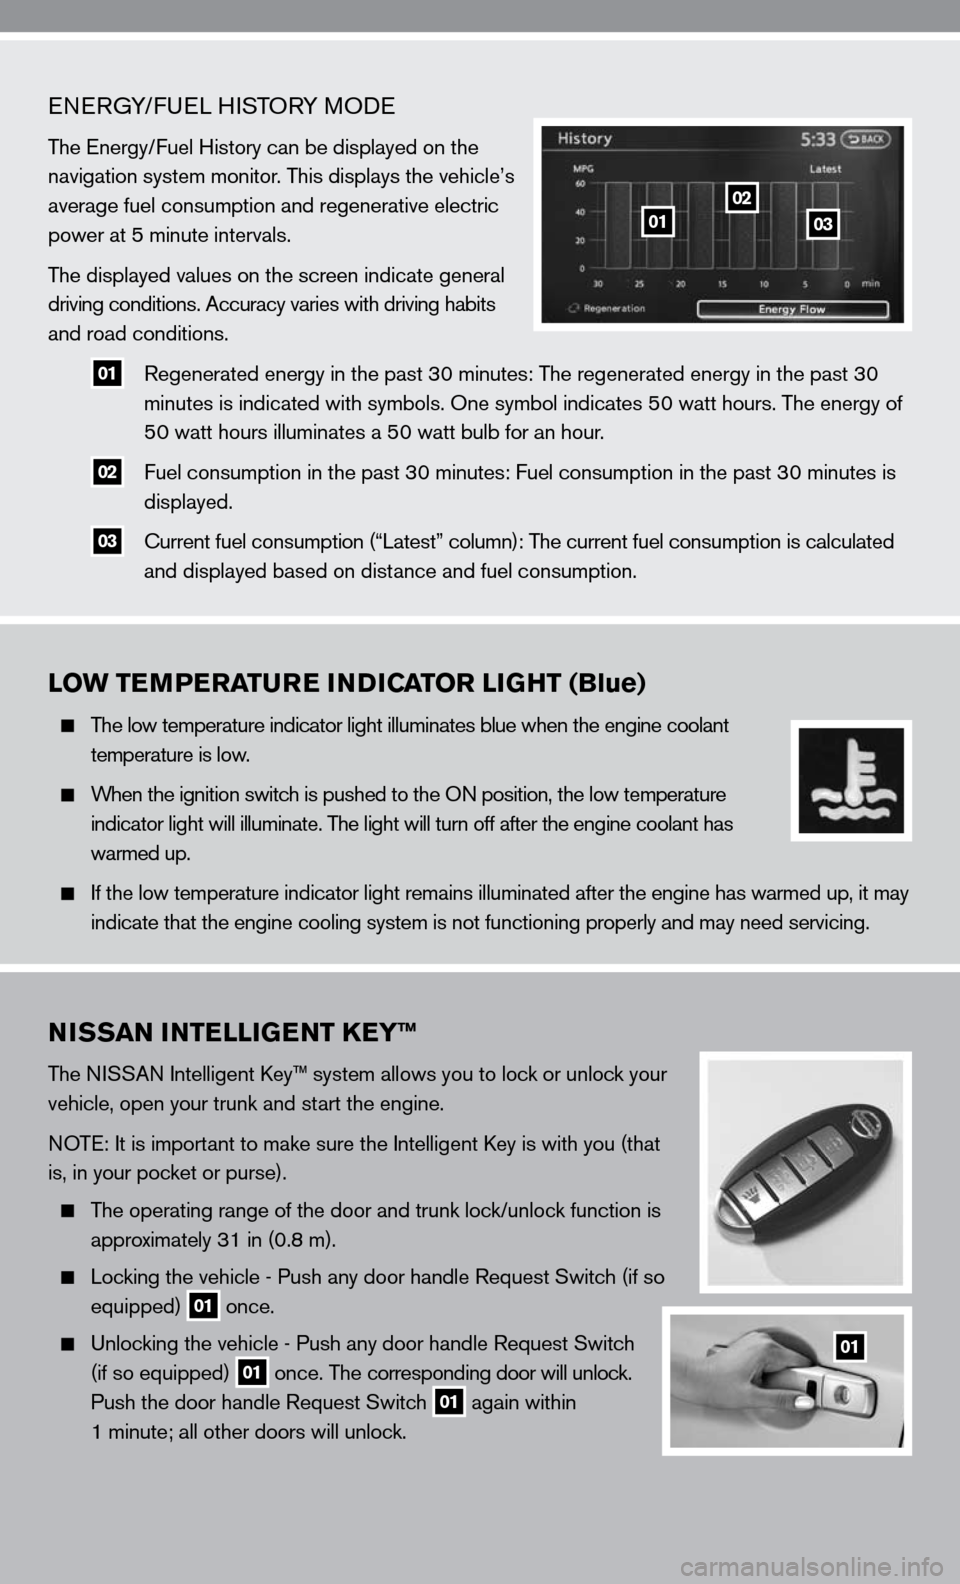
eneRGy/fue L HiSTOR y MOde
The energy/ fuel History can be displayed on the
navigation system monitor. This displays the vehicle’s
average fuel consumption and regenerative electric
power at 5 minute intervals.
The displayed values on the screen indicate general
driving conditions. Accuracy varies with driving habits
and road conditions.
01 Regenerated energy in the past 30 minutes: The regenerated energy in the past 30
minutes is indicated with symbols. One symbol indicates 50 watt hours. The energy of
50 watt hours illuminates a 50 watt bulb for an hour.
02 fuel consumption in the past 30 minutes: fuel consumption in the past 30 minutes is
displayed.
03 c
urrent fuel consumption (“Latest” column): The current fuel consumption is calculated
and displayed based on distance and fuel consumption.
LOW TEMPERATURE INDICATOR LIGHT (Blue)
The low temperature indicator light illuminates blue when the engine coolant
temperature is low.
When the ignition switch is pushed to the O n position, the low temperature
indicator light will illuminate. The light will turn off after the engine coolant has
warmed up.
i f the low temperature indicator light remains illuminated after the engine has warmed up, it may
indicate that the engine cooling system is not functioning properly and \
may need servicing.
0102
03
NISSAN INTELLIGENT KEY™
The ni SSAn intelligent k ey™ system allows you to lock or unlock your
vehicle, open your trunk and start the engine.
n OTe: it is important to make sure the intelligent k ey is with you (that
is, in your pocket or purse).
The operating range of the door and trunk lock/unlock function is
approximately 31 in (0.8 m).
Locking the vehicle - Push any door handle Request Switch (if so
equipped)
01 once.
u nlocking the vehicle - Push any door handle Request Switch
(if so equipped)
01 once. The corresponding door will unlock.
Push the door handle Request Switch
01 again within
1 minute; all other doors will unlock.
01
Page 6 of 36
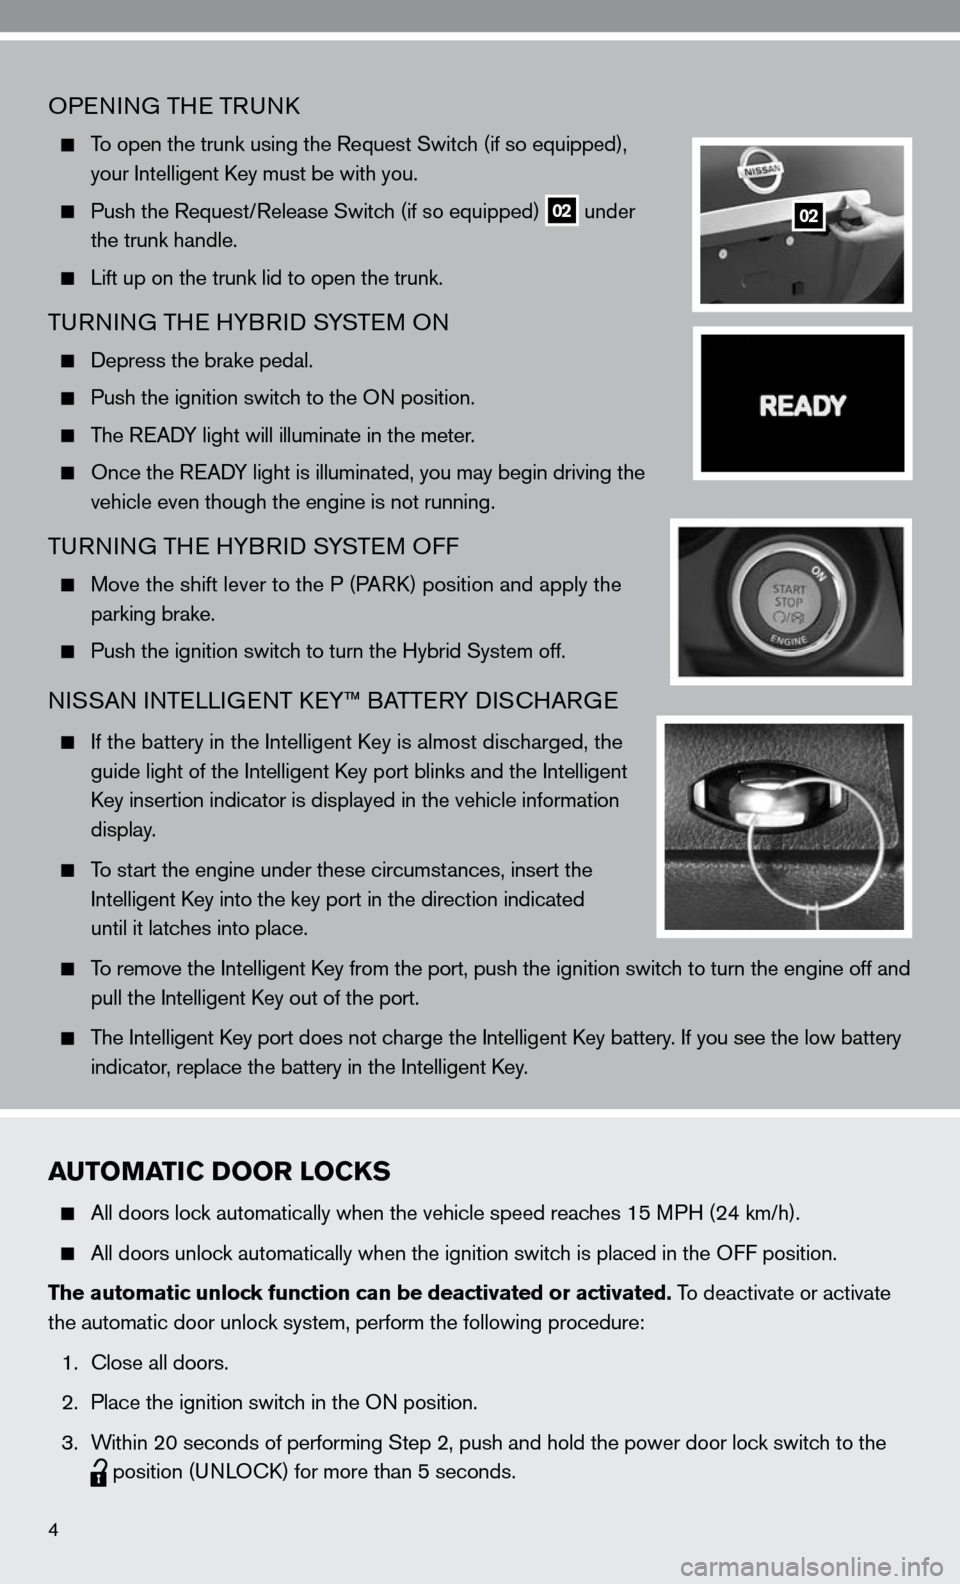
OPenin G THe TRunk
To open the trunk using the Request Switch (if so equipped),
your intelligent k ey must be with you.
Push the Request/Release Switch (if so equipped)
02 under
the trunk handle.
Lift up on the trunk lid to open the trunk.
Tu Rnin G TH e HyBR id SySTe M O n
depress the brake pedal.
Push the ignition switch to the O n position.
The R eAdy light will illuminate in the meter.
Once the R eAdy light is illuminated, you may begin driving the
vehicle even though the engine is not running.
TuRnin G TH e HyBR id SySTe M O ff
Move the shift lever to the P (PAR k) position and apply the
parking brake.
Push the ignition switch to turn the Hybrid System off.
ni SSAn inTe LLiGenT key™ BATTe Ry di Sc HARG e
if the battery in the intelligent k ey is almost discharged, the
guide light of the intelligent k ey port blinks and the intelligent
k ey insertion indicator is displayed in the vehicle information
display.
To start the engine under these circumstances, insert the
intelligent k ey into the key port in the direction indicated
until it latches into place.
To remove the intelligent key from the port, push the ignition switch to turn the engine off and
pull the intelligent k ey out of the port.
The intelligent key port does not charge the intelligent key battery. if you see the low battery
indicator, replace the battery in the intelligent k ey.
4
02
AUTOMATIC DOOR LOCKS
All doors lock automatically when the vehicle speed reaches 15 MPH (24 km/h).
All doors unlock automatically when the ignition switch is placed in the O ff position.
The automatic unlock function can be deactivated or activated. To deactivate or activate
the automatic door unlock system, perform the following procedure:
1. close all doors.
2. Place the ignition switch in the O n position.
3. Within 20 seconds of performing Step 2, push and hold the power door lock switch to the
position (un
LOck) for more than 5 seconds.
Page 12 of 36
USB JACK WITH iPod® CONNECTIVITY (if so equipped)
The USB input jack is located in the center console under the armrest.
To connect a compatible u SB device, open the protective cover on the USB jack, and insert
the u SB device into the jack. When a compatible storage device is plugged into the jack,
compatible audio or video files on the storage device can be played th\
rough the vehicle’s
audio system.
To connect an iPod®, open the USB jack cover, connect the u SB end of the cable supplied
with your iPod® to the jack, then connect the other end of the cable to the iPod®. When the
ignition switch is in the A cc or On position, the battery of your iPod® (if compatible) will
charge while connected to your vehicle.
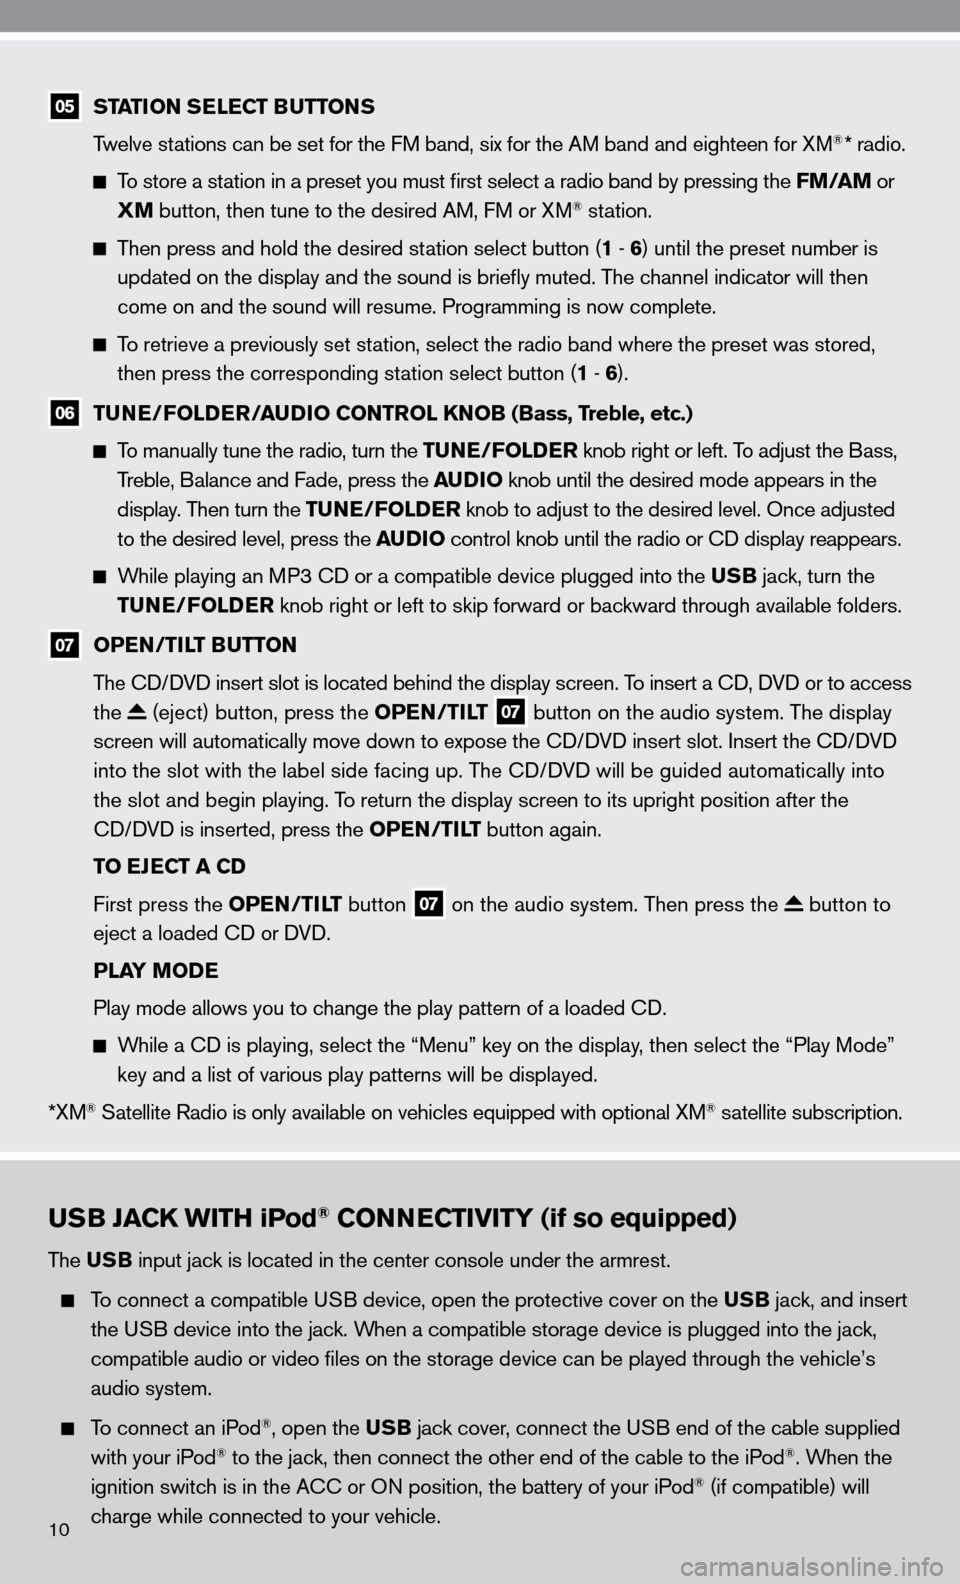
05 STATION SELECT BUTTONS
Twelve stations can be set for the f M band, six for the AM band and eighteen for XM®* radio.
To store a station in a preset you must first select a radio band by pressing the FM/AM or
XM button, then tune to the desired AM, f M or XM® station.
Then press and hold the desired station select button (1 - 6 ) until the preset number is
updated on the display and the sound is briefly muted. The channel indicator will then
come on and the sound will resume. Programming is now complete.
To retrieve a previously set station, select the radio band where the preset was stored,
then press the corresponding station select button (1 - 6 ).
06 TUNE/FOLDER/AUDIO CONTROL KNOB (Bass, Treble, etc.)
To manually tune the radio, turn the TUNE/FOLDER knob right or left. To adjust the Bass,
Treble, Balance and fade, press the AUDIO knob until the desired mode appears in the
display. Then turn the TUNE/FOLDER knob to adjust to the desired level. Once adjusted
to the desired level, press the AUDIO control knob until the radio or cd display reappears.
While playing an MP3 cd or a compatible device plugged into the USB jack, turn the
TUNE/FOLDER knob right or left to skip forward or backward through available folders.
07 OPEN/TILT BUTTON
The cd/ dVd insert slot is located behind the display screen. To insert a cd, dVd or to access
the
(eject) button, press the OPEN/TILT 07 button on the audio system. The display
screen will automatically move down to expose the cd/d Vd insert slot. insert the cd/d Vd
into the slot with the label side facing up. The cd/ dVd will be guided automatically into
the slot and begin playing. To return the display screen to its upright position after the
cd/ dVd is inserted, press the OPEN/TILT button again.
TO EJECT A CD
first press the OPEN/TILT button
07 on the audio system. Then press the button to
eject a loaded cd or d Vd.
PLAY MODE
Play mode allows you to change the play pattern of a loaded cd.
While a cd is playing, select the “Menu” key on the display, then select the “Play Mode”
key and a list of various play patterns will be displayed.
*XM
® Satellite Radio is only available on vehicles equipped with optional XM® satellite subscription.
10
Page 13 of 36
11
PLAYING AN iPod®
The interface for iPod® operation shown on the vehicle center display is similar to the iPod® interface.
Select the u SB/iPod
® mode using one of the following methods:
Push the SOURCE select switch on the steering wheel.
Press the DISC/AUX button.
FOR USB MEMORY:
After selecting the u SB/iPod® mode, select the “Play Movie contents” key or “Play Audio
contents” key to start playing audio or video files on the device.
SEEKING BUTTON
Press or for less than 1.5 seconds to skip through tracks.
Press and hold or for more than 1.5 seconds to rewind or fast forward. When the
button is released the audio will play at normal speed.
MUSIC BOXTM HARD DRIVE AUDIO SYSTEM (if so equipped)
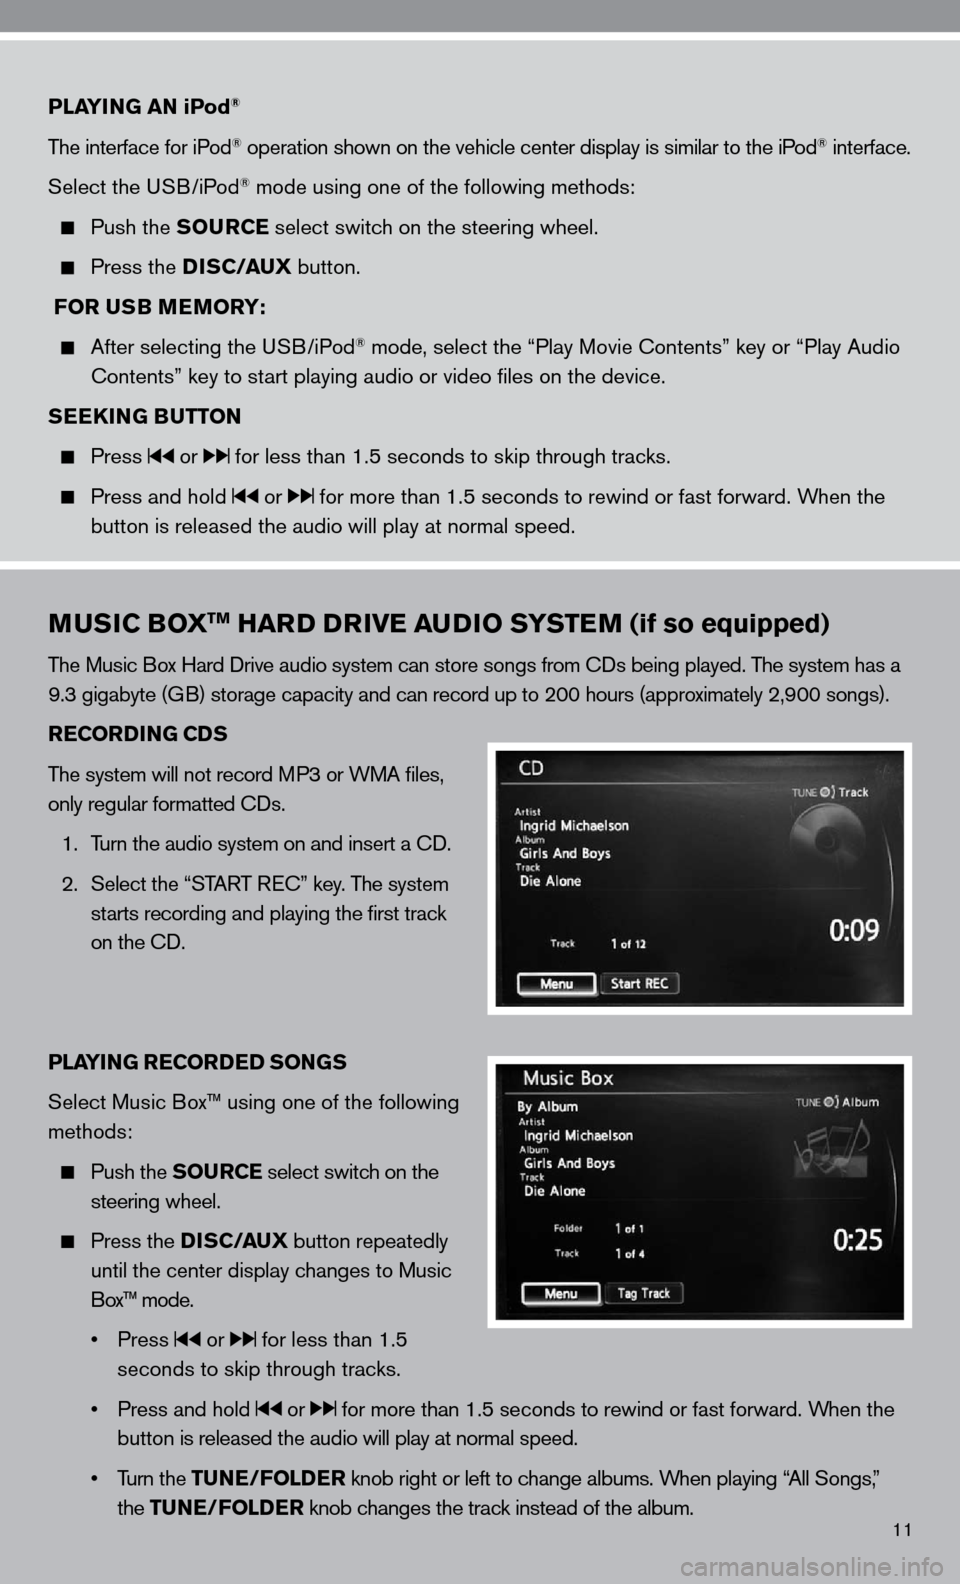
The Music Box Hard drive audio system can store songs from cds being played. The system has a
9.3 gigabyte (GB) storage capacity and can record up to 200 hours (approximately 2,900 songs).
RECORDING CDS
The system will not record MP3 or WMA files,
only regular formatted cds.
1. Turn the audio system on and insert a cd.
2. Select the “START R ec” key. The system
starts recording and playing the first track
on the cd.
PLAYING RECORDED SONGS
Select Music Box™ using one of the following
methods:
Push the SOURCE select switch on the
steering wheel.
Press the DISC/AUX button repeatedly
until the center display changes to Music
Box™ mode.
• Press
or for less than 1.5
seconds to skip through tracks.
• Press and hold
or for more than 1.5 seconds to rewind or fast forward. When the
button is released the audio will play at normal speed.
• Turn the TUNE/FOLDER knob right or left to change albums. When playing “All Songs,”
the TUNE/FOLDER knob changes the track instead of the album.
Page 14 of 36
BLUETOOTH® STREAMING AUDIO (if so equipped)
if you have a compatible Bluetooth® Streaming Audio device, it can be connected to the vehicle’s
audio system and played through the speakers.
cOnnec TinG
Press the SETTING button on the instrument panel, then select the “Bluetooth” key.
Select the “ connect Bluetooth” key and a screen will appear asking if you are connecting the
device to use with the hands-free phone system.
Select “no” when you receive the pop-up question.
enter a P in of your choice. it will be needed by your Bluetooth® audio device to complete the
connection process.
note: See the Bluetooth
® device’s Owner’s Manual for more information.
A udiO OPe RATiOn
To switch to the Bluetooth® Streaming Audio mode, press the SOURCE select switch on
the steering wheel or the DISC/AUX button repeatedly until the Bluetooth® Streaming
Audio mode is displayed on the screen.
The controls (Menu, Play and Pause) for Bluetooth® Streaming Audio are displayed on the
screen.
VEHICLE INFORMATION DISPLAY
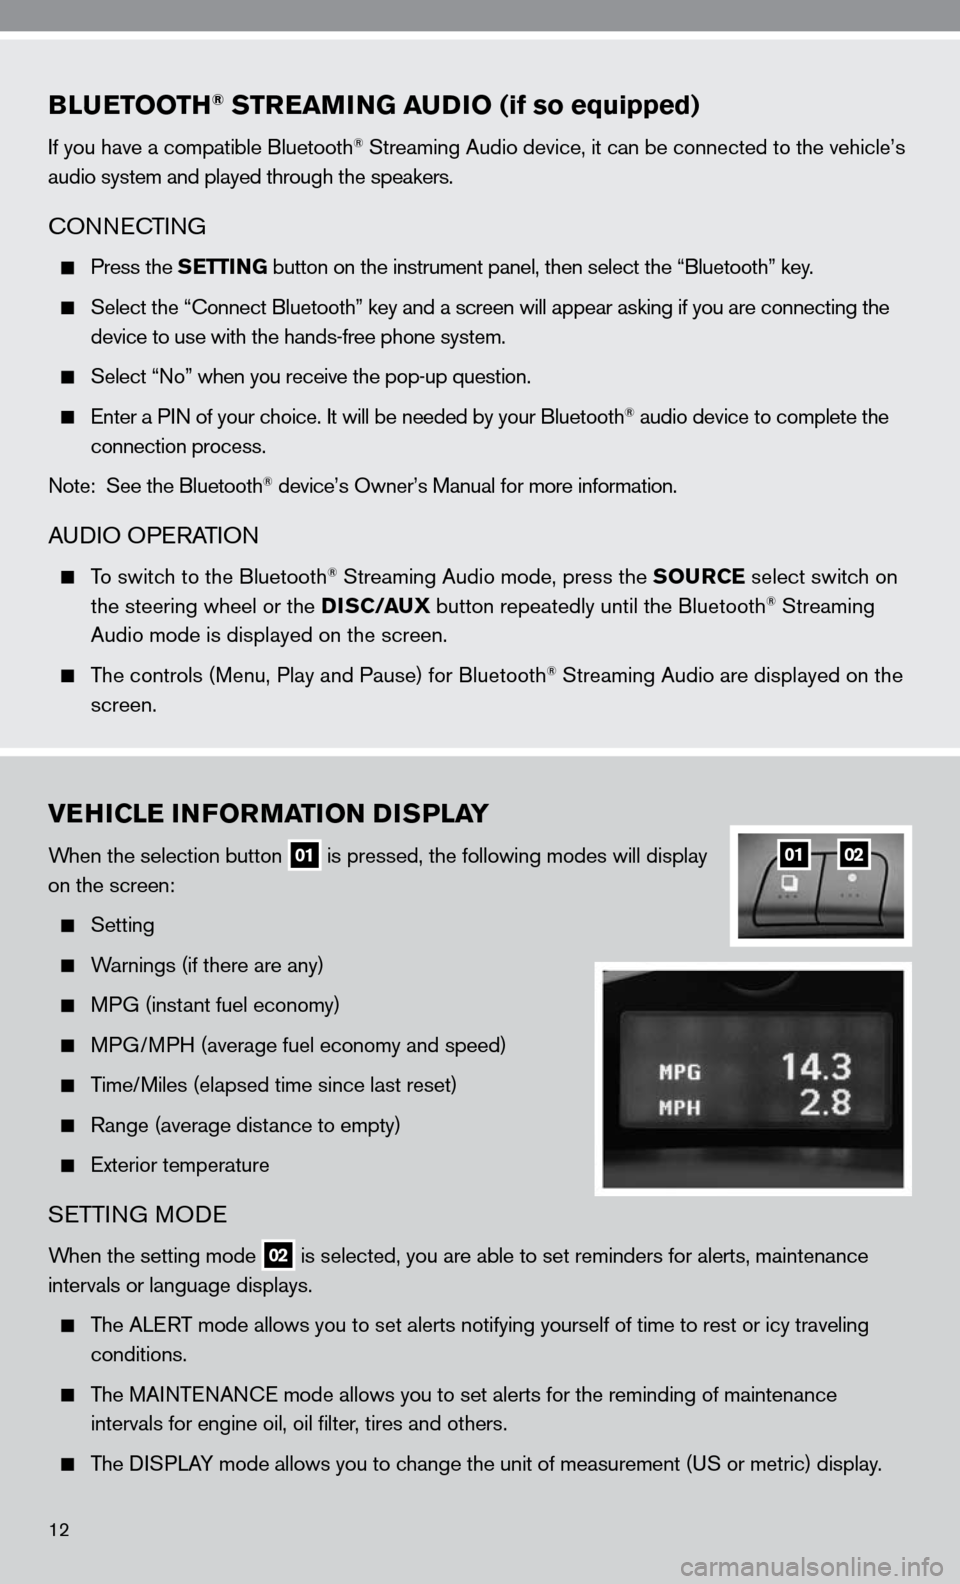
When the selection button 01 is pressed, the following modes will display
on the screen:
Setting
Warnings (if there are any)
MPG (instant fuel economy)
MPG/MPH (average fuel economy and speed)
Time/Miles (elapsed time since last reset)
Range (average distance to empty)
exterior temperature
SeTTin G MO de
When the setting mode 02 is selected, you are able to set reminders for alerts, maintenance
intervals or language displays.
The ALe RT mode allows you to set alerts notifying yourself of time to rest or i\
cy traveling
conditions.
The MAinTenAnce mode allows you to set alerts for the reminding of maintenance
intervals for engine oil, oil filter, tires and others.
The di SPLAy mode allows you to change the unit of measurement (u S or metric) display.
0102
12
Page 15 of 36
13
CLOCK SET/ADJUSTMENT
nAViGATi On S ySTe M O nLy (if so equipped)
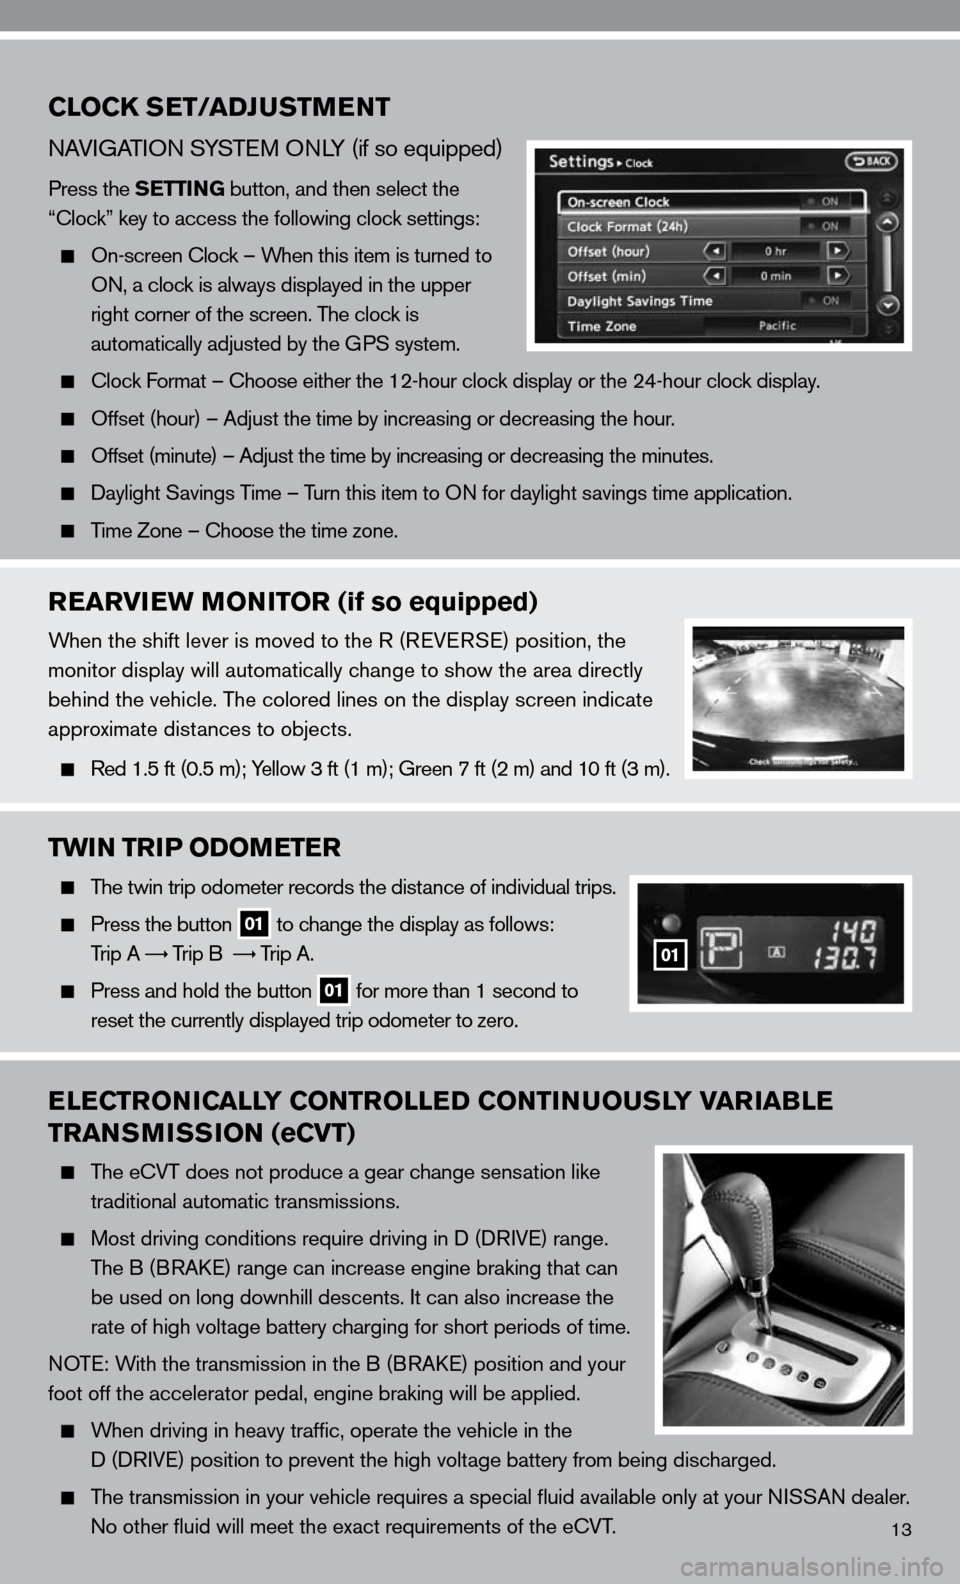
Press the SETTING button, and then select the
“clock” key to access the following clock settings:
On-screen clock – When this item is turned to
On, a clock is always displayed in the upper
right corner of the screen. The clock is
automatically adjusted by the GPS system.
clock f ormat – choose either the 12-hour clock display or the 24-hour clock display.
Offset (hour) – Adjust the time by increasing or decreasing the hou\
r.
Offset (minute) – Adjust the time by increasing or decreasing the minutes.
daylight Savings Time – Turn this item to O n for daylight savings time application.
Time Zone – choose the time zone.
REARVIEW MONITOR (if so equipped)
When the shift lever is moved to the R (R eVeRSe) position, the
monitor display will automatically change to show the area directly
behind the vehicle. The colored lines on the display screen indicate
approximate distances to objects.
Red 1.5 ft (0.5 m); y ellow 3 ft (1 m); Green 7 ft (2 m) and 10 ft (3 m).
TWIN TRIP ODOMETER
The twin trip odometer records the distance of individual trips.
Press the button 01 to change the display as follows:
Trip A
Trip B
Trip A.
Press and hold the button 01 for more than 1 second to
reset the currently displayed trip odometer to zero.
ELECTRONICALLY CONTROLLED CONTINUOUSLY VARIABLE
TRANSMISSION (eCVT)
The e cVT does not produce a gear change sensation like
traditional automatic transmissions.
Most driving conditions require driving in d (d RiV e) range.
The B (BRA ke) range can increase engine braking that can
be used on long downhill descents. it can also increase the
rate of high voltage battery charging for short periods of time.
n OT e: With the transmission in the B (BRA ke) position and your
foot off the accelerator pedal, engine braking will be applied.
When driving in heavy traffic, operate the vehicle in the
d (d RiVe) position to prevent the high voltage battery from being discharged.
The transmission in your vehicle requires a special fluid available onl\
y at your ni SSAn dealer.
no other fluid will meet the exact requirements of the ecVT.
01
Page 17 of 36
15
FUEL-FILLER DOOR RELEASE
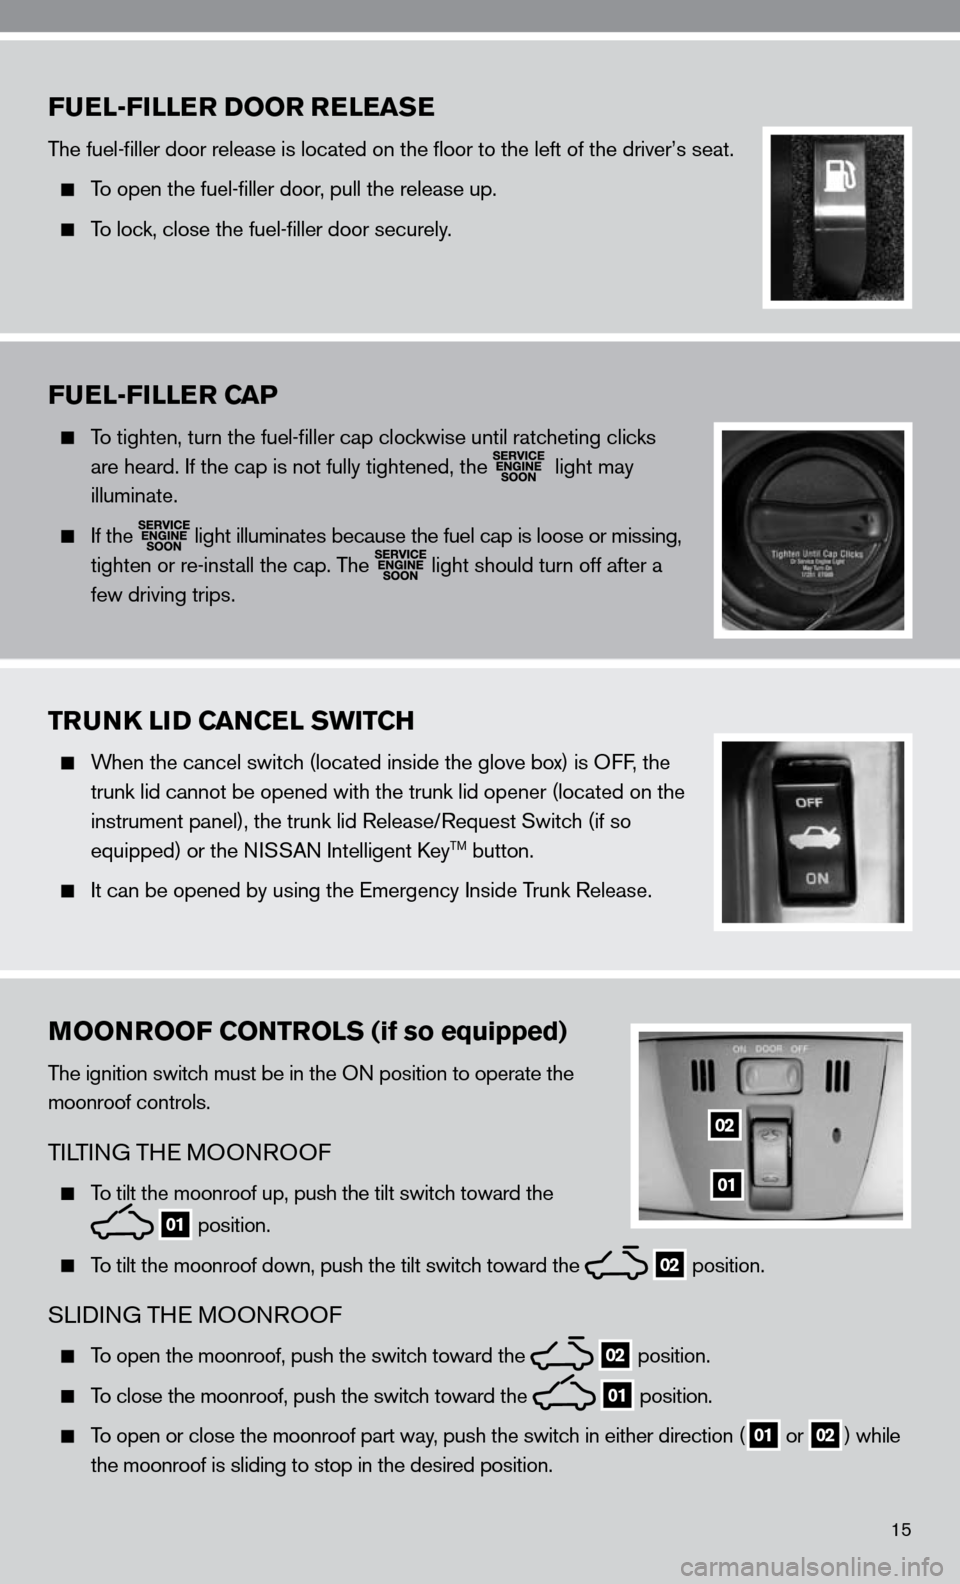
The fuel-filler door release is located on the floor to the left of t\
he driver’s seat.
To open the fuel-filler door, pull the release up.
To lock, close the fuel-filler door securely.
FUEL-FILLER CAP
To tighten, turn the fuel-filler cap clockwise until ratcheting clicks
are heard. if the cap is not fully tightened, the
light may
illuminate.
if the
light illuminates because the fuel cap is loose or missing,
tighten or re-install the cap. The
light should turn off after a
few driving trips.
TRUNK LID CANCEL SWITCH
When the cancel switch (located inside the glove box) is O ff, the
trunk lid cannot be opened with the trunk lid opener (located on the
instrument panel), the trunk lid Release/Request Switch (if so
equipped) or the ni SSAn intelligent key
TM button.
it can be opened by using the emergency inside Trunk Release.
MOONROOF CONTROLS (if so equipped)
The ignition switch must be in the O n position to operate the
moonroof controls.
Ti LTin G TH e MOO nROO f
To tilt the moonroof up, push the tilt switch toward the
01 position.
To tilt the moonroof down, push the tilt switch toward the 02 position.
SL
idinG TH e MOOn ROOf
To open the moonroof, push the switch toward the 02 position.
To close the moonroof, push the switch toward the 01 position.
To open or close the moonroof part way, push the switch in either direction (01 or
02) while
the moonroof is sliding to stop in the desired position.
01
02