2010 NISSAN ALTIMA COUPE wheel
[x] Cancel search: wheelPage 3 of 40

TABLe Of cOnTenTS
ni SSAn intelligent k ey™........................................... 2
Automatic door Locks ............................................. 3
Windshield Wiper/Washer Switch ................................... 3
Headlight and Turn Signal control ................................... 4
Steering Wheel Switches for Audio control/Bluetooth
® (if so equipped) ... 5
cruise control .................................................... 5
Automatic climate control (if so equipped) ............................6
f M/AM/XM
®* Radio with cd Player (vehicles with navigation) ............8
u SB Jack with iPod® connectivity (if so equipped) ..................... 9
Music BoxTM Hard drive Audio System (if so equipped) .................10
Bluetooth® Streaming Audio (if so equipped) ......................... 11
Vehicle information display ........................................ 11
clock Set/Adjustment ............................................ 12
RearView Monitor (if so equipped) .................................. 12
Twin Trip Odometer .............................................. 12
continuously Variable Transmission (cVT) (if so equipped) ..............13
6-Speed Manual Transmission (if so equipped) ........................14
Vehicle dynamic control (Vdc) Off Switch ...........................14
front Passenger Air Bag Status Light ............................... 14
Tire Pressure Monitoring System (TPMS) ............................ 15
Seat Belt Warning Light and chime ................................. 15
child Safety Rear door Locks (Sedan only) .......................... 15
fuel-filler door Release ........................................... 15
fuel-filler cap ................................................... 15
Trunk Lid cancel Switch (if so equipped) .............................16
Moonroof controls (if so equipped) ................................. 16
front Seat Adjustments ........................................... 16
Passenger Rear Seat entry (coupe only) .............................17
f olding down the Rear Seats . . . . . . . . . . . . . . . . . . . . . . . . . . . . . . . . . . . .\
. . 18
HomeLink
® universal Transceiver (if so equipped) ..................... 18
Bluetooth® Hands-free Phone System (vehicles without navigation -
if so equipped) .................................................. 19
Bluetooth
® Hands-free Phone System (vehicles with navigation -
if so equipped) .................................................. 22
ni SSAn Voice Recognition System (vehicles with navigation -
if so equipped) .................................................. 25
navigation System (if so equipped) ................................. 30
This easy-to-use Quick Reference Guide is intended to help you more fully
appreciate some of the unique features and functions of your new vehicle.
However, it is not intended to replace your Owner’s Manual. The Owner’s
Manual contains more detailed information to help you better understand
the important safety warnings, features, operation and maintenance of your
vehicle. All information, specifications, photographs and illustrations in this
publication are those in effect at the time of printing. niSSA n reserves the
right to change specifications or design without notice and without obligation.
Page 7 of 40
5
STEERING WHEEL SWITCHES FOR AUDIO CONTROL/
BLUETOOTH® (if so equipped)
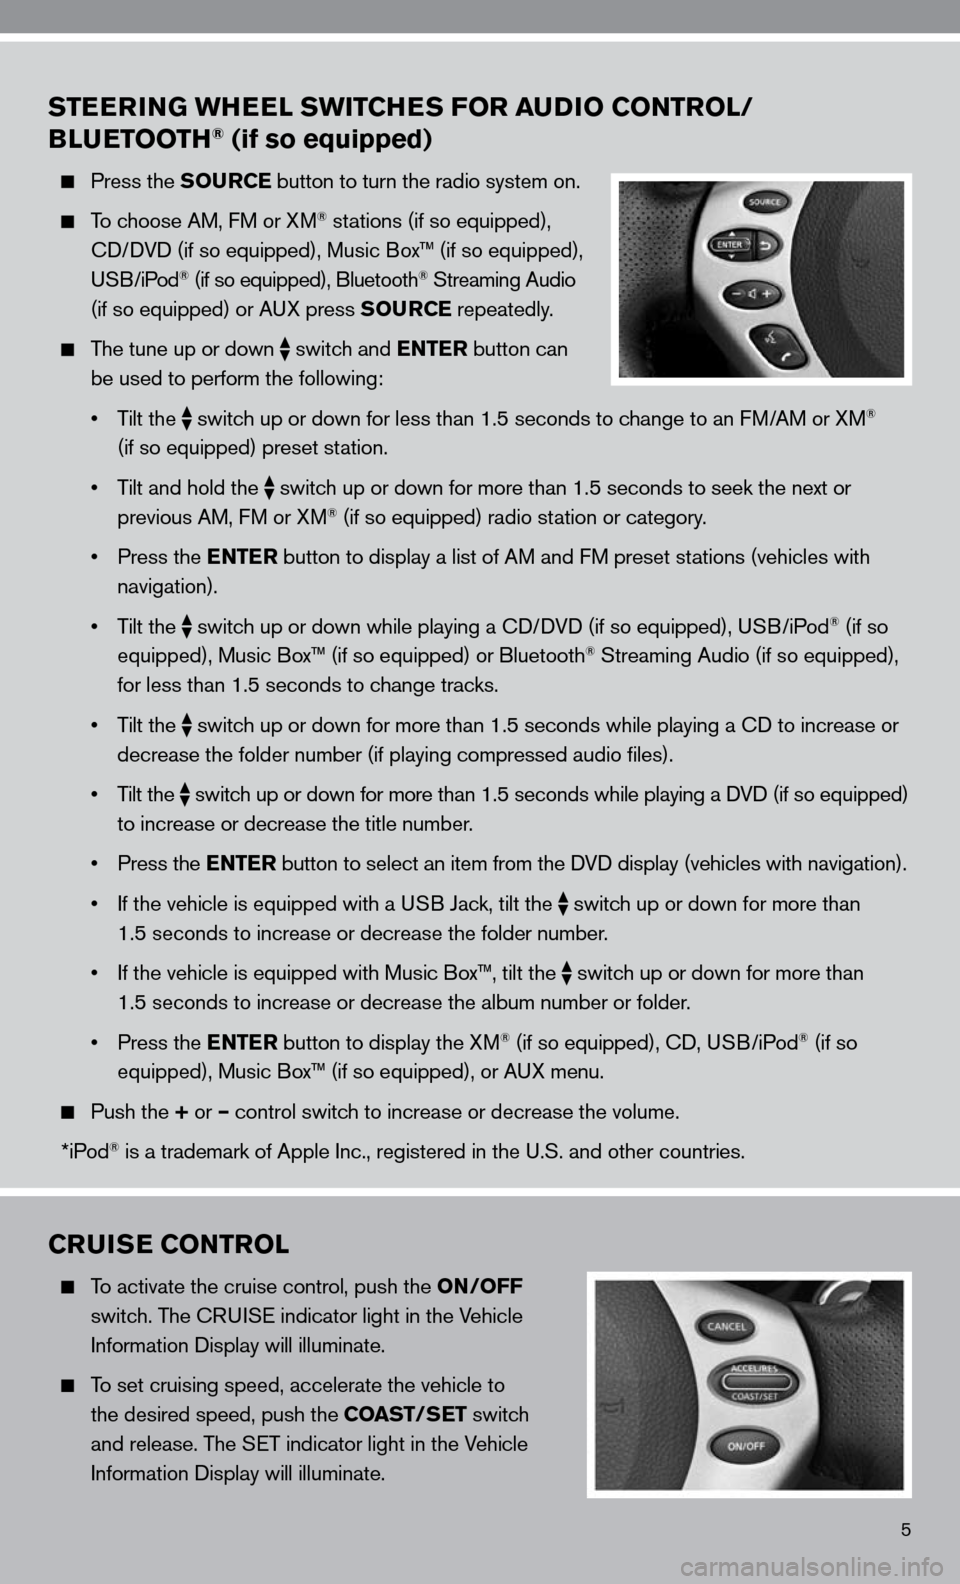
Press the SOURCE button to turn the radio system on.
To choose AM, f M or XM® stations (if so equipped),
cd/ dVd (if so equipped), Music Box™ (if so equipped),
u SB/iPod
® (if so equipped), Bluetooth® Streaming Audio
(if so equipped) or A uX press SOURCE repeatedly.
The tune up or down
switch and ENTER button can
be used to perform the following:
• Tilt the
switch up or down for less than 1.5 seconds to change to an f
M/AM or XM®
(if so equipped) preset station.
• Tilt and hold the
switch up or down for more than 1.5 seconds to seek the next or
previous AM, f M or XM® (if so equipped) radio station or category.
• Press the ENTER button to display a list of AM and fM preset stations (vehicles with
navigation).
• Tilt the
switch up or down while playing a cd/
dVd (if so equipped), u SB/iPod® (if so
equipped), Music Box™ (if so equipped) or Bluetooth® Streaming Audio (if so equipped),
for less than 1.5 seconds to change tracks.
• Tilt the
switch up or down for more than 1.5 seconds while playing a cd to increase or
decrease the folder number (if playing compressed audio files).
• Tilt the
switch up or down for more than 1.5 seconds while playing a d
Vd (if so equipped)
to increase or decrease the title number.
• Press the ENTER button to select an item from the d Vd display (vehicles with navigation).
• If the vehicle is equipped with a USB Jack, tilt the
switch up or down for more than
1.5 seconds to increase or decrease the folder number.
• If the vehicle is equipped with Music Box™, tilt the
switch up or down for more than
1.5 seconds to increase or decrease the album number or folder.
• Press the ENTER button to display the XM
® (if so equipped), cd, u SB/iPod® (if so
equipped), Music Box™ (if so equipped), or A uX menu.
Push the + or – control switch to increase or decrease the volume.
*iPod
® is a trademark of Apple inc., registered in the u.S. and other countries.
CRUISE CONTROL
To activate the cruise control, push the ON/OFF
switch. The cRui Se indicator light in the Vehicle
information display will illuminate.
To set cruising speed, accelerate the vehicle to
the desired speed, push the COAST/SET switch
and release. The S eT indicator light in the Vehicle
information display will illuminate.
Page 12 of 40
10
PLAYING AN iPod®
The interface for iPod® operation shown on the vehicle center display is similar to the iPod® interface.
Select the u SB/iPod
® mode using one of the following methods:
Push the SOURCE select switch on the steering wheel.
Press the DISC/AUX button.
FOR USB MEMORY (vehicles with navigation):
After selecting the u SB/iPod® mode, select the “Play Movie contents” key or “Play Audio
contents” key to start playing audio or video files on the device.
SEEKING BUTTON
Press or for less than 1.5 seconds to skip through tracks.
Press and hold or for more than 1.5 seconds to rewind or fast forward. When the
button is released the audio will play at normal speed.
MUSIC BOXTM HARD DRIVE AUDIO SYSTEM (if so equipped)
The Music Box Hard drive audio system can store songs from cds being played. The system has a
9.3 gigabyte (GB) storage capacity and can record up to 200 hours (approximately 2,900 songs).
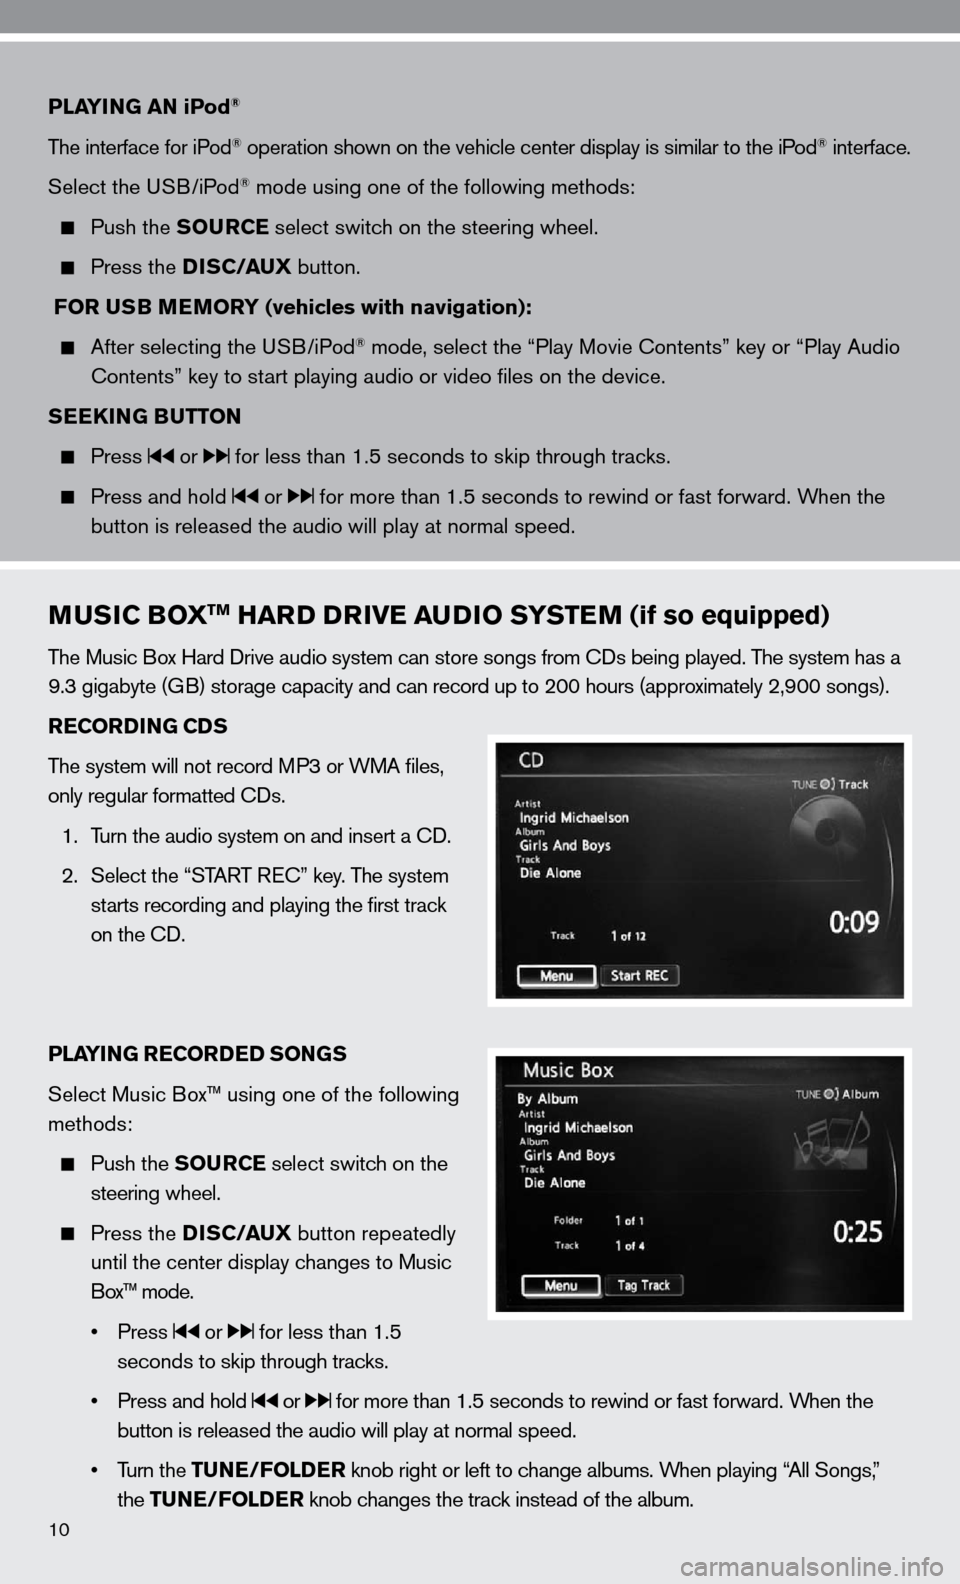
RECORDING CDS
The system will not record MP3 or WMA files,
only regular formatted cds.
1. Turn the audio system on and insert a cd.
2. Select the “START R ec” key. The system
starts recording and playing the first track
on the cd.
PLAYING RECORDED SONGS
Select Music Box™ using one of the following
methods:
Push the SOURCE select switch on the
steering wheel.
Press the DISC/AUX button repeatedly
until the center display changes to Music
Box™ mode.
• Press
or for less than 1.5
seconds to skip through tracks.
• Press and hold
or for more than 1.5 seconds to rewind or fast forward. When the
button is released the audio will play at normal speed.
• Turn the TUNE/FOLDER knob right or left to change albums. When playing “All Songs,”
the TUNE/FOLDER knob changes the track instead of the album.
Page 13 of 40
11
BLUETOOTH® STREAMING AUDIO (if so equipped)
if you have a compatible Bluetooth® Streaming Audio device, it can be connected to the vehicle’s
audio system and played through the speakers.
cOnnec TinG
Press the SETTING button on the instrument panel, then select the “Bluetooth” key.
Select the “ connect Bluetooth” key and a screen will appear asking if you are connecting the
device to use with the hands-free phone system.
Select “no” when you receive the pop-up question.
enter a P in of your choice. it will be needed by your Bluetooth® Streaming Audio device to
complete the connection process.
note: See the Bluetooth
® device’s Owner’s Manual for more information.
A udiO OPe RATiOn
To switch to the Bluetooth® Streaming Audio mode, press the SOURCE select switch on
the steering wheel or the DISC/AUX button repeatedly until the Bluetooth® Streaming
Audio mode is displayed on the screen.
The controls (Menu, Play and Pause) for Bluetooth® Streaming Audio are displayed on the
screen.
VEHICLE INFORMATION DISPLAY
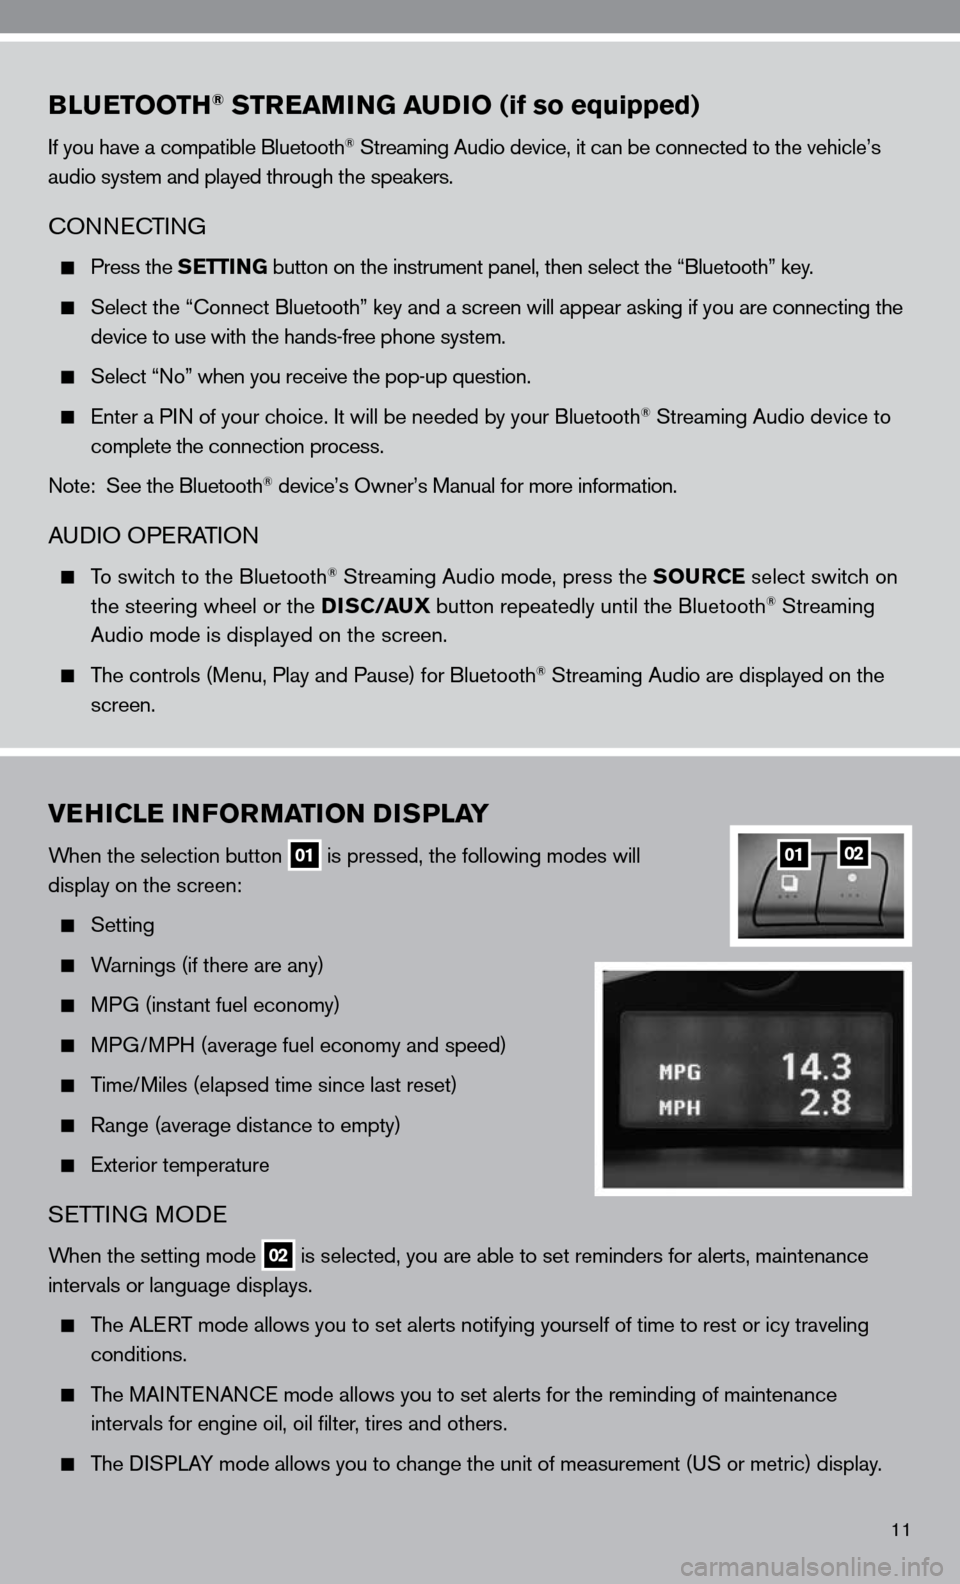
When the selection button 01 is pressed, the following modes will
display on the screen:
Setting
Warnings (if there are any)
MPG (instant fuel economy)
MPG/MPH (average fuel economy and speed)
Time/Miles (elapsed time since last reset)
Range (average distance to empty)
exterior temperature
SeTTin G MO de
When the setting mode 02 is selected, you are able to set reminders for alerts, maintenance
intervals or language displays.
The ALe RT mode allows you to set alerts notifying yourself of time to rest or i\
cy traveling
conditions.
The MAinTenAnce mode allows you to set alerts for the reminding of maintenance
intervals for engine oil, oil filter, tires and others.
The di SPLAY mode allows you to change the unit of measurement (u S or metric) display.
0102
Page 21 of 40
19
4. Hold down both buttons until the indicator light on the HomeLink® flashes, changing from
a “slow blink” to a “rapidly flashing blink.” This could take up to 90 seconds. When the indicator
light flashes rapidly, both buttons may be released. The rapidly flashing light indicates
successful programming. To activate the garage door or other programmed device, press
and hold the programmed HomeLink
® button - releasing when the device begins to activate.
5. if the indicator light on the HomeLink
® blinks rapidly for 2 seconds and then turns solid,
HomeLink® has picked up a “rolling code” garage door opener signal. You will need to
proceed with the next steps to train the HomeLink® to complete the programming, which
may require a ladder and another person for convenience.
6. Press and release the “smart” or “learn” program button loca\
ted on the garage door opener’s
motor to activate the “training mode.” This button is usually located near the antenna wire that
hangs down from the motor. if the wire originates from under a light lens, you will need to
remove the lens to access the program button.
NOTE: Once you have pressed and released the program button on the garage door
opener’s motor and the “training light” is lit, you have 30 seconds in which to perform
step 7. Use the help of a second person for convenience to assist when perform\
ing this step.
7. Within 30 seconds of pressing and releasing the garage door opener program button,
firmly press and release the HomeLink
® button you’ve just programmed. Press and release
the HomeLink® button up to 3 times to complete the training.
8. Your HomeLink
® button should now be programmed. (To program the remaining HomeLink®
buttons for additional door or gate openers, follow steps 2-8 only.)
BLUETOOTH® HANDS-FREE PHONE SYSTEM
(vehicles without navigation - if so equipped)
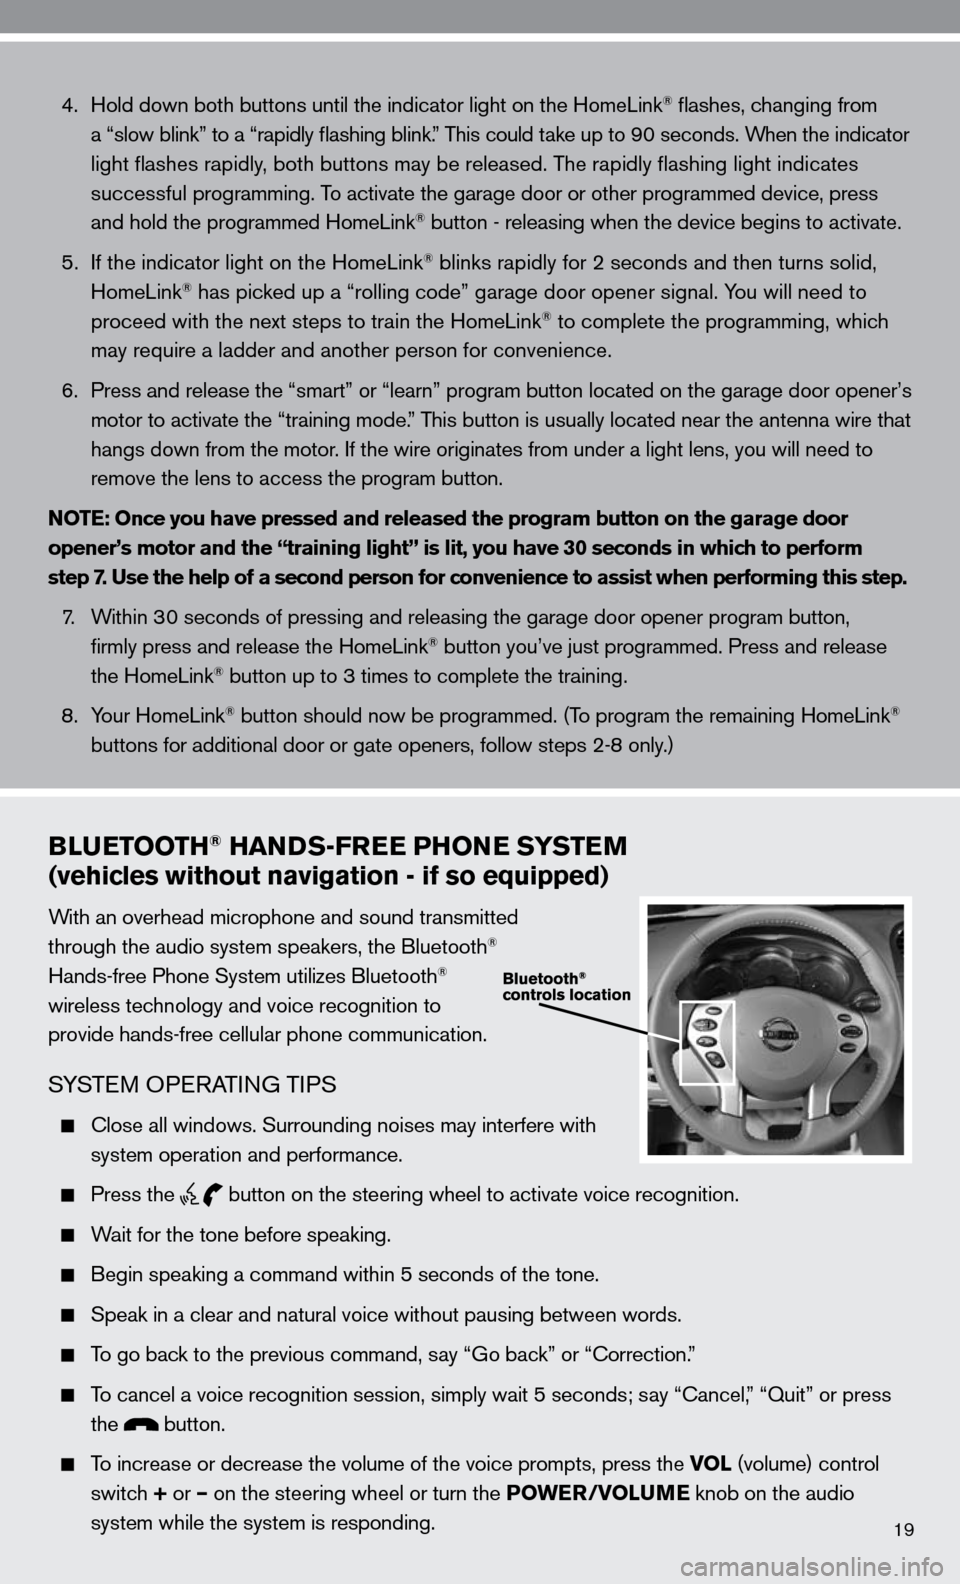
With an overhead microphone and sound transmitted
through the audio system speakers, the Bluetooth®
Hands-free Phone System utilizes Bluetooth®
wireless technology and voice recognition to
provide hands-free cellular phone communication.
SYSTe M OPeRATin G TiPS
close all windows. Surrounding noises may interfere with
system operation and performance.
Press the
button on the steering wheel to activate voice recognition.
Wait for the tone before speaking.
Begin speaking a command within 5 seconds of the tone.
Speak in a clear and natural voice without pausing between words.
To go back to the previous command, say “Go back” or “correction.”
To cancel a voice recognition session, simply wait 5 seconds; say “ cancel,” “Quit” or press
the
button.
To increase or decrease the volume of the voice prompts, press the VOL (volume) control
switch + or – on the steering wheel or turn the POWER/VOLUME knob on the audio
system while the system is responding.
Page 22 of 40
20
if the Voice Recognition system does not recognize your voice commands, train th\
e system
using the Speaker Adaptation Mode. See your Owner’s Manual for detailed information.
Some commands are not available while the vehicle is in motion.
The “Help” command can be used in any menu to hear a list of availa\
ble commands.
Please refer to the cellular phone manufacturer’s Owner’s Manual for detailed information
regarding your Bluetooth® phone.
For recommended phones and detailed instructions, please visit
www.nissanusa.com/bluetooth.
cOnnec TinG YOu R PHOne
To use the hands-free feature, you need to set up, or connect, the system\
to recognize your
compatible cellular phone(s). five compatible Bluetooth®-enabled phones can be connected.
After setup, the system automatically connects with a connected phone wh\
en the ignition is in
the A cc or O n position, as long as the phone is on and in the vehicle.
n OTe: Some cellular phones require the user to enable the automatic reconnec\
tion feature. Please
refer to the cellular phone manufacturer’s Owner’s Manual for Blue\
tooth
® setup information.
cOnnec TinG PROcedu Re
n OTe: The vehicle must be stationary when connecting the phone.
1. Press the
button on the steering wheel. The system announces the available commands.
2. Say “connect Phone.”
3. The system acknowledges the previous command and announces the next set of available
commands. Say “Add phone.”
4. initiate connecting from the phone.
The connecting procedure varies according to each cellular phone model. for detailed
connecting instructions and a list of compatible phones, please visit
www.nissanusa.com/bluetooth.
When prompted for a Passkey code, enter “1234” from the handset. (The Passkey code
is assigned by ni SSAn and cannot be changed.)
5. Say a name for the phone when the system asks you to provide one. You can give the phone
a name of your choice.
MAkin G A PHO ne cALL
1. Press the button.
2. After the tone, do one of the following:
Say “call.” After the system responds, say the name of the person in the phonebook.
Say “ call Phone number.” After waiting for the tone, say [number]. for example, say “ call
Phone number.” After waiting for the tone, say “123-456-7891.”
Say “Redial” to redial the previous phone number.
Say “ call Phone number.” After the system responds, say “Special number” to dial more
than 10 digits or special characters.
You can say all the digits of a 7- or 10-digit phone number at one time.
Page 24 of 40
22
BLUETOOTH® HANDS-FREE PHONE SYSTEM
(vehicles with navigation - if so equipped)
With an overhead microphone and sound
transmitted through the audio system speakers,
the Bluetooth
® Hands-free Phone System utilizes
Bluetooth® wireless technology, a touch-screen
and voice recognition to provide hands-free
cellular phone communication.
SYSTe M OPeRATin G TiPS
close all windows. Surrounding noises may
interfere with system operation and performance.
Press the
button on the steering wheel to activate voice recognition.
Wait for the “Would you like to access Phone, navigation, information, Audio or Help?”
prompt and the listening tone before speaking.
Begin speaking a command within 1.5 seconds of the listening tone.
To cancel a voice recognition session, press and hold the
button for 2 seconds.
To increase or decrease the volume of the voice prompts, push the + or – (volume) control
switch on the steering wheel or turn the VOL (volume) knob on the audio system while the
system is responding.
Speak in a clear and natural voice without pausing between words.
The “Help” command will bring up the voice recognition command list\
.
Please refer to the cellular phone manufacturer’s Owner’s Manual for detailed information
regarding your Bluetooth® phone.
for recommended phones and detailed instructions, please visit
www.nissanusa.com/bluetooth.
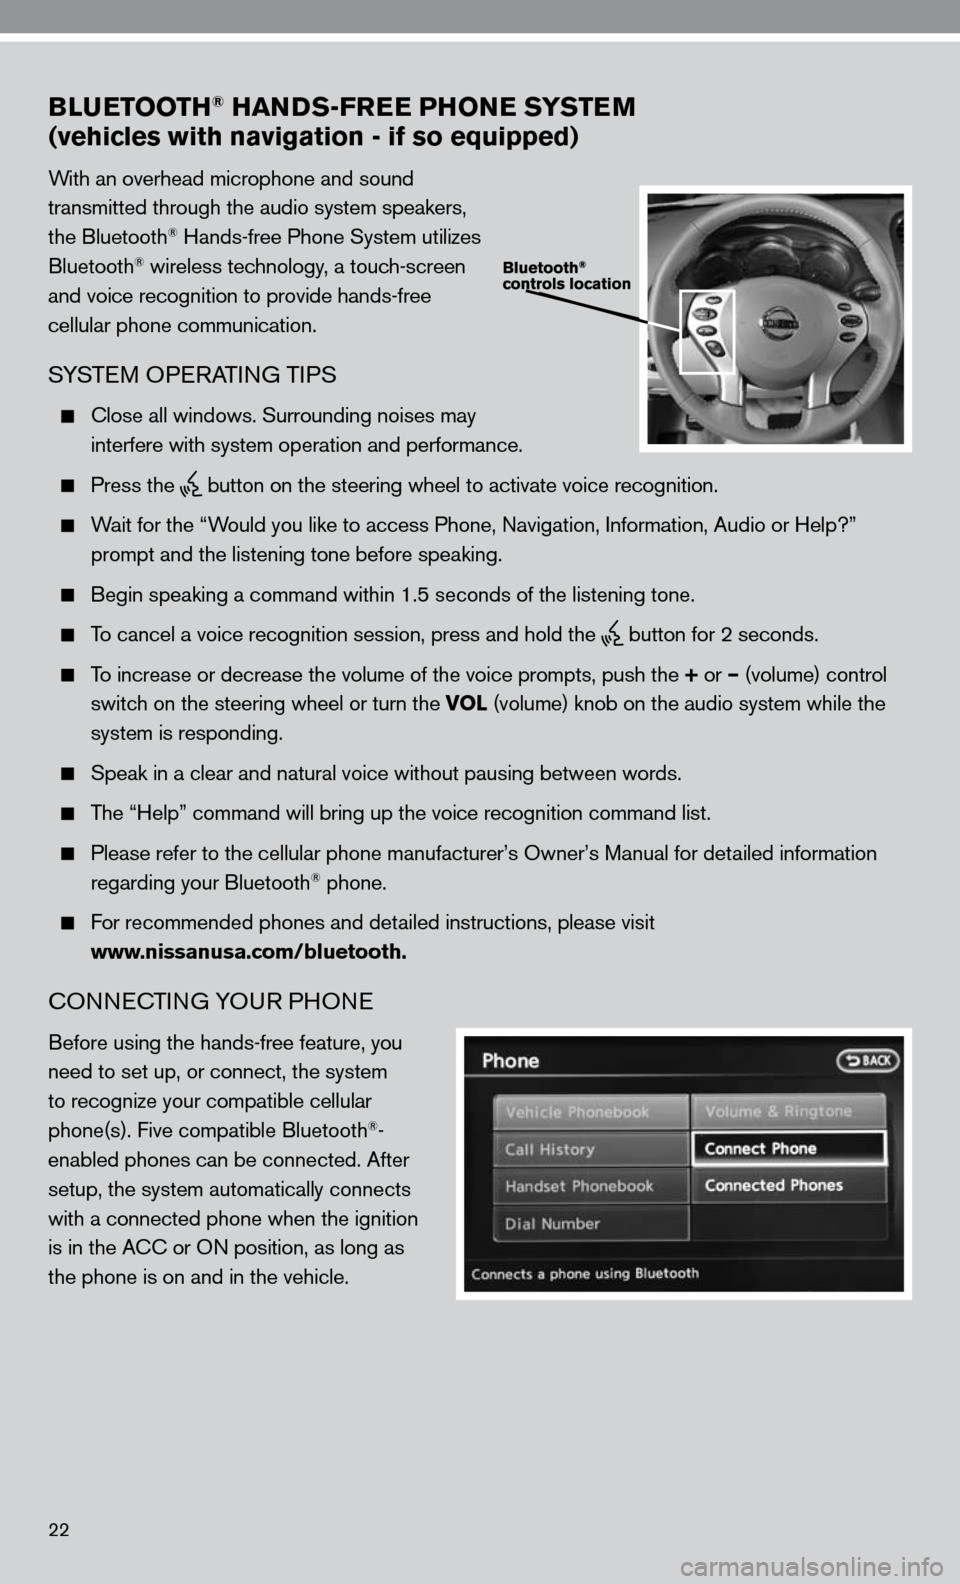
cOnnec TinG YOu R PHOne
Before using the hands-free feature, you
need to set up, or connect, the system
to recognize your compatible cellular
phone(s). five compatible Bluetooth
®-
enabled phones can be connected. After
setup, the system automatically connects
with a connected phone when the ignition
is in the A cc or O n position, as long as
the phone is on and in the vehicle.
Page 26 of 40
24
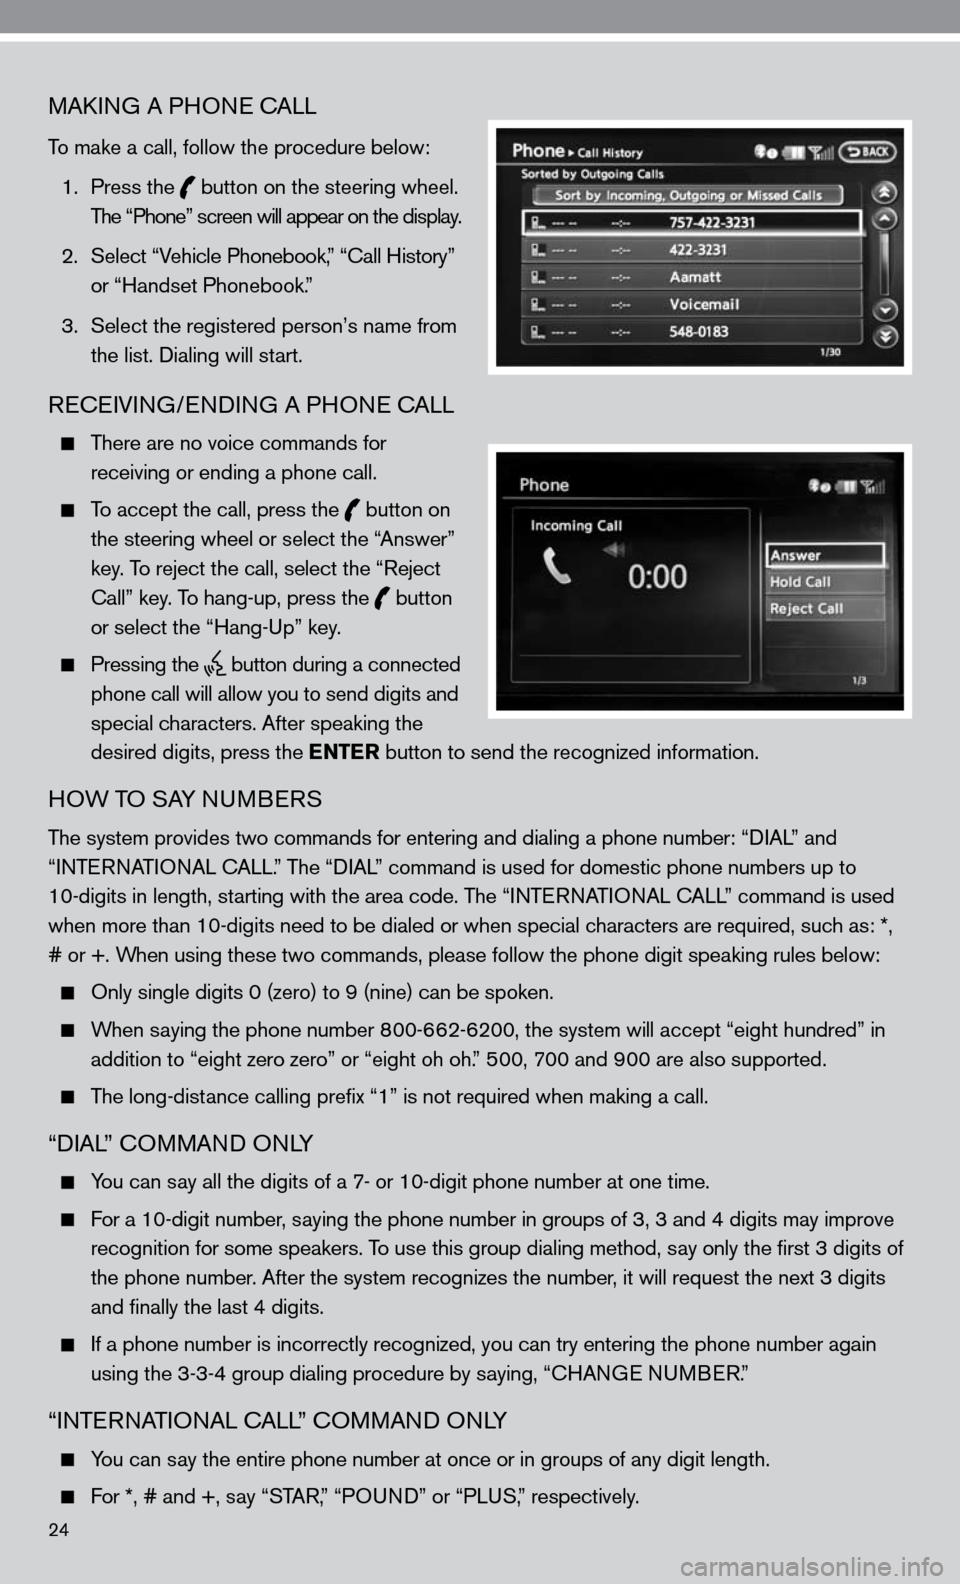
MAkinG A PHO ne cALL
To make a call, follow the procedure below:
1. Press the
button on the steering wheel.
The “Phone” screen will appear on the display.
2. Select “Vehicle Phonebook,” “ call History”
or “Handset Phonebook.”
3. Select the registered person’s name from
the list. dialing will start.
ReceiVin G/endin G A PHO ne cALL
There are no voice commands for
receiving or ending a phone call.
To accept the call, press the
button on
the steering wheel or select the “Answer”
key. To reject the call, select the “Reject
call” key. To hang-up, press the
button
or select the “Hang-up” key.
Pressing the
button during a connected
phone call will allow you to send digits and
special characters. After speaking the
desired digits, press the ENTER button to send the recognized information.
HOW TO SAY nu MBeRS
The system provides two commands for entering and dialing a phone number: “ diAL” and
“inTe RnATi OnAL c ALL.” The “diAL” command is used for domestic phone numbers up to
10-digits in length, starting with the area code. The “inTe RnATi OnAL c ALL” command is used
when more than 10-digits need to be dialed or when special characters are required, such as: *,
# or +. When using these two commands, please follow the phone digit speaking rul\
es below:
Only single digits 0 (zero) to 9 (nine) can be spoken.
When saying the phone number 800-662-6200, the system will accept “eight hundred” in
addition to “eight zero zero” or “eight oh oh.” 500, 700 and 900 are also supported.
The long-distance calling prefix “1” is not required when making a call.
“diAL” c OMMAnd O nLY
You can say all the digits of a 7- or 10-digit phone number at one time.
f or a 10-digit number, saying the phone number in groups of 3, 3 and 4 digits may improve
recognition for some speakers. To use this group dialing method, say only the first 3 digits of
the phone number. After the system recognizes the number, it will request the next 3 digits
and finally the last 4 digits.
i f a phone number is incorrectly recognized, you can try entering the phone number again
using the 3-3-4 group dialing procedure by saying, “c HAnGe nu MBeR.”
“inTe RnATi OnAL c ALL” c OMMAnd O nLY
You can say the entire phone number at once or in groups of any digit length.
f or *, # and +, say “STAR, ” “POund” or “PLuS,” respectively.