Page 1 of 40
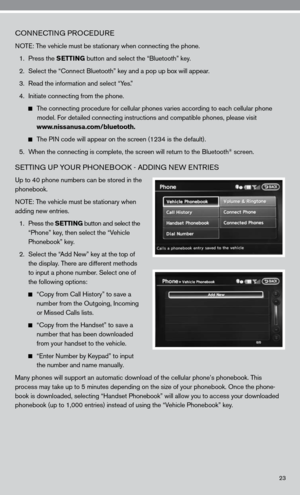
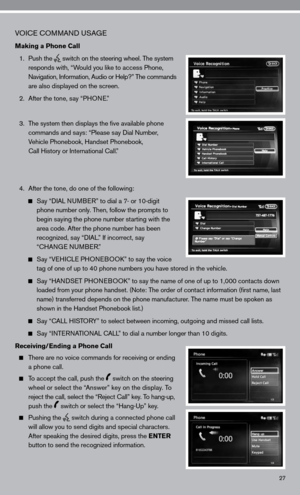
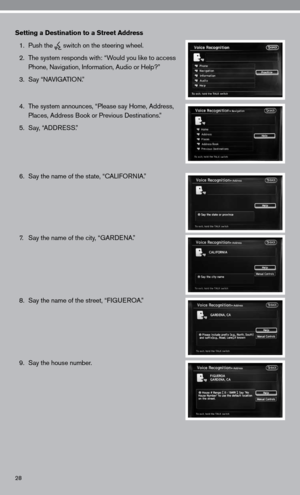
Quick RefeRence Guide
2010
ALTiMA
Page 2 of 40
*See your Owner’s Manual for more information.
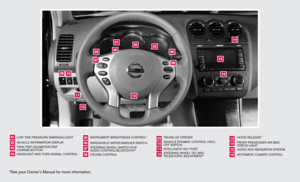
LOW TiRe PR eSS uRe WAR ninG Li GHT
Ve Hic Le infORMATi On di SPLAY
TW in TR iP O dOM eTe R/TR iP
c HAn Ge B uTTO n
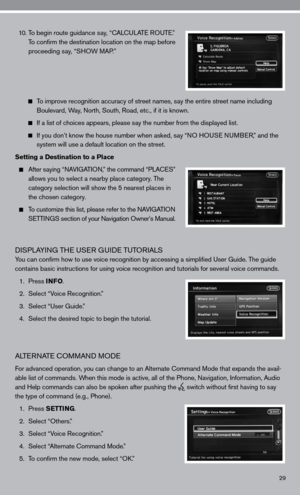
H eAd LiGHT And Tu Rn S iG nAL c OnTROL in
STR uM enT BR iGHTne SS cOnTROL*
W ind SHieLd W iP eR/WASH eR SW iTc H
STee Rin G WH eeL SW iTc H fOR
A udi O c OnTROL/BLueTOOTH
®
cRui Se c OnTROL TR
unk Lid OP eneR
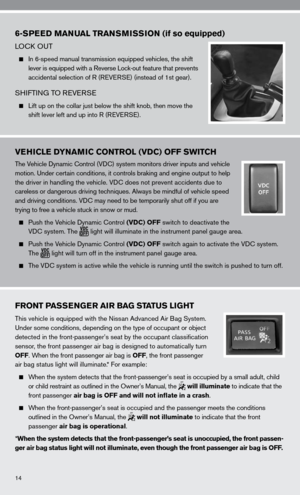
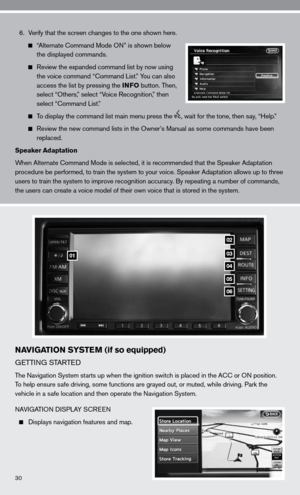
Ve Hic Le d YnAM ic cOnTROL (Vdc)
O ff SW iTc H
inTe LLiGenT keY PORT
STee Rin G WH eeL Ti LT And
Te LeSc OP ic Ad Ju STM enT* HOO
d ReLeAS e*
f RO nT PASS enGeR Ai R BAG
STATu S LiGHT
A udi O And nAVi GATiOn SYSTe M
A uTOMATic c LiMATe c OnTROL
01
16
08
131415
09101211
050607
020304
10
09
11
13
12
07
05
04
01
02
03
0608
1516
14
Page 3 of 40

TABLe Of cOnTenTS
ni SSAn intelligent k ey™........................................... 2
Automatic door Locks ............................................. 3
Windshield Wiper/Washer Switch ................................... 3
Headlight and Turn Signal control ................................... 4
Steering Wheel Switches for Audio control/Bluetooth
® (if so equipped) ... 5
cruise control .................................................... 5
Automatic climate control (if so equipped) ............................6
f M/AM/XM
®* Radio with cd Player (vehicles with navigation) ............8
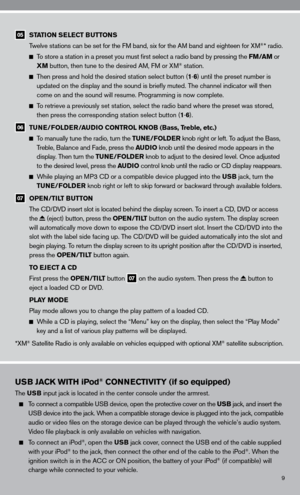
u SB Jack with iPod® connectivity (if so equipped) ..................... 9
Music BoxTM Hard drive Audio System (if so equipped) .................10
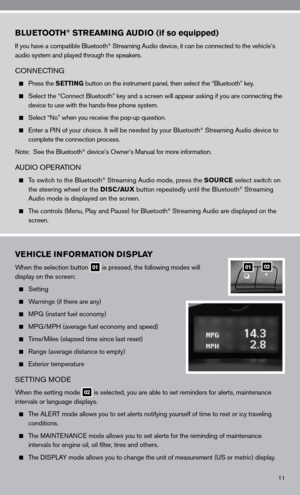
Bluetooth® Streaming Audio (if so equipped) ......................... 11
Vehicle information display ........................................ 11
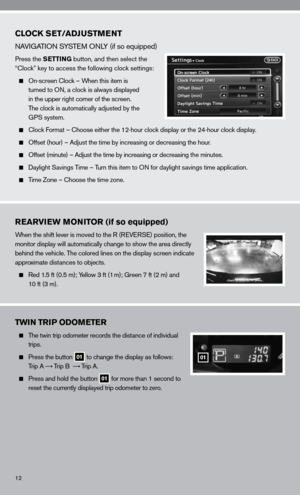
clock Set/Adjustment ............................................ 12
RearView Monitor (if so equipped) .................................. 12
Twin Trip Odometer .............................................. 12
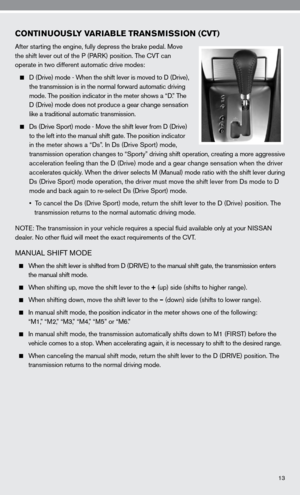
continuously Variable Transmission (cVT) (if so equipped) ..............13
6-Speed Manual Transmission (if so equipped) ........................14
Vehicle dynamic control (Vdc) Off Switch ...........................14
front Passenger Air Bag Status Light ............................... 14
Tire Pressure Monitoring System (TPMS) ............................ 15
Seat Belt Warning Light and chime ................................. 15
child Safety Rear door Locks (Sedan only) .......................... 15
fuel-filler door Release ........................................... 15
fuel-filler cap ................................................... 15
Trunk Lid cancel Switch (if so equipped) .............................16
Moonroof controls (if so equipped) ................................. 16
front Seat Adjustments ........................................... 16
Passenger Rear Seat entry (coupe only) .............................17
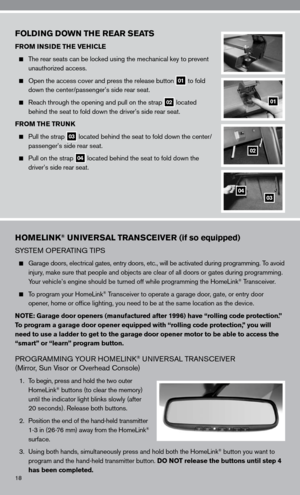
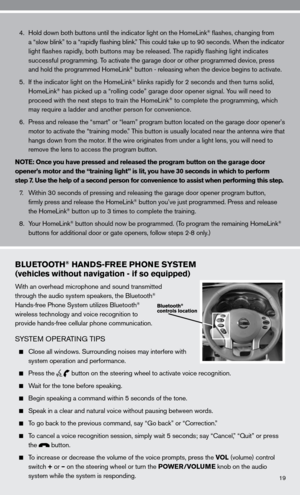
f olding down the Rear Seats . . . . . . . . . . . . . . . . . . . . . . . . . . . . . . . . . . . .\
. . 18
HomeLink
® universal Transceiver (if so equipped) ..................... 18
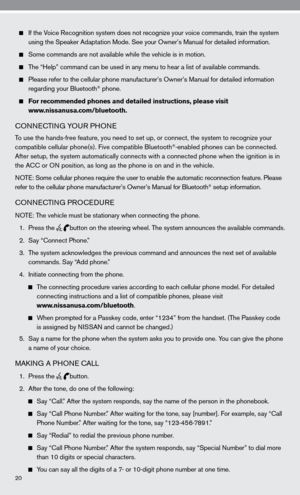
Bluetooth® Hands-free Phone System (vehicles without navigation -
if so equipped) .................................................. 19
Bluetooth
® Hands-free Phone System (vehicles with navigation -
if so equipped) .................................................. 22
ni SSAn Voice Recognition System (vehicles with navigation -
if so equipped) .................................................. 25
navigation System (if so equipped) ................................. 30
This easy-to-use Quick Reference Guide is intended to help you more fully
appreciate some of the unique features and functions of your new vehicle.
However, it is not intended to replace your Owner’s Manual. The Owner’s
Manual contains more detailed information to help you better understand
the important safety warnings, features, operation and maintenance of your
vehicle. All information, specifications, photographs and illustrations in this
publication are those in effect at the time of printing. niSSA n reserves the
right to change specifications or design without notice and without obligation.
Page 4 of 40

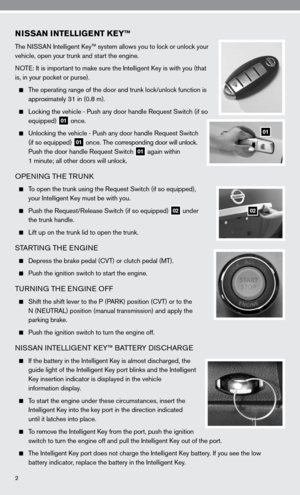
NISSAN INTELLIGENT KEY™
The niSSAn intelligent k ey™ system allows you to lock or unlock your
vehicle, open your trunk and start the engine.
n OTe: it is important to make sure the intelligent k ey is with you (that
is, in your pocket or purse).
The operating range of the door and trunk lock/unlock function is
approximately 31 in (0.8 m).
Locking the vehicle - Push any door handle Request Switch (if so
equipped)
01 once.
u nlocking the vehicle - Push any door handle Request Switch
(if so equipped)
01 once. The corresponding door will unlock.
Push the door handle Request Switch
01 again within
1 minute; all other doors will unlock.
OPenin G THe TRunk
To open the trunk using the Request Switch (if so equipped),
your intelligent k ey must be with you.
Push the Request/Release Switch (if so equipped)
02 under
the trunk handle.
Lift up on the trunk lid to open the trunk.
STARTin G THe enGine
depress the brake pedal (cVT) or clutch pedal (MT).
Push the ignition switch to start the engine.
Tu Rnin G TH e enGine O ff
Shift the shift lever to the P (PAR k) position ( cVT) or to the
n (neu TRAL) position (manual transmission) and apply the
parking brake.
Push the ignition switch to turn the engine off.
ni SSAn inTe LLiGenT keY™ BATTe RY diSc HARG e
if the battery in the intelligent k ey is almost discharged, the
guide light of the intelligent k ey port blinks and the intelligent
k ey insertion indicator is displayed in the vehicle
information display.
To start the engine under these circumstances, insert the
intelligent k ey into the key port in the direction indicated
until it latches into place.
To remove the intelligent k ey from the port, push the ignition
switch to turn the engine off and pull the intelligent k ey out of the port.
The intelligent k ey port does not charge the intelligent k ey battery. if you see the low
battery indicator, replace the battery in the intelligent k ey.
2
01
02
Page 5 of 40
.
All doors unlock automatically when the ignition switch is placed in the O ff position.
The aut")
AUTOMATIC DOOR LOCKS
All doors lock automatically when the vehicle speed reaches 15 MPH (24 km/h).
All doors unlock automatically when the ignition switch is placed in the O ff position.
The automatic unlock function can be deactivated or activated. To deactivate or activate
the automatic door unlock system, perform the following procedure:
1. close all doors.
2. Place the ignition switch in the O n position.
3. Within 20 seconds of performing Step 2, push and hold the power door lock switch to the
position (un
LOck) for more than 5 seconds.
4. When activated, the hazard indicator will flash twice. When deactivated, the hazard indicator
will flash once.
5. The ignition switch must be placed in the O ff and On position again between each setting
change.
When the automatic door unlock system is deactivated, the doors do not unlock when the ignition
switch is placed in the O ff position. To unlock the door manually, use the inside lock knob or the
power door lock switch (driver’s or front passenger’s side).
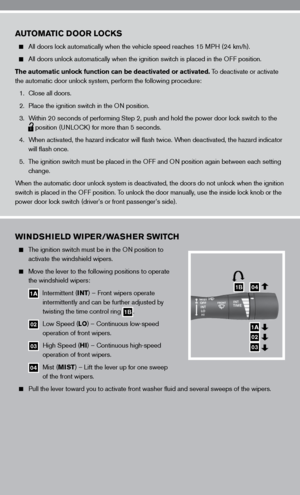
WINDSHIELD WIPER/WASHER SWITCH
The ignition switch must be in the O n position to
activate the windshield wipers.
Move the lever to the following positions to operate
the windshield wipers:
1A intermittent (INT) – front wipers operate
intermittently and can be further adjusted by
twisting the time control ring
1B.
02 Low Speed (LO ) – continuous low-speed
operation of front wipers.
03 High Speed (HI ) – continuous high-speed
operation of front wipers.
04 Mist (MIST ) – Lift the lever up for one sweep
of the front wipers.
Pull the lever toward you to activate front washer fluid and several s\
weeps of the wipers.
1B04
1A
02
03
Page 6 of 40
:
Turn the headlight control switch 01 to the A
uTO position to
activate the autolight system. The autolight")
4
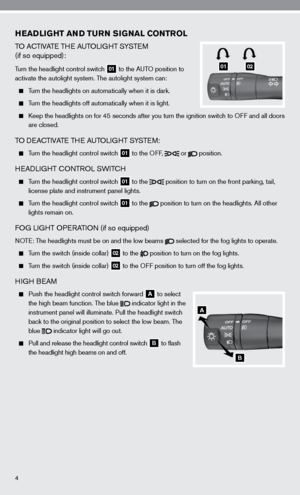
HEADLIGHT AND TURN SIGNAL CONTROL
TO AcTiVATe TH e AuTOLi GHT SYSTe M
(if so equipped):
Turn the headlight control switch 01 to the A
uTO position to
activate the autolight system. The autolight system can:
Turn the headlights on automatically when it is dark.
Turn the headlights off automatically when it is light.
keep the headlights on for 45 seconds after you turn the ignition switch to O ff and all doors
are closed.
TO deA cTiVATe TH e AuTOLi GHT SYSTe M:
Turn the headlight control switch
01 to the O
ff,
or
position.
H
eAd LiGHT c OnTROL SW iTc H
Turn the headlight control switch
01 to the
position to turn on the front parking, tail,
license plate and instrument panel lights.
Turn the headlight control switch
01 to the
position to turn on the headlights. All other
lights remain on.
fOG Li GHT OP eRATi On (if so equipped)
nOTe: The headlights must be on and the low beams
selected for the fog lights to operate.
Turn the switch (inside collar)
02 to the
position to turn on the fog lights.
Turn the switch (inside collar)
02 to the O
ff position to turn off the fog lights.
HiGH B eAM
Push the headlight control switch forward
A to select
the high beam function. The blue
indicator light in the
instrument panel will illuminate. Pull the headlight switch
back to the original position to select the low beam. The
blue
indicator light will go out.
Pull and release the headlight control switch
B to flash
the headlight high beams on and off.
0102
A
B
Page 7 of 40

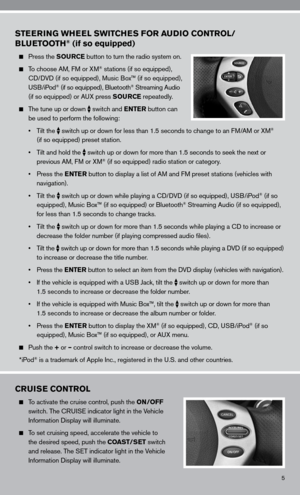
Press the SOURCE button to turn the radio system on.
To choose AM, f M or XM® stations (if so equipped),
cd/ dVd (")
5
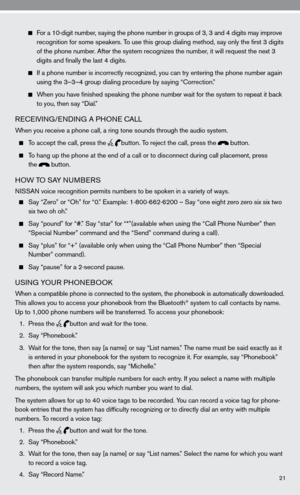
STEERING WHEEL SWITCHES FOR AUDIO CONTROL/
BLUETOOTH® (if so equipped)
Press the SOURCE button to turn the radio system on.
To choose AM, f M or XM® stations (if so equipped),
cd/ dVd (if so equipped), Music Box™ (if so equipped),
u SB/iPod
® (if so equipped), Bluetooth® Streaming Audio
(if so equipped) or A uX press SOURCE repeatedly.
The tune up or down
switch and ENTER button can
be used to perform the following:
• Tilt the
switch up or down for less than 1.5 seconds to change to an f
M/AM or XM®
(if so equipped) preset station.
• Tilt and hold the
switch up or down for more than 1.5 seconds to seek the next or
previous AM, f M or XM® (if so equipped) radio station or category.
• Press the ENTER button to display a list of AM and fM preset stations (vehicles with
navigation).
• Tilt the
switch up or down while playing a cd/
dVd (if so equipped), u SB/iPod® (if so
equipped), Music Box™ (if so equipped) or Bluetooth® Streaming Audio (if so equipped),
for less than 1.5 seconds to change tracks.
• Tilt the
switch up or down for more than 1.5 seconds while playing a cd to increase or
decrease the folder number (if playing compressed audio files).
• Tilt the
switch up or down for more than 1.5 seconds while playing a d
Vd (if so equipped)
to increase or decrease the title number.
• Press the ENTER button to select an item from the d Vd display (vehicles with navigation).
• If the vehicle is equipped with a USB Jack, tilt the
switch up or down for more than
1.5 seconds to increase or decrease the folder number.
• If the vehicle is equipped with Music Box™, tilt the
switch up or down for more than
1.5 seconds to increase or decrease the album number or folder.
• Press the ENTER button to display the XM
® (if so equipped), cd, u SB/iPod® (if so
equipped), Music Box™ (if so equipped), or A uX menu.
Push the + or – control switch to increase or decrease the volume.
*iPod
® is a trademark of Apple inc., registered in the u.S. and other countries.
CRUISE CONTROL
To activate the cruise control, push the ON/OFF
switch. The cRui Se indicator light in the Vehicle
information display will illuminate.
To set cruising speed, accelerate the vehicle to
the desired speed, push the COAST/SET switch
and release. The S eT indicator light in the Vehicle
information display will illuminate.
Page 8 of 40

01 AUTO BUTTON
Press the AUTO button 01 . Turn the driver’s side temperature control dial 02 to the
desired temperature. This will allow the")
6
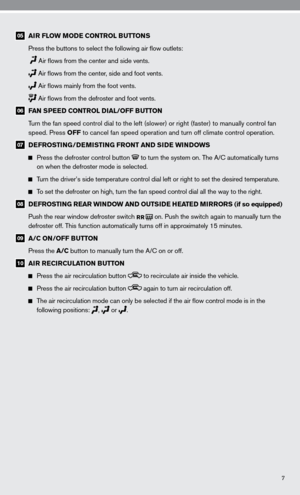
AUTOMATIC CLIMATE CONTROL (if so equipped)
01 AUTO BUTTON
Press the AUTO button 01 . Turn the driver’s side temperature control dial 02 to the
desired temperature. This will allow the fan speed, air flow distribution and temperature
to be automatically maintained.
When AUTO is pressed, AUTO will illuminate. When DUAL 03 is pressed, DUAL will
illuminate.
To disable auto mode, press one of the air flow mode control buttons 05 , turn the fan
speed control dial 06 or press the front defroster control button 07 .
02 DRIVER’S SIDE TEMPERATURE CONTROL DIAL
Turn the driver’s side temperature control dial left for cold air or r\
ight for hot air.
03 DUAL BUTTON
Press the DUAL button to turn the passenger’s side temperature controls on or off. T\
his will
allow the passenger’s side temperature to be adjusted independently from the driver’s side
control.
04 PASSENGER’S SIDE TEMPERATURE CONTROL DIAL
Turn the passenger’s side temperature control dial left for cold air or right for hot air; doing so
will activate dual mode.
To reset at a faster cruising speed, push and hold the ACCEL/RES switch. When the vehicle
attains the desired speed, release the switch.
To reset at a slower cruising speed, push and hold the COAST/SET switch. Release
the switch when the vehicle slows to the desired speed.
To cancel cruise control, push the CANCEL switch or tap the brake pedal. The S eT
indicator light in the Vehicle information display will go out.
To resume a preset speed, push and release the ACCEL/RES switch. The vehicle
returns to the last set cruising speed when the vehicle speed is over 25\
MPH (40 km/h).
To turn off cruise control, push the ON/OFF switch. Both the c Rui Se indicator light
and the S eT indicator light in the Vehicle information display will go out.
01
0204
06
0910070803
05