2010 NISSAN ALTIMA COUPE brake
[x] Cancel search: brakePage 4 of 40

NISSAN INTELLIGENT KEY™
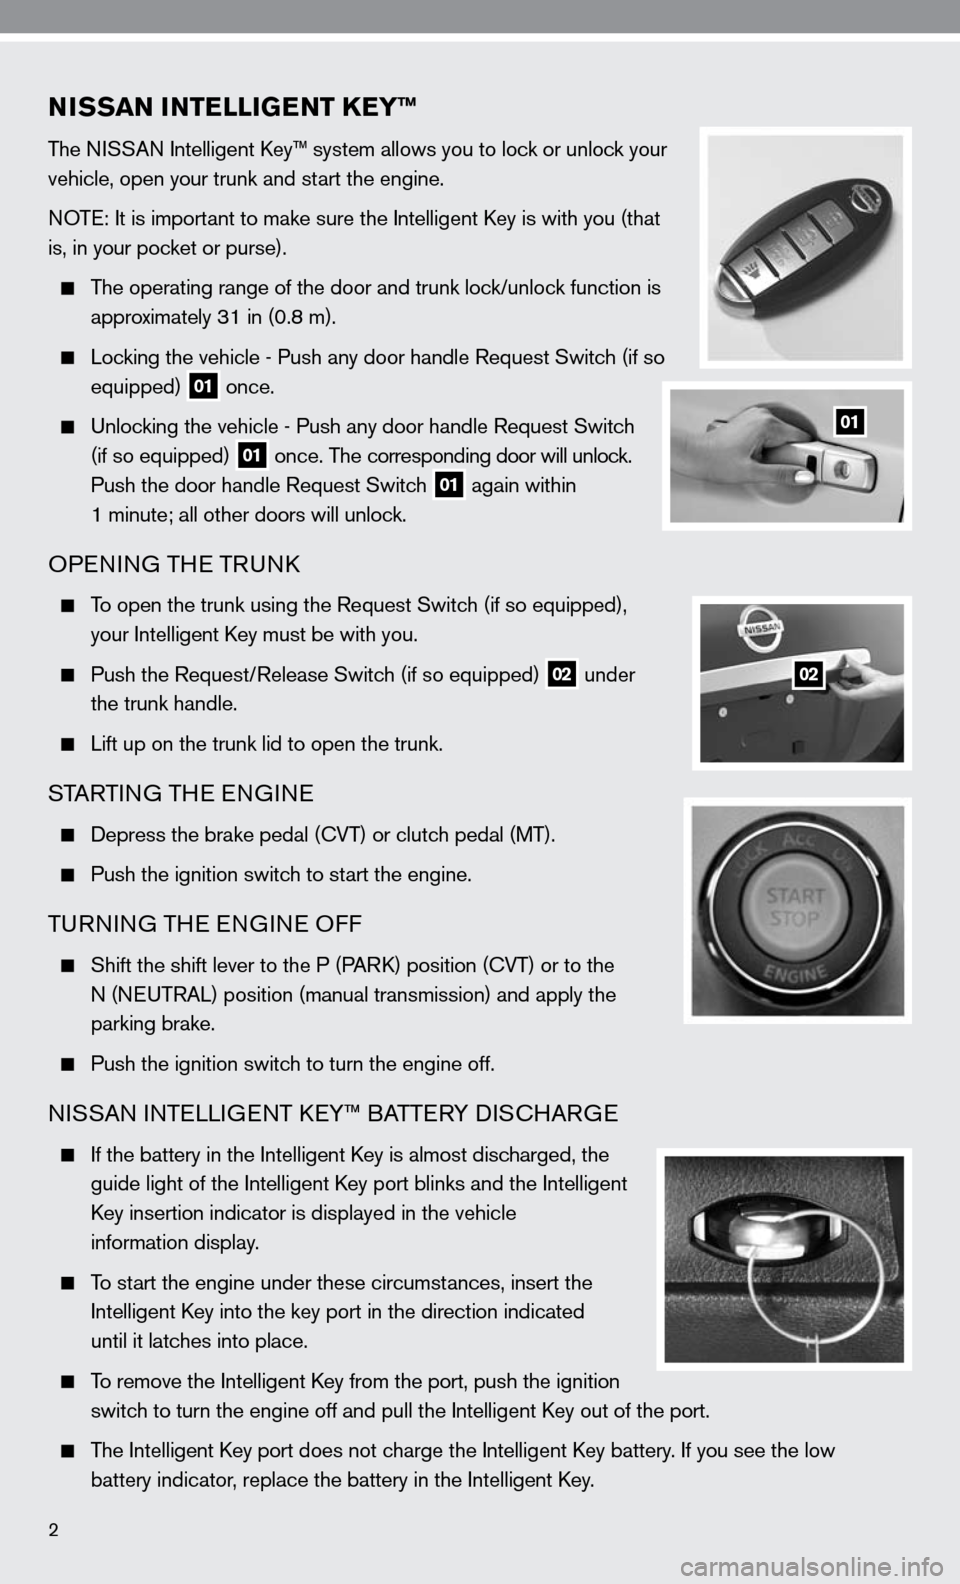
The niSSAn intelligent k ey™ system allows you to lock or unlock your
vehicle, open your trunk and start the engine.
n OTe: it is important to make sure the intelligent k ey is with you (that
is, in your pocket or purse).
The operating range of the door and trunk lock/unlock function is
approximately 31 in (0.8 m).
Locking the vehicle - Push any door handle Request Switch (if so
equipped)
01 once.
u nlocking the vehicle - Push any door handle Request Switch
(if so equipped)
01 once. The corresponding door will unlock.
Push the door handle Request Switch
01 again within
1 minute; all other doors will unlock.
OPenin G THe TRunk
To open the trunk using the Request Switch (if so equipped),
your intelligent k ey must be with you.
Push the Request/Release Switch (if so equipped)
02 under
the trunk handle.
Lift up on the trunk lid to open the trunk.
STARTin G THe enGine
depress the brake pedal (cVT) or clutch pedal (MT).
Push the ignition switch to start the engine.
Tu Rnin G TH e enGine O ff
Shift the shift lever to the P (PAR k) position ( cVT) or to the
n (neu TRAL) position (manual transmission) and apply the
parking brake.
Push the ignition switch to turn the engine off.
ni SSAn inTe LLiGenT keY™ BATTe RY diSc HARG e
if the battery in the intelligent k ey is almost discharged, the
guide light of the intelligent k ey port blinks and the intelligent
k ey insertion indicator is displayed in the vehicle
information display.
To start the engine under these circumstances, insert the
intelligent k ey into the key port in the direction indicated
until it latches into place.
To remove the intelligent k ey from the port, push the ignition
switch to turn the engine off and pull the intelligent k ey out of the port.
The intelligent k ey port does not charge the intelligent k ey battery. if you see the low
battery indicator, replace the battery in the intelligent k ey.
2
01
02
Page 8 of 40

6
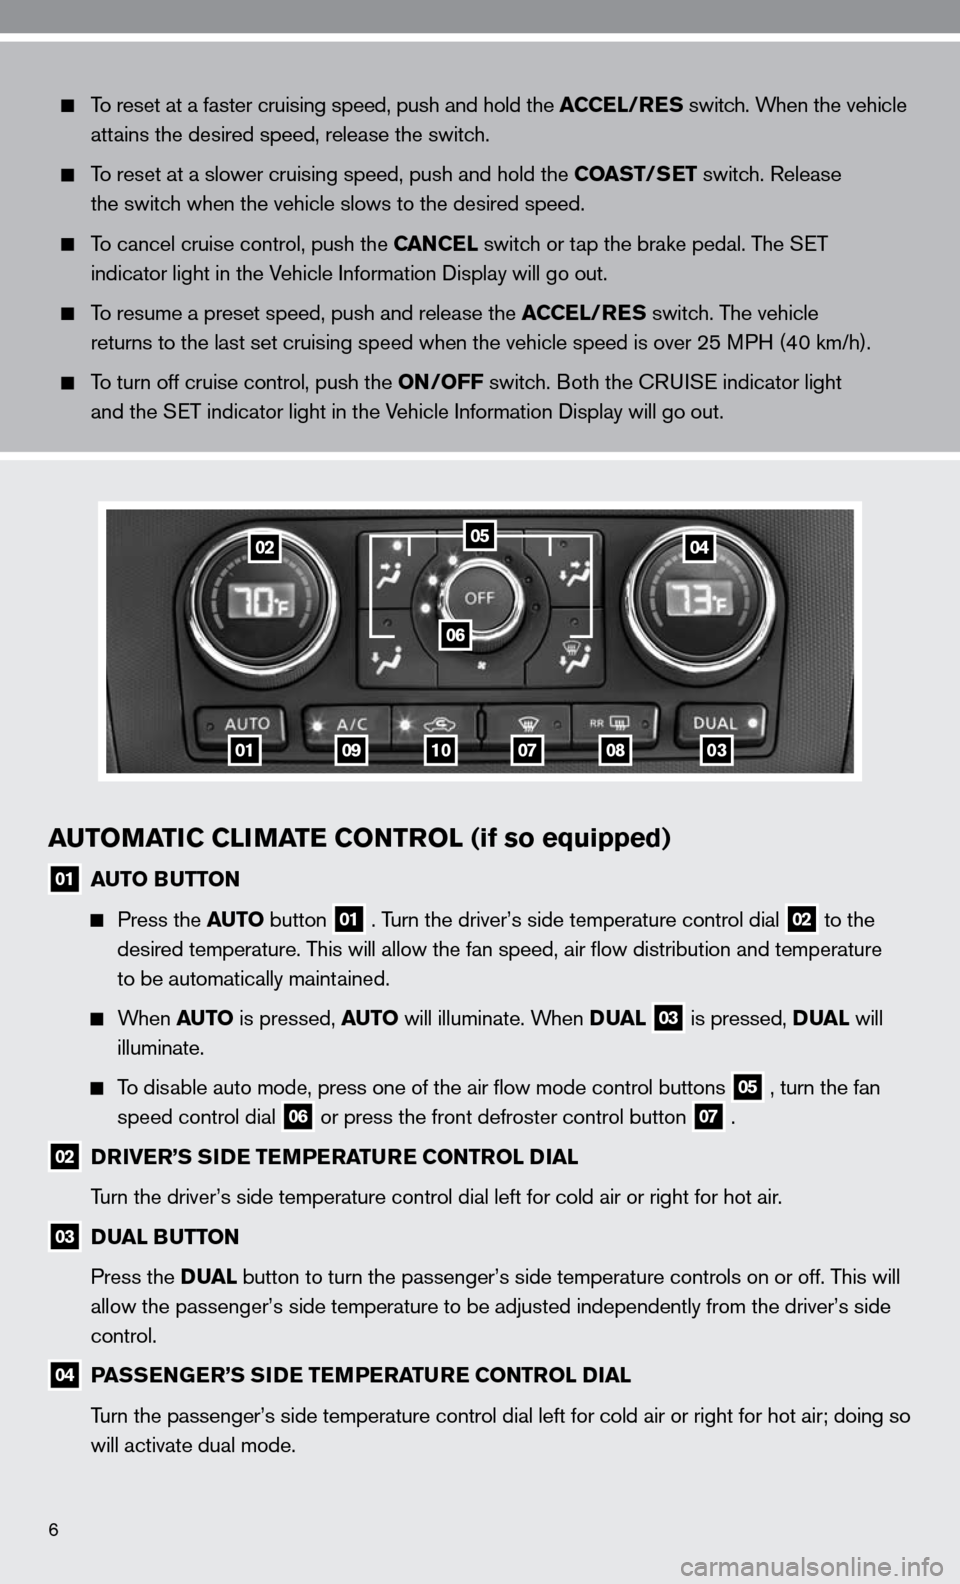
AUTOMATIC CLIMATE CONTROL (if so equipped)
01 AUTO BUTTON
Press the AUTO button 01 . Turn the driver’s side temperature control dial 02 to the
desired temperature. This will allow the fan speed, air flow distribution and temperature
to be automatically maintained.
When AUTO is pressed, AUTO will illuminate. When DUAL 03 is pressed, DUAL will
illuminate.
To disable auto mode, press one of the air flow mode control buttons 05 , turn the fan
speed control dial 06 or press the front defroster control button 07 .
02 DRIVER’S SIDE TEMPERATURE CONTROL DIAL
Turn the driver’s side temperature control dial left for cold air or r\
ight for hot air.
03 DUAL BUTTON
Press the DUAL button to turn the passenger’s side temperature controls on or off. T\
his will
allow the passenger’s side temperature to be adjusted independently from the driver’s side
control.
04 PASSENGER’S SIDE TEMPERATURE CONTROL DIAL
Turn the passenger’s side temperature control dial left for cold air or right for hot air; doing so
will activate dual mode.
To reset at a faster cruising speed, push and hold the ACCEL/RES switch. When the vehicle
attains the desired speed, release the switch.
To reset at a slower cruising speed, push and hold the COAST/SET switch. Release
the switch when the vehicle slows to the desired speed.
To cancel cruise control, push the CANCEL switch or tap the brake pedal. The S eT
indicator light in the Vehicle information display will go out.
To resume a preset speed, push and release the ACCEL/RES switch. The vehicle
returns to the last set cruising speed when the vehicle speed is over 25\
MPH (40 km/h).
To turn off cruise control, push the ON/OFF switch. Both the c Rui Se indicator light
and the S eT indicator light in the Vehicle information display will go out.
01
0204
06
0910070803
05
Page 10 of 40

8
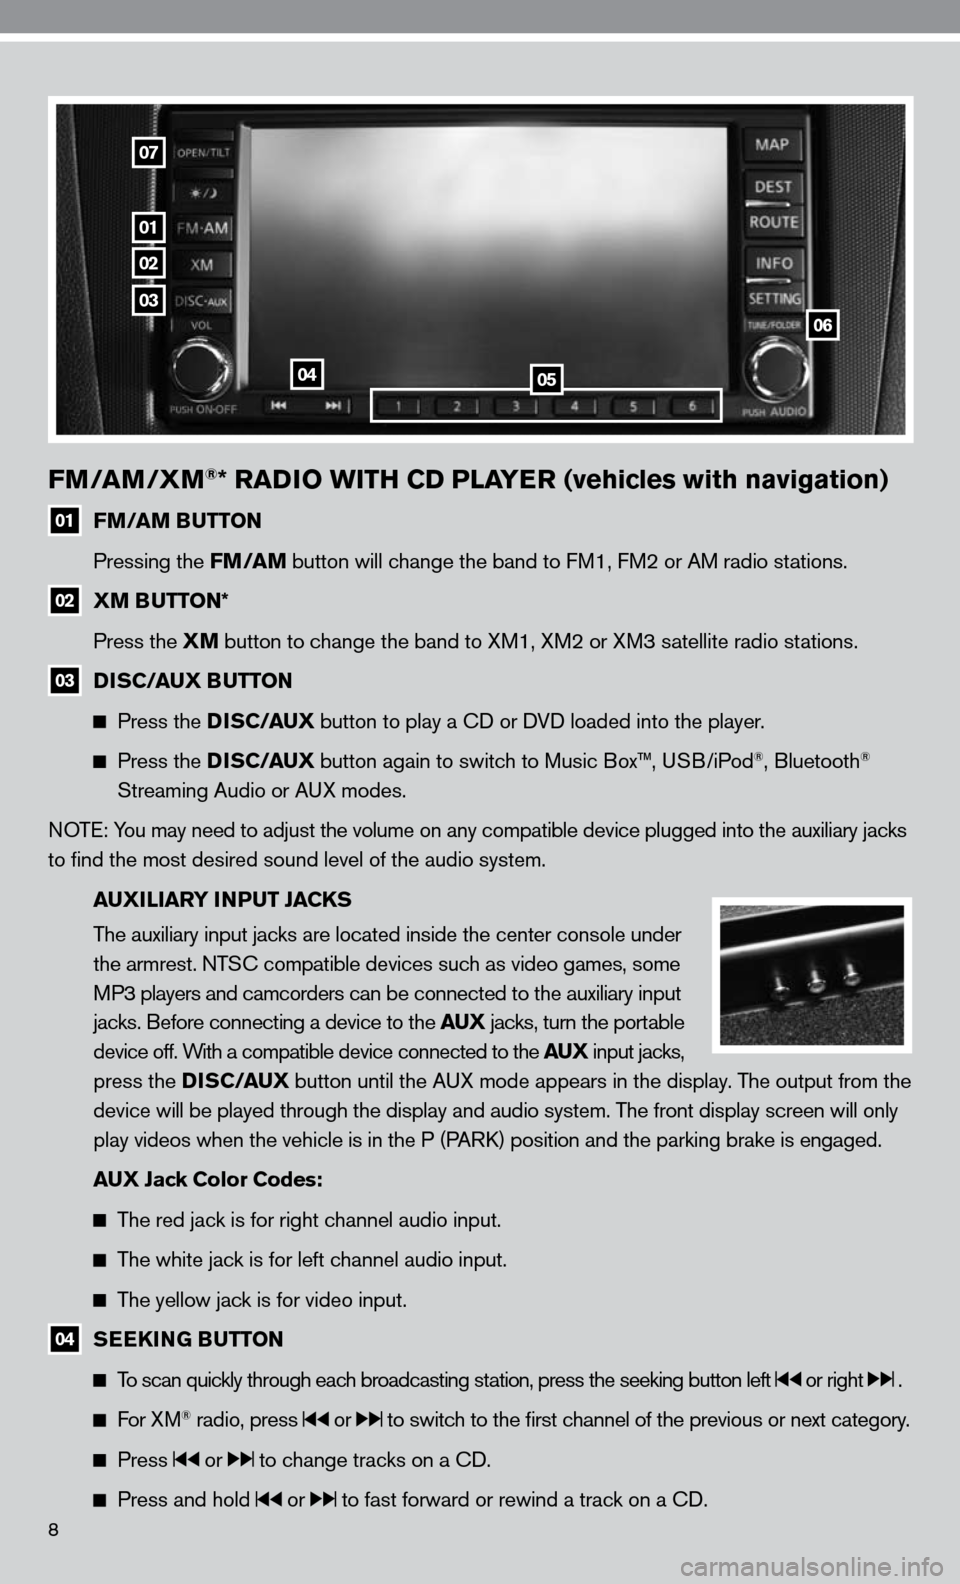
FM/AM/XM®* RADIO WITH CD PLAYER (vehicles with navigation)
01 FM/AM BUTTON
Pressing the FM/AM button will change the band to fM1, fM2 or AM radio stations.
02 XM BUTTON*
Press the XM button to change the band to XM1, XM2 or XM3 satellite radio stations.
03 DISC/AUX BUTTON
Press the D I S C/AUX button to play a cd or dVd loaded into the player.
Press the D I S C/AUX button again to switch to Music Box™, u SB/iPod®, Bluetooth®
Streaming Audio or A uX modes.
n OTe: You may need to adjust the volume on any compatible device plugged into t\
he auxiliary jacks
to find the most desired sound level of the audio system.
AUXILIARY INPUT JACKS
The auxiliary input jacks are located inside the center console under
the armrest. nTS c compatible devices such as video games, some
MP3 players and camcorders can be connected to the auxiliary input
jacks. Before connecting a device to the AUX jacks, turn the portable
device off. With a compatible device connected to the AUX input jacks,
press the D I S C/AUX button until the AuX mode appears in the display. The output from the
device will be played through the display and audio system. The front display screen will only
play videos when the vehicle is in the P (PAR k) position and the parking brake is engaged.
AUX Jack Color Codes:
The red jack is for right channel audio input.
The white jack is for left channel audio input.
The yellow jack is for video input.
04 SEEKING BUTTON
To scan quickly through each broadcasting station, press the seeking button left or right .
f or XM® radio, press or to switch to the first channel of the previous or next category.
Press or to change tracks on a cd.
Press and hold or to fast forward or rewind a track on a cd.
01
02
03
0405
06
07
Page 15 of 40

13
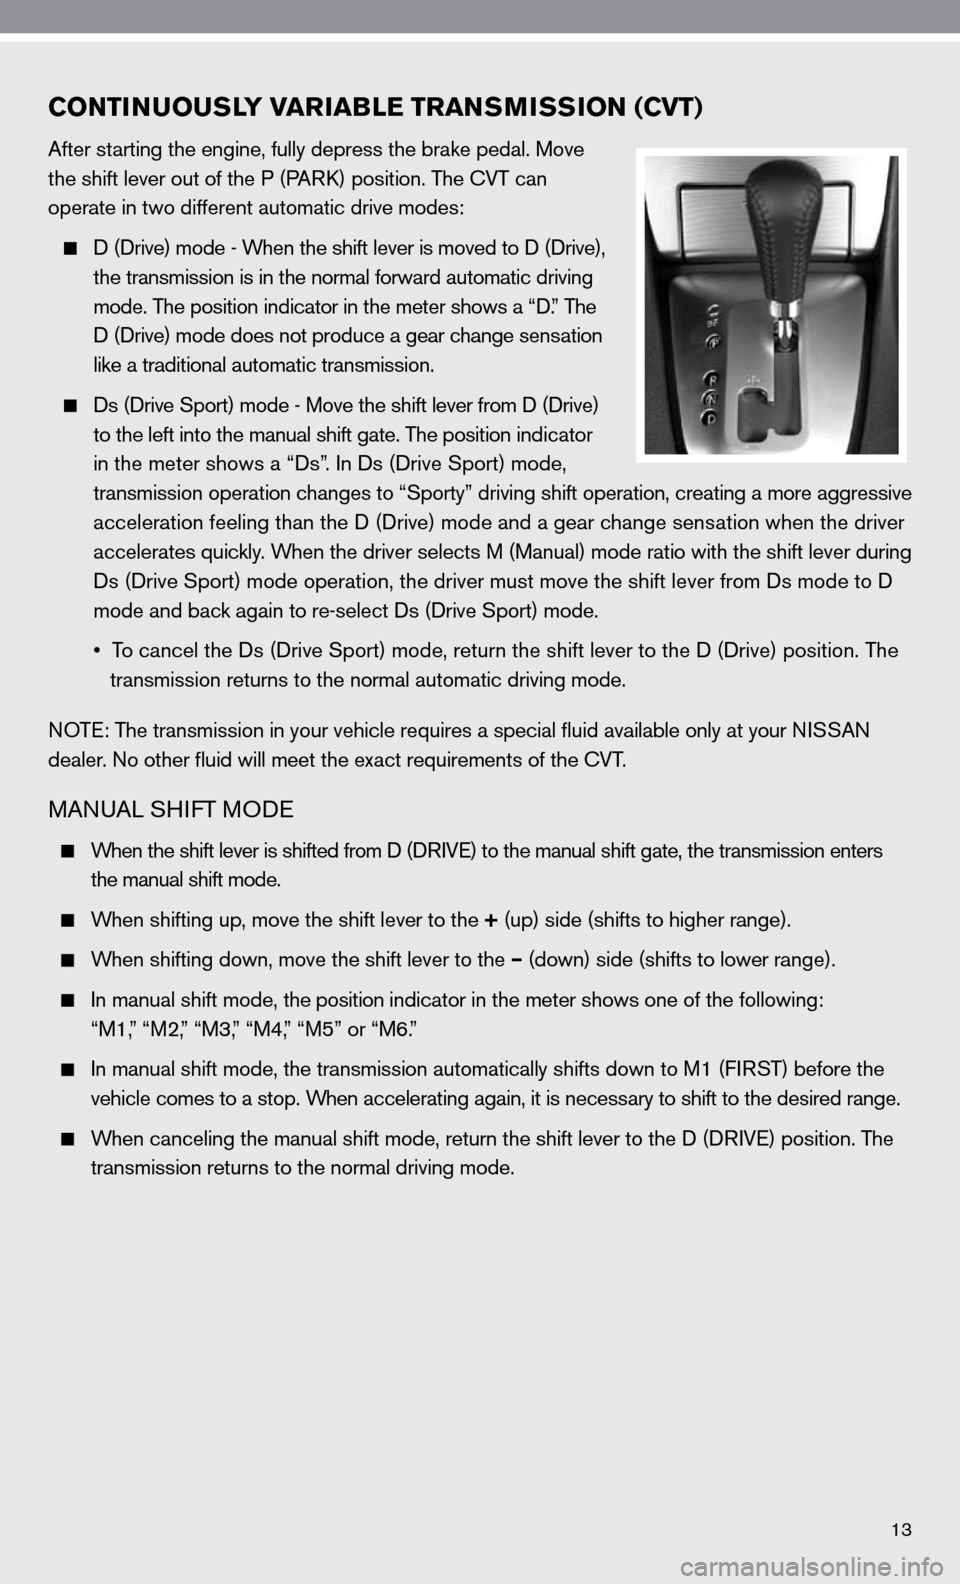
CONTINUOUSLY VARIABLE TRANSMISSION (CVT)
After starting the engine, fully depress the brake pedal. Move
the shift lever out of the P (PARk) position. The cVT can
operate in two different automatic drive modes:
d (d rive) mode - When the shift lever is moved to d (d rive),
the transmission is in the normal forward automatic driving
mode. The position indicator in the meter shows a “ d.” The
d (d rive) mode does not produce a gear change sensation
like a traditional automatic transmission.
ds (drive Sport) mode - Move the shift lever from d (d rive)
to the left into the manual shift gate. The position indicator
in the meter shows a “ds”. in ds (drive Sport) mode,
transmission operation changes to “Sporty” driving shift operation, creating a more aggressive
acceleration feeling than the d (drive) mode and a gear change sensation when the driver
accelerates quickly. When the driver selects M (Manual) mode ratio with the shift lever during
ds (drive Sport) mode operation, the driver must move the shift lever from ds mode to d
mode and back again to re-select ds (drive Sport) mode.
• To cancel the Ds (Drive Sport) mode, return the shift lever to the D (Drive) position. The
transmission returns to the normal automatic driving mode.
n OTe: The transmission in your vehicle requires a special fluid available onl\
y at your niSSA n
dealer. no other fluid will meet the exact requirements of the cVT.
MAnu AL SH ifT MO de
When the shift lever is shifted from d (d RiVe) to the manual shift gate, the transmission enters
the manual shift mode.
When shifting up, move the shift lever to the + (up) side (shifts to higher range).
When shifting down, move the shift lever to the – (down) side (shifts to lower range).
in manual shift mode, the position indicator in the meter shows one of the following:
“M1,” “M2,” “M3,” “M4,” “M5” or “M6.”
i n manual shift mode, the transmission automatically shifts down to M1 ( fiRST) before the
vehicle comes to a stop. When accelerating again, it is necessary to shift to the desired range.
When canceling the manual shift mode, return the shift lever to the d (d RiV e) position. The
transmission returns to the normal driving mode.