2010 NISSAN ALTIMA COUPE key
[x] Cancel search: keyPage 22 of 40
20
if the Voice Recognition system does not recognize your voice commands, train th\
e system
using the Speaker Adaptation Mode. See your Owner’s Manual for detailed information.
Some commands are not available while the vehicle is in motion.
The “Help” command can be used in any menu to hear a list of availa\
ble commands.
Please refer to the cellular phone manufacturer’s Owner’s Manual for detailed information
regarding your Bluetooth® phone.
For recommended phones and detailed instructions, please visit
www.nissanusa.com/bluetooth.
cOnnec TinG YOu R PHOne
To use the hands-free feature, you need to set up, or connect, the system\
to recognize your
compatible cellular phone(s). five compatible Bluetooth®-enabled phones can be connected.
After setup, the system automatically connects with a connected phone wh\
en the ignition is in
the A cc or O n position, as long as the phone is on and in the vehicle.
n OTe: Some cellular phones require the user to enable the automatic reconnec\
tion feature. Please
refer to the cellular phone manufacturer’s Owner’s Manual for Blue\
tooth
® setup information.
cOnnec TinG PROcedu Re
n OTe: The vehicle must be stationary when connecting the phone.
1. Press the
button on the steering wheel. The system announces the available commands.
2. Say “connect Phone.”
3. The system acknowledges the previous command and announces the next set of available
commands. Say “Add phone.”
4. initiate connecting from the phone.
The connecting procedure varies according to each cellular phone model. for detailed
connecting instructions and a list of compatible phones, please visit
www.nissanusa.com/bluetooth.
When prompted for a Passkey code, enter “1234” from the handset. (The Passkey code
is assigned by ni SSAn and cannot be changed.)
5. Say a name for the phone when the system asks you to provide one. You can give the phone
a name of your choice.
MAkin G A PHO ne cALL
1. Press the button.
2. After the tone, do one of the following:
Say “call.” After the system responds, say the name of the person in the phonebook.
Say “ call Phone number.” After waiting for the tone, say [number]. for example, say “ call
Phone number.” After waiting for the tone, say “123-456-7891.”
Say “Redial” to redial the previous phone number.
Say “ call Phone number.” After the system responds, say “Special number” to dial more
than 10 digits or special characters.
You can say all the digits of a 7- or 10-digit phone number at one time.
Page 25 of 40
23
cOnnecTinG PROcedu Re
n OTe: The vehicle must be stationary when connecting the phone.
1. Press the SETTING button and select the “Bluetooth” key.
2. Select the “connect Bluetooth” key and a pop up box will appear.
3. Read the information and select “Yes.”
4. initiate connecting from the phone.
The connecting procedure for cellular phones varies according to each cellular phone
model. f or detailed connecting instructions and compatible phones, please visit
www.nissanusa.com/bluetooth.
The P in code will appear on the screen (1234 is the default).
5. When the connecting is complete, the screen will return to the Bluetooth
® screen.
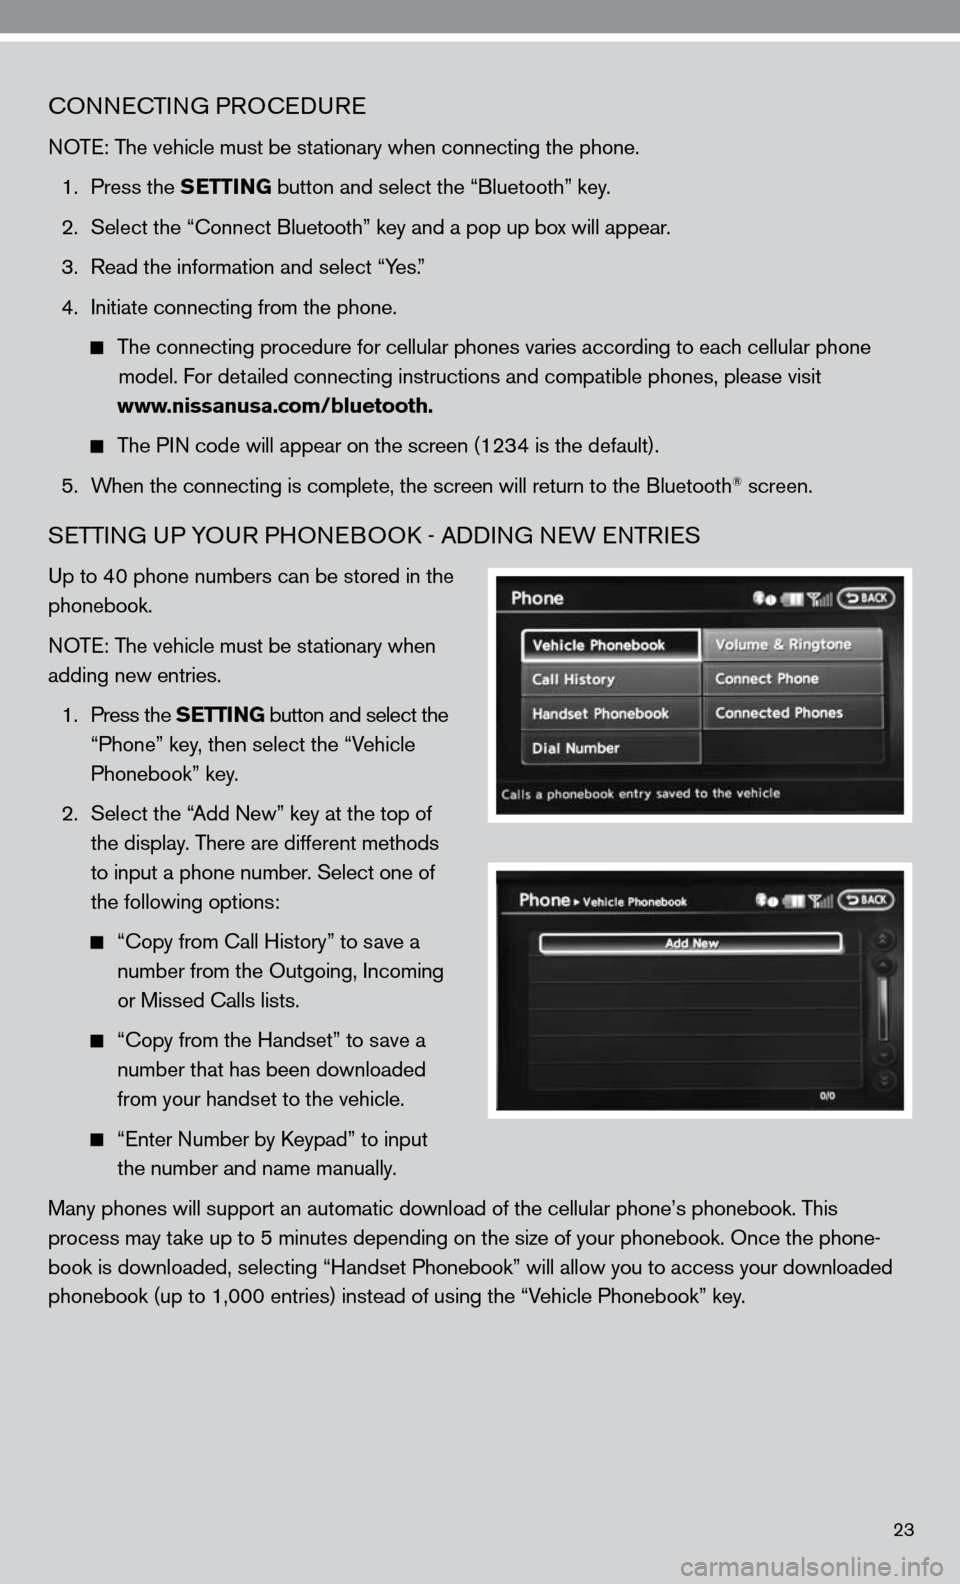
SeTTin G uP YO uR PHO neBOO k - Addin G neW enTR ieS
up to 40 phone numbers can be stored in the
phonebook.
n OT e: The vehicle must be stationary when
adding new entries.
1. Press the SETTING button and select the
“Phone” key, then select the “Vehicle
Phonebook” key.
2. Select the “Add new” key at the top of
the display. There are different methods
to input a phone number. Select one of
the following options:
“c opy from call History” to save a
number from the Outgoing, incoming
or Missed calls lists.
“c opy from the Handset” to save a
number that has been downloaded
from your handset to the vehicle.
“e nter number by keypad” to input
the number and name manually.
Many phones will support an automatic download of the cellular phone’\
s phonebook. This
process may take up to 5 minutes depending on the size of your phonebook. Once the ph\
one-
book is downloaded, selecting “Handset Phonebook” will allow you t\
o access your downloaded
phonebook (up to 1,000 entries) instead of using the “Vehicle Phonebook” key.
Page 26 of 40
24
MAkinG A PHO ne cALL
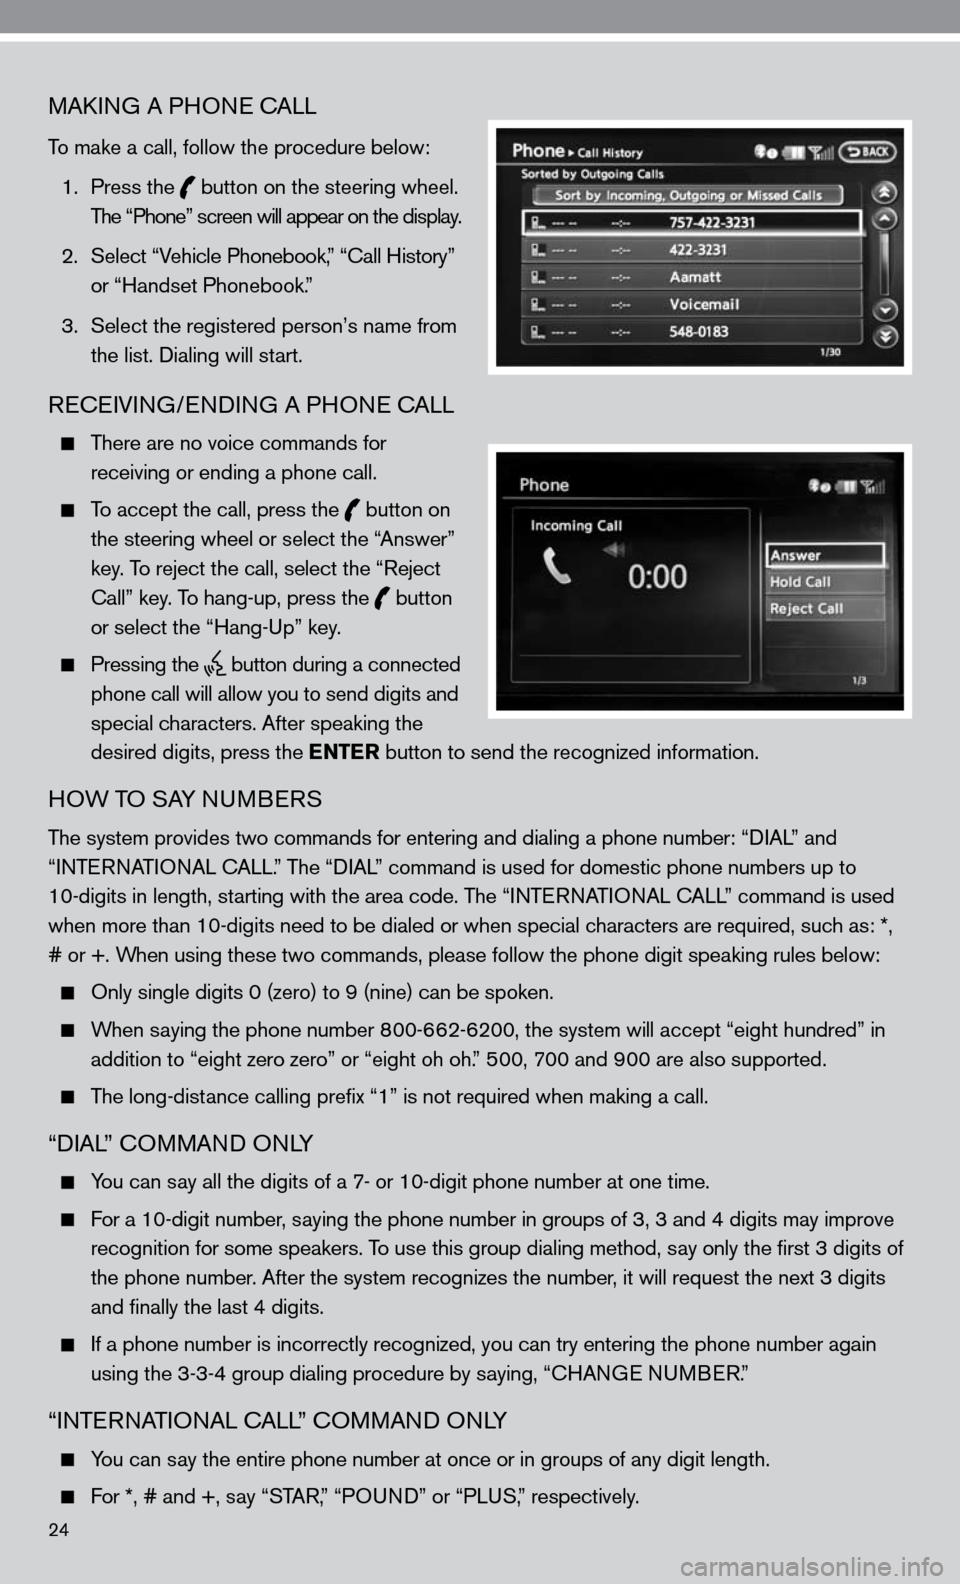
To make a call, follow the procedure below:
1. Press the
button on the steering wheel.
The “Phone” screen will appear on the display.
2. Select “Vehicle Phonebook,” “ call History”
or “Handset Phonebook.”
3. Select the registered person’s name from
the list. dialing will start.
ReceiVin G/endin G A PHO ne cALL
There are no voice commands for
receiving or ending a phone call.
To accept the call, press the
button on
the steering wheel or select the “Answer”
key. To reject the call, select the “Reject
call” key. To hang-up, press the
button
or select the “Hang-up” key.
Pressing the
button during a connected
phone call will allow you to send digits and
special characters. After speaking the
desired digits, press the ENTER button to send the recognized information.
HOW TO SAY nu MBeRS
The system provides two commands for entering and dialing a phone number: “ diAL” and
“inTe RnATi OnAL c ALL.” The “diAL” command is used for domestic phone numbers up to
10-digits in length, starting with the area code. The “inTe RnATi OnAL c ALL” command is used
when more than 10-digits need to be dialed or when special characters are required, such as: *,
# or +. When using these two commands, please follow the phone digit speaking rul\
es below:
Only single digits 0 (zero) to 9 (nine) can be spoken.
When saying the phone number 800-662-6200, the system will accept “eight hundred” in
addition to “eight zero zero” or “eight oh oh.” 500, 700 and 900 are also supported.
The long-distance calling prefix “1” is not required when making a call.
“diAL” c OMMAnd O nLY
You can say all the digits of a 7- or 10-digit phone number at one time.
f or a 10-digit number, saying the phone number in groups of 3, 3 and 4 digits may improve
recognition for some speakers. To use this group dialing method, say only the first 3 digits of
the phone number. After the system recognizes the number, it will request the next 3 digits
and finally the last 4 digits.
i f a phone number is incorrectly recognized, you can try entering the phone number again
using the 3-3-4 group dialing procedure by saying, “c HAnGe nu MBeR.”
“inTe RnATi OnAL c ALL” c OMMAnd O nLY
You can say the entire phone number at once or in groups of any digit length.
f or *, # and +, say “STAR, ” “POund” or “PLuS,” respectively.
Page 28 of 40
26
Saying “Help” will display the user Guide explained later in this guide. continue listening to the
prompts and respond after the tone until the desired operation is completed. Remember to wait for the
tone before speaking. for proper recognition of phone numbers and street names, please review the
operating tips below. The commands shown in the menus above are available in Standard Mode. To
access an expanded list of commands, please see “Alternate command Mode” in this guide.
SYSTe M OPeRATin G TiPS
Before Starting
To get the best possible performance out of the Voice Recognition system, observe the following:
The interior of the vehicle should be as quiet as possible. close the windows to minimize the
surrounding noises.
Wait until the tone sounds before speaking a command.
Speak in a natural conversational voice with minimal pauses between words.
if you want to repeat a step or if the system incorrectly recognizes your command, push the
switch on the steering wheel or select the “ BA
ck” key on the display.
if the system does not recognize your command, please repeat the command \
again.
However, avoid raising the volume of your voice or slowing down your speech unless
the system prompts you to do so. Speaking too slowly reduces recognition\
accuracy.
To give commands quickly, press the
switch to interrupt the voice guidance.
How to speak phone numbers
The system provides two commands for entering and dialing a phone number: “ diAL” and
“inTe RnATi OnAL c ALL.” The “diAL” command is used for domestic phone numbers up to
10 digits in length starting with the area code. The “ inTe R nAT iO nAL cALL” command is used
when more than 10 digits need to be dialed or when special characters are required such as *, #,
or +. When using these two commands, please follow the phone digit speaking rul\
es below:
Only single digits 0 (zero) to 9 (nine) can be spoken.
Speak digits at a normal pace. Speaking too slowly reduces recognition a\
ccuracy.
When saying the phone number 800-662-6200, the system will accept “eight zero zero” or
“eight oh oh.” 500, 700 and 900 are also supported.
The long-distance dialing prefix “1” is not required when making a call.
“diAL” c OMMAnd O nLY
You can say all the digits of a 7- or 10-digit phone number at one time.
for a 10-digit number, saying the phone number in groups of 3, 3 and 4 digits may improve
recognition for some speakers. To use this group dialing method, say only the first 3 digits of
the phone number. After the system recognizes the 3 three digits, it will request the next 3
digits and finally the last 4 digits.
if a phone number is incorrectly recognized, you can try entering the pho\
ne number again
using the 3-3-4 group dialing procedure by saying, “c HAnGe nu MBeR.”
“inTe RnATi OnAL c ALL” c OMMAnd O nLY
You can say the entire phone number at once or in groups of any digit length.
for *, # and +, say “STAR,” “PO und” or “PLuS,” respectively.
Page 29 of 40
27
VOice c OMMAnd u SAGe
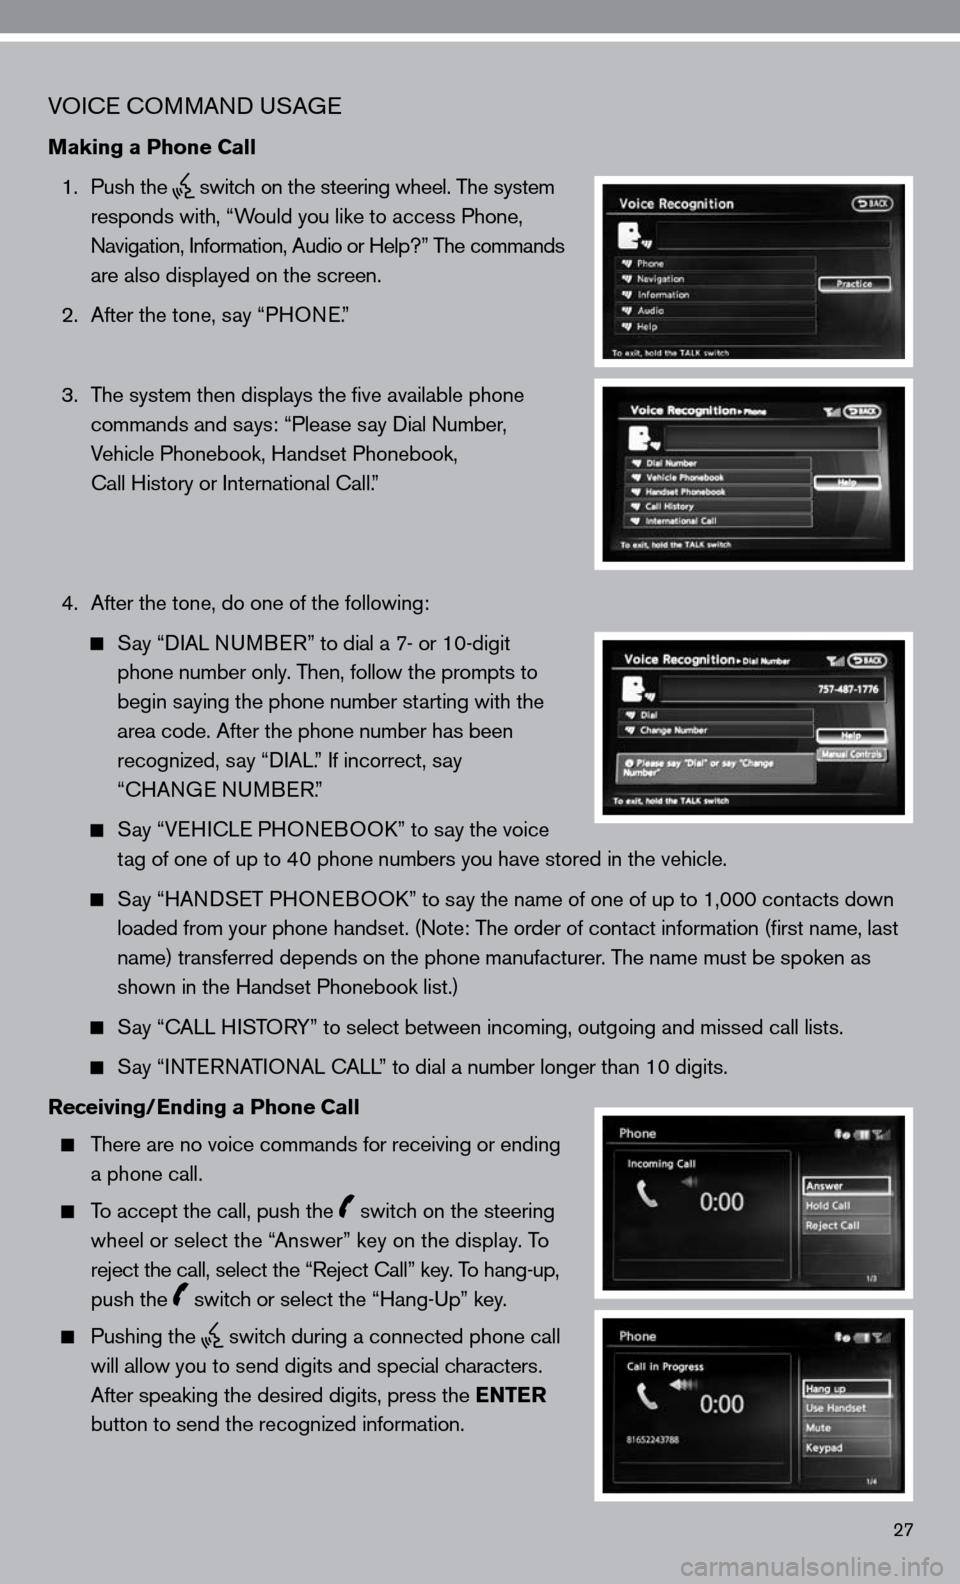
Making a Phone Call
1. Push the
switch on the steering wheel. The system
responds with, “Would you like to access Phone,
n avigation, information, Audio or Help?” The commands
are also displayed on the screen.
2. After the tone, say “PHO ne.”
3. The system then displays the five available phone
commands and says: “Please say dial number,
Vehicle Phonebook, Handset Phonebook,
call History or international call.”
4. After the tone, do one of the following:
Say “ diAL nu MB eR” to dial a 7- or 10-digit
phone number only. Then, follow the prompts to
begin saying the phone number starting with the
area code. After the phone number has been
recognized, say “ diAL.” if incorrect, say
“cHAn Ge nu MBeR.”
Say “V eH ic Le PHO neBOO k” to say the voice
tag of one of up to 40 phone numbers you have stored in the vehicle.
Say “HAnd SeT PHO neBOO k” to say the name of one of up to 1,000 contacts down
loaded from your phone handset. ( note: The order of contact information (first name, last
name) transferred depends on the phone manufacturer. The name must be spoken as
shown in the Handset Phonebook list.)
Say “c ALL HiSTORY” to select between incoming, outgoing and missed call lists.
Say “inTe RnATi OnAL c ALL” to dial a number longer than 10 digits.
Receiving/Ending a Phone Call
There are no voice commands for receiving or ending
a phone call.
To accept the call, push the switch on the steering
wheel or select the “Answer” key on the display. To
reject the call, select the “Reject call” key. To hang-up,
push the
switch or select the “Hang-up” key.
Pushing the
switch during a connected phone call
will allow you to send digits and special characters.
After speaking the desired digits, press the ENTER
button to send the recognized information.
Page 33 of 40
31
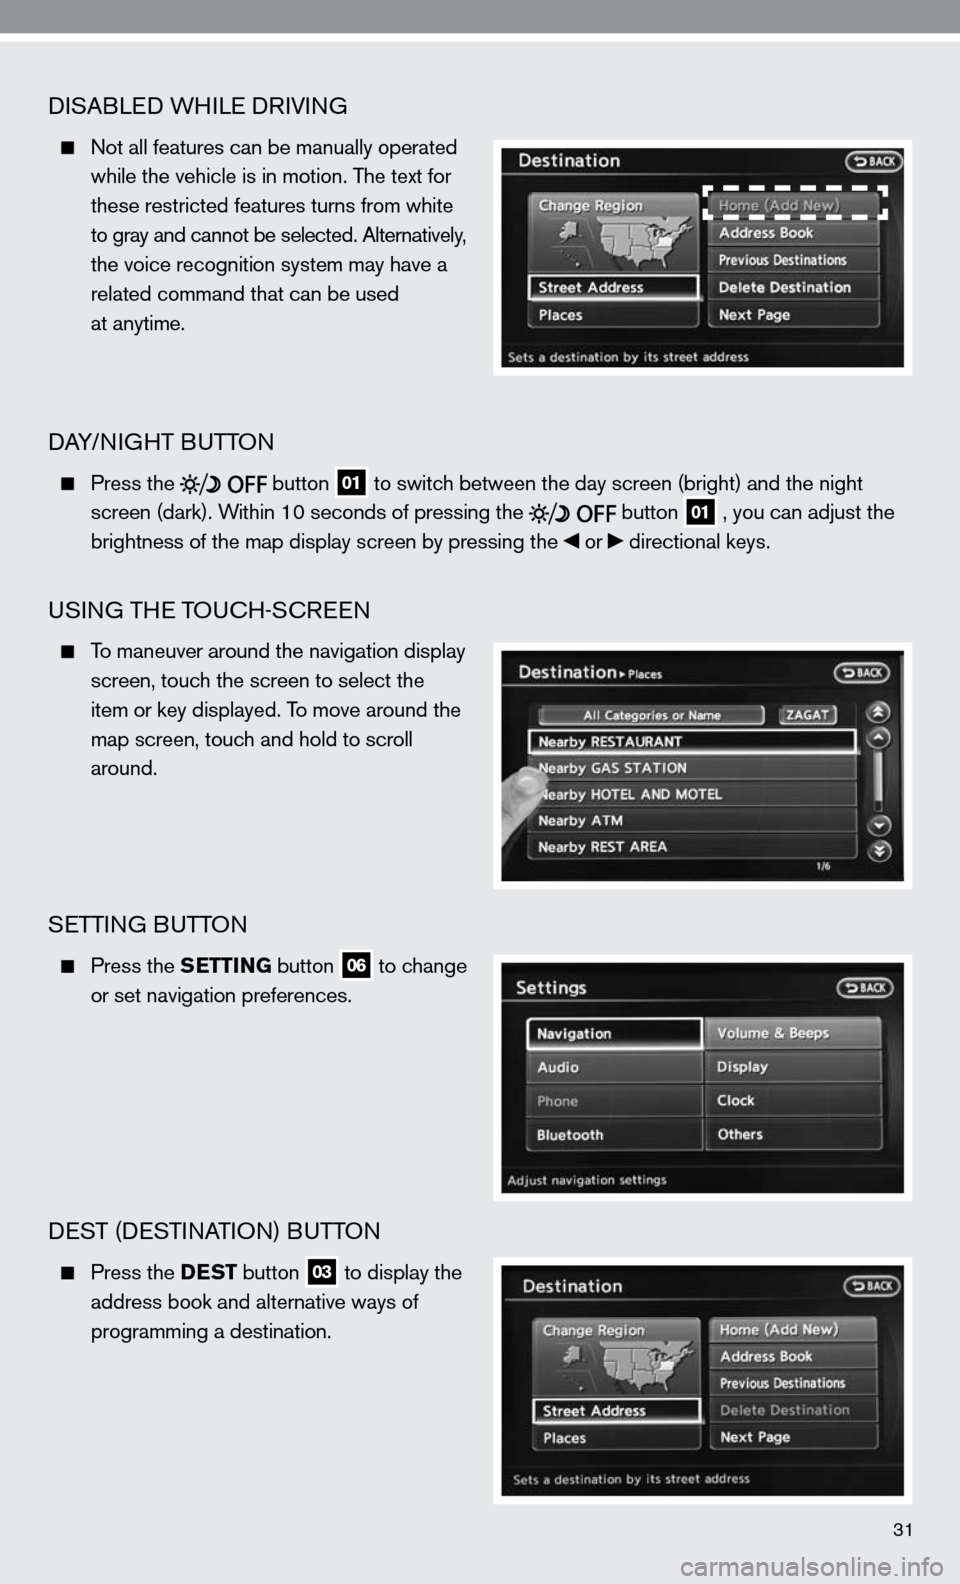
diSABLed WH iLe d RiVin G
not all features can be manually operated
while the vehicle is in motion. The text for
these restricted features turns from white
to gray and cannot be selected. Alternatively,
the voice recognition system may have a
related command that can be used
at anytime.
dAY/ niGHT B uTTOn
Press the
button 01 to switch between the day screen (bright) and the night
screen (dark). Within 10 seconds of pressing the
button 01 , you can adjust the
brightness of the map display screen by pressing the or directional keys.
uSinG TH e TOucH-ScR een
To maneuver around the navigation display
screen, touch the screen to select the
item or key displayed. To move around the
map screen, touch and hold to scroll
around.
SeTTin G BuTTO n
Press the SETTING button 06 to change
or set navigation preferences.
deST (de STinATi On) B uTTO n
Press the DEST button 03 to display the
address book and alternative ways of
programming a destination.
Page 34 of 40
32
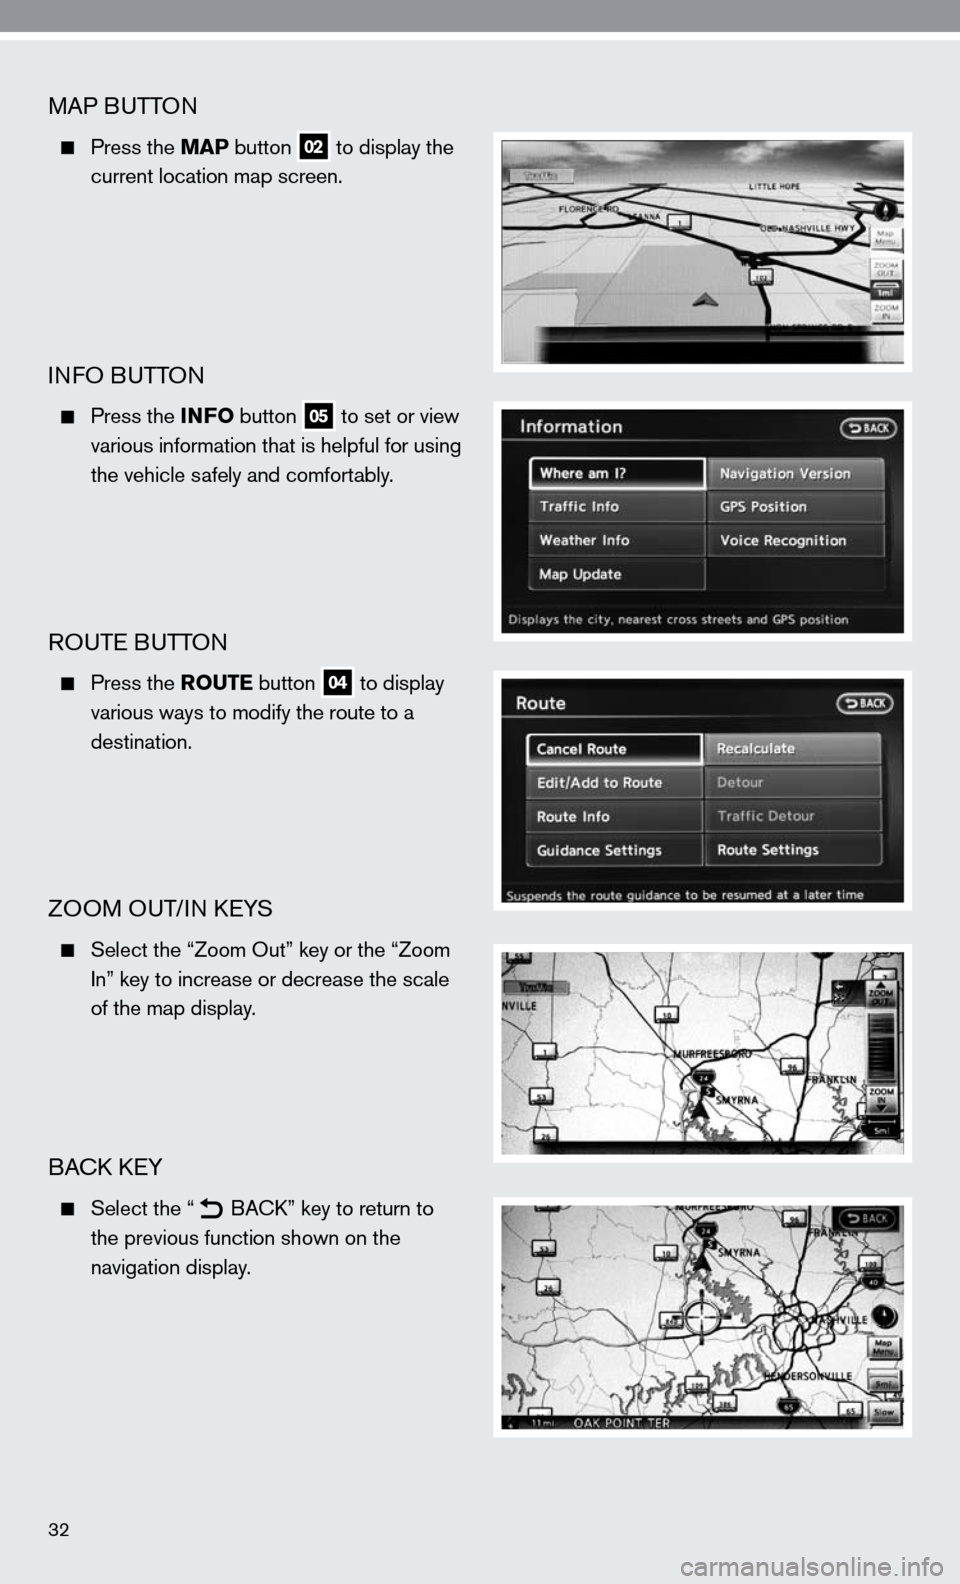
MAP BuTTOn
Press the MAP button 02 to display the
current location map screen.
infO B uTTOn
Press the INFO button 05 to set or view
various information that is helpful for using
the vehicle safely and comfortably.
ROuTe B uTTOn
Press the ROUTE button 04 to display
various ways to modify the route to a
destination.
ZOOM O uT/in keYS
Select the “Zoom Out” key or the “Zoom
i n” key to increase or decrease the scale
of the map display.
BAck keY
Select the “
B
Ack ” key to return to
the previous function shown on the
navigation display.
Page 35 of 40
33
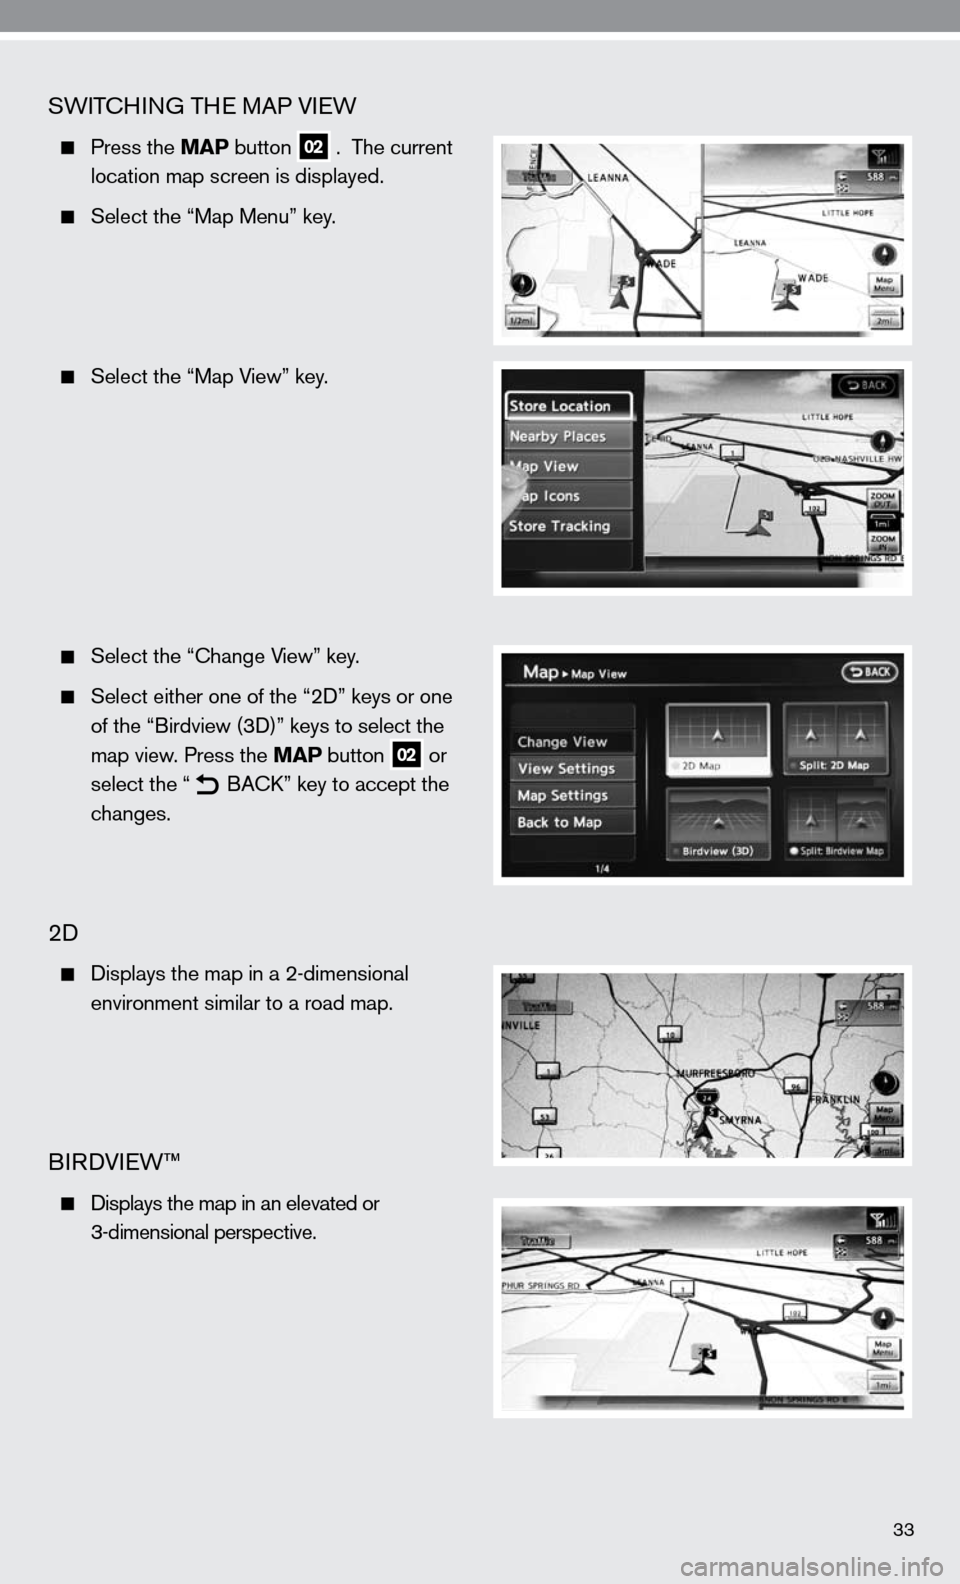
SWiTc Hin G TH e MAP VieW
Press the MAP button 02 . The current
location map screen is displayed.
Select the “Map Menu” key.
Select the “Map View” key.
Select the “ change View” key.
Select either one of the “2 d” keys or one
of the “Birdview (3 d)” keys to select the
map view. Press the MAP button
02 or
select the “
B
Ack ” key to accept the
changes.
2d
displays the map in a 2-dimensional
environment similar to a road map.
BiRd Vie W™
d isplays the map in an elevated or
3-dimensional perspective.