2010 NISSAN 370Z COUPE light
[x] Cancel search: lightPage 178 of 409
Black plate (178,1)
Model "Z34-D" EDITED: 2009/ 9/ 10
SAA0480
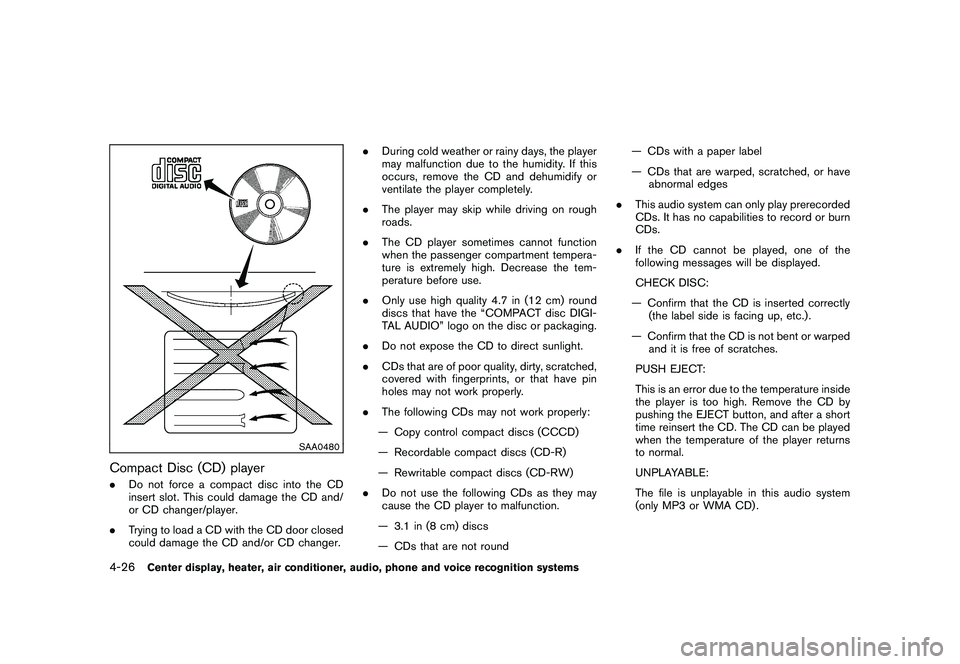
Compact Disc (CD) player.Do not force a compact disc into the CD
insert slot. This could damage the CD and/
or CD changer/player.
. Trying to load a CD with the CD door closed
could damage the CD and/or CD changer. .
During cold weather or rainy days, the player
may malfunction due to the humidity. If this
occurs, remove the CD and dehumidify or
ventilate the player completely.
. The player may skip while driving on rough
roads.
. The CD player sometimes cannot function
when the passenger compartment tempera-
ture is extremely high. Decrease the tem-
perature before use.
. Only use high quality 4.7 in (12 cm) round
discs that have the “COMPACT disc DIGI-
TAL AUDIO” logo on the disc or packaging.
. Do not expose the CD to direct sunlight.
. CDs that are of poor quality, dirty, scratched,
covered with fingerprints, or that have pin
holes may not work properly.
. The following CDs may not work properly:
— Copy control compact discs (CCCD)
— Recordable compact discs (CD-R)
— Rewritable compact discs (CD-RW)
. Do not use the following CDs as they may
cause the CD player to malfunction.
— 3.1 in (8 cm) discs
— CDs that are not round — CDs with a paper label
— CDs that are warped, scratched, or have
abnormal edges
. This audio system can only play prerecorded
CDs. It has no capabilities to record or burn
CDs.
. If the CD cannot be played, one of the
following messages will be displayed.
CHECK DISC:
— Confirm that the CD is inserted correctly (the label side is facing up, etc.) .
— Confirm that the CD is not bent or warped and it is free of scratches.
PUSH EJECT:
This is an error due to the temperature inside
the player is too high. Remove the CD by
pushing the EJECT button, and after a short
time reinsert the CD. The CD can be played
when the temperature of the player returns
to normal.
UNPLAYABLE:
The file is unplayable in this audio system
(only MP3 or WMA CD) .4-26
Center display, heater, air conditioner, audio, phone and voice recognition systems
Page 179 of 409

Black plate (179,1)
Model "Z34-D" EDITED: 2009/ 9/ 10
LHA0484
DVD (Digital Versatile Disc) player
(models with navigation system).Do not force a compact disc into the CD/
DVD insert slot. This could damage the CD/
DVD player.
. During cold weather or rainy days, the player may malfunction due to humidity. If this
occurs, remove the CD/DVD and dehumidify
or ventilate the player completely.
. The player may skip while driving on rough
roads.
. The CD/DVD player sometimes cannot
function when the passenger compartment
temperature is extremely high. Decrease the
temperature before use.
. Only use high quality 4.7 in (12 cm) round
discs that have the “COMPACT disc DIGI-
TAL AUDIO” or “DVD Video” logo on the
disc or packaging.
. Do not expose the CD/DVD to direct
sunlight.
. CD/DVDs that are of poor quality, dirty,
scratched, covered with fingerprints, or that
have pinholes may not work properly.
. The following CD/DVDs are not guaranteed
to play:
— Copy control compact discs (CCCD)
— Recordable compact discs (CD-R)
— Rewritable compact discs (CD-RW)
— Recordable DVDs (DVD +R, DVD +R
DL)
— Rewritable DVDs (DVD +RW, DVD +RW DL)
. Do not use the following CD/DVDs as they
may cause the CD/DVD player to malfunc-
tion.
— 3.1 in (8 cm) discs
— CD/DVDs that are not round
— CD/DVDs with a paper label
— CD/DVDs that are warped, scratched or have abnormal edges
— This audio system can only play prere- corded CD/DVDs. It has no capabilities
to record or burn CD/DVDs.
. If the CD/DVD cannot be played, one of the
following messages will be displayed.
Disc Read Error:
— Confirm that the CD/DVD is inserted correctly (the label side is facing up, etc.) .
— Confirm that the CD/DVD is not bent or warped and it is free of scratches.
Please Eject Disc:
— This may be an error due to the tempera- ture inside the player being too high.
Remove the CD/DVD by pushing the
EJECT button, and after a short time
reinsert the CD/DVD. The CD/DVD can
Center display, heater, air conditioner, audio, phone and voice recognition systems
4-27
Page 223 of 409
Black plate (223,1)
Model "Z34-D" EDITED: 2009/ 9/ 10
alcohol intended for industrial use.
. A new disc may be rough on the inner and
outer edges. Remove the rough edges by
rubbing the inner and outer edges with the
side of a pen or pencil as illustrated.
USB memory.Never touch the terminal portion of the USB
memory.
. Do not place heavy objects on the USB
memory.
. Do not store the USB memory in highly
humid locations.
. Do not expose the USB memory to direct
sunlight.
. Do not spill any liquids on the USB memory.
Refer to the USB memory Owner’s Manual for
the details.
SAA2555
With navigation system
SAA2556
Without navigation system
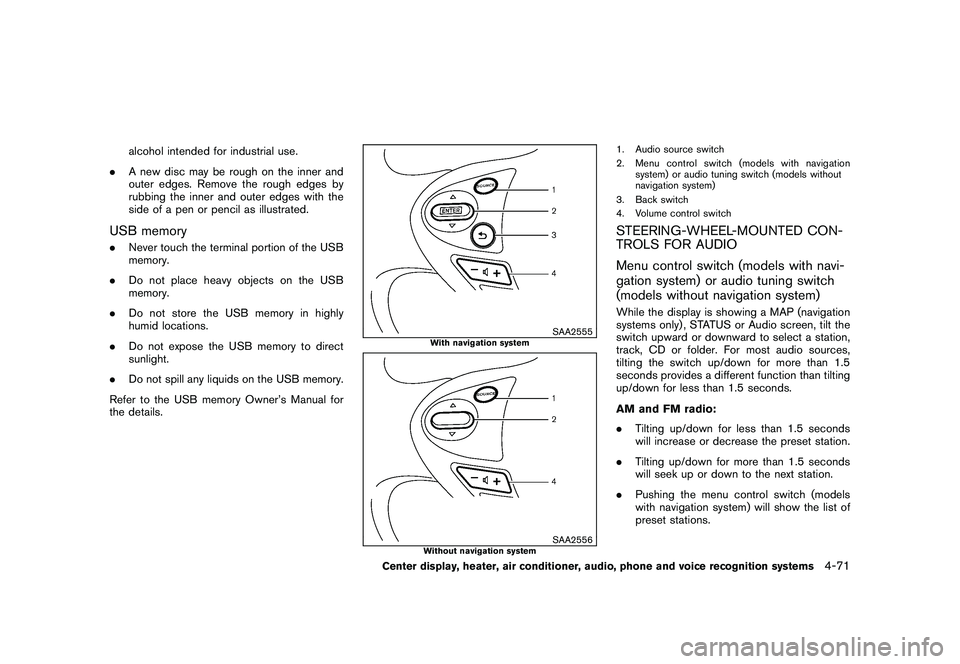
1. Audio source switch
2. Menu control switch (models with navigation system) or audio tuning switch (models without
navigation system)
3. Back switch
4. Volume control switchSTEERING-WHEEL-MOUNTED CON-
TROLS FOR AUDIO
Menu control switch (models with navi-
gation system) or audio tuning switch
(models without navigation system)While the display is showing a MAP (navigation
systems only) , STATUS or Audio screen, tilt the
switch upward or downward to select a station,
track, CD or folder. For most audio sources,
tilting the switch up/down for more than 1.5
seconds provides a different function than tilting
up/down for less than 1.5 seconds.
AM and FM radio:
. Tilting up/down for less than 1.5 seconds
will increase or decrease the preset station.
. Tilting up/down for more than 1.5 seconds
will seek up or down to the next station.
. Pushing the menu control switch (models
with navigation system) will show the list of
preset stations.
Center display, heater, air conditioner, audio, phone and voice recognition systems
4-71
Page 225 of 409

Black plate (225,1)
Model "Z34-D" EDITED: 2009/ 9/ 10
.Models without navigation system
AM ?FM ?CD ?AUX ?SAT*
*: if so equippedANTENNA
Window antenna (for Coupe models)The antenna pattern is printed inside the rear
window.
CAUTION
. Do not place metalized film near the
rear window glass or attach any
metal parts to it. This may cause
poor reception or noise.
. When cleaning the inside of the rear
window, be careful not to scratch or
damage the rear window antenna.
Lightly wipe along the antenna with
a dampened soft cloth.
SAA2374
Trunk mounted antenna (for Roadster
models)Removing the antenna:
You can remove the antenna if necessary.
Hold the bottom of the antenna and remove by
turning counterclockwise.
CAUTION
.To avoid damaging or deforming the
antenna,besuretoremovethe
antenna under the following condi-
tions. — The vehicle enters an automatic
car wash.
— The vehicle enters a garage with a low ceiling.
— The vehicle is covered with a car cover.
. Always properly tighten the antenna
rod during installation. Otherwise,
the antenna rod may break during
vehicle operation.Center display, heater, air conditioner, audio, phone and voice recognition systems
4-73
Page 263 of 409
Black plate (263,1)
Model "Z34-D" EDITED: 2009/ 9/ 10
SAA2529
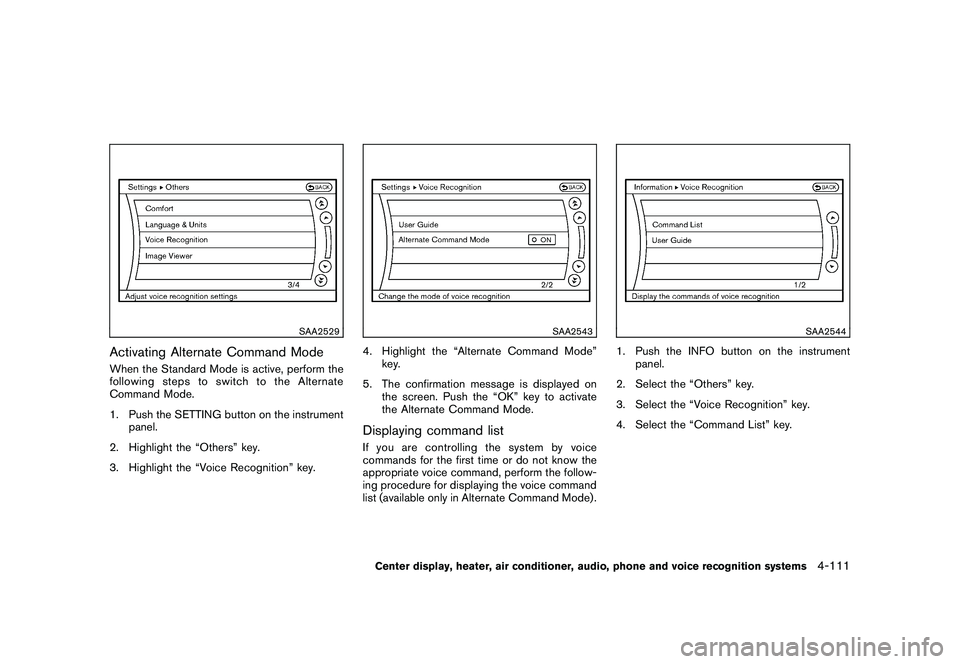
Activating Alternate Command ModeWhen the Standard Mode is active, perform the
following steps to switch to the Alternate
Command Mode.
1. Push the SETTING button on the instrumentpanel.
2. Highlight the “Others” key.
3. Highlight the “Voice Recognition” key.
SAA2543
4. Highlight the “Alternate Command Mode” key.
5. The confirmation message is displayed on the screen. Push the “OK” key to activate
the Alternate Command Mode.Displaying command listIf you are controlling the system by voice
commands for the first time or do not know the
appropriate voice command, perform the follow-
ing procedure for displaying the voice command
list (available only in Alternate Command Mode) .
SAA2544
1. Push the INFO button on the instrumentpanel.
2. Select the “Others” key.
3. Select the “Voice Recognition” key.
4. Select the “Command List” key.
Center display, heater, air conditioner, audio, phone and voice recognition systems
4-111
Page 268 of 409
Black plate (268,1)
Model "Z34-D" EDITED: 2009/ 9/ 10
SAA2547
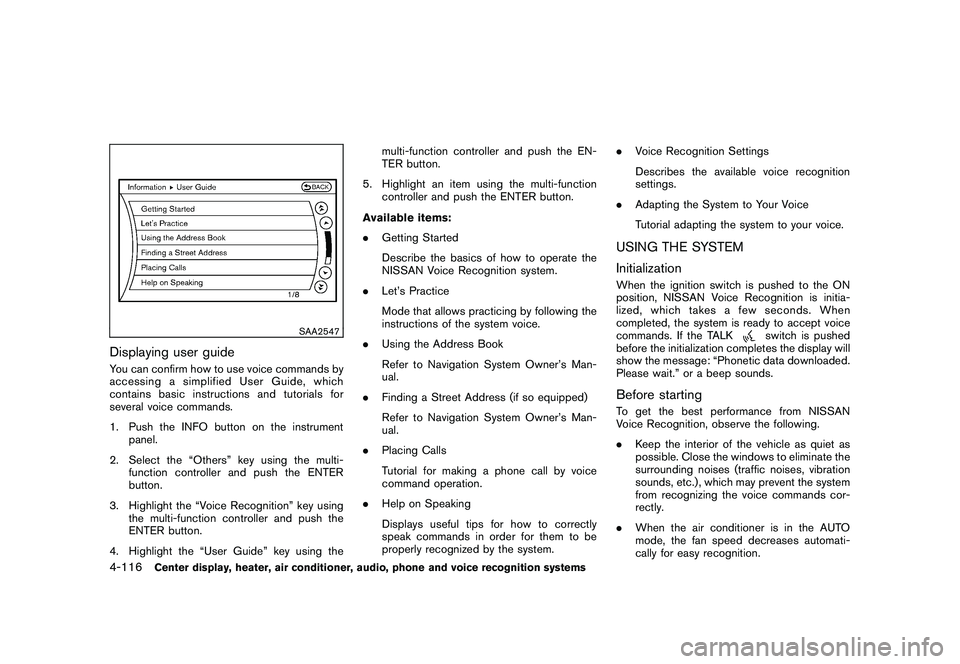
Displaying user guideYou can confirm how to use voice commands by
accessing a simplified User Guide, which
contains basic instructions and tutorials for
several voice commands.
1. Push the INFO button on the instrumentpanel.
2. Select the “Others” key using the multi- function controller and push the ENTER
button.
3. Highlight the “Voice Recognition” key using the multi-function controller and push the
ENTER button.
4. Highlight the “User Guide” key using the multi-function controller and push the EN-
TER button.
5. Highlight an item using the multi-function controller and push the ENTER button.
Available items:
. Getting Started
Describe the basics of how to operate the
NISSAN Voice Recognition system.
. Let’s Practice
Mode that allows practicing by following the
instructions of the system voice.
. Using the Address Book
Refer to Navigation System Owner’s Man-
ual.
. Finding a Street Address (if so equipped)
Refer to Navigation System Owner’s Man-
ual.
. Placing Calls
Tutorial for making a phone call by voice
command operation.
. Help on Speaking
Displays useful tips for how to correctly
speak commands in order for them to be
properly recognized by the system. .
Voice Recognition Settings
Describes the available voice recognition
settings.
. Adapting the System to Your Voice
Tutorial adapting the system to your voice.
USING THE SYSTEM
InitializationWhen the ignition switch is pushed to the ON
position, NISSAN Voice Recognition is initia-
lized, which takes a few seconds. When
completed, the system is ready to accept voice
commands. If the TALK
switch is pushed
before the initialization completes the display will
show the message: “Phonetic data downloaded.
Please wait.” or a beep sounds.
Before startingTo get the best performance from NISSAN
Voice Recognition, observe the following.
. Keep the interior of the vehicle as quiet as
possible. Close the windows to eliminate the
surrounding noises (traffic noises, vibration
sounds, etc.) , which may prevent the system
from recognizing the voice commands cor-
rectly.
. When the air conditioner is in the AUTO
mode, the fan speed decreases automati-
cally for easy recognition.
4-116
Center display, heater, air conditioner, audio, phone and voice recognition systems
Page 278 of 409
Black plate (278,1)
Model "Z34-D" EDITED: 2009/ 9/ 10
your vehicle to ensure that the replacement or
alternate tires and wheels allow the TPMS to
continue to function properly.Additional information.The TPMS does not monitor the tire
pressure of the spare tire.
. The TPMS will activate only when the
vehicle is driven at speeds above 16 MPH
(25 km/h) . Also, this system may not detect
a sudden drop in tire pressure (for example a
flat tire while driving) .
. The low tire pressure warning light does not
automatically turn off when the tire pressure
is adjusted. After the tire is inflated to the
recommended pressure, the vehicle must be
driven at speeds above 16 MPH (25 km/h)
to activate the TPMS and turn off the low tire
pressure warning light. Use a tire pressure
gauge to check the tire pressure.
. Tire pressure rises and falls depending on
the heat caused by the vehicle’s operation
and the outside temperature. Low outside
temperature can lower the temperature of
the air inside the tire which can cause a
lower tire inflation pressure. This may cause
the low tire pressure warning light to
illuminate. If the warning light illuminates in
low ambient temperature, check the tire
pressure for all four tires. For additional information, see “Low tire pres-
sure warning light” in the “2. Instruments and
controls” section and “TIRE PRESSURE MON-
ITORING SYSTEM (TPMS)” in the “6. In case of
emergency” section.
WARNING
.
If the low tire pressure warning light
illuminates while driving, avoid sud-
den steering maneuvers or abrupt
braking, reduce vehicle speed, pull
off the road to a safe location and
stop the vehicle as soon as possi-
ble. Driving with under-inflated tires
may permanently damage the tires
and increase the likelihood of tire
failure. Serious vehicle damage
could occur and may lead to an
accident and could result in serious
personal injury. Check the tire pres-
sure for all four tires. Adjust the tire
pressure to the recommended COLD
tire pressure shown on the Tire and
Loading Information label to turn
the low tire pressure warning light
OFF. If the light still illuminates
while driving after adjusting the tire
pressure, a tire may be flat. If you
have a flat tire, replace it with a spare tire as soon as possible. (See
“FLAT TIRE” in the “6. In case of
emergency” section for changing a
flat tire.)
. When a spare tire is mounted or a
wheel is replaced, the TPMS will not
function and the low tire pressure
warning light will flash for approxi-
mately 1 minute. The light will
remain on after 1 minute. Contact
your NISSAN dealer as soon as
possible for tire replacement and/
or system resetting.
. Replacing tires with those not ori-
ginally specified by NISSAN could
affect the proper operation of the
TPMS.
. Do not inject any tire liquid or
aerosol tire sealant into the tires,
as this may cause a malfunction of
the tire pressure sensors (for mod-
els not equipped with the emer-
gency tire puncture repair kit) .
. If you used the Emergency Tire
Sealant to repair a minor tire punc-
ture, your NISSAN dealer will also
need to replace the TPMS sensor in
addition to repairing or replacing
5-4
Starting and driving
Page 279 of 409
Black plate (279,1)
Model "Z34-D" EDITED: 2009/ 9/ 10
the tire (for models equipped with
the emergency tire puncture repair
kit) .
. NISSAN recommends using only
NISSAN Genuine Emergency Tire
Sealant provided with your vehicle.
Other tire sealants may damage the
valve stem seal which can cause the
tire to lose air pressure (for models
equipped with the emergency tire
puncture repair kit) .
CAUTION
.The TPMS may not function properly
when the wheels are equipped with
tire chains or the wheels are buried
in snow.
. Do not place metalized film or any
metal parts (antenna, etc.) on the
windows. This may cause poor re-
ception of the signals from the tire
pressure sensors, and the TPMS will
not function properly.
Some devices and transmitters may temporarily
interfere with the operation of the TPMS and
cause the low tire pressure warning light to
illuminate. Some examples are: — Facilities or electric devices using similar
radio frequencies are near the vehicle.
— If a transmitter set to similar frequencies is being used in or near the vehicle.
— If a computer (or similar equipment) or a DC/ AC converter is being used in or near the
vehicle.
FCC Notice:
Changes or modifications not expressly
approved by the party responsible for
compliance could void the user’s authority
to operate the equipment.
This device complies with Part 15 of the
FCC Rules and RSS-210 of Industry Cana-
da.
Operation is subject to the following two
conditions: (1) This device may not cause
harmful interference, and (2) this device
must accept any interference received,
including interference that may cause un-
desired operation of the device.
AVOIDING COLLISION AND ROLL-
OVER
WARNING
Failure to operate this vehicle in a safe
and prudent manner may result in loss
of control or an accident.
Be alert and drive defensively at all times. Obey
all traffic regulations. Avoid excessive speed,
high speed cornering, or sudden steering
maneuvers, because these driving practices
could cause you to lose control of your vehicle.
As with any vehicle, a loss of control could
result in a collision with other vehicles or
objects, or cause the vehicle to rollover,
particularly if the loss of control causes the
vehicle to slide sideways. Be attentive at all
times, and avoid driving when tired. Never drive
when under the influence of alcohol or drugs
(including prescription or over-the-counter
drugs which may cause drowsiness) . Always
wear your seat belt as outlined in the “SEAT
BELTS” in the “1. Safety — Seats, seat belts and
supplemental restraint system” section of this
manual, and also instruct your passengers to do
so.
Seat belts help reduce the risk of injury in
collisions and rollovers. In a rollover crash, an
unbelted or improperly belted person is
Starting and driving
5-5