Page 405 of 514

6-6 For emergencies
6
5. If you do not see steam or spray coming from under the
hood, leave the engine on until the temperature indicator
on the instrument panel moves below the red zone. When
it is in the middle of the normal zone, you can start driving
again. If the indicator stays in the red zone, turn off the
engine.6. When you do not see any more steam or spray, open the
hood. Look for obvious leaks, such as a split radiator
hose. Be careful as components will be hot. Any leak
source must be repaired.
7. If there is no obvious leak source, check the coolant level
in the reserve tank. If there is none, or if it is too low,
slowly add coolant.
8. If the reserve tank needs coolant, you will probably also
need to add coolant to the radiator. Do not loosen or
remove the radiator cap until the engine has cooled down.
WA R N I N G
!�Before raising the engine hood, check to see if there
is steam or spray coming from under the hood.
Steam or spray coming from an overheated engine
could seriously scald you.
Do not open the hood until there is no steam or
spray.
WA R N I N G
!�Removing the radiator cap could scald you with
escaping hot water or steam. When checking the
radiator level, cover the cap with a cloth before try-
ing to remove it. Turn it slowly counterclockwise,
without pressing down, to the first notch. The pres-
sure in the system will then be let out. When the
pressure is COMPLETELY LET OUT, press down
and keep turning the cap counterclockwise until it
will come off.
BK0102600US.book 6 ページ 2009年3月30日 月曜日 午後2時2分
Page 413 of 514

The compact spare tire is designed to save space in the luggage
compartment. Its lighter weight makes it easier to use if a flat
tire occurs")
6-14 For emergencies
6
Compact spare tire
(if so equipped)
The compact spare tire is designed to save space in the luggage
compartment. Its lighter weight makes it easier to use if a flat
tire occurs.
To remove the spare tire
N00849700143
1. Lift up the luggage floor board.
2. To remove the spare tire, remove the installation clamp
(A) by turning it counterclockwise.
CAUTION
!�You can use the same wheel nuts on the compact
spare tire wheel.�Do not go over 50 mph (80 km/h) when driving with
the compact spare tire.�Avoid fast starting and braking when driving with
the compact spare tire. �Do not drive through automatic car washes and over
obstacles that could possibly damage the underside
of your vehicle. Because the compact spare tire is
smaller than the original tire, there is less clearance
between the ground and your vehicle. �Because the compact spare tire is designed only for
your vehicle, do not use it on any other vehicle. �Do not put the compact spare tire on a different
wheel, and do not put standard tires, snow tires,
wheel covers or trim rings on the compact spare
wheel. Otherwise, you could damage these parts or
other parts on your vehicle.
BK0102600US.book 14 ページ 2009年3月30日 月曜日 午後2時2分
Page 419 of 514
6-20 For emergencies
6
8. Lower the vehicle slowly by rotating the wheel nut
wrench counterclockwise until the tire touches the
ground.9. Tighten the nuts in the order shown in the illustration until
each nut has been tightened to the torque listed here.
88 to 108 N•m (65 to 80 ft-lb)
10. Lower the jack all the way and remove it.
CAUTION
!�Never use your foot or a pipe extension to apply
added force to the wheel nut wrench when tighten-
ing the wheel nuts. If you do so, you can over-tighten
the wheel nuts and damage the wheel, wheel nuts
and hub bolts.
BK0102600US.book 20 ページ 2009年3月30日 月曜日 午後2時2分
Page 421 of 514
6-22 For emergencies
6
To install the flat tire or spare tire
N00849900057
Tighten the clamp (A) firmly with your fingers by turning it
clockwise until the tire cannot move.
To store the jack, bar and wheel nut wrench
N00850000029
Reverse the removing procedure when storing the jack, bar and
wheel nut wrench.
Refer to “Tools and jack” on page 6-7.
BK0102600US.book 22 ページ 2009年3月30日 月曜日 午後2時2分
Page 474 of 514
Vehicle care and maintenance
7-47
7
2. Remove the locking cap (B) by turning it counterclock-
wise.3. Remove the headlight bulb (C) with holder.
4. To install the bulb, perform the removal steps in reverse.
BK0102600US.book 47 ページ 2009年3月30日 月曜日 午後2時2分
Page 475 of 514

7-48 Vehicle care and maintenance
7
Adjustment of headlight aim
N00943200121
The alignment of the headlights should be checked by an
authorized Mitsubishi Motors dealer or a repair facility of your
choice.Parking and front side-marker and front turn
signal lights
N00917300349
1. Turn the bulb socket counterclockwise to remove it. And
remove the bulb from the socket by turning it counter-
clockwise while pressing in.
2. To install the bulb, perform the removal steps in reverse.
CAUTION
!�Handle halogen light bulb with care. The gas inside
a halogen light bulb is highly pressurized, so drop-
ping, knocking, or scratching a halogen light bulb
can cause it to shatter.�Never hold the halogen light bulb with a bare hand,
dirty glove, etc. The oil from your hand could cause
the bulb to break the next time the headlights are
used.
If the glass surface is dirty, clean it with alcohol and
let it dry completely before installing the bulb.
BK0102600US.book 48 ページ 2009年3月30日 月曜日 午後2時2分
Page 476 of 514
Vehicle care and maintenance
7-49
7
Front fog lights
(if so equipped)
N00943600398
To r e m o v e1. Remove the six clips (A) by turning them counterclock-
wise or prying them, and remove the screw (B) by turning
it counterclockwise, then remove the cover (C).2. Depress the tab (D) on the harness connector and pull the
harness connector to downward to remove it.
BK0102600US.book 49 ページ 2009年3月30日 月曜日 午後2時2分
Page 477 of 514
7-50 Vehicle care and maintenance
7
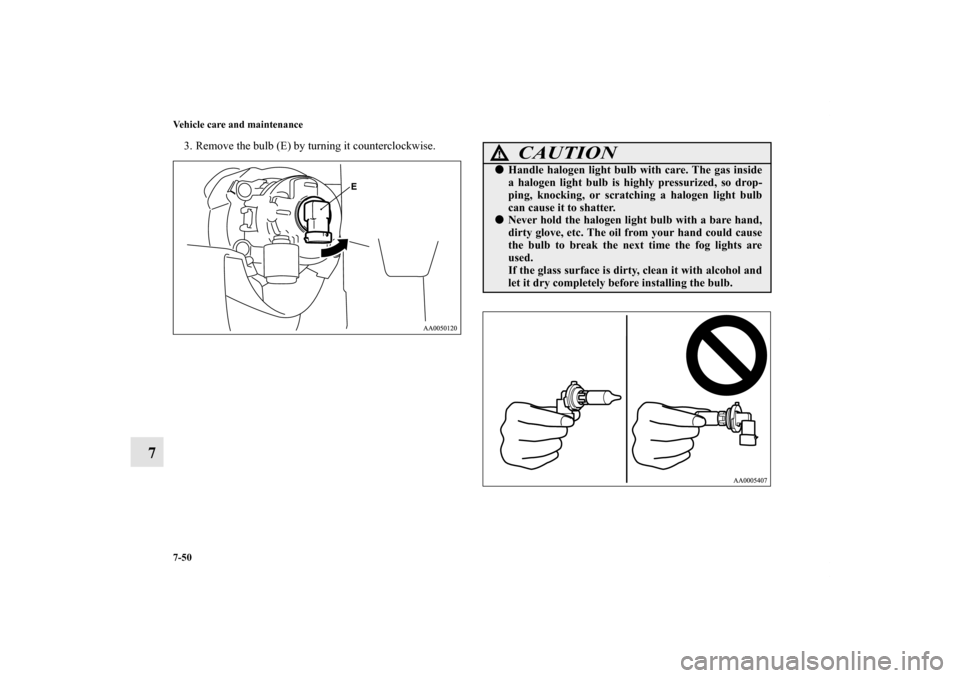
3. Remove the bulb (E) by turning it counterclockwise.
CAUTION
!�Handle halogen light bulb with care. The gas inside
a halogen light bulb is highly pressurized, so drop-
ping, knocking, or scratching a halogen light bulb
can cause it to shatter.�Never hold the halogen light bulb with a bare hand,
dirty glove, etc. The oil from your hand could cause
the bulb to break the next time the fog lights are
used.
If the glass surface is dirty, clean it with alcohol and
let it dry completely before installing the bulb.
BK0102600US.book 50 ページ 2009年3月30日 月曜日 午後2時2分

 firmly with your fingers by turning it
clockwise until the tire cannot move.
To store the jack, bar an")
 by turning it counterclock-
wise.3. Remove the headlight bulb (C) with holder.
4. To install the bulb, perform the removal steps in re")

N00943600398
To r e m o v e1. Remove the six clips (A) by turning them counterclock-
wise or prying them, and remove the screw (")