Page 111 of 514

3-22 Features and controls
3
Disarmed stage
N00510500117
The system will be disarmed when either of the following steps
are taken:
1. All doors or the liftgate is unlocked by the remote control
transmitter.
2. The ignition key is turned to the “ACC” or “ON” position.
3. If the UNLOCK button is pressed when all doors and the
liftgate are closed and no door is opened within approxi-
mately 30 seconds, re-arming will automatically occur.NOTE�Once the system has been disarmed, it cannot be rearmed
except by repeating the arming procedure.
Testing the theft-alarm system
N00510600075
Use the following procedure to test the system:
1. Lower the driver’s window.
2. Arm the system as explained in “Armed stage”.
3. Make sure that the theft-alarm indicator comes on and
flash in approximately 20 seconds.
4. Wait a few seconds and then unlock the driver’s side door
by using the inside door lock knob and opening the door.
5. Check to be sure that the horn sounds intermittently and
the headlights blink on and off when the door is opened.
6. Disarm the system by unlocking all doors or the liftgate
by the remote control transmitter or using the key.NOTE�To make sure the alarm sounds when the engine hood is
opened, open the engine hood by using the engine hood
release lever when the system is in the “armed” stage.
Disarm…by remote control transmitterBK0102600US.book 22 ページ 2009年3月30日 月曜日 午後2時2分
Page 113 of 514

3-24 Features and controls
3
Main switchThe main switch located on the driver’s door can be used to
operate all the door windows.
The windows will move while the switch is pressed and stop
when the switch is released.
Sub switchEach sub switch can be used for its own passenger door win-
dow, unless the driver’s window lock switch is activated. NOTE�The rear door windows open only half-way.Timer functionThe power windows can be run up or down when the ignition
key is in the “ON” position.
The door windows can be opened or closed for a 30 seconds
period after the ignition key is turned to the “ACC” or
“LOCK” position. However, once the driver’s door or the front
passenger’s door is opened, the power windows cannot be
operated.
1- Driver’s door window switch
(To open the driver’s door window all the way, you do not
need to hold the switch down for the entire time.)
2- Front passenger door window switch
3- Left rear door window switch
4- Right rear door window switch
5- Window lock switch
1- Close
2- Open
BK0102600US.book 24 ページ 2009年3月30日 月曜日 午後2時2分
Page 114 of 514

Features and controls
3-25
3
Lock switch
N00549000039
When this switch is in the lock mode, the passenger door
switches cannot be used to open or close the door windows,
and the main switch will open or close only the driver’s door
window. To unlock the switch, press it again.
What to do if you hear wind buffeting when driv-
ing
N00551400014
Wind buffeting can be described as the perception of pressure
on the ears or a booming or rumbling sound. Your vehicle may
exhibit wind buffeting when driving with one or both rear door
windows down or partially opened. This is a normal occur-
rence that can be minimized. If the buffeting occurs with the
rear door windows open, open the front door windows as well
as the rear door windows to minimize the condition.
1- Lock
2- Unlock
WA R N I N G
!�Before driving with a child in the vehicle, be sure to
lock the window switch to make it inoperative. Chil-
dren tampering with the switch could easily trap
their hands or heads in the window.
BK0102600US.book 25 ページ 2009年3月30日 月曜日 午後2時2分
Page 123 of 514

3-34 Features and controls
3Ignition switch
N00512400530
LOCKThe engine is off and the steering wheel is locked. The key can
be inserted and removed only when the switch is in this posi-
tion. ACCAllows operation of electrical accessories with the engine off. ON The engine runs and all accessories can be used.
START Engages the starter. After the engine starts, release the key and
it will return automatically to the “ON” position.NOTE�If your vehicle is equipped with ignition switch illumina-
tion, the ignition switch will be illuminated:
• The ignition switch illumination comes on while the
driver’s door is opened and remains on for about 30 sec-
onds after the driver’s door is closed.
• When you remove the ignition key from the ignition
switch, it will be illuminated for about 30 seconds.
However, it will go off even while the illumination
comes on if the ignition switch is turned to “ON” posi-
tion.
�Your vehicle is equipped with an electronic immobilizer.
To start the engine, the ID code which the transponder
inside the key sends must match the one registered to the
immobilizer computer.
(Refer to the section “Electronic immobilizer” on page
3-3.)
�Your vehicle is equipped with Daytime Running Lights.
When the ignition key is in the “ON” position, the low
beam of the headlight will illuminate dimly. (Refer to
“Combination headlights and dimmer switch” on page
3-153.)
BK0102600US.book 34 ページ 2009年3月30日 月曜日 午後2時2分
Page 124 of 514
Features and controls
3-35
3
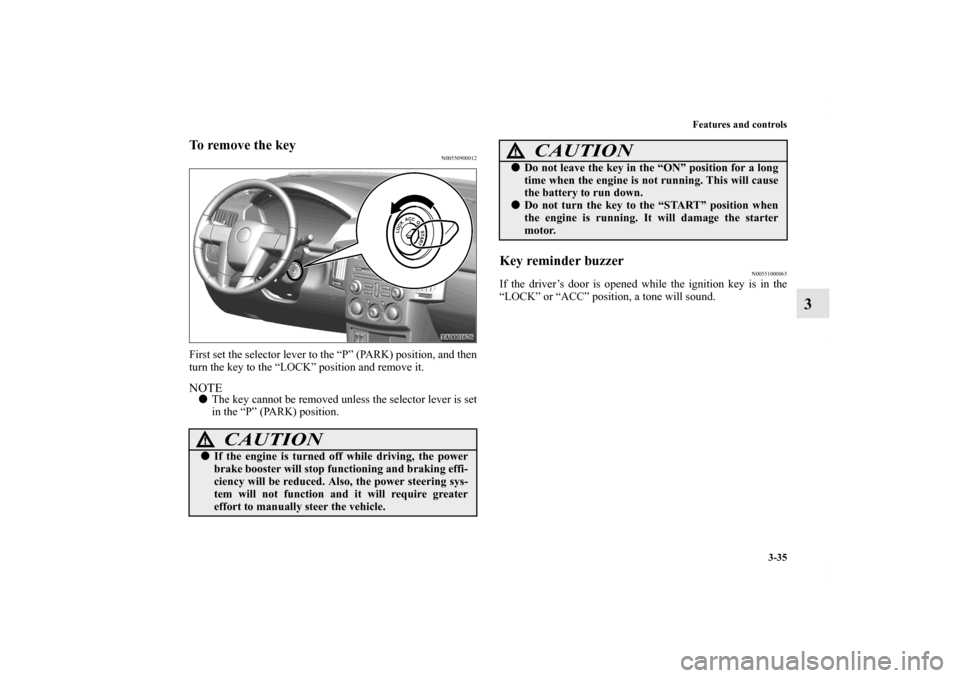
To remove the key
N00550900012
First set the selector lever to the “P” (PARK) position, and then
turn the key to the “LOCK” position and remove it.NOTE�The key cannot be removed unless the selector lever is set
in the “P” (PARK) position.
Key reminder buzzer
N00551000065
If the driver’s door is opened while the ignition key is in the
“LOCK” or “ACC” position, a tone will sound.
CAUTION
!�If the engine is turned off while driving, the power
brake booster will stop functioning and braking effi-
ciency will be reduced. Also, the power steering sys-
tem will not function and it will require greater
effort to manually steer the vehicle.
�Do not leave the key in the “ON” position for a long
time when the engine is not running. This will cause
the battery to run down. �Do not turn the key to the “START” position when
the engine is running. It will damage the starter
motor.
CAUTION
!
BK0102600US.book 35 ページ 2009年3月30日 月曜日 午後2時2分
Page 171 of 514
 → P.3-84
2- C")
3-82 Features and controls
3Indicator and warning light package
N00519800735
Ty p e 2 Ty p e 1
1- Engine malfunction indicator (“SERVICE ENGINE SOON”
or “Check engine light”) → P.3-84
2- Cruise control indicator → P.3-64
3- High beam indicator → P.3-83
4- Turn signal indicators/Hazard warning lights → P.3-83
5- Front fog light indicator (if so equipped) → P.3-83
6- Selector lever position indicator → P. 3 - 4 2
Sports mode indicator → P.3-45
7- Automatic transaxle fluid temperature warning light
→ P. 3 - 4 3
8- ASC indicator → P.3-60
TCL indicator → P.3-60
9- TCL OFF indicator → P. 3 - 6 0
10- Seat belt reminder/warning light → P.2-19
11- Door-ajar warning light → P.3-8512- Oil pressure warning light → P.3-85
13- Charging system warning light → P.3-85
14- Immobilizer indicator → P. 3 - 3
15- Tire pressure monitoring system warning light → P. 3 - 7 1
16- SRS warning light → P.2-24, 2-44
17- Anti-lock braking system warning light → P. 3 - 5 5
18- Brake warning light → P.3-83
19- Low-fuel warning light → P.3-80
BK0102600US.book 82 ページ 2009年3月30日 月曜日 午後2時2分
Page 197 of 514

3-108 Features and controls
3
Setting and customization
N00533500055
It is possible to adjust/set/customize the specifications and dis-
plays of the items shown in the table below.
Condition
Item
Condition
Reference
page
DisplayDisplay brightness adjust-
ment*
1
P. 3 - 1 1 2
Turn off display
*
1
P. 3 - 1 1 4
Record maintenance
*
1, *3
P. 3 - 1 1 5
Display settings
*
1, *3
P. 3 - 1 1 8
Units
*
1, *3
P.3-120
Door open warning
*
1, *3
P.3-123
Rheostat synchronization
*
1, *3
P.3-125
Timer buzzer setting
*
1, *3
P.3-126
History
*
1, *3
P.3-127
Opening display setting
*
1, *3
P.3-128
Calendar Date setting
*
1, *3
P.3-130
CompassZone code setting
*
2, *3
P.3-131
Compass calibration
*
2, *3
P.3-133
Customi-
zationLights
*
1, *3
P.3-135
Wipers
*
1, *3
P.3-139
Keyless entry system &
power door lock system*
1, *3
P.3-142
Buzzers
*
1, *3
P.3-147
Number of keyless entry
registration*
1, *3
P.3-150
Defaults
*
1, *3
P.3-151
*
1Adjustment/setting/customization is possible with the igni-
tion key in the “ACC” or “ON” position.
*2Adjustment/setting is possible with the ignition key in the
“ON” position.
*3Setting/customization is possible when the vehicle speed is
no higher than 1mph (2 km/h).
Item
Condition
Reference
page
BK0102600US.book 108 ページ 2009年3月30日 月曜日 午後2時2分
Page 201 of 514

3-112 Features and controls
3
7. Press the “ ” function button, align the cursor with the
desired setting, and press the “SELECT” function button.
• “Lights”
→ Refer to “Lights customization” on page 3-135
•“Wipers”
→ Refer to “Wipers customization” on page 3-139
• “Keyless entry system & power door lock system”
→ Refer to “Keyless entry system & power door lock
system customization” on page 3-142
• “Buzzers”
→ Refer to “Buzzers customization” on page 3-147
Display brightness adjustment
N00533800074
It is possible to adjust the display brightness that is seen when
the light switch is “OFF”.
When the light switch is in the “ ” or “ ” position, it is
possible to make fine adjustments after making adjustments
using the instrument panel light dimmer control.NOTE�When the light switch is in the “ ” or “ ” position,
pressing the “BRIGHT” function button causes the bright-
ness to change to that seen when the light switch is
“OFF”.
To return the brightness to the original level, press the
“BRIGHT” function button again.
BK0102600US.book 112 ページ 2009年3月30日 月曜日 午後2時2分