Page 412 of 514

For emergencies
6-13
6
NOTE�The chocks shown in the illustration do not come with
your vehicle. It is recommended that you purchase chocks
or blocks and keep them in the vehicle for use if needed.
�If chocks or blocks are not available, use stones or any
other objects that are large enough to hold the wheel in
position.
6. Get the jack, bar and wheel nut wrench ready.
Refer to “Tools and jack” on page 6-7.Spare tire information
N00849600269
Check the air pressure of the spare tire frequently and make
sure it is ready for emergency use at any time.
Maintaining the spare tire at the air pressure listed on the tire
and loading information placard will ensure that it can always
be used under any conditions (city/high-speed driving, varying
load weight, etc.).
The spare tire is stored beneath the luggage floor board of the
luggage compartment.
WA R N I N G
!�Tires, including spare tire, degrade over time with
age even when they are not being used.
It is recommended that tires over 6 years generally
be replaced even if damage is not obvious.
CAUTION
!�While the spare tire is stowed, the inflation pressure
should be checked at least once a month to assure
that it remains at the recommended inflation pres-
sure. See the tire and loading information placard
attached to the driver’s door sill. Refer to “Tire and
loading information placard” on page 9-3.�Driving with an improperly inflated tire can cause
an accident. If you have no choice but to drive with
an under-inflated tire, keep your speed down and
avoid sudden steering or braking, if possible. Inflate
the tire to the correct pressure as soon as possible.
Refer to “Tire inflation pressures” on page 7-24.�If your vehicle is equipped with the 17-inch-steel
spare tire or compact spare tire, it should only be
used temporarily. When the spare tire is used, the
tire pressure monitoring system will not work prop-
erly. See an authorized Mitsubishi Motors dealer as
soon as possible to replace or repair the original tire.�You can use the same wheel nuts on the spare tire
wheel.
BK0102600US.book 13 ページ 2009年3月30日 月曜日 午後2時2分
Page 431 of 514
7-4 Vehicle care and maintenance
7Engine hood
N00937500389
To openUse the engine hood release lever (located under the instrument
panel near the driver’s door) to unlock the engine hood.
Pull the lever toward you to release the engine hood latch.Release the safety lever and lift the engine hood.
NOTE�To prevent damage to the engine hood and wipers, make
sure the wipers are at resting position when you open the
engine hood.
WA R N I N G
!�Never use the release lever to unlatch the engine
hood while the vehicle is in motion. �Do not drive your vehicle unless the engine hood is
locked.
BK0102600US.book 4 ページ 2009年3月30日 月曜日 午後2時2分
Page 462 of 514

Vehicle care and maintenance
7-35
7
and release lever. Work the grease into the hood lock mecha-
nism until all the movable surfaces are covered.
Also, put a light coat of the same grease on the safety catch
wherever moving parts touch.
For cold and snowy weather
N00942600115
Ventilation slotsThe ventilation slots in front of the windshield should be kept
clear of leaves or brushed clear after a heavy snowfall, so that
the operation of the heating and ventilation systems will not be
impaired.WeatherstrippingTo prevent freezing of the weatherstripping on the doors,
engine hood, etc., they should be treated with silicone grease.Additional equipment (For regions where snow is
encountered)It is a good idea to carry a shovel or a short-handled spade in
the vehicle during the winter so that you can clear away snow
if you get stranded. A small hand-brush for sweeping snow off
the vehicle and a plastic scraper for the windshield, side and
rear window are also useful.
BK0102600US.book 35 ページ 2009年3月30日 月曜日 午後2時2分
Page 466 of 514
Vehicle care and maintenance
7-39
7
Passenger compartment fuse location tablePassenger compartment fuse location
No.
Symbol
Electrical system
Capacity
1
Rear air conditioning 5 A
2— — —
3Radio 30 A
4 Sunroof 20 A
5 Rear window defogger 30 A
6 Heater 30 A
7— — —
8 — — —
9 Power outlet 15 A
10 Power door locks 15 A
11 Rear window wiper 15 A
12 — — —
13 Engine control 7.5 A
14 Outside rearview mirrors 7.5 A
15 — — —
16 Cigarette lighter 15 A
17 Engine control 7.5 A
18 — — —
19 Door mirror heater 7.5 A
20 Relay 7.5 A
BK0102600US.book 39 ページ 2009年3月30日 月曜日 午後2時2分
Page 467 of 514
7-40 Vehicle care and maintenance
7
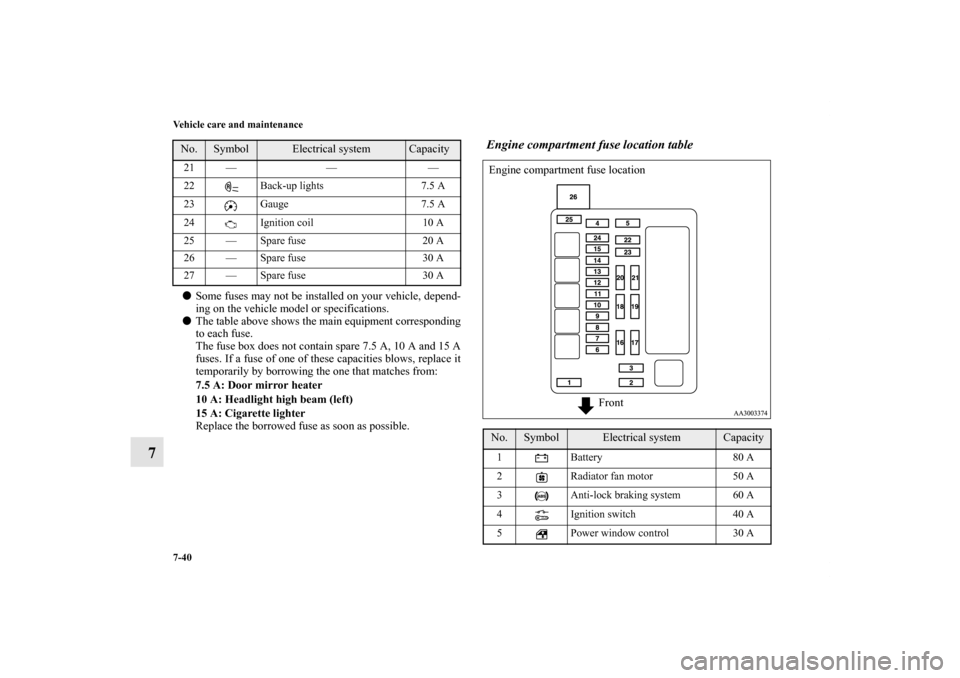
�Some fuses may not be installed on your vehicle, depend-
ing on the vehicle model or specifications.
�The table above shows the main equipment corresponding
to each fuse.
The fuse box does not contain spare 7.5 A, 10 A and 15 A
fuses. If a fuse of one of these capacities blows, replace it
temporarily by borrowing the one that matches from:
7.5 A: Door mirror heater
10 A: Headlight high beam (left)
15 A: Cigarette lighter
Replace the borrowed fuse as soon as possible.
Engine compartment fuse location table
21 — — —
22 Back-up lights 7.5 A
23 Gauge 7.5 A
24 Ignition coil 10 A
25 — Spare fuse 20 A
26 — Spare fuse 30 A
27 — Spare fuse 30 A No.
Symbol
Electrical system
Capacity
No.
Symbol
Electrical system
Capacity
1 Battery 80 A
2 Radiator fan motor 50 A
3 Anti-lock braking system 60 A
4 Ignition switch 40 A
5 Power window control 30 A Engine compartment fuse location
Front
BK0102600US.book 40 ページ 2009年3月30日 月曜日 午後2時2分
Page 507 of 514

Alphabetical index
2Service brake 3-53
Warning light 3-83
Break-in recommendations 3-2
Bulb capacity 7-44
C
California Perchlorate Materials Requirements 1-9
Capacities 9-8
Cargo loads 4-12
Catalytic converter 7-3
Cautions on the handling of all-wheel drive vehicles 3-51
Certification label 9-4
Charging system warning light 3-85
Child restraints 2-25
Child safety locks for rear door 3-15
Cleaning
Inside of your vehicle 7-58
Outside of your vehicle 7-60
Clock 3-197
Coat hook 3-210
Combination headlights and dimmer switch 3-153
Consumer information 8-2
Coolant (engine) 7-9
,9-8
Cruise control 3-63
Indicator 3-64
Cup holder 3-206
D
Defogger (rear window) 3-163Digital clock 3-197
Dimensions 9-4
Dimmer (high/low beam change) 3-156
Disc brake pads 7-33
Dome light
Bulb capacity 7-46
Replacement 7-55
Switch 3-200
Door lights 3-202
Bulb capacity 7-46
Replacement 7-57
Doors
Locks 3-13
Power door locks 3-15
Warning light and buzzer 3-85
Drive belt 7-33
Driving during cold weather 4-5
Driving precaution 4-2
Driving, alcohol and drugs 4-3
E
Electric rear window defogger switch 3-163
Electronic immobilizer (Anti-theft starting system) 3-3
Emission-control system maintenance 7-31
Engine
Block heater 3-39
Compartment 7-6
Coolant 7-9
,9-8
Coolant temperature gauge 3-81
BK0102600US.book 2 ページ 2009年3月30日 月曜日 午後2時2分
Page 510 of 514

Alphabetical index
5
Engine oil 7-6
,9-8
Rear axle oil 7-14,9-8
Transfer oil 7-13
,9-8
Oil pressure warning light 3-85
Operation under adverse driving conditions 6-25
Outside rearview mirrors 3-32
Overhead console control switch 3-165
Overheating 6-5
P
Parking 4-7
Parking brake 3-28
Parking brake pedal stroke 7-30
Parking brake 7-30
Parking brake break-in 7-30
Parking lights
Bulb capacity 7-45
Replacement 7-48
Polishing 7-61
Power brakes 3-53
Power door locks 3-15
Power outlet 3-195
Power steering
Fluid 7-16
,9-8
System 3-57
Power windows 3-23
Main switch 3-24
Sub switch 3-24
Timer function 3-24Puncture (Tire changing) 6-12
R
Radiator cap 7-10
Radio
AM/FM electronically tuned radio with
CD autochanger-Type 2 5-43
AM/FM electronically tuned radio with CD player-Type 1
5-30
AM/FM/Satellite electronically tuned radio with
CD autochanger-Type 3 5-43
General information about your radio 5-78
Reading lights
Replacement 7-55
Switch 3-200
Rear axle oil 7-14
,9-8
Rear cooler 5-25
Rear personal lights
Bulb capacity 7-46
Replacement 7-56
Switch 3-201
Rear side-marker light
Bulb capacity 7-45
Replacement 7-51
Rear turn signal lights
Bulb capacity 7-45
Replacement 7-51
Rear window defogger switch 3-163
Rear-view camera 3-75
BK0102600US.book 5 ページ 2009年3月30日 月曜日 午後2時2分
 to unlock the engine hood.
Pull the le")