Page 462 of 514

Vehicle care and maintenance
7-35
7
and release lever. Work the grease into the hood lock mecha-
nism until all the movable surfaces are covered.
Also, put a light coat of the same grease on the safety catch
wherever moving parts touch.
For cold and snowy weather
N00942600115
Ventilation slotsThe ventilation slots in front of the windshield should be kept
clear of leaves or brushed clear after a heavy snowfall, so that
the operation of the heating and ventilation systems will not be
impaired.WeatherstrippingTo prevent freezing of the weatherstripping on the doors,
engine hood, etc., they should be treated with silicone grease.Additional equipment (For regions where snow is
encountered)It is a good idea to carry a shovel or a short-handled spade in
the vehicle during the winter so that you can clear away snow
if you get stranded. A small hand-brush for sweeping snow off
the vehicle and a plastic scraper for the windshield, side and
rear window are also useful.
BK0102600US.book 35 ページ 2009年3月30日 月曜日 午後2時2分
Page 466 of 514
Vehicle care and maintenance
7-39
7
Passenger compartment fuse location tablePassenger compartment fuse location
No.
Symbol
Electrical system
Capacity
1
Rear air conditioning 5 A
2— — —
3Radio 30 A
4 Sunroof 20 A
5 Rear window defogger 30 A
6 Heater 30 A
7— — —
8 — — —
9 Power outlet 15 A
10 Power door locks 15 A
11 Rear window wiper 15 A
12 — — —
13 Engine control 7.5 A
14 Outside rearview mirrors 7.5 A
15 — — —
16 Cigarette lighter 15 A
17 Engine control 7.5 A
18 — — —
19 Door mirror heater 7.5 A
20 Relay 7.5 A
BK0102600US.book 39 ページ 2009年3月30日 月曜日 午後2時2分
Page 467 of 514
7-40 Vehicle care and maintenance
7
�Some fuses may not be installed on your vehicle, depend-
ing on the vehicle model or specifications.
�The table above shows the main equipment corresponding
to each fuse.
The fuse box does not contain spare 7.5 A, 10 A and 15 A
fuses. If a fuse of one of these capacities blows, replace it
temporarily by borrowing the one that matches from:
7.5 A: Door mirror heater
10 A: Headlight high beam (left)
15 A: Cigarette lighter
Replace the borrowed fuse as soon as possible.
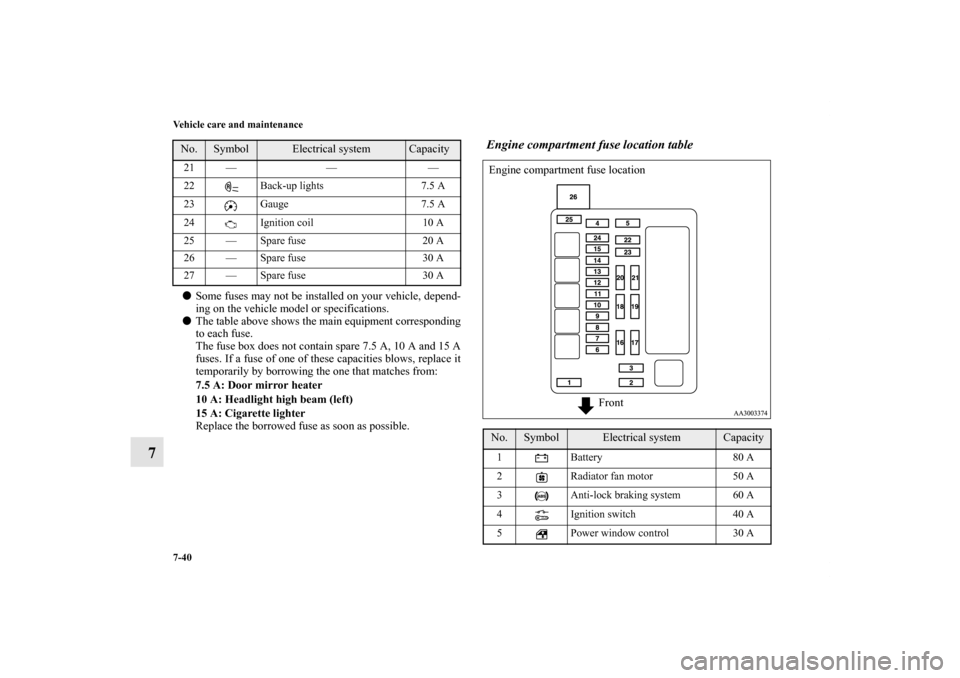
Engine compartment fuse location table
21 — — —
22 Back-up lights 7.5 A
23 Gauge 7.5 A
24 Ignition coil 10 A
25 — Spare fuse 20 A
26 — Spare fuse 30 A
27 — Spare fuse 30 A No.
Symbol
Electrical system
Capacity
No.
Symbol
Electrical system
Capacity
1 Battery 80 A
2 Radiator fan motor 50 A
3 Anti-lock braking system 60 A
4 Ignition switch 40 A
5 Power window control 30 A Engine compartment fuse location
Front
BK0102600US.book 40 ページ 2009年3月30日 月曜日 午後2時2分
Page 468 of 514

Vehicle care and maintenance
7-41
7
�Some fuses may not be installed on your vehicle, depend-
ing on the vehicle model or specifications.
�The table above shows the main equipment corresponding
to each fuse.Identification of fuse
6Front fog lights/
Daytime running lights15 A
7 Heated seat 20 A
8 Horn 15 A
9 Engine control 20 A
10 Air conditioning 10 A
11 Stop lights 15 A
12 Trailer 20 A
13 Alternator 7.5 A
14 Hazard warning flasher 10 A
15 Automatic transaxle 20 A
16 Headlight high beam (right) 10 A
17 Headlight high beam (left) 10 A
18 Headlight low beam (right) 10 A
19 Headlight low beam (left) 10 A
20 Tail light (right) 7.5 A
21 Tail light (left) 7.5 A
22 Dome light 15 A
23 Radio 15 A
24
Fuel pump 15 A No.
Symbol
Electrical system
Capacity
25 Front wiper 30 A
26 Radio 40 A Capacity
Color
5 A Yellowish brown
7.5 A Brown
10 A Red
15 A Blue
20 A Yellow
30 A Green (fuse type) / Pink (fusible link type)
40 A Green
50 A Red
60 A Yellow
80 A White
No.
Symbol
Electrical system
Capacity
BK0102600US.book 41 ページ 2009年3月30日 月曜日 午後2時2分
Page 471 of 514

7-44 Vehicle care and maintenance
7Replacement of light bulbs
N00942900219
Before replacing a bulb, be sure the light is off. Do not touch
the glass part of the new bulb with your bare fingers; the oil
from your skin will stay on the glass and dim or destroy the
bulb when it gets hot.NOTE�If you are unsure of how to carry out the work as required,
it is recommended that these procedures be carried out by
an authorized Mitsubishi Motors dealer or a repair facility
of your choice.
�Be careful not to scratch the vehicle body when removing
a light and lens.
�When it rains, or when the vehicle has been washed, the
inside of the lens sometimes becomes temporarily foggy.
This is the same phenomenon as when window glass mists
up on a humid day, and does not indicate a functional
problem.
When the light is switched on, the heat will remove the
fog. However, if water gathers inside the light, please
have it checked by an authorized Mitsubishi Motors
dealer or a repair facility of your choice.
Bulb capacity
N00943000099
The bulb should only be replaced with a new bulb with the
same rating and type. The type and rating are listed on the base
of the bulb.
CAUTION
!�Bulbs are extremely hot immediately after being
turned off.
When replacing a bulb, wait for it to cool sufficiently
before touching it. You could otherwise be burned.
BK0102600US.book 44 ページ 2009年3月30日 月曜日 午後2時2分
Page 472 of 514
Vehicle care and maintenance
7-45
7
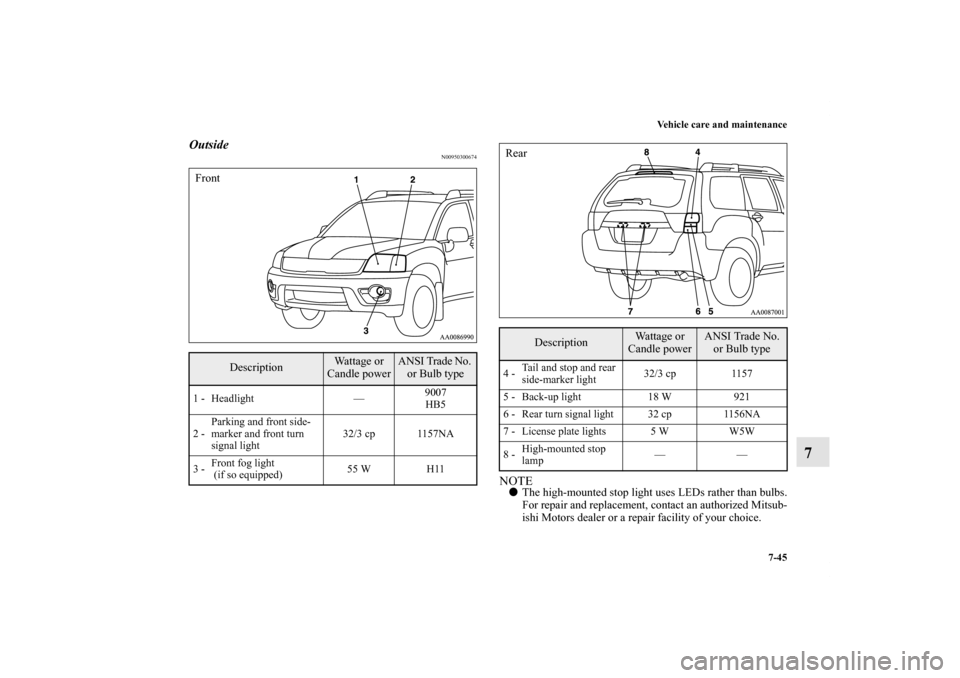
Outside
N00950300674
NOTE�The high-mounted stop light uses LEDs rather than bulbs.
For repair and replacement, contact an authorized Mitsub-
ishi Motors dealer or a repair facility of your choice.
Description
Wattage or
Candle power
ANSI Trade No.
or Bulb type
1 - Headlight —9007
HB5
2 -Parking and front side-
marker and front turn
signal light32/3 cp 1157NA
3 -Front fog light
(if so equipped)55 W H11Front
Description
Wattage or
Candle power
ANSI Trade No.
or Bulb type
4 -Tail and stop and rear
side-marker light32/3 cp 1157
5 - Back-up light 18 W 921
6 - Rear turn signal light 32 cp 1156NA
7 - License plate lights 5 W W5W
8 -High-mounted stop
lamp——Rear
BK0102600US.book 45 ページ 2009年3月30日 月曜日 午後2時2分
Page 473 of 514
7-46 Vehicle care and maintenance
7
Inside
N00950400486
Headlights
N00943100801
1. Depress the tab (A) on the harness connector and pull the
harness connector toward you to remove it.
Description
Wattage
1 - Luggage room light 8 W
2 - Door light 5 W
3 - Dome light (front) 5 W
4 - Rear personal lights 8 WBK0102600US.book 46 ページ 2009年3月30日 月曜日 午後2時2分
Page 474 of 514
Vehicle care and maintenance
7-47
7
2. Remove the locking cap (B) by turning it counterclock-
wise.3. Remove the headlight bulb (C) with holder.
4. To install the bulb, perform the removal steps in reverse.
BK0102600US.book 47 ページ 2009年3月30日 月曜日 午後2時2分

 on the harness connector and pull the
harness connector toward you to remove it.
Description
Wat")
 by turning it counterclock-
wise.3. Remove the headlight bulb (C) with holder.
4. To install the bulb, perform the removal steps in re")