2010 MERCEDES-BENZ SLS COUPE warning light
[x] Cancel search: warning lightPage 225 of 361
Applying the electric parking brake
X Push handle 0001.
The red 0009indicator lamp in the instru-
men tcluster lights up.
i The electric parking brake can also be
applied when the key is in position 0.
Releasing the electric parking brake man-
ually
X Pull handle 0001.
The red 0009indicator lamp in the instru-
men tcluster goes out.
The electric parking brake can only be
released when the ignition is switched on
using the Start/Stop button (Y page 202).
Releasing the electric parking brake auto-
matically
The electric parking brake is released auto-
matically when the following conditions are
simultaneously fulfilled:
R the engine is running.
R the transmission is in position Dor R.
R the bonnet is closed.
R your seat belt is fastened.
R you depress the accelerator pedal.
If the transmission is in position R, the boot
lid must be closed.
For the parking brake to be released auto-
matically if your seat belt is not fastened, the
following conditions must be fulfilled:
R the driver's door is closed.
R you shift out of Por you have previously
driven faster than 3 km/h.
Emergency braking with the electric park-
ing brake
The vehicle can also be braked during an
emergency using the electric parking brake.
X While driving, push the handle of the elec-
tric parking brake (Y page 221).
i The vehicle is braked as long as you keep
the handle of the electric parking brake
pressed. The longer the electric parking brake handle is depressed, the greater the
braking force.
The red 0009indicator lamp flashes in the
instrument cluster during braking. The
Release parking brake message appears
in the multifunction display and a warning
tone sounds.
When the vehicle has been braked to a stand-
still, the electric parking brake is engaged. Switching off the engine
G
Risk of accident
If the engine is not running, there is no power
assistance for the steerin gand brakes. Steer-
ing and braking then requires significantly
greater effort.
As a result, you might lose control of the vehi-
cle, cause an accident and injure yoursel fand
others.
Therefore, do not switch off the engine while
you are driving.
! Do not open the doors until the vehicle
has come to a standstill .Atlow speeds,
park position Pwill otherwise be engaged
automatically. This can damage the trans-
mission.
i Observe the display messages in the
instrument cluster.
Using KEYLESS-GO X
Use the button on the centre console to
shift the transmission to P.
X Press the Start/Stop button (Y page 202).
The engine stops and all the indicator
lamps in the instrument cluster go out
(Y page 229).
i If you switch the engine off with the trans-
mission in position Ror D, the transmission
automatically shifts to N.
If you set the selector lever to Nbefore
switching off the engine, the transmission
remains in Nfor approximately 30 minutes. 222
Driving and parkingControls
BA 197 ECE RE 2010/6a; 1; 2, en-GB
sabbaeu
Version: 3.0.3.6 2010-05-07T14:19:43+02:00 - Seite 222
Page 232 of 361
Manual drive program
In manual drive program
M, you need to
change geary ourself using the steering wheel
gearshift paddles (Y page 228). At low engine
speeds, the transmission shifts down auto-
matically.
! In manual drive program M, the transmis-
sion does not shift up automatically even
when the engine limiting speed for the cur-
rent gear is reached. When the engine lim-
iting speed is reached, the fuel supply is cut
to prevent the engine from overrevving.
Always make sure that the engine speed
does not reach the red area of the rev coun-
ter and observe the upshift indicator. There
is otherwise a risk of engine damage.
X To activate the manual drive program:
turn the program selector switch until M
appears in the instrument cluster's multi-
function display.
M lights up in red on the program selector
switch.
X To deactivate the manual drive pro-
gram: turn the selector switch and select
another drive program.
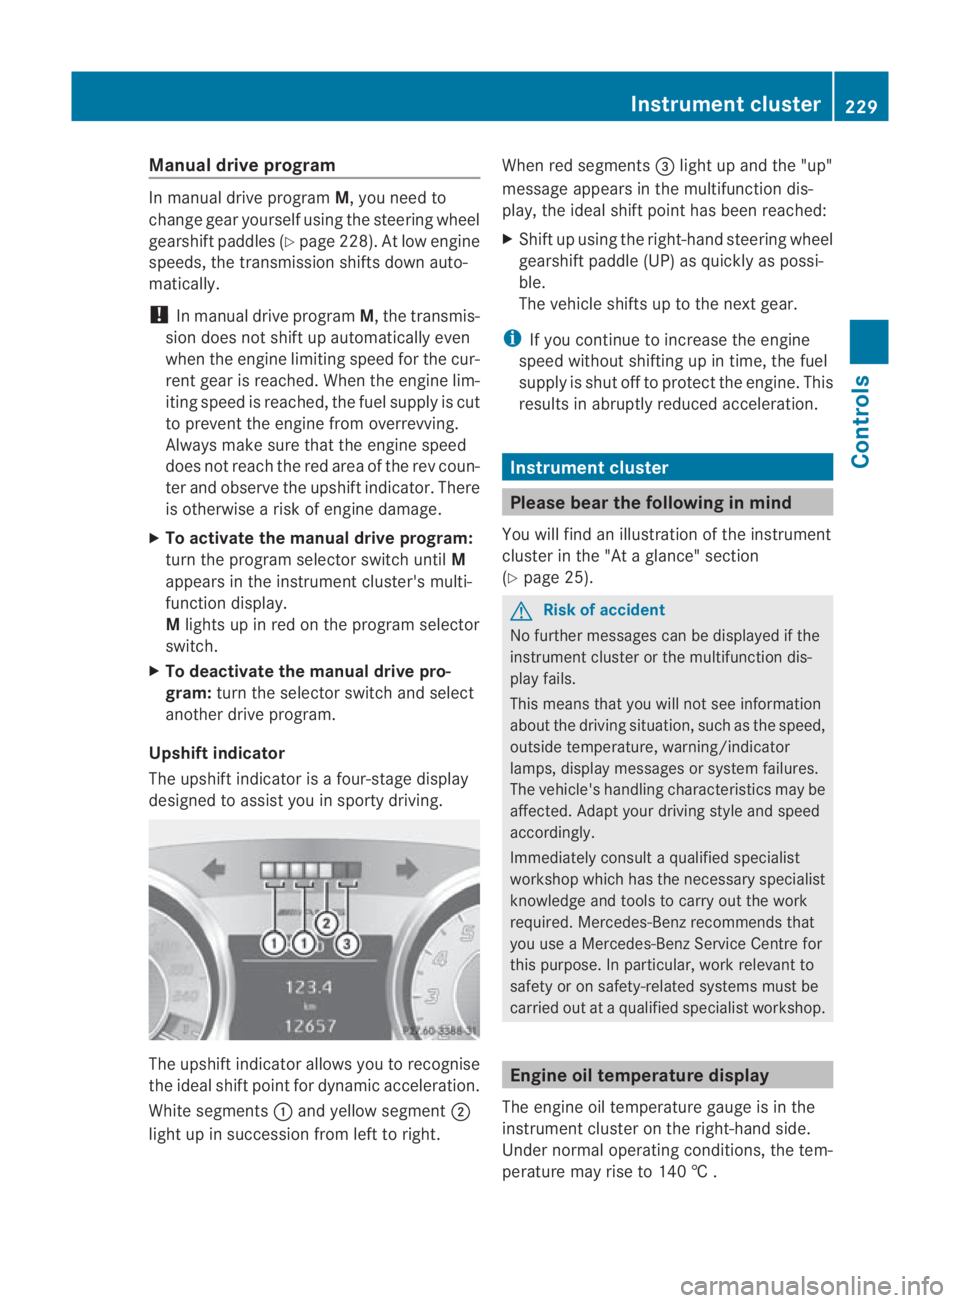
Upshift indicator
The upshift indicator is a four-stage display
designed to assist you in sporty driving. The upshift indicator allows you to recognise
the ideal shift point for dynamic acceleration.
White segments
0001and yellow segment 0002
light up in succession from left to right. When red segments
0015light up and the "up"
message appears in the multifunction dis-
play, the ideal shift point has been reached:
X Shift up using the right-hand steering wheel
gearshift paddle (UP) as quickly as possi-
ble.
The vehicle shifts up to the next gear.
i If you continue to increase the engine
speed without shifting up in time, the fuel
supply is shut off to protec tthe engine. This
results in abruptly reduced acceleration. Instrument cluster
Please bear the following in mind
You will find an illustration of the instrument
cluster in the "At a glance" section
(Y page 25). G
Risk of accident
No further messages can be displayed if the
instrument cluster or the multifunction dis-
play fails.
This means that you will not see information
about the driving situation, such as the speed,
outside temperature, warning/indicator
lamps, display messages or system failures.
The vehicle's handling characteristics may be
affected. Adapt your driving style and speed
accordingly.
Immediately consult a qualified specialist
workshop which has the necessary specialist
knowledge and tools to carry out the work
required. Mercedes-Ben zrecommends that
you use a Mercedes-Benz Service Centre for
this purpose. In particular, work relevant to
safety or on safety-related systems must be
carried out at a qualified specialist workshop. Engine oil temperature display
The engine oil temperature gauge is in the
instrument cluster on the right-hand side.
Under normal operating conditions, the tem-
perature may rise to 140 † . Instrument cluster
229Controls
BA 197 ECE RE 2010/6a; 1; 2, en-GB
sabbaeu Version: 3.0.3.6 2010-05-07T14:19:43+02:00 - Seite 229 Z
Page 248 of 361
Setting
aspeed X
Press the cruise control lever to the pres-
sure point up 0001for a highe rspeed or
down 0014for a lower speed.
X Keep the cruise control lever pressed until
the desired speed is reached.
X Release the cruise control lever.
The new speed is stored.
i Cruise control is not deactivated if you
depress the accelerator pedal. For exam-
ple, if you accelerate briefly to overtake,
cruise control adjusts the vehicle's speed
to the last speed stored after you have fin-
ished overtaking.
Making adjustments in 1 km/h incre-
ments X
Press the cruise control lever to the pres-
sure point, up 0001for a higher speed or
down 0014for a lower speed.
The last speed stored is increased or
reduced.
Making adjustments in 10 km/h incre-
ments X
Briefly press the cruise control lever
beyond the pressure point, up 0001for a
higher speed or down 0014for a lower speed.
The last speed stored is increased or
reduced.
Deactivating cruise control There are several ways to deactivate cruise
control:
X
Briefly press the cruise control lever for-
wards 0013.
or
X Brake or
X
Briefly press the cruise control lever in the
direction of arrow 0012.
Variable SPEEDTRONIC is selected. LIM
indicator lamp 0002in the cruise contro llever
lights up.
Cruise control is automatically deactivated if:
R you press the electric parking brake han-
dle.
R you are driving at less than 30 km/h.
R ESP ®
intervenes or you deactivate ESP ®
.
R you shift the transmission to Nwhile the
vehicle is in motion.
If cruise control is deactivated, you will hear
a warning tone. The “Cruise control
off” message is displayed in the multifunc-
tion display for approximately five seconds.
i The last speed stored is cleared when you
switch off the engine. SPEEDTRONIC
SPEEDTRONIC brakes automatically so that
you do not exceed the set speed. On long and
steep downhill gradients, especially if the
vehicle is laden, you must select shift range
1, 2or 3in good time. By doing so, you will
make use of the brakin geffect of the engine,
which relieves the load on the brake system
and prevents the brakes from overheating
and wearing too quickly. If you need addi-
tional braking, depress the brake pedal
repeatedly rather than continuously. G
Risk of accident
Never depress the brake peda lcontinuously
while the vehicle is in motion, e.g. never cause
the brakes to rub by applying constant slight
pedal pressure. This causes the brake system
to overheat, increases the braking distance
and can lead to the brakes failing completely. G
Risk of accident
Do not change down for additional engine
braking on a slippery road surface. This could Driving systems
245Controls
BA 197 ECE RE 2010/6a; 1; 2, en-GB
sabbaeu Version: 3.0.3.6 2010-05-07T14:19:43+02:00 - Seite 245 Z
Page 252 of 361
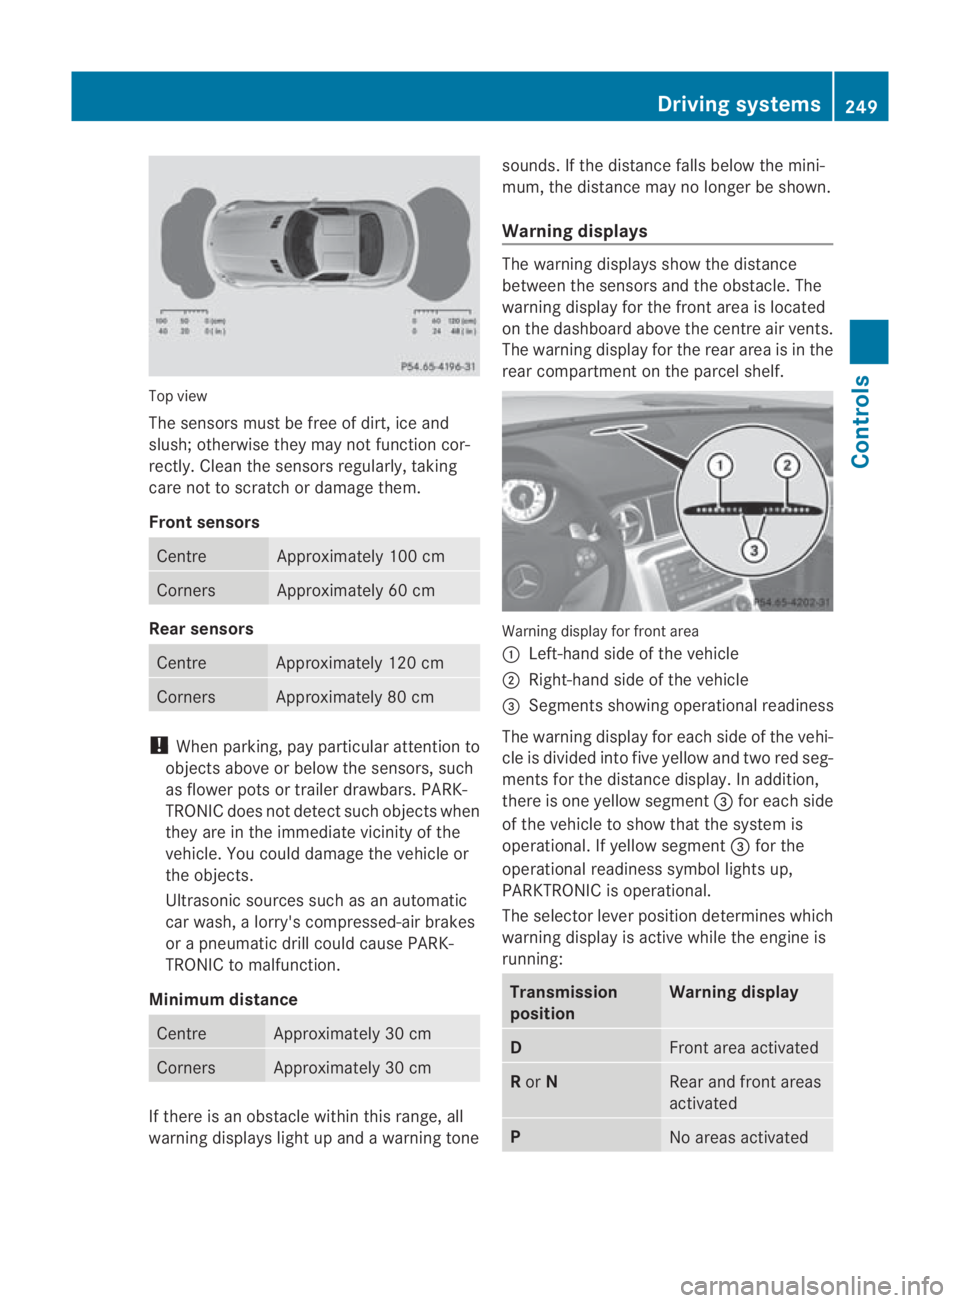
Top view
The sensors must be free of dirt, ice and
slush; otherwise they may not function cor-
rectly. Clean the sensors regularly, taking
care not to scratch or damage them.
Front sensors Centre Approximately 100 cm
Corners Approximately 60 cm
Rear sensors
Centre Approximately 120 cm
Corners Approximately 80 cm
!
When parking, pay particular attention to
objects above or below the sensors, such
as flower pots or trailer drawbars. PARK-
TRONIC does not detect such objects when
they are in the immediate vicinity of the
vehicle. You could damage the vehicle or
the objects.
Ultrasonic sources such as an automatic
car wash, a lorry's compressed-air brakes
or a pneumatic drill could cause PARK-
TRONIC to malfunction.
Minimum distance Centre Approximately 30 cm
Corners Approximately 30 cm
If there is an obstacle within this range, all
warning displays light up and a warning tone sounds. If the distance falls below the mini-
mum, the distance may no longer be shown.
Warning displays The warning displays show the distance
between the sensors and the obstacle. The
warning display for the front area is located
on the dashboard above the centre air vents.
The warning display for the rear area is in the
rear compartment on the parcel shelf.
Warning display for front area
0001
Left-hand side of the vehicle
0002 Right-hand side of the vehicle
0015 Segments showing operational readiness
The warning display for each side of the vehi-
cle is divided into five yellow and two red seg-
ments for the distance display .Inaddition,
there is one yellow segment 0015for each side
of the vehicle to show that the system is
operational. If yellow segment 0015for the
operational readiness symbol lights up,
PARKTRONIC is operational.
The selector lever position determines which
warning display is active while the engine is
running: Transmission
position Warning display
D
Front area activated
R
or N Rear and front areas
activated
P
No areas activatedDriving systems
249Controls
BA 197 ECE RE 2010/6a; 1; 2, en-GB
sabbaeu Version: 3.0.3.6 2010-05-07T14:19:43+02:00 - Seite 249 Z
Page 253 of 361
One or more segments light up as the vehicle
approaches an obstacle, depending on the
vehicle's distance from the obstacle. From
the sixth segment onwards, you will hear an
intermittent warning tone; from the seventh
segment onwards, you will hear a continuous
warning tone for a maximum of two seconds.
This indicates that you have now reached the
minimum distance.
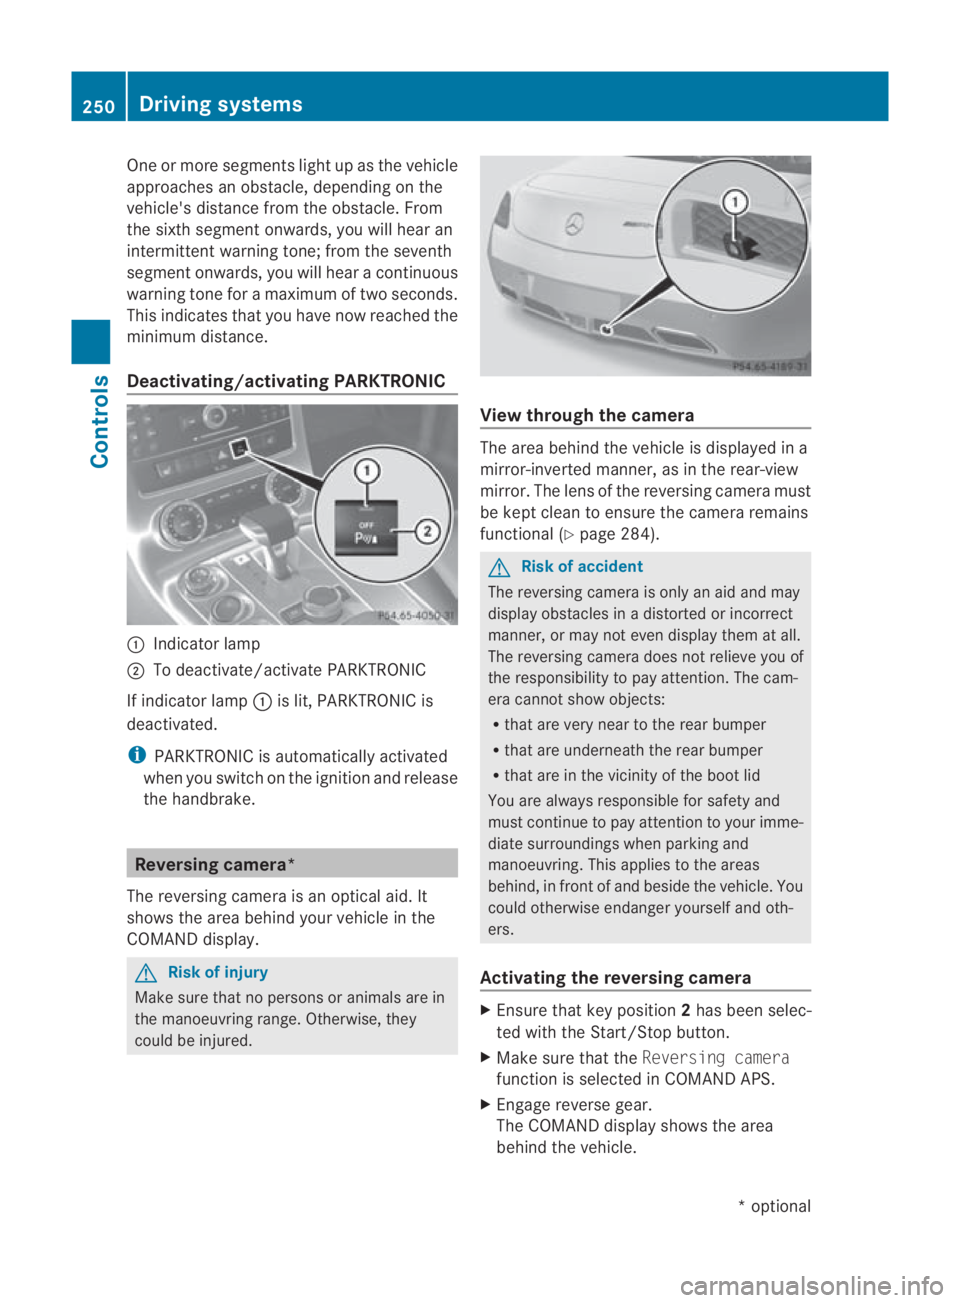
Deactivating/activating PARKTRONIC 0001
Indicator lamp
0002 To deactivate/activate PARKTRONIC
If indicator lamp 0001is lit, PARKTRONIC is
deactivated.
i PARKTRONIC is automatically activated
when you switch on the ignition and release
the handbrake. Reversing camera*
The reversing camera is an optical aid. It
shows the area behind your vehicle in the
COMAND display. G
Risk of injury
Make sure that no persons or animals are in
the manoeuvring range. Otherwise, they
could be injured. View through the camera
The area behind the vehicle is displayed in a
mirror-inverted manner, as in the rear-view
mirror. The lens of the reversing camera must
be kept clean to ensure the camera remains
functional (Y
page 284). G
Risk of accident
The reversing camera is only an aid and may
display obstacles in a distorted or incorrect
manner, or may not even display them at all.
The reversing camera does not relieve you of
the responsibility to pay attention. The cam-
era cannot show objects:
R that are very near to the rear bumper
R that are underneath the rear bumper
R that are in the vicinity of the boot lid
You are always responsible for safety and
must continue to pay attention to your imme-
diate surroundings when parking and
manoeuvring. This applies to the areas
behind, in front of and beside the vehicle. You
could otherwise endanger yourselfa nd oth-
ers.
Activating the reversing camera X
Ensure tha tkey position 2has been selec-
ted with the Start/Stop button.
X Make sure that the Reversing camera
function is selected in COMAND APS.
X Engage reverse gear.
The COMAND display shows the area
behind the vehicle. 250
Driving systemsControls
*o
ptional
BA 197 ECE RE 2010/6a; 1; 2, en-GB
sabbaeu
Version: 3.0.3.6 2010-05-07T14:19:43+02:00 - Seite 250
Page 297 of 361
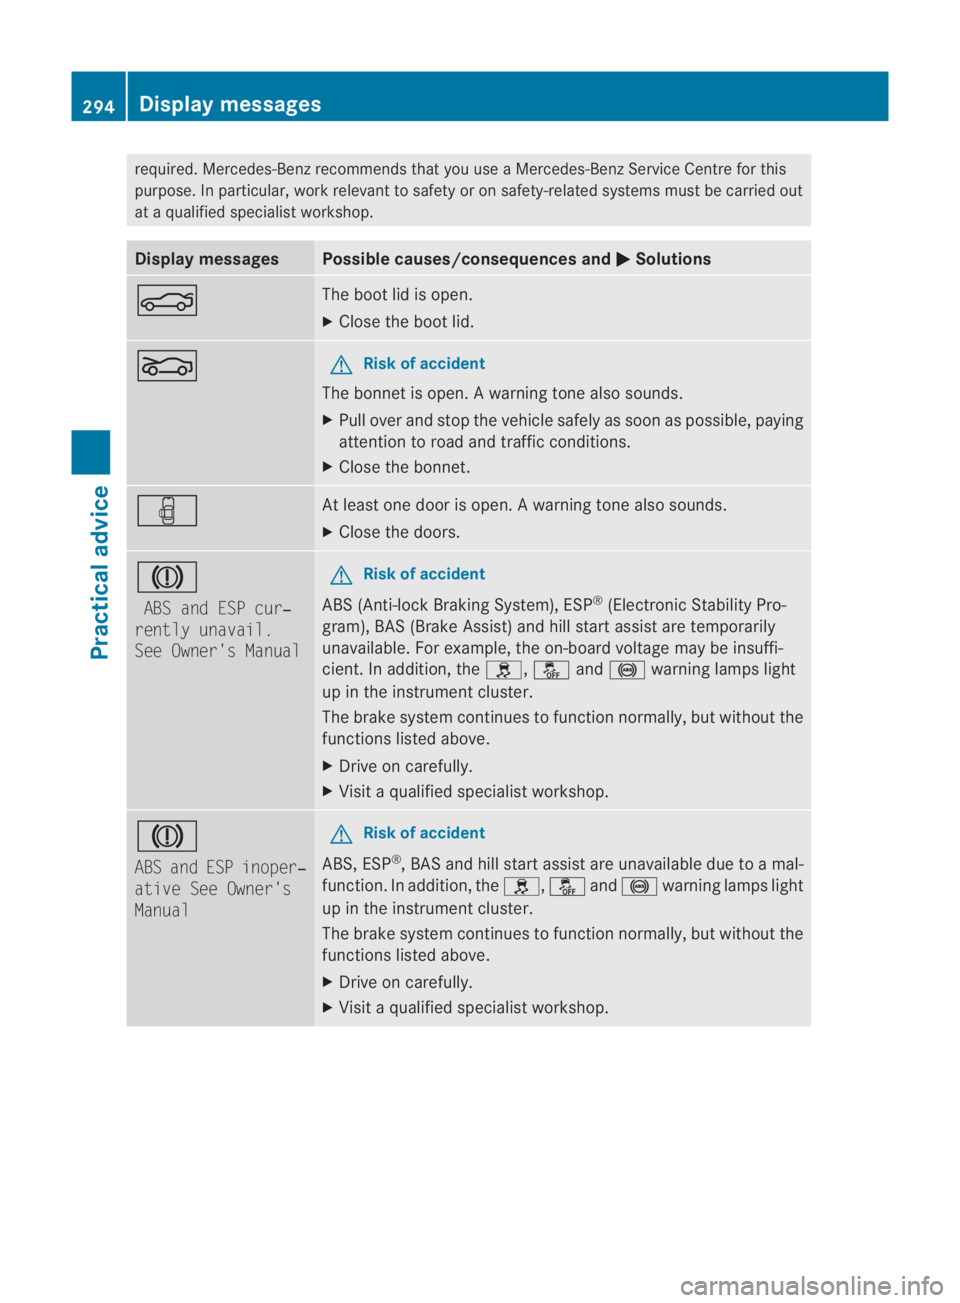
required. Mercedes-Benz recommends that you use a Mercedes-Benz Service Centre for this
purpose. In particular, work relevant to safety or on safety-related systems must be carried out
at a qualified specialist workshop. Display messages Possible causes/consequences and
0003 Solutions
000C The boot lid is open.
X
Close the boot lid. 0003 G
Risk of accident
The bonnet is open. Awarning tone also sounds.
X Pull ove rand stop the vehicle safely as soo nas possible, paying
attention to road and traffic conditions.
X Close the bonnet. 0007 At least one door is open.
Awarning tone also sounds.
X Close the doors. 0004
ABS and ESP cur‐
rently unavail.
See Owner's Manual G
Ris
kofa ccident
ABS (Anti-lock Braking System), ESP ®
(Electronic Stability Pro-
gram), BA S(Brake Assist) and hill star tassist are temporarily
unavailable. For example, the on-board voltage may be insuffi-
cient. In addition, the 0002,0001and0012 warning lamps light
up in the instrument cluster.
The brake system continues to function normally, but without the
functions listed above.
X Drive on carefully.
X Visit a qualified specialist workshop. 0004
ABS and ESP inoper‐
ative See Owner's
Manual G
Risk of accident
ABS, ESP ®
, BAS and hill start assist are unavailable due to amal-
function .Inaddition ,the 0002, 0001and0012 warning lamps light
up in the instrument cluster.
The brake system continues to function normally, but without the
functions listed above.
X Drive on carefully.
X Visit a qualified specialist workshop. 294
Display messagesPractical advice
BA 197 ECE RE 2010/6a; 1; 2, en-GB
sabbaeu
Version: 3.0.3.6 2010-05-07T14:19:43+02:00 - Seite 294
Page 298 of 361
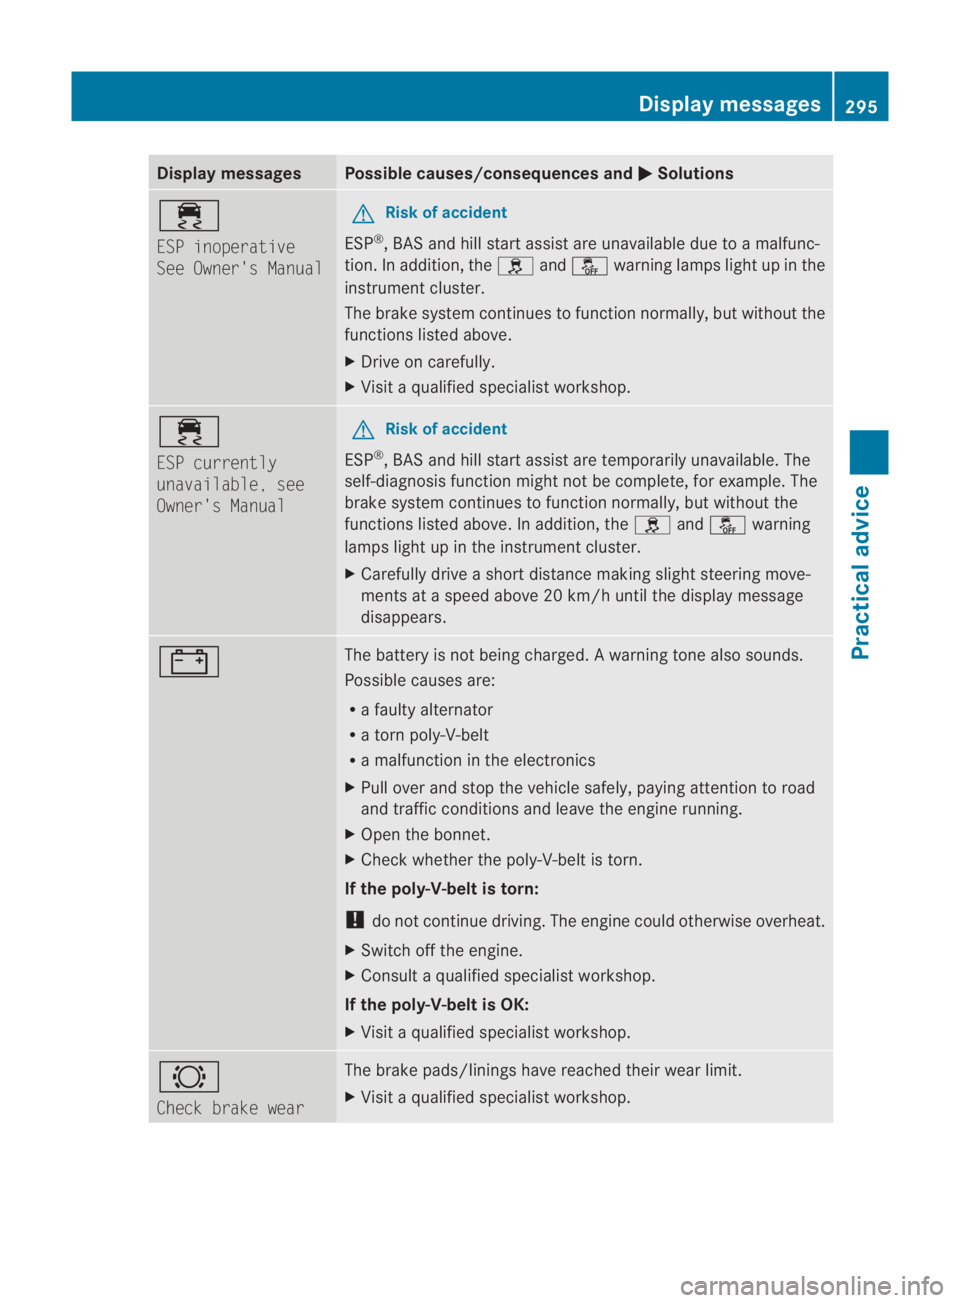
Display messages Possible causes/consequences and
0003 Solutions
0011
ESP inoperative
See Owner's Manual G
Risk of accident
ESP ®
, BA Sand hill start assist are unavailable due to amalfunc-
tion. In addition, the 0002and0001 warning lamps light up in the
instrument cluster.
The brake system continue sto function normally, but without the
functions listed above.
X Drive on carefully.
X Visit a qualified specialist workshop. 0011
ESP currently
unavailable, see
Owner's Manual G
Risk of accident
ESP ®
, BAS and hill start assist are temporarily unavailable. The
self-diagnosis function might not be complete, for example. The
brake system continues to function normally, but without the
functions listed above. In addition, the 0002and0001 warning
lamps light up in the instrument cluster.
X Carefully drive a short distance making slight steering move-
ments at a speed above 20 km/h until the display message
disappears. 000D The battery is not being charged.
Awarning tone also sounds.
Possible causes are:
R a faulty alternator
R a torn poly-V-belt
R a malfunction in the electronics
X Pull ove rand stop the vehicle safely, paying attentio nto road
and traffic conditions and leave the engine running.
X Open the bonnet.
X Check whether the poly-V-belt is torn.
If the poly-V-belt is torn:
! do not continue driving. The engine could otherwise overheat.
X Switch off the engine.
X Consult a qualified specialist workshop.
If the poly-V-belt is OK:
X Visit a qualified specialist workshop. 0006
Check brake wear The brake pads/linings have reached their wear limit.
X
Visit a qualified specialist workshop. Display messages
295Practical advice
BA 197 ECE RE 2010/6a; 1; 2, en-GB
sabbaeu Version: 3.0.3.6 2010-05-07T14:19:43+02:00 - Seite 295 Z
Page 299 of 361
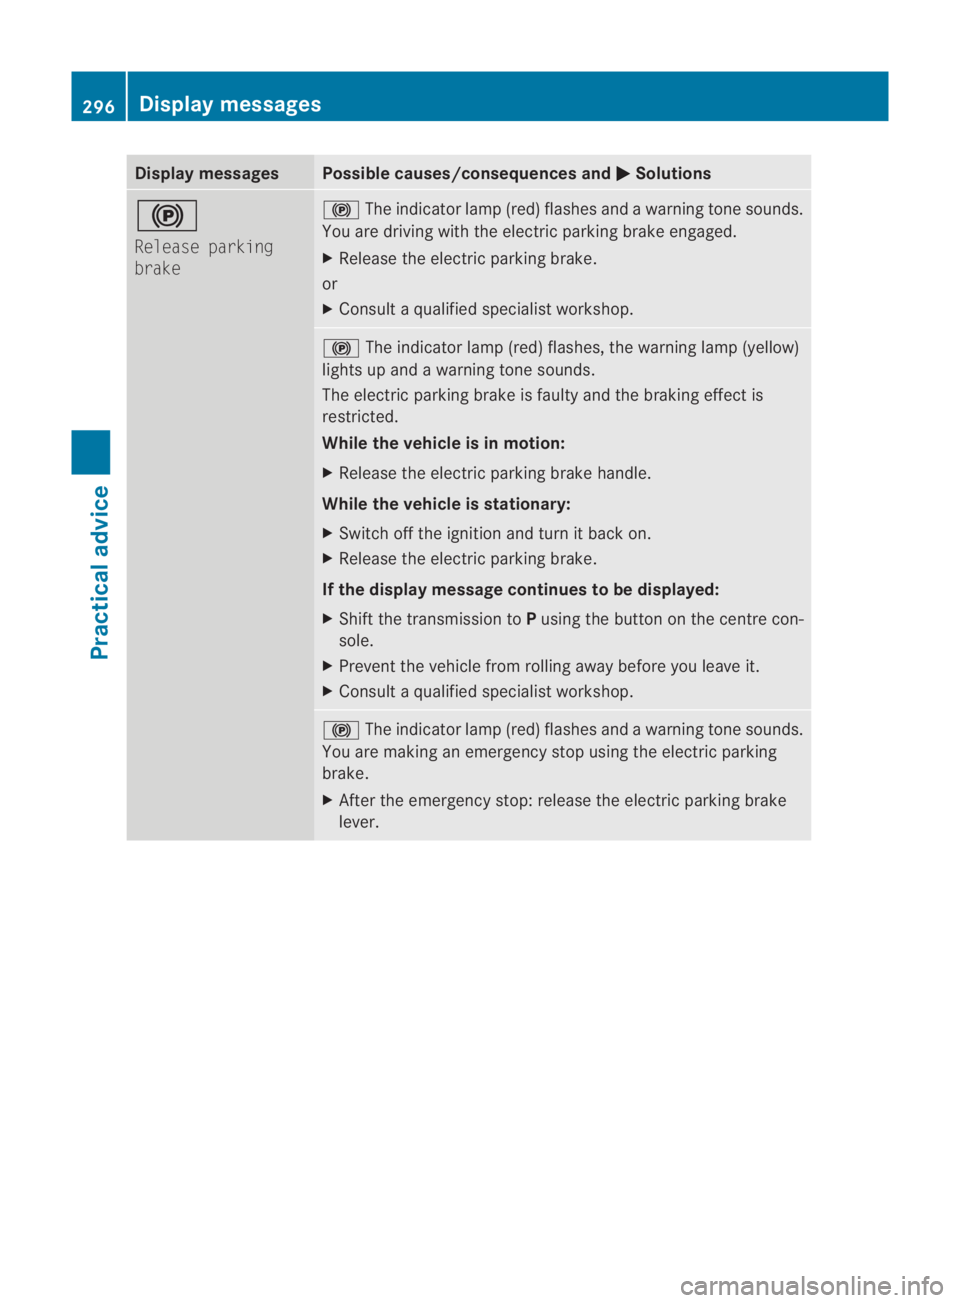
Display messages Possible causes/consequences and
0003 Solutions
0009
Release parking
brake 0009
The indicato rlamp (red) flashes and a warning tone sounds.
You are driving with the electric parking brake engaged.
X Release the electric parking brake.
or
X Consult a qualified specialist workshop. 0009
The indicator lamp (red )flashes, the warning lamp (yellow)
lights up and a warning tone sounds.
The electric parking brake is faulty and the braking effect is
restricted.
While the vehicle is in motion:
X Release the electric parking brake handle.
While the vehicle is stationary:
X Switch off the ignition and turn it back on.
X Release the electric parking brake.
If the display message continues to be displayed:
X Shift the transmission to Pusing the button on the centre con-
sole.
X Prevent the vehicle fro mrolling away before you leave it.
X Consult a qualified specialist workshop. 0009
The indicator lamp (red) flashes and a warning tone sounds.
You are making an emergency stop using the electric parking
brake.
X After the emergency stop: release the electric parking brake
lever. 296
Display messagesPractical advice
BA 197 ECE RE 2010/6a; 1; 2, en-GB
sabbaeu
Version: 3.0.3.6 2010-05-07T14:19:43+02:00 - Seite 296