2010 MERCEDES-BENZ SLK55AMG warning light
[x] Cancel search: warning lightPage 277 of 312
X
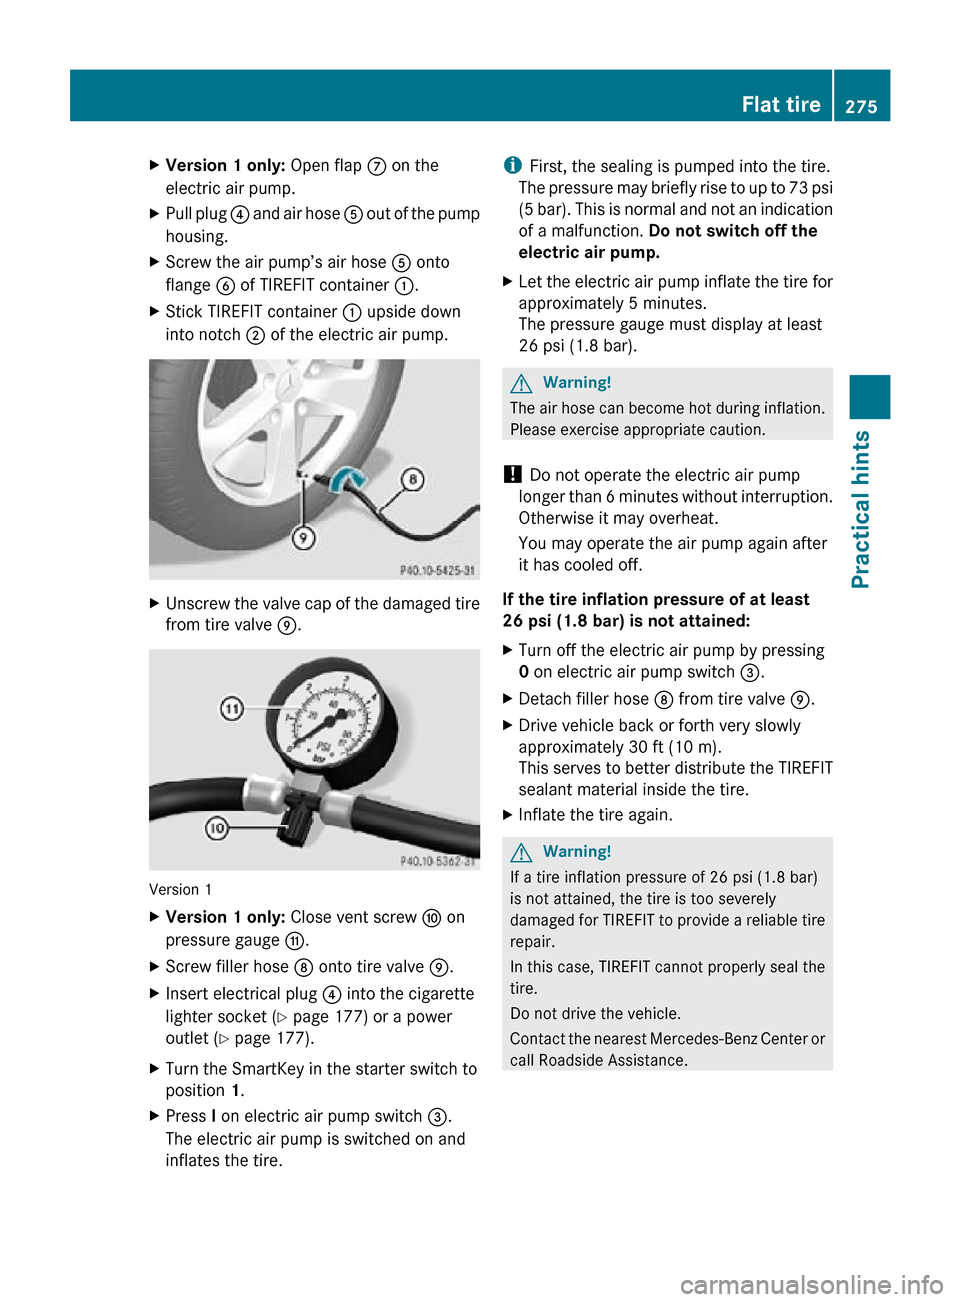
Version 1 only: Open flap C on the
electric air pump.
X Pull plug ? and air hose A out of the pump
housing.
X Screw the air pump’s air hose A onto
flange B of TIREFIT container :.
X Stick TIREFIT container : upside down
into notch ; of the electric air pump. X
Unscrew the valve cap of the damaged tire
from tire valve E. Version 1
X
Version 1 only: Close vent screw F on
pressure gauge G.
X Screw filler hose D onto tire valve E.
X Insert electrical plug ? into the cigarette
lighter socket ( Y page 177) or a power
outlet (Y page 177).
X Turn the SmartKey in the starter switch to
position 1.
X Press I on electric air pump switch =.
The electric air pump is switched on and
inflates the tire. i
First, the sealing is pumped into the tire.
The pressure may briefly rise to up to 73 psi
(5 bar). This is normal and not an indication
of a malfunction. Do not switch off the
electric air pump.
X Let the electric air pump inflate the tire for
approximately 5 minutes.
The pressure gauge must display at least
26 psi (1.8 bar). G
Warning!
The air hose can become hot during inflation.
Please exercise appropriate caution.
! Do not operate the electric air pump
longer than 6 minutes without interruption.
Otherwise it may overheat.
You may operate the air pump again after
it has cooled off.
If the tire inflation pressure of at least
26 psi (1.8 bar) is not attained:
X Turn off the electric air pump by pressing
0 on electric air pump switch =.
X Detach filler hose D from tire valve E.
X Drive vehicle back or forth very slowly
approximately 30 ft (10 m).
This serves to better distribute the TIREFIT
sealant material inside the tire.
X Inflate the tire again. G
Warning!
If a tire inflation pressure of 26 psi (1.8 bar)
is not attained, the tire is too severely
damaged for TIREFIT to provide a reliable tire
repair.
In this case, TIREFIT cannot properly seal the
tire.
Do not drive the vehicle.
Contact the nearest Mercedes-Benz Center or
call Roadside Assistance. Flat tire
275Practical hints
171_AKB; 3; 60, en-US
d2ureepe, Version: 2.11.8.1 2009-05-11T16:00:23+02:00 - Seite 275 Z
Page 280 of 312
Always try lifting the vehicle using the jack on
a level surface. However, should
circumstances require you to do so on a hill:
X
Place wheel chocks or other sizeable
objects on the downhill side in front of both
wheels on the side opposite to the side on
which the wheel is to be changed. G
Warning!
Only jack up the vehicle on level ground or on
slight inclines/declines. Otherwise, the
vehicle could fall off the jack and injure you or
others. X
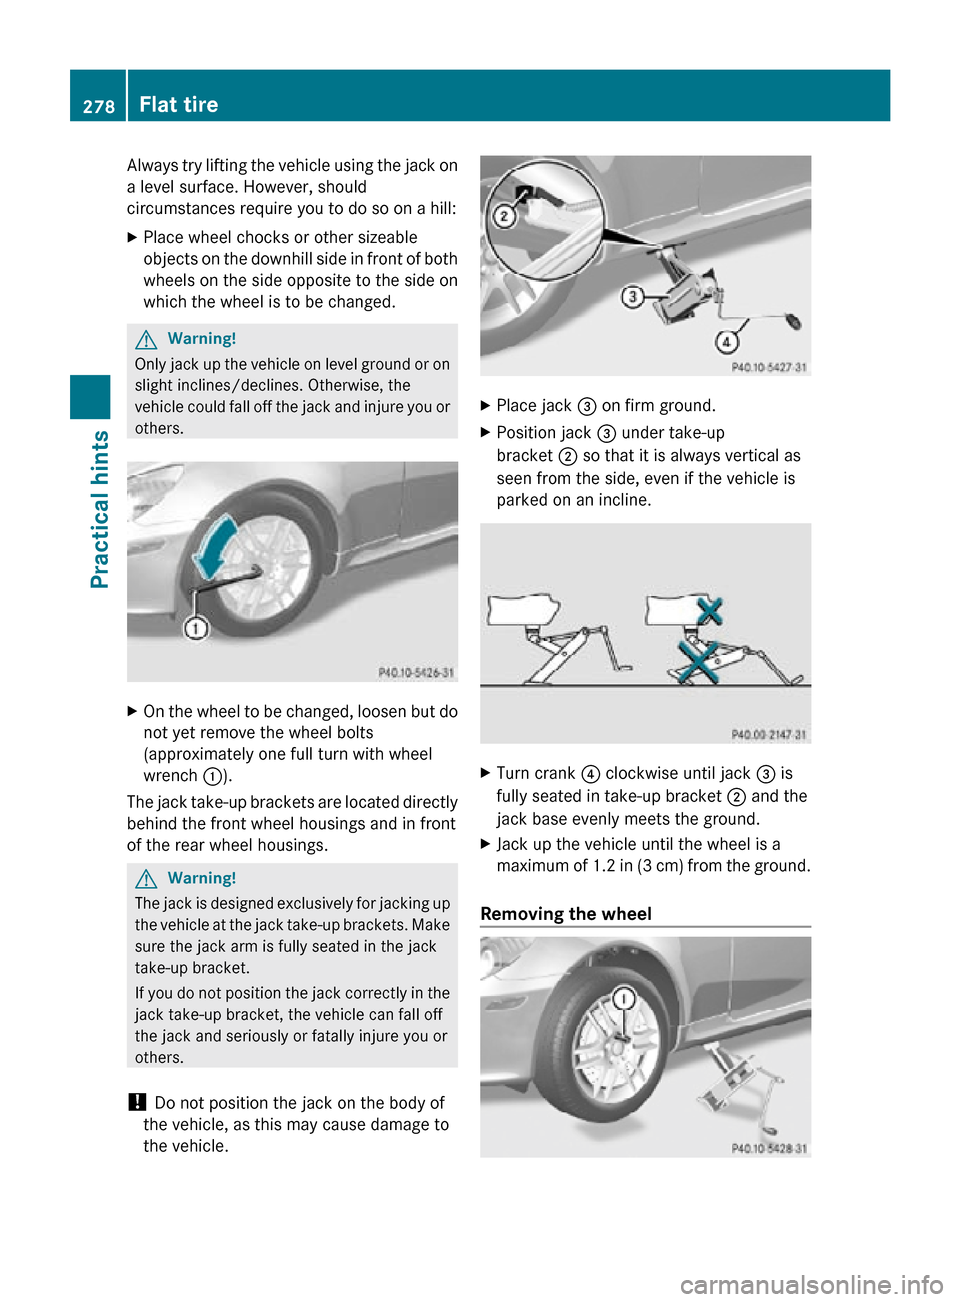
On the wheel to be changed, loosen but do
not yet remove the wheel bolts
(approximately one full turn with wheel
wrench :).
The jack take-up brackets are located directly
behind the front wheel housings and in front
of the rear wheel housings. G
Warning!
The jack is designed exclusively for jacking up
the vehicle at the jack take-up brackets. Make
sure the jack arm is fully seated in the jack
take-up bracket.
If you do not position the jack correctly in the
jack take-up bracket, the vehicle can fall off
the jack and seriously or fatally injure you or
others.
! Do not position the jack on the body of
the vehicle, as this may cause damage to
the vehicle. X
Place jack = on firm ground.
X Position jack = under take-up
bracket ; so that it is always vertical as
seen from the side, even if the vehicle is
parked on an incline. X
Turn crank ? clockwise until jack = is
fully seated in take-up bracket ; and the
jack base evenly meets the ground.
X Jack up the vehicle until the wheel is a
maximum of 1.2 in (3 cm) from the ground.
Removing the wheel 278
Flat tirePractical hints
171_AKB; 3; 60, en-US
d2ureepe,
Version: 2.11.8.1 2009-05-11T16:00:23+02:00 - Seite 278
Page 281 of 312
X
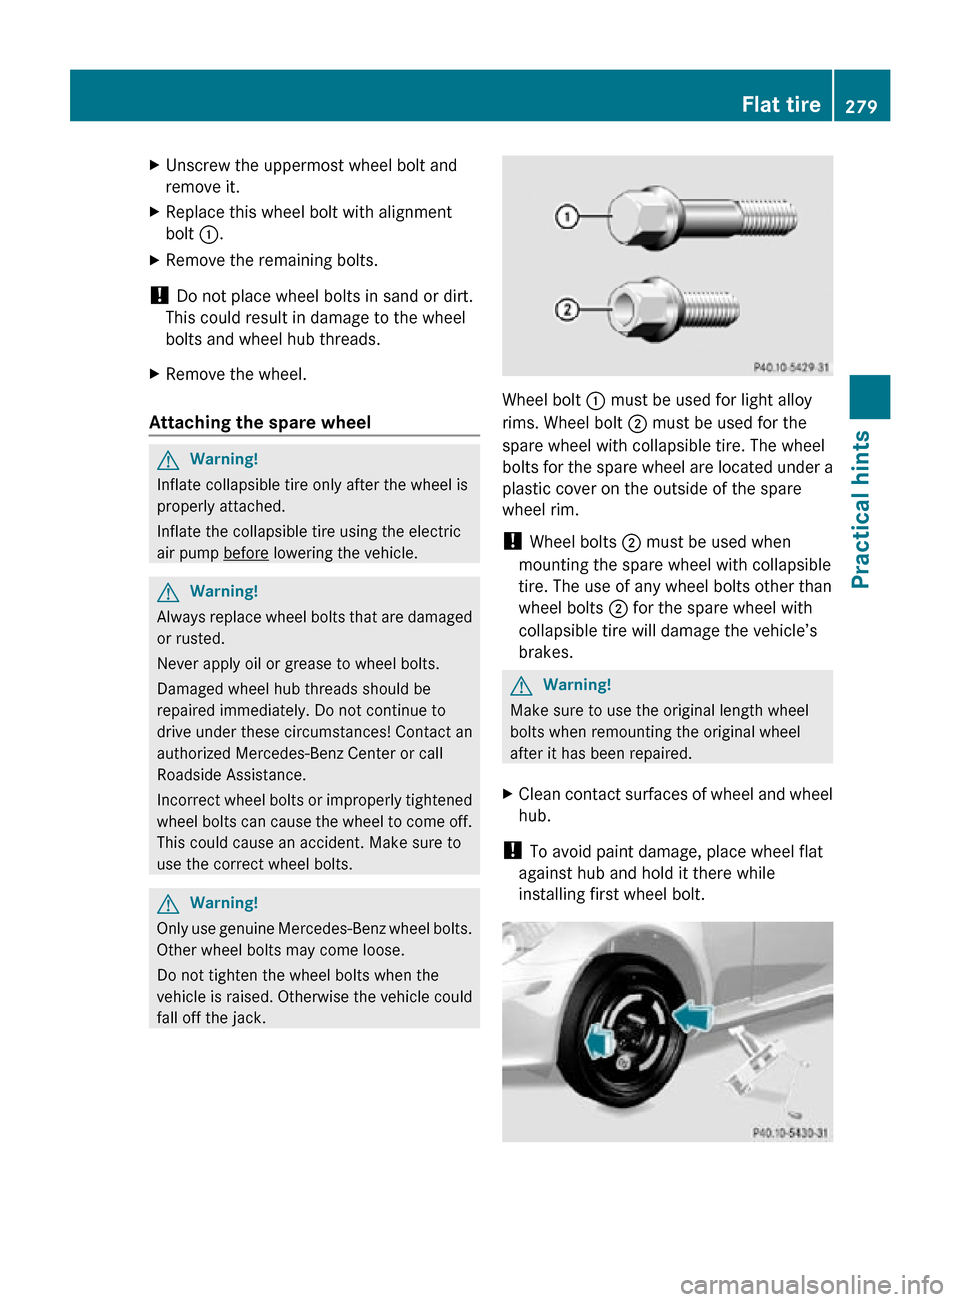
Unscrew the uppermost wheel bolt and
remove it.
X Replace this wheel bolt with alignment
bolt :.
X Remove the remaining bolts.
! Do not place wheel bolts in sand or dirt.
This could result in damage to the wheel
bolts and wheel hub threads.
X Remove the wheel.
Attaching the spare wheel G
Warning!
Inflate collapsible tire only after the wheel is
properly attached.
Inflate the collapsible tire using the electric
air pump before lowering the vehicle.
G
Warning!
Always replace wheel bolts that are damaged
or rusted.
Never apply oil or grease to wheel bolts.
Damaged wheel hub threads should be
repaired immediately. Do not continue to
drive under these circumstances! Contact an
authorized Mercedes-Benz Center or call
Roadside Assistance.
Incorrect wheel bolts or improperly tightened
wheel bolts can cause the wheel to come off.
This could cause an accident. Make sure to
use the correct wheel bolts. G
Warning!
Only use genuine Mercedes-Benz wheel bolts.
Other wheel bolts may come loose.
Do not tighten the wheel bolts when the
vehicle is raised. Otherwise the vehicle could
fall off the jack. Wheel bolt
: must be used for light alloy
rims. Wheel bolt ; must be used for the
spare wheel with collapsible tire. The wheel
bolts for the spare wheel are located under a
plastic cover on the outside of the spare
wheel rim.
! Wheel bolts ; must be used when
mounting the spare wheel with collapsible
tire. The use of any wheel bolts other than
wheel bolts ; for the spare wheel with
collapsible tire will damage the vehicle’s
brakes. G
Warning!
Make sure to use the original length wheel
bolts when remounting the original wheel
after it has been repaired.
X Clean contact surfaces of wheel and wheel
hub.
! To avoid paint damage, place wheel flat
against hub and hold it there while
installing first wheel bolt. Flat tire
279Practical hints
171_AKB; 3; 60, en-US
d2ureepe, Version: 2.11.8.1 2009-05-11T16:00:23+02:00 - Seite 279 Z
Page 282 of 312
X
Guide the spare wheel onto the alignment
bolt and push it on.
X Insert the wheel bolts and tighten them
slightly.
X Unscrew the alignment bolt.
X Install the last wheel bolt and tighten it
slightly.
X Inflate the collapsible tire ( Y page 280).
Inflating the collapsible tire G
Warning!
Inflate collapsible tire only after the wheel is
properly attached.
Inflate the collapsible tire using the electric
air pump before lowering the vehicle.
G
Warning!
Observe safety instructions on air pump label.
! Do not lower the vehicle before inflating
the collapsible tire. Otherwise the rim may
be damaged.
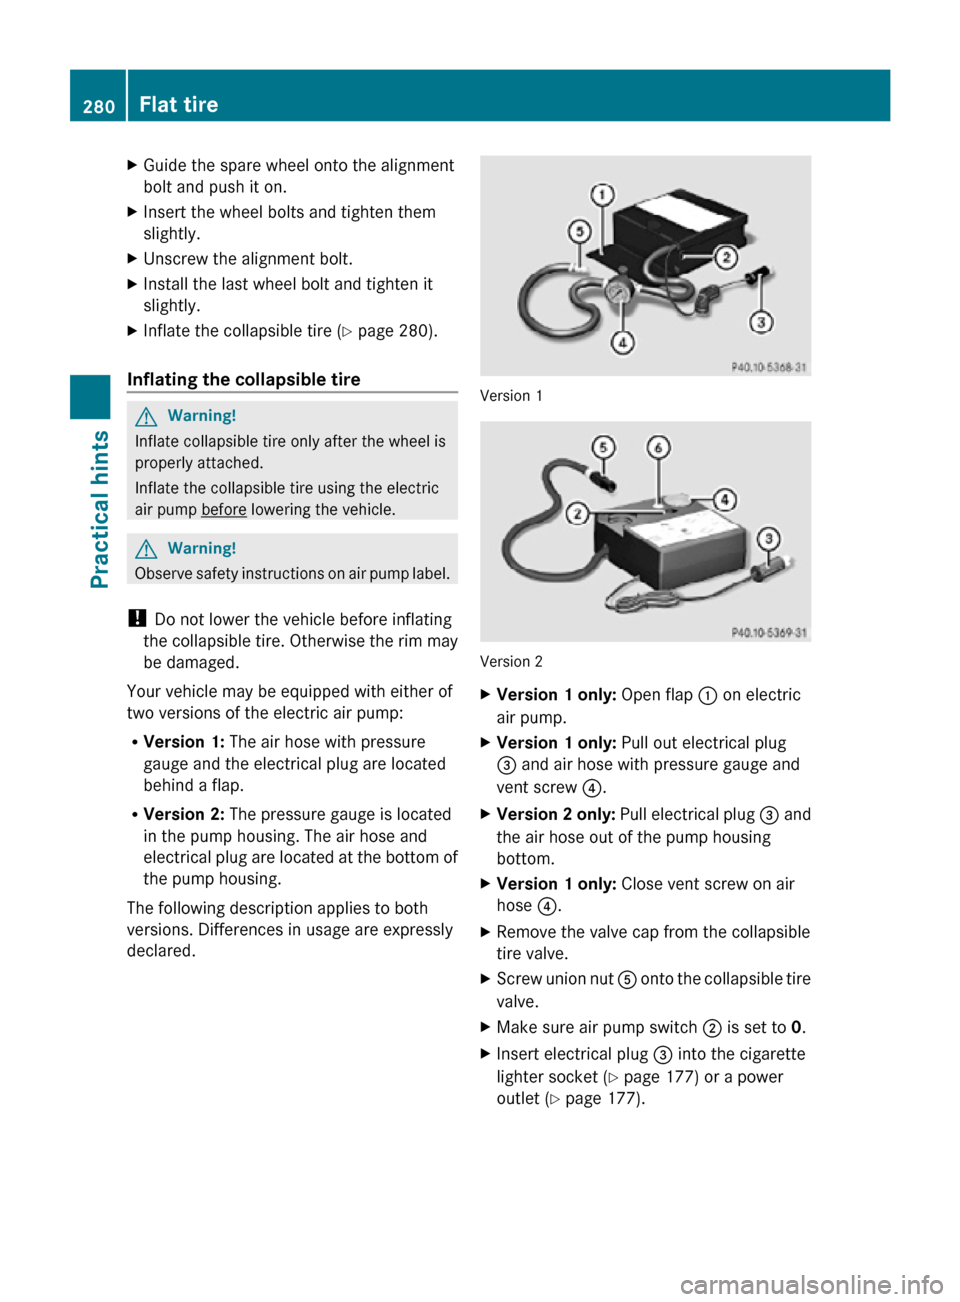
Your vehicle may be equipped with either of
two versions of the electric air pump:
R Version 1: The air hose with pressure
gauge and the electrical plug are located
behind a flap.
R Version 2: The pressure gauge is located
in the pump housing. The air hose and
electrical plug are located at the bottom of
the pump housing.
The following description applies to both
versions. Differences in usage are expressly
declared. Version 1
Version 2
X
Version 1 only: Open flap : on electric
air pump.
X Version 1 only: Pull out electrical plug
= and air hose with pressure gauge and
vent screw ?.
X Version 2 only: Pull electrical plug = and
the air hose out of the pump housing
bottom.
X Version 1 only: Close vent screw on air
hose ?.
X Remove the valve cap from the collapsible
tire valve.
X Screw union nut A onto the collapsible tire
valve.
X Make sure air pump switch ; is set to 0.
X Insert electrical plug = into the cigarette
lighter socket ( Y page 177) or a power
outlet (Y page 177). 280
Flat tirePractical hints
171_AKB; 3; 60, en-US
d2ureepe,
Version: 2.11.8.1 2009-05-11T16:00:23+02:00 - Seite 280
Page 305 of 312
Engine oil additives
! Do
not blend oil additives with engine oil.
They may damage the engine. Damage or
malfunctions resulting from blending oil
additives are not covered by the Mercedes-
Benz Limited Warranty. Air conditioning refrigerant
R134a (HFC) refrigerant and special PAG
lubricating
oil are used in the air conditioning
system.
! Never use R 12 (CFC) or mineral-based
lubricating oil. Otherwise damage to the
system will occur. Brake fluid
G
Warning!
During vehicle operation, the boiling point of
the brake fluid is continuously reduced
through the absorption of moisture from the
atmosphere.
Under extremely strenuous operating
conditions, this moisture content can lead to
the formation of bubbles in the system, thus
reducing the system’s efficiency.
Therefore, the brake fluid must be replaced
regularly.
Refer to your vehicle’s Maintenance
Booklet for replacement interval.
Only brake fluid approved by Mercedes-Benz
is recommended. Any authorized Mercedes-
Benz Center will provide you with additional
information. Premium unleaded gasoline
G
Warning!
Gasoline is highly flammable and poisonous.
It burns violently and can cause serious
personal injury. Never allow sparks, flames or smoking
materials near gasoline!
Turn off the engine before refueling.
Whenever you are around gasoline, avoid
inhaling fumes and any skin or clothing
contact. Extinguish all smoking materials.
Direct skin contact with fuels and the
inhalation of fuel vapors are damaging your
health.
! To maintain the engine’s durability and
performance, premium unleaded gasoline
must be used.
If premium unleaded gasoline is not
available and low octane gasoline is used,
follow these precautions:
R Have the fuel tank only partially filled
with
unleaded regular gasoline and fill up
with premium unleaded gasoline as soon
as possible.
R Avoid full throttle driving and abrupt
acceleration.
R Do not exceed an engine speed of
3 000 rpm if the vehicle is loaded with a
light load such as two persons and no
luggage.
R Do not exceed 2
/ 3 of maximum
accelerator pedal position if the vehicle
is fully loaded or operating in
mountainous terrain. Fuel requirements
Only use premium unleaded gasoline. The
octane
number (posted at the pump) must be
91 min. It is an average of both the Research
Octane Number (RON) and the Motor Octane
Number (MON): (RON+MON)/2. This is also
known as the ANTI-KNOCK INDEX.
Reformulated gasolines (RFG) and/or
unleaded gasoline containing oxygenates
such as ethanol, TAME, ETBE, IPA, IBA, and
TBA can be used provided the ratio of any one Fuels, coolants, lubricants, etc.
303
Technical data
171_AKB; 3; 60, en-US
d2ureepe, Version: 2.11.8.1 2009-05-11T16:00:23+02:00 - Seite 303 Z