2010 MERCEDES-BENZ SLK55AMG warning light
[x] Cancel search: warning lightPage 61 of 312
When you open a door, the windows on that
side lowers slightly. Once you close the
door, the windows move up again.
! A window will not work if it is blocked with
ice or if the vehicle battery is discharged. If
you cannot shut a door, do not force it or
you could damage the door or the window.
Fix whatever is affecting the window before
trying to shut the door. Automatic central locking
You can switch the automatic central locking
on or off using the control system
(Y page 108).
The doors and the trunk lock automatically
when the vehicle is set into motion.
You can open a locked door from the inside.
Open door only when conditions are safe to
do so.
The doors are designed to unlock
automatically after an accident if the force of
the impact exceeds a preset threshold.
The vehicle locks automatically when the
ignition is switched on and the wheels are
turning at a vehicle speed of above 9 mph
(15 km/h). You could therefore lock yourself
out when the vehicle is pushed or towed or is
on a test stand. Locking and unlocking from the inside
G
Observe Safety notes, see page 45.
You can lock or unlock the vehicle from the
inside using the central locking or unlocking
switch. This can be useful, for example, if you
want to lock the vehicle before starting to
drive.
The central locking or unlocking switch does
not lock or unlock the fuel filler flap or the
interior storage compartments, such as the
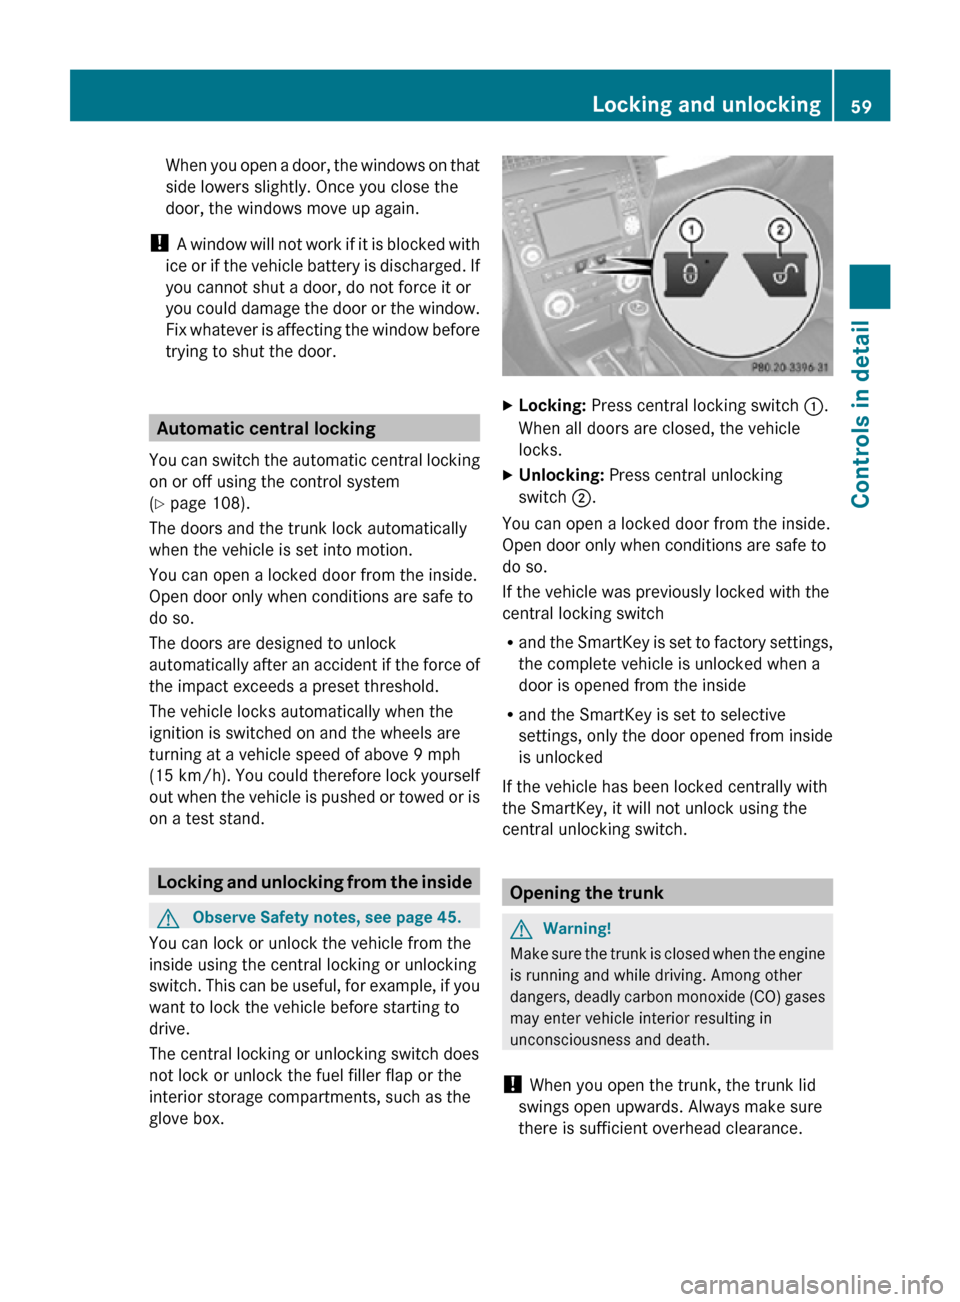
glove box. X
Locking: Press central locking switch :.
When all doors are closed, the vehicle
locks.
X Unlocking: Press central unlocking
switch ;.
You can open a locked door from the inside.
Open door only when conditions are safe to
do so.
If the vehicle was previously locked with the
central locking switch
R and the SmartKey is set to factory settings,
the complete vehicle is unlocked when a
door is opened from the inside
R and the SmartKey is set to selective
settings, only the door opened from inside
is unlocked
If the vehicle has been locked centrally with
the SmartKey, it will not unlock using the
central unlocking switch. Opening the trunk
G
Warning!
Make sure the trunk is closed when the engine
is running and while driving. Among other
dangers, deadly carbon monoxide (CO) gases
may enter vehicle interior resulting in
unconsciousness and death.
! When you open the trunk, the trunk lid
swings open upwards. Always make sure
there is sufficient overhead clearance. Locking and unlocking
59Controls in detail
171_AKB; 3; 60, en-US
d2ureepe, Version: 2.11.8.1 2009-05-11T16:00:23+02:00 - Seite 59 Z
Page 62 of 312
You can open the trunk when the vehicle is
stationary and the retractable hardtop is fully
opened or closed.
A minimum height clearance of 5.78 ft
(1.76 m) is required to open the trunk lid.
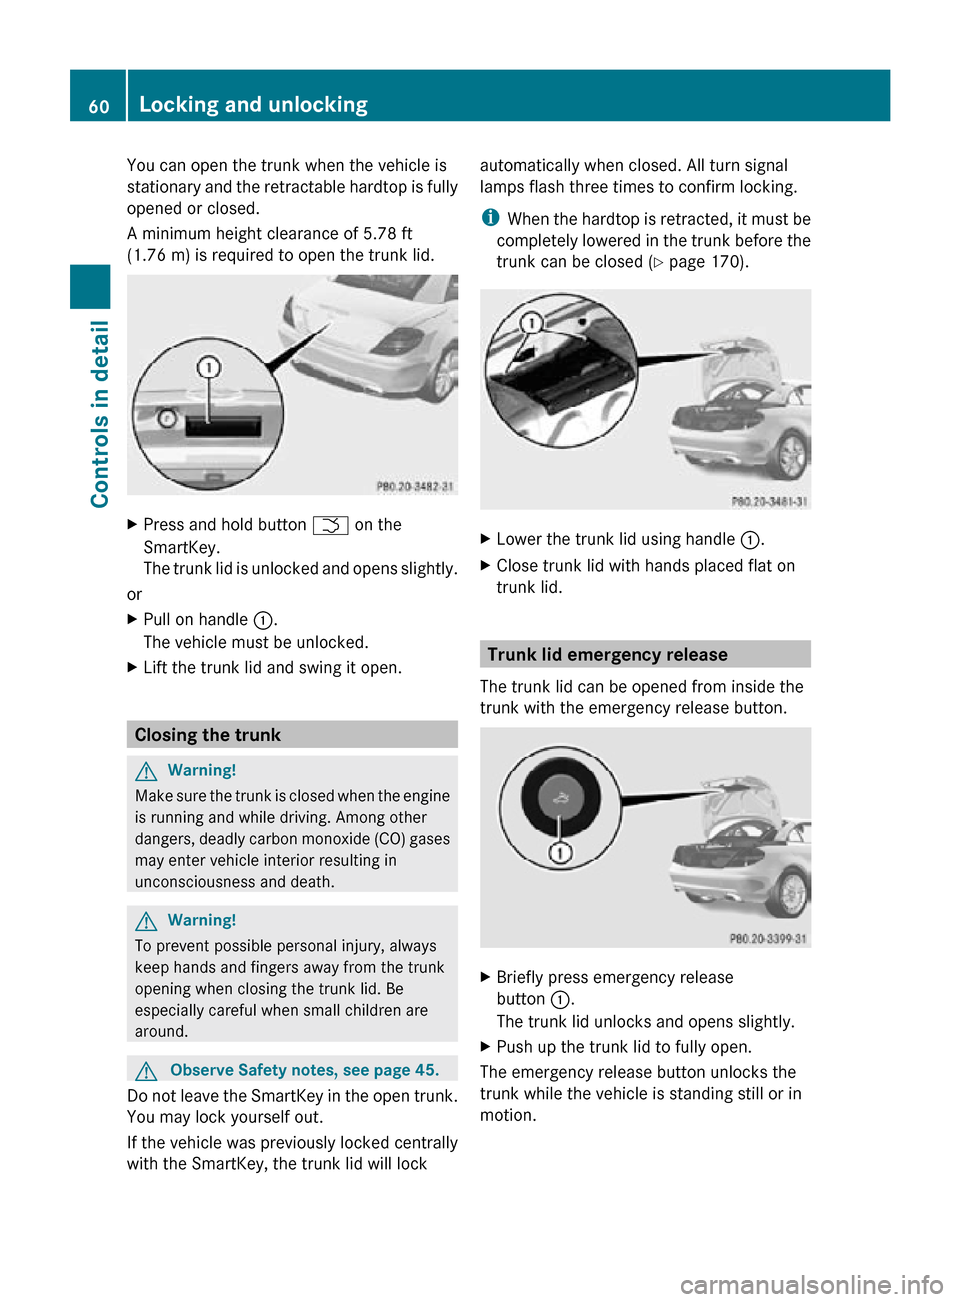
X
Press and hold button F on the
SmartKey.
The trunk lid is unlocked and opens slightly.
or
X Pull on handle :.
The vehicle must be unlocked.
X Lift the trunk lid and swing it open. Closing the trunk
G
Warning!
Make sure the trunk is closed when the engine
is running and while driving. Among other
dangers, deadly carbon monoxide (CO) gases
may enter vehicle interior resulting in
unconsciousness and death. G
Warning!
To prevent possible personal injury, always
keep hands and fingers away from the trunk
opening when closing the trunk lid. Be
especially careful when small children are
around. G
Observe Safety notes, see page 45.
Do not leave the SmartKey in the open trunk.
You may lock yourself out.
If the vehicle was previously locked centrally
with the SmartKey, the trunk lid will lock automatically when closed. All turn signal
lamps flash three times to confirm locking.
i
When the hardtop is retracted, it must be
completely lowered in the trunk before the
trunk can be closed ( Y page 170). X
Lower the trunk lid using handle :.
X Close trunk lid with hands placed flat on
trunk lid. Trunk lid emergency release
The trunk lid can be opened from inside the
trunk with the emergency release button. X
Briefly press emergency release
button :.
The trunk lid unlocks and opens slightly.
X Push up the trunk lid to fully open.
The emergency release button unlocks the
trunk while the vehicle is standing still or in
motion. 60
Locking and unlockingControls in detail
171_AKB; 3; 60, en-US
d2ureepe,
Version: 2.11.8.1 2009-05-11T16:00:23+02:00 - Seite 60
Page 64 of 312

driving, refer to “Lamps in instrument cluster”
(Y page 256).
If the SmartKey is left in starter switch
position 0 for an extended period of time, it
can
no longer be turned in the starter switch.
In this case, the steering is locked. To unlock,
remove SmartKey from the starter switch and
reinsert.
The steering is locked when the SmartKey is
removed from the starter switch.
X Always remove the SmartKey from the
starter switch when the engine is not in
operation.
This
will help to prevent accelerated vehicle
battery discharge or a completely
discharged vehicle battery.
If the SmartKey cannot be turned in the
starter
switch, the vehicle battery may not be
sufficiently charged.
X Check the vehicle battery and charge it if
necessary ( Y page 283).
or
X Get a jump start (Y page 283). Seats
Safety notes
G
Warning!
In order to avoid possible loss of vehicle
control
the following must be done before the
vehicle is put into motion:
R seat adjustment
R head restraint adjustment
R steering wheel adjustment
R rear view mirror adjustment
R fastening of seat belts G
Warning!
Do not adjust the driver’s seat while driving.
Adjusting the seat while driving could cause
the driver to lose control of the vehicle. Never ride in a moving vehicle with the seat
backrest
in an excessively reclined position as
this can be dangerous. You could slide under
the seat belt in a collision. If you slide under
it, the seat belt would apply force at the
abdomen or neck. That could cause serious
or fatal injuries. The seat backrest and seat
belts provide the best restraint when the
wearer is in a position that is as upright as
possible and seat belts are properly
positioned on the body. G
Warning!
Your seat must be adjusted so that you can
correctly fasten your seat belt.
Observe the following points:
R Adjust
the seat backrest until your arms are
slightly angled when holding the steering
wheel.
R Adjust the seat to a comfortable seating
position that still allows you to reach the
accelerator/brake pedal safely. The
position should be as far back as possible
with the driver still able to operate the
controls properly.
R Adjust the head restraint so that it is as
close to the head as possible. The center of
the head restraint must support the back of
the head at eye level.
R Never place hands under the seat or near
any moving parts while a seat is being
adjusted.
Failure to do so could result in an accident
and/or serious personal injury. G
Warning!
Children 12 years old and under must be
seated and properly secured in an
appropriately sized infant restraint, toddler
restraint, or booster seat recommended for
the
size and weight of the child. For additional
information, see section “Children in the
vehicle”.
A child’s risk of serious or fatal injuries is
significantly increased if the child restraints 62
Seats
Controls in detail
171_AKB; 3; 60, en-US
d2ureepe,
Version: 2.11.8.1 2009-05-11T16:00:23+02:00 - Seite 62
Page 65 of 312

are not properly secured in the vehicle and/
or the child is not properly secured in the child
restraint.
G
Warning!
For your protection, drive only with properly
positioned head restraints.
Adjust the head restraint so that it is as close
to the head as possible and the center of the
head restraint supports the back of the head
at eye level. This will reduce the potential for
injury to the head and neck in the event of an
accident or similar situation.
Do not drive the vehicle without the seat head
restraints. Head restraints are intended to
help reduce injuries during an accident. Seat adjustment
The seats can be adjusted either manually or
electrically, depending on the vehicle’s
equipment.
! When moving the seats, make sure there
are no items in the footwell or behind the
seats. Otherwise, you could damage the
seats and/or the items.
Manual seat adjustment X
Seat fore and aft adjustment: Pull
handle :.
X Slide the seat to the desired position.
X Allow handle : to reengage with an
audible click. X
Check for proper engagement before
driving.
X Seat height: Pull or push handle ; up or
down and adjust the seat height until your
legs are lightly supported.
X Seat backrest tilt: Pull handle = and
adjust the seat backrest until your arms are
slightly angled when holding the steering
wheel.
X Release handle = when the desired seat
backrest tilt is reached.
When you hear an audible click, the seat
backrest is again fixed into place.
Power seats G
Warning!
The power seats can be operated at any time.
Therefore, do not leave children unattended
in the vehicle, or with access to an unlocked
vehicle. A child’s unsupervised access to a
vehicle could result in an accident and/or
serious personal injury.
i Vehicles without memory function:
The seats can be adjusted within 5 minutes
after either front door has been opened.
The counter resets each time
R you open or close a front door
R you insert the SmartKey into the starter
switch
R you remove the SmartKey from the
starter switch
R you switch the ignition on or off
Just like in vehicles with memory function,
the power seats can be operated at any
time when the ignition is switched on.
i The memory function (Y page 70) lets
you store the settings for the seat position
together with the settings for the steering
wheel (electrical) and exterior rear view
mirrors. Seats
63Controls in detail
171_AKB; 3; 60, en-US
d2ureepe, Version: 2.11.8.1 2009-05-11T16:00:23+02:00 - Seite 63 Z
Page 66 of 312
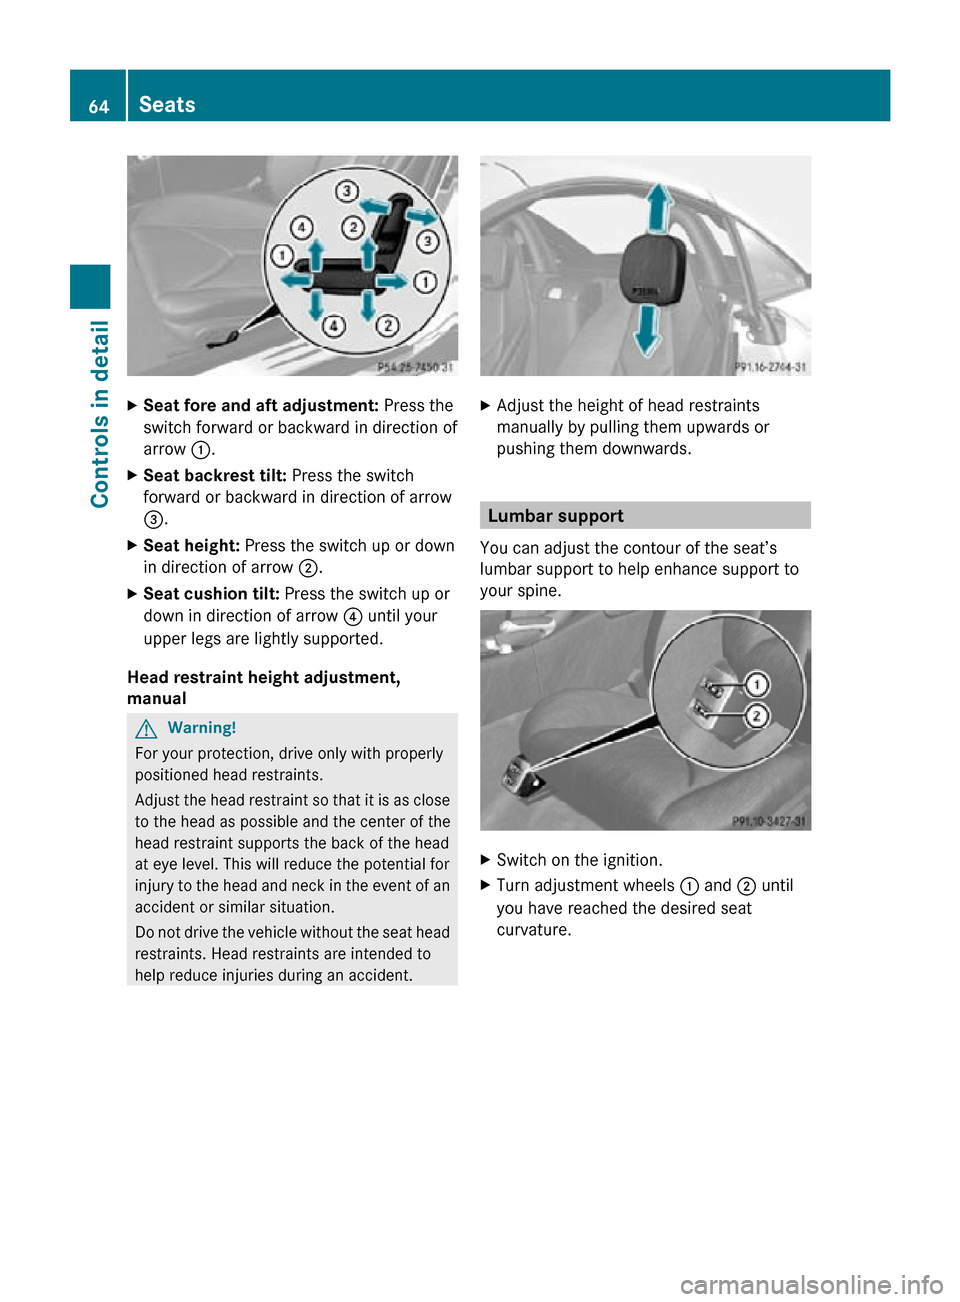
X
Seat fore and aft adjustment: Press the
switch forward or backward in direction of
arrow :.
X Seat backrest tilt: Press the switch
forward or backward in direction of arrow
=.
X Seat height: Press the switch up or down
in direction of arrow ;.
X Seat cushion tilt: Press the switch up or
down in direction of arrow ? until your
upper legs are lightly supported.
Head restraint height adjustment,
manual G
Warning!
For your protection, drive only with properly
positioned head restraints.
Adjust the head restraint so that it is as close
to the head as possible and the center of the
head restraint supports the back of the head
at eye level. This will reduce the potential for
injury to the head and neck in the event of an
accident or similar situation.
Do not drive the vehicle without the seat head
restraints. Head restraints are intended to
help reduce injuries during an accident. X
Adjust the height of head restraints
manually by pulling them upwards or
pushing them downwards. Lumbar support
You can adjust the contour of the seat’s
lumbar support to help enhance support to
your spine. X
Switch on the ignition.
X Turn adjustment wheels : and ; until
you have reached the desired seat
curvature. 64
SeatsControls in detail
171_AKB; 3; 60, en-US
d2ureepe,
Version: 2.11.8.1 2009-05-11T16:00:23+02:00 - Seite 64
Page 68 of 312
The AIRSCARF neck-level heating will switch
back on again automatically as soon as
sufficient voltage is available.
Multifunction steering wheel
Safety notes
G
Warning!
Do not adjust the steering wheel while driving.
Adjusting the steering wheel while driving, or
driving without the steering wheel adjustment
feature locked could cause the driver to lose
control of the vehicle.
The electrical steering wheel adjustment
feature can be operated at any time.
Therefore, do not leave children unattended
in the vehicle, or with access to an unlocked
vehicle. A child’s unsupervised access to a
vehicle could result in an accident and/or
serious personal injury.
Make sure
R you can reach the steering wheel with your
arms slightly bent at the elbows
R you can move your legs freely
R all displays (including malfunction and
indicator lamps) on the instrument cluster
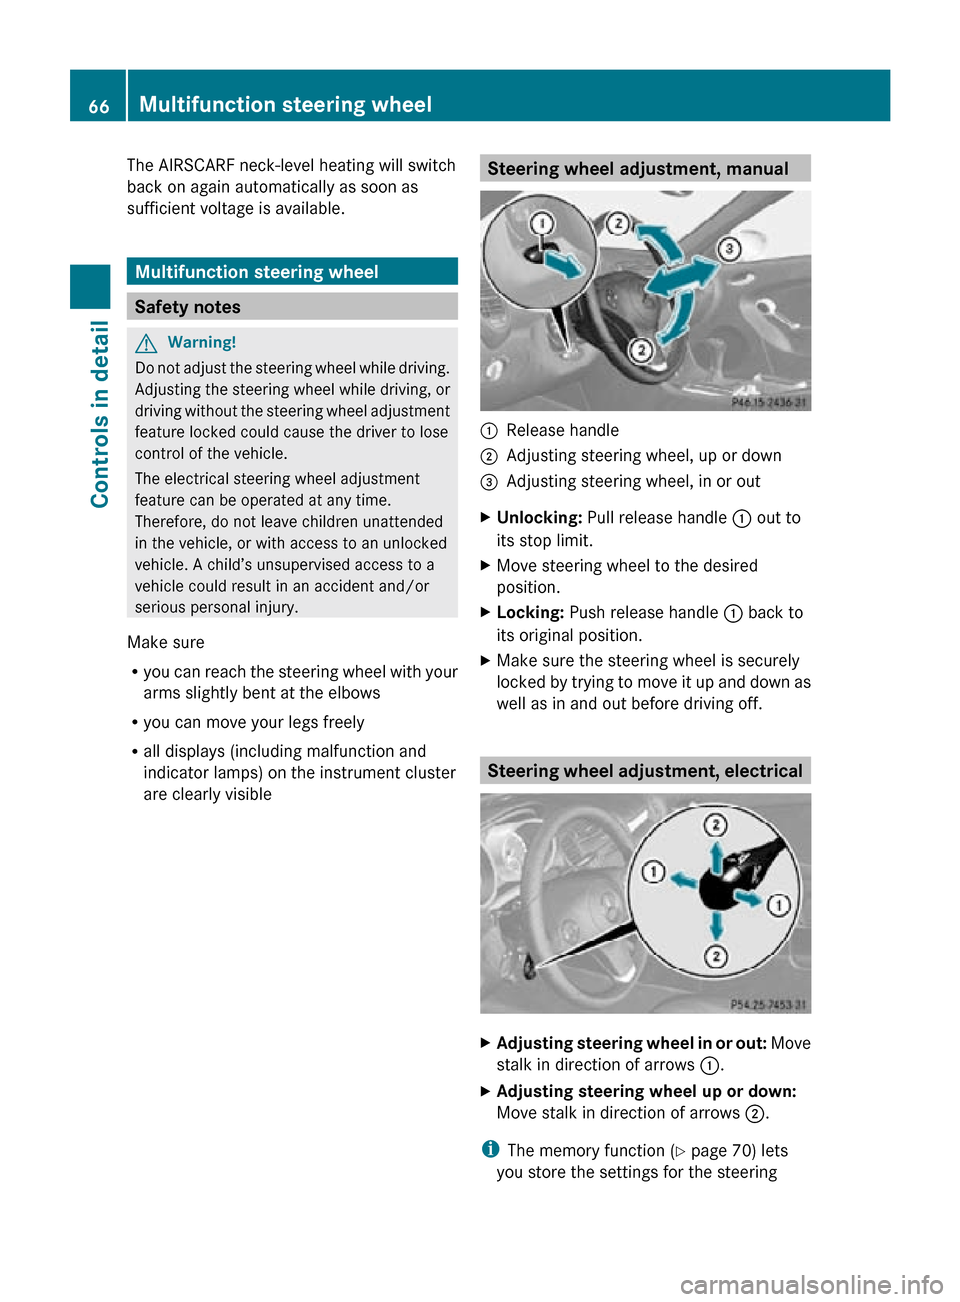
are clearly visible Steering wheel adjustment, manual
:
Release handle
; Adjusting steering wheel, up or down
= Adjusting steering wheel, in or out
X Unlocking: Pull release handle : out to
its stop limit.
X Move steering wheel to the desired
position.
X Locking: Push release handle : back to
its original position.
X Make sure the steering wheel is securely
locked by trying to move it up and down as
well as in and out before driving off. Steering wheel adjustment, electrical
X
Adjusting steering wheel in or out: Move
stalk in direction of arrows :.
X Adjusting steering wheel up or down:
Move stalk in direction of arrows ;.
i The memory function (Y page 70) lets
you store the settings for the steering 66
Multifunction steering wheelControls in detail
171_AKB; 3; 60, en-US
d2ureepe,
Version: 2.11.8.1 2009-05-11T16:00:23+02:00 - Seite 66
Page 71 of 312

the passenger-side exterior rear view
mirror.
The indicator lamp in the respective button
comes on for approximately 10 seconds.
If you do not make adjustments to the
selected exterior rear view mirror within
10 seconds, the indicator lamp goes out.
You will then have to select the desired
exterior rear view mirror again before
adjustments can be made. Adjustments
can only be made with the indicator lamp
for the respective exterior rear view mirror
button illuminated.
X Press adjustment button ; up, down, left
or right according to the desired setting.
! If an exterior rear view mirror was forcibly
hit from the front, manually snap it back
into place.
i At low ambient temperatures, the exterior
rear view mirrors will be heated
automatically. Auto-dimming rear view mirrors
The exterior rear view mirror on the driver’s
side and the interior rear view mirror will
respond automatically to glare when the
ignition is switched on and incoming light
from headlamps falls on the sensor in the
interior rear view mirror.
The rear view mirrors will not react if reverse
gear R is engaged or the interior lighting is
switched on. G
Warning!
The auto dimming function does not react if
incoming light is not aimed directly at sensors
in the interior rear view mirror.
The interior rear view mirror and the exterior
rear view mirror on the driver’s side do not
react, for example, if the cloth wind screen is
installed.
Light hitting the mirror(s) at certain angles
(incident light) could blind you. As a result, you may not be able to observe traffic
conditions and could cause an accident.
Exterior rear view mirror parking
position
To assist during parking maneuvers, you can
set the passenger-side exterior rear view
mirror so that you can see the rear wheel and
the road curb.
Setting and storing the parking position X
Switch on the ignition.
X Press button =, to select the passenger-
side exterior rear view mirror.
X Shift the automatic transmission into
reverse gear R (manual transmission to
reverse gear).
The passenger-side exterior rear view
mirror moves to the preset parking
position.
X Adjust the passenger-side exterior rear
view mirror with adjustment button ; so
that you see the rear wheel and the road
curb.
X Press memory button M (Y page 70) and
within 3 seconds, press one of the arrows
of adjustment button ;.
The parking position is stored if the exterior
rear view mirror does not move. Mirrors
69Controls in detail
171_AKB; 3; 60, en-US
d2ureepe, Version: 2.11.8.1 2009-05-11T16:00:23+02:00 - Seite 69 Z
Page 72 of 312
Calling up the parking position
X
Switch on the ignition.
X Press button ;, to select the passenger-
side exterior rear view mirror.
X Shift the automatic transmission into
reverse gear R (manual transmission to
reverse gear).
The passenger-side exterior rear view
mirror moves to the stored parking
position.
The passenger-side exterior rear view mirror
returns to its previously stored driving
position
R 10 seconds after you have put the gear
selector lever out of reverse gear R (manual
transmission out of reverse)
R immediately once your vehicle exceeds a
speed of approximately 6 mph (10 km/h)
R immediately when you press button : to
select the driver’s side exterior rear view
mirror Memory function
Notes
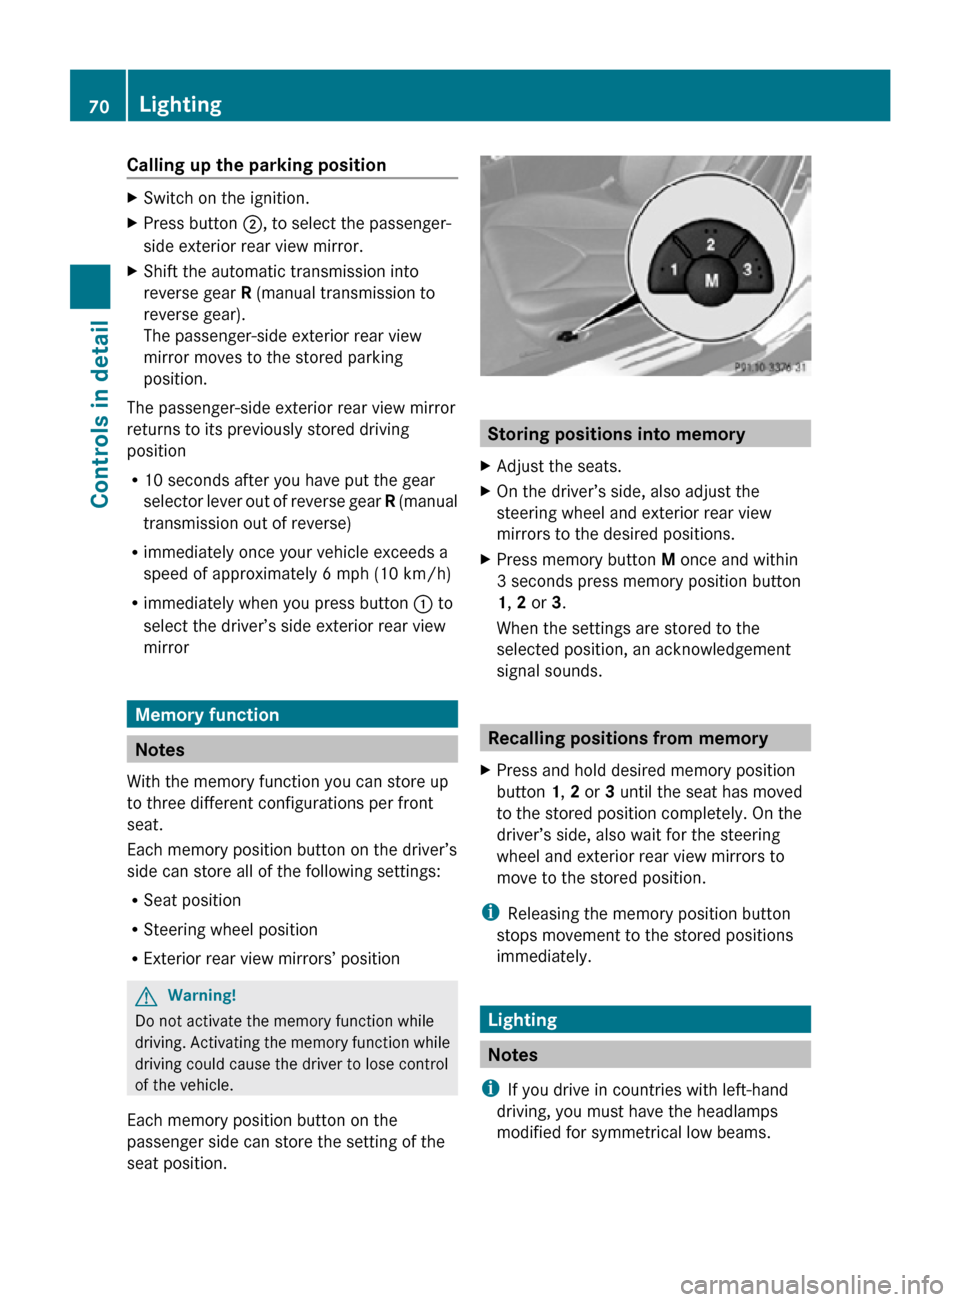
With the memory function you can store up
to three different configurations per front
seat.
Each memory position button on the driver’s
side can store all of the following settings:
R Seat position
R Steering wheel position
R Exterior rear view mirrors’ position G
Warning!
Do not activate the memory function while
driving. Activating the memory function while
driving could cause the driver to lose control
of the vehicle.
Each memory position button on the
passenger side can store the setting of the
seat position. Storing positions into memory
X Adjust the seats.
X On the driver’s side, also adjust the
steering wheel and exterior rear view
mirrors to the desired positions.
X Press memory button M once and within
3 seconds press memory position button
1, 2 or 3.
When the settings are stored to the
selected position, an acknowledgement
signal sounds. Recalling positions from memory
X Press and hold desired memory position
button 1, 2 or 3 until the seat has moved
to the stored position completely. On the
driver’s side, also wait for the steering
wheel and exterior rear view mirrors to
move to the stored position.
i Releasing the memory position button
stops movement to the stored positions
immediately. Lighting
Notes
i If you drive in countries with left-hand
driving, you must have the headlamps
modified for symmetrical low beams. 70
LightingControls in detail
171_AKB; 3; 60, en-US
d2ureepe,
Version: 2.11.8.1 2009-05-11T16:00:23+02:00 - Seite 70