2010 MERCEDES-BENZ SLK350 instrument cluster
[x] Cancel search: instrument clusterPage 64 of 312

driving, refer to “Lamps in instrument cluster”
(Y page 256).
If the SmartKey is left in starter switch
position 0 for an extended period of time, it
can
no longer be turned in the starter switch.
In this case, the steering is locked. To unlock,
remove SmartKey from the starter switch and
reinsert.
The steering is locked when the SmartKey is
removed from the starter switch.
X Always remove the SmartKey from the
starter switch when the engine is not in
operation.
This
will help to prevent accelerated vehicle
battery discharge or a completely
discharged vehicle battery.
If the SmartKey cannot be turned in the
starter
switch, the vehicle battery may not be
sufficiently charged.
X Check the vehicle battery and charge it if
necessary ( Y page 283).
or
X Get a jump start (Y page 283). Seats
Safety notes
G
Warning!
In order to avoid possible loss of vehicle
control
the following must be done before the
vehicle is put into motion:
R seat adjustment
R head restraint adjustment
R steering wheel adjustment
R rear view mirror adjustment
R fastening of seat belts G
Warning!
Do not adjust the driver’s seat while driving.
Adjusting the seat while driving could cause
the driver to lose control of the vehicle. Never ride in a moving vehicle with the seat
backrest
in an excessively reclined position as
this can be dangerous. You could slide under
the seat belt in a collision. If you slide under
it, the seat belt would apply force at the
abdomen or neck. That could cause serious
or fatal injuries. The seat backrest and seat
belts provide the best restraint when the
wearer is in a position that is as upright as
possible and seat belts are properly
positioned on the body. G
Warning!
Your seat must be adjusted so that you can
correctly fasten your seat belt.
Observe the following points:
R Adjust
the seat backrest until your arms are
slightly angled when holding the steering
wheel.
R Adjust the seat to a comfortable seating
position that still allows you to reach the
accelerator/brake pedal safely. The
position should be as far back as possible
with the driver still able to operate the
controls properly.
R Adjust the head restraint so that it is as
close to the head as possible. The center of
the head restraint must support the back of
the head at eye level.
R Never place hands under the seat or near
any moving parts while a seat is being
adjusted.
Failure to do so could result in an accident
and/or serious personal injury. G
Warning!
Children 12 years old and under must be
seated and properly secured in an
appropriately sized infant restraint, toddler
restraint, or booster seat recommended for
the
size and weight of the child. For additional
information, see section “Children in the
vehicle”.
A child’s risk of serious or fatal injuries is
significantly increased if the child restraints 62
Seats
Controls in detail
171_AKB; 3; 60, en-US
d2ureepe,
Version: 2.11.8.1 2009-05-11T16:00:23+02:00 - Seite 62
Page 68 of 312

The AIRSCARF neck-level heating will switch
back on again automatically as soon as
sufficient voltage is available.
Multifunction steering wheel
Safety notes
G
Warning!
Do not adjust the steering wheel while driving.
Adjusting the steering wheel while driving, or
driving without the steering wheel adjustment
feature locked could cause the driver to lose
control of the vehicle.
The electrical steering wheel adjustment
feature can be operated at any time.
Therefore, do not leave children unattended
in the vehicle, or with access to an unlocked
vehicle. A child’s unsupervised access to a
vehicle could result in an accident and/or
serious personal injury.
Make sure
R you can reach the steering wheel with your
arms slightly bent at the elbows
R you can move your legs freely
R all displays (including malfunction and
indicator lamps) on the instrument cluster
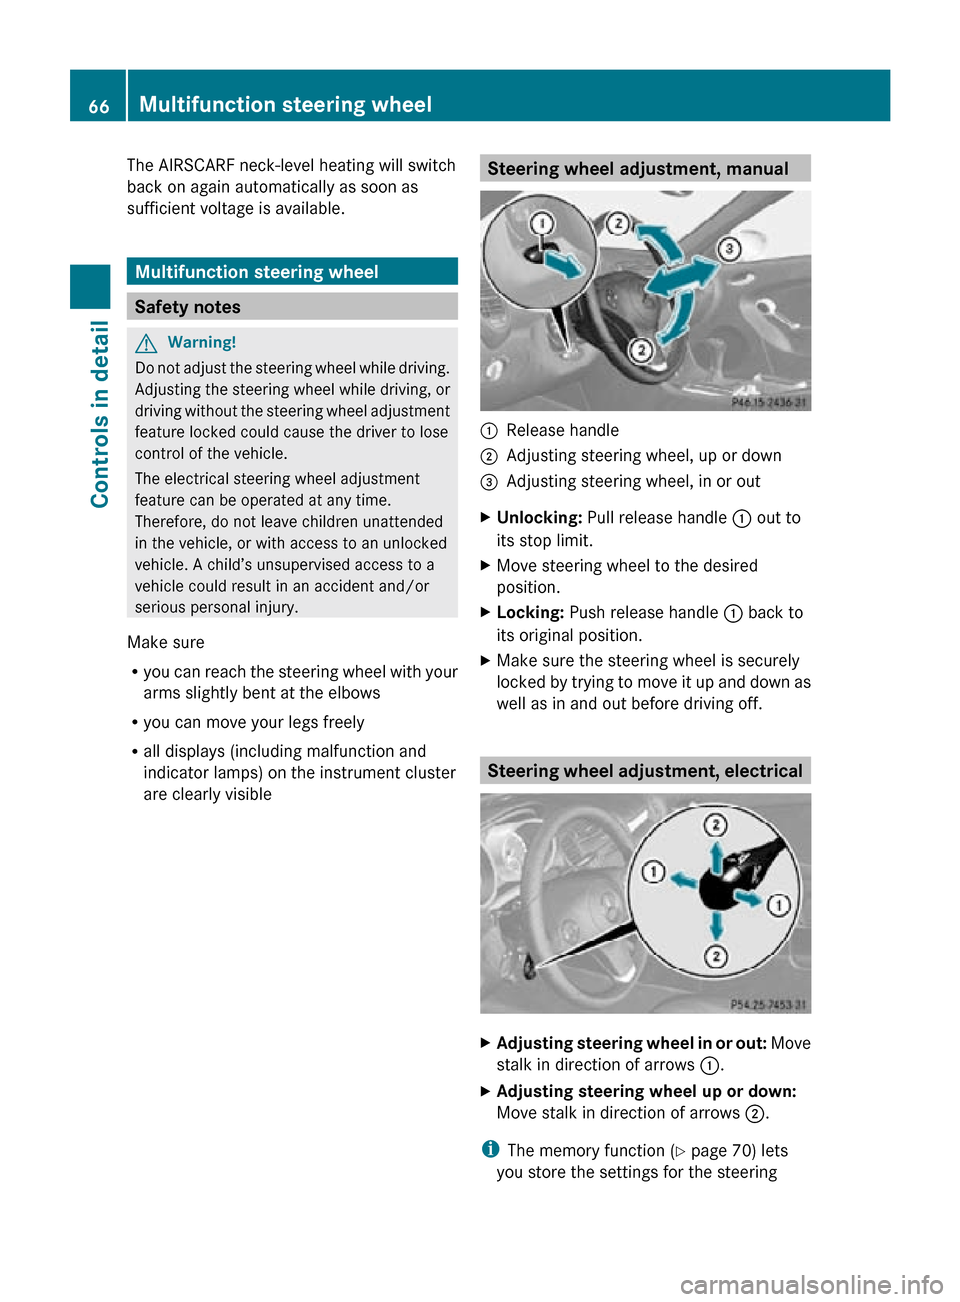
are clearly visible Steering wheel adjustment, manual
:
Release handle
; Adjusting steering wheel, up or down
= Adjusting steering wheel, in or out
X Unlocking: Pull release handle : out to
its stop limit.
X Move steering wheel to the desired
position.
X Locking: Push release handle : back to
its original position.
X Make sure the steering wheel is securely
locked by trying to move it up and down as
well as in and out before driving off. Steering wheel adjustment, electrical
X
Adjusting steering wheel in or out: Move
stalk in direction of arrows :.
X Adjusting steering wheel up or down:
Move stalk in direction of arrows ;.
i The memory function (Y page 70) lets
you store the settings for the steering 66
Multifunction steering wheelControls in detail
171_AKB; 3; 60, en-US
d2ureepe,
Version: 2.11.8.1 2009-05-11T16:00:23+02:00 - Seite 66
Page 75 of 312

USA only
With the exterior lamp switch in position
$ or
Ã, you cannot switch on the high-
beam headlamps.
The high-beam flasher is available at all times.
X For nighttime driving turn the exterior lamp
switch to position L to permit activation
of the high-beam headlamps.
When the engine is running, and you turn the
exterior lamp switch to position T or
L, the manual headlamp mode has
priority over the daytime running lamp mode.
The corresponding exterior lamps come on
(Y page 71).
Fog lamps Fog lamps cannot be switched on with the
exterior lamp switch in position Ã.
G
Warning!
In low ambient lighting or foggy conditions,
only switch from position à to L with
the vehicle at a standstill in a safe location.
Switching from à to L will briefly
switch off the headlamps. Doing so while
driving in low ambient lighting conditions may
result in an accident.
Fog lamps will operate with the parking lamps
and/or the low-beam headlamps on. Fog
lamps should only be used in conjunction with
low-beam headlamps. Consult your State or
Province Motor Vehicle Regulations
regarding permissible lamp operation.
X Turn the exterior lamp switch to position
T or L (Y page 71).
X Switching on front fog lamps: Pull out the
exterior lamp switch to first stop.
The green indicator lamp N in the
exterior lamp switch comes on. X
Switching on rear fog lamp: Pull out the
exterior lamp switch to second stop.
The rear fog lamp, the front fog lamps, the
green N and the yellow indicator lamp
R in the exterior lamp switch come on.
X Switching off front fog lamps/rear fog
lamp: Push in the exterior lamp switch to
its stop.
Locator lighting and night security
illumination Locator lighting and night security
illumination are described in the “Control
system” section, see “Switching locator
lighting on or off” (Y page 106) and
“Switching night security illumination
(Headlamps delayed shut-off feature) on or
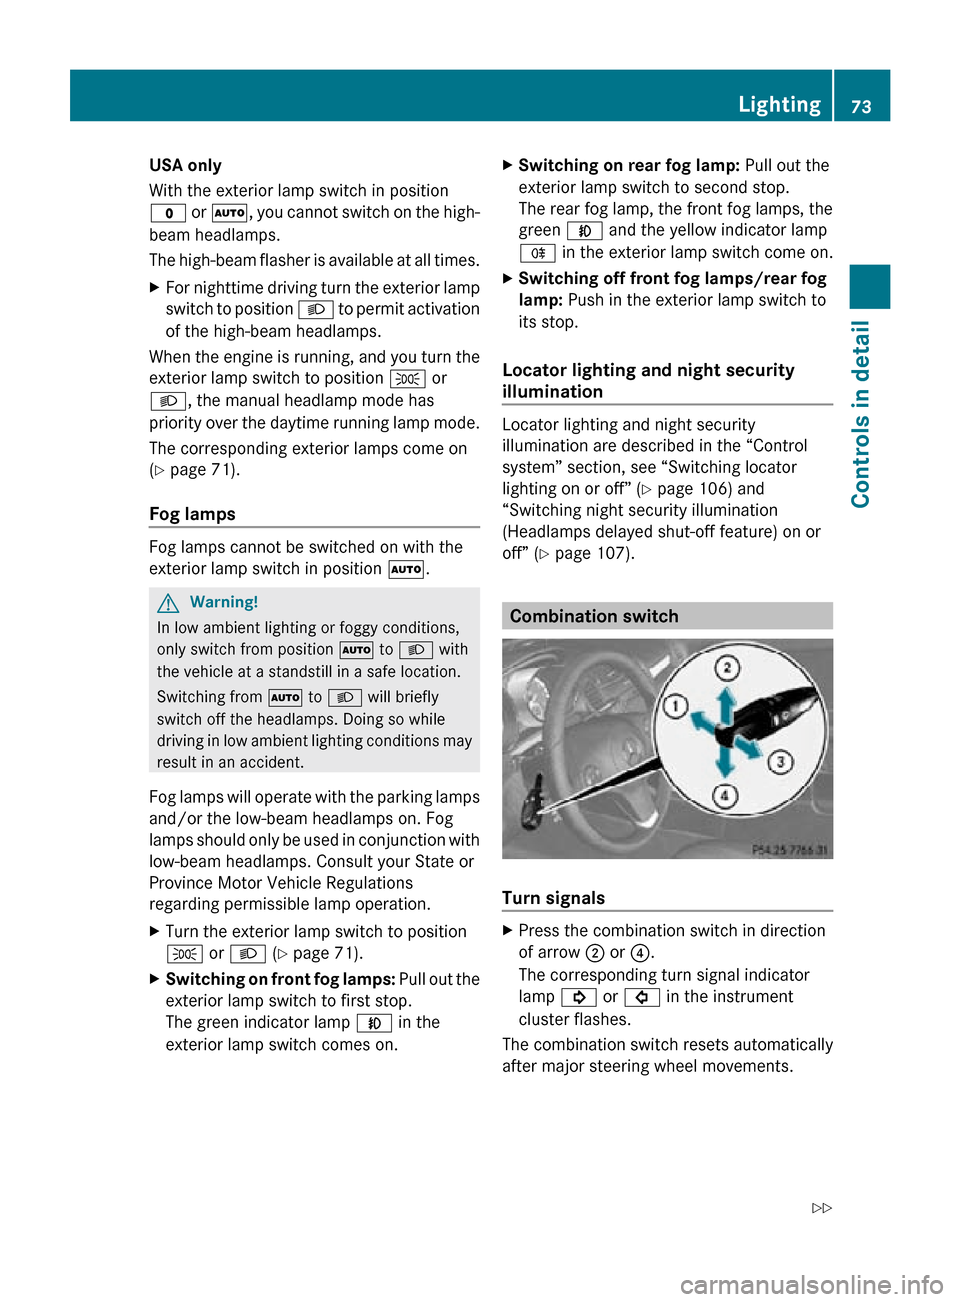
off” (Y page 107). Combination switch
Turn signals
X
Press the combination switch in direction
of arrow ; or ?.
The corresponding turn signal indicator
lamp ! or # in the instrument
cluster flashes.
The combination switch resets automatically
after major steering wheel movements. Lighting
73Controls in detail
171_AKB; 3; 60, en-US
d2ureepe, Version: 2.11.8.1 2009-05-11T16:00:23+02:00 - Seite 73 Z
Page 76 of 312

To signal minor directional changes:
X
Press the combination switch only to the
point of resistance in direction of
arrow ; or ? and release.
The corresponding turn signal lamps will
flash three times.
High beam X
Turn the exterior lamp switch to position
L (Y page 71).
X Switching on: Push the combination
switch in direction of arrow :.
The high-beam headlamp indicator lamp
K in the instrument cluster comes on.
X Switching off: Pull the combination switch
in direction of arrow = to its original
position.
i Also note the information on high-beam
headlamps with activated automatic
headlamp mode (Y page 71) or the daytime
running lamp mode ( Y page 72).
High-beam flasher X
Switching on: Pull the combination switch
briefly in direction of arrow =.Hazard warning flasher
The hazard warning flasher can be switched
on at all times, even with the SmartKey
removed from the starter switch.
The hazard warning flasher comes on
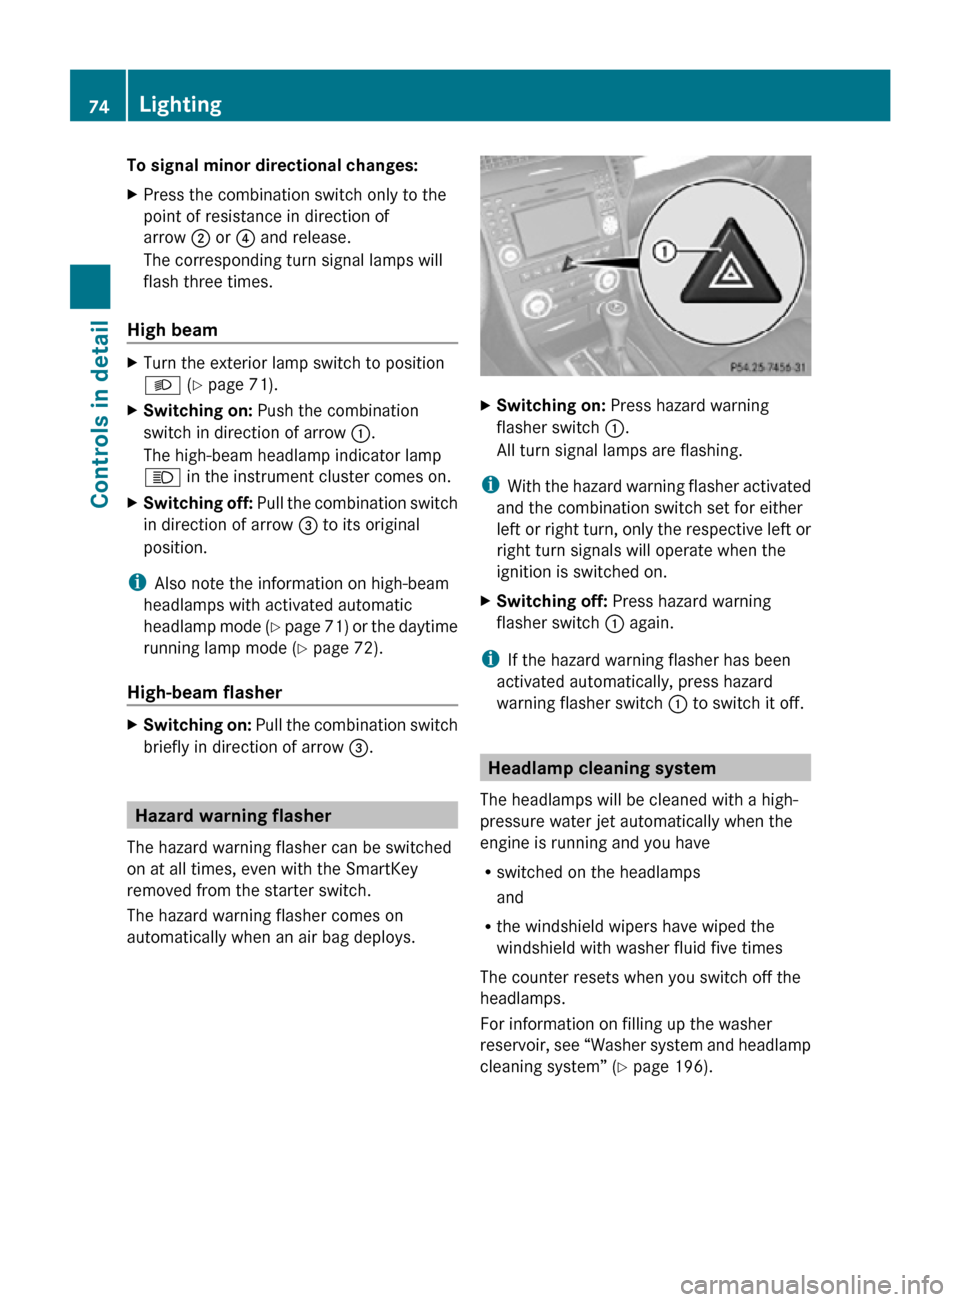
automatically when an air bag deploys. X
Switching on: Press hazard warning
flasher switch :.
All turn signal lamps are flashing.
i With the hazard warning flasher activated
and the combination switch set for either
left or right turn, only the respective left or
right turn signals will operate when the
ignition is switched on.
X Switching off: Press hazard warning
flasher switch : again.
i If the hazard warning flasher has been
activated automatically, press hazard
warning flasher switch : to switch it off. Headlamp cleaning system
The headlamps will be cleaned with a high-
pressure water jet automatically when the
engine is running and you have
R switched on the headlamps
and
R the windshield wipers have wiped the
windshield with washer fluid five times
The counter resets when you switch off the
headlamps.
For information on filling up the washer
reservoir, see “Washer system and headlamp
cleaning system” ( Y page 196).74
LightingControls in detail
171_AKB; 3; 60, en-US
d2ureepe,
Version: 2.11.8.1 2009-05-11T16:00:23+02:00 - Seite 74
Page 85 of 312

If no damage on major assemblies, fuel
system, and engine mount can be
determined:
X
Start the engine in the usual manner. Parking
G
Warning!
Do not park this vehicle in areas where
combustible materials such as grass, hay or
leaves can come into contact with the hot
exhaust system. These materials could be
ignited and cause a vehicle fire.
Vehicle movement can cause serious
personal injury or damage to the vehicle or
the vehicle drivetrain. Therefore, always do
the following before turning off the engine and
leaving the vehicle:
R Keep right foot on the brake pedal.
R Engage the parking brake.
R Manual transmission: Shift the manual
transmission into 1st gear or reverse gear
R.
R Automatic transmission: Shift the
automatic transmission into park position
P.
R Slowly release the brake pedal.
R When parked on an incline, always turn the
front wheels towards the road curb.
R Turn the SmartKey in the starter switch to
position 0 and remove the SmartKey from
the starter switch.
R Take the SmartKey with you and lock the
vehicle when leaving. G
Warning!
Manual transmission:
Wait until the vehicle is stationary before
removing the SmartKey from the starter
switch. The vehicle cannot be steered when
the SmartKey is removed from the starter
switch. Parking brake G
Warning!
Engaging the parking brake while the vehicle
is in motion can cause the rear wheels to lock
up. You could lose control of the vehicle and
cause an accident. In addition, the vehicle’s
brake lights do not light up when the parking
brake is engaged. G
Warning!
When leaving the vehicle, always remove the
SmartKey from the starter switch, take it with
you, and lock the vehicle. Do not leave
children unattended in the vehicle, or with
access to an unlocked vehicle. Children could
release the parking brake and/or shift the
automatic transmission out of park position
P (manual transmission: shift into the neutral
position), either of which could result in an
accident and/or serious personal injury. X
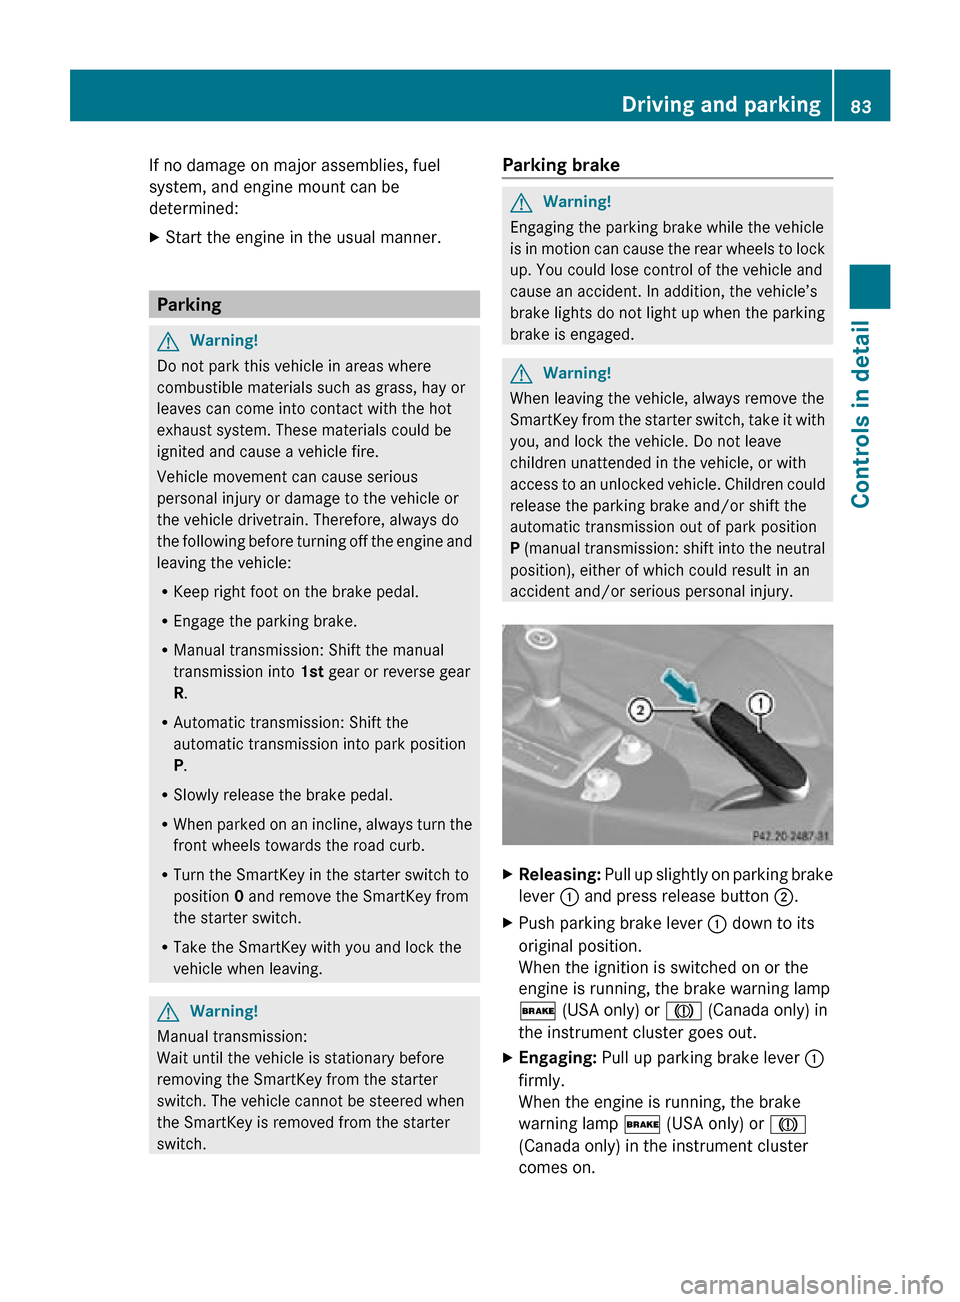
Releasing: Pull up slightly on parking brake
lever : and press release button ;.
X Push parking brake lever : down to its
original position.
When the ignition is switched on or the
engine is running, the brake warning lamp
$ (USA only) or J (Canada only) in
the instrument cluster goes out.
X Engaging: Pull up parking brake lever :
firmly.
When the engine is running, the brake
warning lamp $ (USA only) or J
(Canada only) in the instrument cluster
comes on. Driving and parking
83Controls in detail
171_AKB; 3; 60, en-US
d2ureepe, Version: 2.11.8.1 2009-05-11T16:00:23+02:00 - Seite 83 Z
Page 94 of 312

the optimal gear for maximum
acceleration.
i When you brake or stop, the automatic
transmission shifts down into a gear from
which you can easily accelerate or take off.
Kickdown Using the kickdown while driving in manual
program mode
M is not possible.
Deactivating manual shift program X
Press the program mode selector switch
repeatedly until C or S appears in the
multifunction display.
or
X Restart the engine.
The automatic transmission will go to
automatic program mode C.
Manual program mode M is not stored.Emergency operation (limp-home
mode)
If vehicle acceleration becomes less
responsive or sluggish or the automatic
transmission no longer shifts, the automatic
transmission is most likely operating in limp-
home (emergency operation) mode. In this
mode only second gear and reverse gear R
can be selected.
X Stop the vehicle in a safe location.
X Shift the automatic transmission into park
position P.
X Turn off the engine.
X Wait at least 10 seconds before restarting.
X Restart the engine.
X Shift the automatic transmission into drive
position D (for second gear) or reverse gear
R.
X Have the automatic transmission checked
at an authorized Mercedes-Benz Center as
soon as possible. Instrument cluster
Introduction
For a full view illustration of the instrument
cluster, see “Instrument cluster”
(Y page 26). G
Warning!
No messages will be displayed if either the
instrument cluster or the multifunction
display is inoperative.
As a result, you will not be able to see
information about your driving conditions,
such as
R speed
R outside temperature
R warning/indicator lamps
R malfunction/warning messages
R failure of any systems
Driving characteristics may be impaired.
If you must continue to drive, do so with added
caution. Contact an authorized Mercedes-
Benz Center as soon as possible. :
To brighten instrument cluster
illumination (knob +)
; To dim instrument cluster illumination
(knob -)
= Reset button .
For information on changing the instrument
cluster settings, e.g. the language, see
(Y page 103). 92
Instrument clusterControls in detail
171_AKB; 3; 60, en-US
d2ureepe,
Version: 2.11.8.1 2009-05-11T16:00:23+02:00 - Seite 92
Page 95 of 312

Activating the instrument cluster
The instrument cluster is activated when you
R open the driver’s door
R switch on the ignition
R press reset button .
R switch on the exterior lamps
i Opening the driver’s door or pressing the
reset button . without switching on the
ignition or the exterior lamps activates the
instrument cluster illumination only for
30 seconds. Adjusting the instrument cluster
illumination
X To brighten illumination: Press knob :
briefly.
X To dim illumination: Press knob ;
briefly.
The illumination brightness for the instrument
cluster changes each time you press
knob :
or ;. Several settings are possible.
i The instrument cluster illumination is
dimmed or brightened automatically to suit
ambient light conditions.
You can only adjust the brightness of the
instrument cluster illumination when it is
dark outside.
i With the exterior lighting switched on, the
brightness of the switches in the center
console will also be adjusted when using
knob : or ;. Resetting trip odometer
X Make sure you are viewing the standard
display
(Y page 96) in the multifunction
display.
X Press and hold reset button .
until the trip
odometer is reset. Tachometer
The red marking on the tachometer
(Y
page 26) denotes excessive engine speed.
! Avoid driving at excessive engine speeds,
as it may result in serious engine damage
that is not covered by the Mercedes-Benz
Limited Warranty.
To help protect the engine, the fuel supply is
interrupted if the engine is operated within
the red marking. Clock
In vehicles with the audio system, the clock
can be set via the control system
(Y page 105).
For setting the time with the COMAND
system, see separate COMAND system
operating instructions. Control system
Introduction
The
control system is activated as soon as the
starter switch is in position 1.
The control system enables you to call up
information about your vehicle and to change
vehicle settings.
For example, you can use the control system
to find out when your vehicle is next due for
maintenance service, to set the language for
messages in the instrument cluster display,
and much more. G
Warning!
A driver’s attention to the road and traffic
conditions must always be his/her primary
focus when driving.
For your safety and the safety of others,
selecting features through the multifunction
steering wheel should only be done by the
driver
when traffic and road conditions permit
it to be done safely. Control system
93
Controls in detail
171_AKB; 3; 60, en-US
d2ureepe, Version: 2.11.8.1 2009-05-11T16:00:23+02:00 - Seite 93 Z
Page 104 of 312

simply a reminder with respect to the
operation of certain systems. They do not
replace the owner’s and/or driver’s
responsibility to maintain the vehicle’s
operating safety. Have all required
maintenance and safety checks performed on
the vehicle. Bring the vehicle to an authorized
Mercedes-Benz Center to address the
malfunction and warning messages.
X Press button V or U repeatedly until
the Vehicle status message memory
menu appears in the multifunction display.
If conditions have occurred causing status
messages to be recorded, the number of
messages appears in the multifunction
display. :
Number of recorded status messages
X Press button & or *.
The stored messages will now be displayed
in the order in which they have occurred.
For malfunction and warning messages,
see “Vehicle status messages in the
multifunction display” ( Y page 236).
Should the vehicle’s system record any
conditions while driving, the number of
messages will reappear in the multifunction
display when the SmartKey in the starter
switch is turned to position 0 or removed
from the starter switch.
Except for high-priority messages, the vehicle
status message memory will be cleared when
you switch off the ignition. Settings menu
Introduction In the
Settings menu there are two
functions: The function To reset, push
reset button for 3 seconds, with which
you can reset all the settings to the original
factory settings and a collection of submenus
with which you can make individual settings
for your vehicle.
The following settings and submenus are
available in the Settings menu:
R Resetting to factory settings
(Y page 102)
R Submenus in the Settings menu
(Y page 103)
R Instrument cluster submenu
(Y page 103)
R Time/Date submenu ( Y page 105)
R Lighting submenu ( Y page 105)
R Vehicle submenu ( Y page 108)
R Convenience submenu ( Y page 108)
Resetting to factory settings You can reset the settings of all submenus to
the factory settings.
For safety reasons, the function
Headlamp
Mode in the Lighting submenu cannot be
reset while driving.
X Press button V or U repeatedly until
the Settings menu appears in the
multifunction display. 102
Control systemControls in detail
171_AKB; 3; 60, en-US
d2ureepe,
Version: 2.11.8.1 2009-05-11T16:00:23+02:00 - Seite 102