2010 MERCEDES-BENZ SLK350 Vin location
[x] Cancel search: Vin locationPage 174 of 312
With the SmartKey
G
Observe Safety notes, see page 170. X
Close the luggage cover ( Y page 173).
X Close the trunk lid.
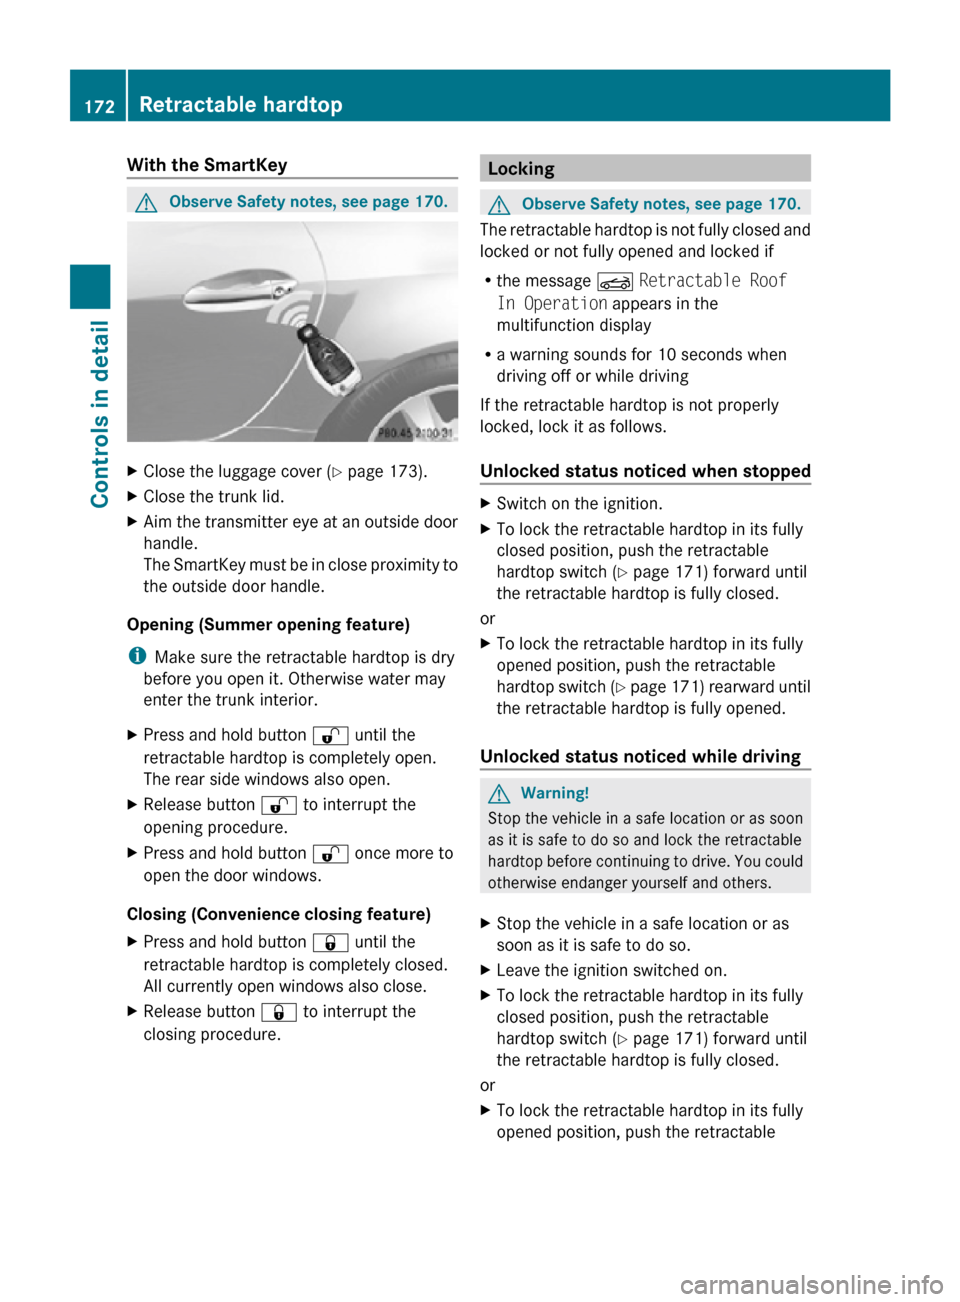
X Aim the transmitter eye at an outside door
handle.
The SmartKey must be in close proximity to
the outside door handle.
Opening (Summer opening feature)
i Make sure the retractable hardtop is dry
before you open it. Otherwise water may
enter the trunk interior.
X Press and hold button % until the
retractable hardtop is completely open.
The rear side windows also open.
X Release button % to interrupt the
opening procedure.
X Press and hold button % once more to
open the door windows.
Closing (Convenience closing feature)
X Press and hold button & until the
retractable hardtop is completely closed.
All currently open windows also close.
X Release button & to interrupt the
closing procedure. Locking
G
Observe Safety notes, see page 170.
The retractable hardtop is not fully closed and
locked or not fully opened and locked if
R the message K Retractable Roof
In Operation appears in the
multifunction display
R a warning sounds for 10 seconds when
driving off or while driving
If the retractable hardtop is not properly
locked, lock it as follows.
Unlocked status noticed when stopped X
Switch on the ignition.
X To lock the retractable hardtop in its fully
closed position, push the retractable
hardtop switch ( Y page 171) forward until
the retractable hardtop is fully closed.
or
X To lock the retractable hardtop in its fully
opened position, push the retractable
hardtop switch (Y page 171) rearward until
the retractable hardtop is fully opened.
Unlocked status noticed while driving G
Warning!
Stop the vehicle in a safe location or as soon
as it is safe to do so and lock the retractable
hardtop before continuing to drive. You could
otherwise endanger yourself and others.
X Stop the vehicle in a safe location or as
soon as it is safe to do so.
X Leave the ignition switched on.
X To lock the retractable hardtop in its fully
closed position, push the retractable
hardtop switch ( Y page 171) forward until
the retractable hardtop is fully closed.
or
X To lock the retractable hardtop in its fully
opened position, push the retractable 172
Retractable hardtopControls in detail
171_AKB; 3; 60, en-US
d2ureepe,
Version: 2.11.8.1 2009-05-11T16:00:23+02:00 - Seite 172
Page 187 of 312
X
Step 8: Locate the “training” button on the
garage door opener motor head unit.
i Exact
location and color of the button may
vary by garage door opener brand.
Depending on manufacturer, the “training”
button may also be referred to as “learn” or
“smart” button. If there is difficulty locating
the transmitting button, refer to the garage
door opener Operator’s Manual.
X Step 9: Press the “training” button on the
garage door opener motor head unit.
The “training light” is activated.
You have 30 seconds to initiate the
following two steps.
X Step 10: Return to the vehicle and firmly
press, hold for 2 seconds and release the
programmed
signal transmitter button (;,
= or ?).
X Step 11: Press, hold for 2 seconds and
release same signal transmitter button a
second time to complete the training
process.
i Some garage door openers (or other
rolling
code equipped devices) may require
you to press, hold for 2 seconds and
release the same signal transmitter button
a third time to complete the training
process.
X Step 12: Confirm the garage door
operation by pressing the programmed
signal transmitter button ( ;, = or ?).
X Step 13: To program the remaining two
signal
transmitter buttons, repeat the steps
above starting with step 3.
Gate operator/Canadian programming
Canadian radio-frequency laws require
transmitter signals to “time-out” (or quit)
after several seconds of transmission which
may not be long enough for the integrated
signal
transmitter to pick up the signal during
programming. Similar to this Canadian law,
some U.S. gate operators are designed to
“time-out” in the same manner. If you live in Canada or if you are having
difficulties programming a gate operator
(regardless of where you live) by using the
programming
procedures, replace step 4 with
the following:
X Step 4: Press and hold the signal
transmitter button ( ;, = or ?). Do not
release this button until it has been
successfully trained.
X While still holding down the signal
transmitter button ( ;, = or ?), “cycle”
your hand-held remote control button B
as follows: Press and hold button B for
2 seconds, then release it for 2 seconds,
and again press and hold it for 2 seconds.
Repeat this sequence on the hand-held
remote control until the frequency signal
has been learned.
Upon successful training, indicator
lamp : will flash slowly and then rapidly
after several seconds.
X Proceed with programming step 5 and
step 6 to complete.
i Upon completion of programming the
integrated remote control, make sure you
retain the hand-held remote control that
came with the garage door opener, gate
operator or other device. You may need it
for use in other vehicles, for future
programming of an integrated remote
control, or simply for continued use as a
hand-held remote control to operate the
respective device in other situations.
Reprogramming a single signal
transmitter button To program a device using a signal
transmitter button previously trained, follow
these steps: Useful features
185
Controls in detail
171_AKB; 3; 60, en-US
d2ureepe, Version: 2.11.8.1 2009-05-11T16:00:23+02:00 - Seite 185 Z
Page 204 of 312

G
Warning!
The TPMS does not indicate a warning for
wrongly selected inflation pressures. Always
adjust
tire inflation pressure according to the
Tire and Loading Information placard or the
supplemental tire inflation pressure
information on the inside of the fuel filler flap.
The TPMS is not able to issue a warning due
to a sudden dramatic loss of pressure (e.g. tire
blowout caused by a foreign object). In this
case bring the vehicle to a halt by carefully
applying the brakes and avoiding abrupt
steering maneuvers. G
Warning!
Each tire, including the spare (if provided),
should be checked at least once a month
when cold and inflated to the inflation
pressure recommended by the vehicle
manufacturer on the Tire and Loading
Information placard on the driver’s door B-
pillar
or the tire inflation pressure label on the
inside of the fuel filler flap. If your vehicle has
tires of a different size than the size indicated
on the Tire and Loading Information placard
or the tire inflation pressure label, you should
determine the proper tire inflation pressure
for those tires.
As an added safety feature, your vehicle has
been equipped with a tire pressure monitoring
system (TPMS) that illuminates a low tire
pressure telltale when one or more of your
tires are significantly underinflated.
Accordingly, when the low tire pressure
telltale illuminates, you should stop and check
your tires as soon as possible, and inflate
them to the proper pressure. Driving on a
significantly underinflated tire causes the tire
to overheat and can lead to tire failure.
Underinflation also reduces fuel efficiency
and tire tread life, and may affect the vehicle’s
handling and stopping ability. Please note that
the TPMS is not a substitute for proper tire
maintenance, and it is the driver’s
responsibility to maintain correct tire
pressure, even if underinflation has not reached the level to trigger illumination of the
TPMS low tire pressure telltale.
Your vehicle has also been equipped with a
TPMS malfunction indicator to indicate when
the system is not operating properly. The
TPMS
malfunction indicator is combined with
the low tire pressure telltale. When the
system detects a malfunction, the telltale will
flash for approximately 1 minute and then
remain continuously illuminated. This
sequence will continue upon subsequent
vehicle start-ups as long as the malfunction
exists. When the malfunction indicator is
illuminated, the system may not be able to
detect or signal low tire pressure as intended.
TPMS malfunctions may occur for a variety of
reasons, including the installation of
incompatible replacement or alternate tires
or wheels on the vehicle that prevent the
TPMS from functioning properly. Always
check the TPMS malfunction telltale after
replacing one or more tires or wheels on your
vehicle to ensure that the replacement or
alternate tires and wheels allow the TPMS to
continue to function properly.
i If a condition causing the TPMS to
malfunction develops, it may take up to
10 minutes for the system to signal a
malfunction using the TPMS telltale
flashing and illumination sequence.
The telltale extinguishes after a few
minutes driving if the malfunction has been
corrected.
Tire pressure inquiries are made using the
multifunction display. The current tire
inflation pressure for each tire appears in the
multifunction display after a few minutes of
driving.
i Possible differences between the
readings of a tire pressure gauge of an air
hose, e.g. gas station equipment, and the
vehicle’s control system can occur. The tire
pressure displayed by the control system
apply to sea level. In high-altitude
locations, the reading on a tire pressure 202
Tires and wheels
Operation
171_AKB; 3; 60, en-US
d2ureepe,
Version: 2.11.8.1 2009-05-11T16:00:23+02:00 - Seite 202
Page 222 of 312
Always use winter tires at temperatures
below 45‡ (7†) and whenever wintry road
conditions prevail. Not all M+S rated tires
provide special winter performance. Make
sure the tires you use show the mountain/
snowflakeimarking on the tire sidewall.
These tires meet specific snow traction
performance requirements of the Rubber
Manufacturers Association (RMA) and the
Rubber Association of Canada (RAC) and
have been designed specifically for use in
snow conditions. Use of winter tires is the
only way to achieve the maximum
effectiveness of your vehicle’s driving safety
systems such as the ABS and the ESP
®
in
winter operation.
For safe handling, make sure all mounted
winter tires are of the same make and have
the same tread design.
For information on winter tires for your
vehicle model, see the “Technical data”
section ( Y page 297).
Always
observe the speed rating of the winter
tires installed on your vehicle. Snow chains
! Some tire sizes do not leave adequate
clearance for snow chains. To help avoid
serious damage to your vehicle or tires,
make sure the use of snow chains is
permissible as specified in the “Technical
data” section of this Operator’s Manual.
Snow chains should only be driven on snow-
covered roads at speeds not to exceed
30 mph (50 km/h)
. Remove chains as soon
as possible when driving on roads without
snow.
Observe the following guidelines when using
snow chains:
R Use of snow chains is not permissible with
all wheel/tire combinations ( Y page 297).
R Use snow chains in pairs and on rear
wheels only. Follow the manufacturer’s
mounting instructions. !
If snow chains are mounted to the front
wheels, they may scrape against the body
or
axle components. The tires or the vehicle
could be damaged as a result.
R Only use snow chains that are approved by
Mercedes-Benz. Any authorized Mercedes-
Benz Center will be glad to advise you on
this subject.
R Use of snow chains may be prohibited
depending on location. Always check local
and state laws before installing snow
chains.
R Do not use snow chains on the spare wheel.
i When driving with snow chains, you may
wish to switch off the ESP ®
(Y page 49)
before setting the vehicle in motion. This
will improve the vehicle’s traction. Winter driving instructions
G
Warning!
If the vehicle becomes stuck in snow, make
sure snow is kept clear of the exhaust pipe
and from around the vehicle with the engine
running. Otherwise, deadly carbon monoxide
(CO) gases may enter vehicle interior
resulting in unconsciousness and death.
To
assure sufficient fresh air ventilation, open
a window slightly on the side of the vehicle
not facing the wind. G
Warning!
The outside temperature indicator is not
designed to serve as an ice-warning device
and is therefore unsuitable for that purpose.
Indicated temperatures just above the
freezing
point do not guarantee that the road
surface is free of ice. The road may still be icy,
especially in wooded areas or on bridges. G
Warning!
On slippery road surfaces, never downshift in
order to obtain braking action. This could
result
in drive wheel slip and reduced vehicle 220
Winter driving
Operation
171_AKB; 3; 60, en-US
d2ureepe,
Version: 2.11.8.1 2009-05-11T16:00:23+02:00 - Seite 220
Page 226 of 312
Driving off
Warm up the engine smoothly. Do not place
full load on the engine until the operating
temperature has been reached.
! When
driving off on a slippery surface, do
not allow a drive wheel to spin for an
extended period with the ESP ®
switched
off. Doing so may cause serious damage to
the drivetrain which is not covered by the
Mercedes-Benz Limited Warranty.
! Simultaneously depressing the
accelerator pedal and applying the brakes
reduces engine performance and causes
premature brake and drivetrain wear which
is not covered by the Mercedes-Benz
Limited Warranty. Hydroplaning
Depending
on the depth of the water layer on
the road, hydroplaning may occur, even at low
speeds and with new tires. In heavy rain or
when conditions indicate possible
hydroplaning:
X Reduce vehicle speed.
X Avoid track grooves in the road.
X Apply brakes cautiously. Standing water
! Do not drive through flooded areas.
Before
driving through water, determine its
depth.
If you must drive through standing water,
drive slowly to prevent water from entering
the passenger compartment or the engine
compartment. Water in these areas could
cause damage to electrical components or
wiring of the engine or transmission, or
could result in water being ingested by the
engine through the air intake causing
severe internal engine damage. Any such damage is not covered by the Mercedes-
Benz Limited Warranty. Driving abroad
If
you plan to drive the vehicle outside the U.S.
or Canada, you should request dealer
network information for your destination from
any authorized Mercedes-Benz Center. Control and operation of radio
transmitter
Safety notes G
Warning!
Please do not forget that your primary
responsibility
is to drive the vehicle. A driver’s
attention to the road must always be his/her
primary focus when driving. For your safety
and the safety of others, we recommend that
you pull over to a safe location and stop
before placing or taking a telephone call.
If you choose to use the telephone 16
while
driving, please use the hands-free device and
only use the telephone when road, weather
and traffic conditions permit. Some
jurisdictions prohibit the driver from using a
mobile telephone while driving a vehicle.
Only operate the audio system or
COMAND 16
(Cockpit Management and Data
System) if road, weather and traffic
conditions permit. Otherwise, you may not be
able to observe traffic conditions and could
endanger yourself and others.
Bear in mind that at a speed of just 30 mph
(approximately 50 km/h), your vehicle is
covering a distance of 44 feet (approximately
14 m) every second.
16 Observe all legal requirements. 224
Driving instructions
Operation
171_AKB; 3; 60, en-US
d2ureepe,
Version: 2.11.8.1 2009-05-11T16:00:23+02:00 - Seite 224
Page 241 of 312
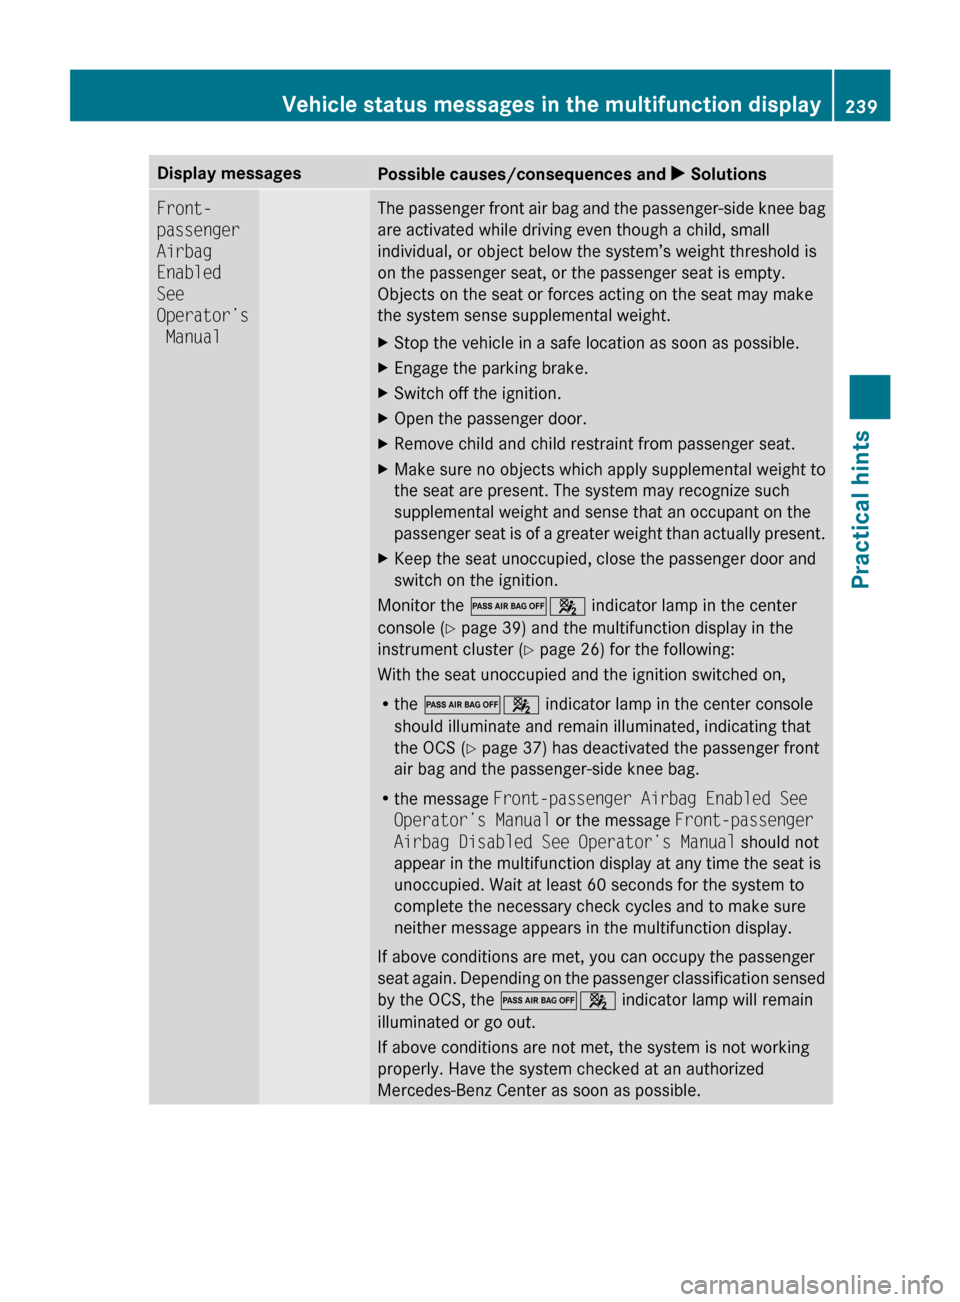
Display messages
Possible causes/consequences and
X SolutionsFront-
passenger
Airbag
Enabled
See
Operator’s
Manual The passenger front air bag and the passenger-side knee bag
are activated while driving even though a child, small
individual, or object below the system’s weight threshold is
on the passenger seat, or the passenger seat is empty.
Objects on the seat or forces acting on the seat may make
the system sense supplemental weight.
X
Stop the vehicle in a safe location as soon as possible.
X Engage the parking brake.
X Switch off the ignition.
X Open the passenger door.
X Remove child and child restraint from passenger seat.
X Make sure no objects which apply supplemental weight to
the seat are present. The system may recognize such
supplemental weight and sense that an occupant on the
passenger
seat is of a greater weight than actually present.
X Keep the seat unoccupied, close the passenger door and
switch on the ignition.
Monitor the 04 indicator lamp in the center
console (Y page 39) and the multifunction display in the
instrument cluster
(Y page 26) for the following:
With the seat unoccupied and the ignition switched on,
R the 04 indicator lamp in the center console
should illuminate and remain illuminated, indicating that
the OCS (Y page 37) has deactivated the passenger front
air bag and the passenger-side knee bag.
R the message Front-passenger Airbag Enabled See
Operator’s Manual or the message Front-passenger
Airbag Disabled See Operator’s Manual should not
appear in the multifunction display at any time the seat is
unoccupied. Wait at least 60 seconds for the system to
complete the necessary check cycles and to make sure
neither message appears in the multifunction display.
If above conditions are met, you can occupy the passenger
seat again. Depending on the passenger classification sensed
by the OCS, the 04 indicator lamp will remain
illuminated or go out.
If above conditions are not met, the system is not working
properly. Have the system checked at an authorized
Mercedes-Benz Center as soon as possible. Vehicle status messages in the multifunction display
239
Practical hints
171_AKB; 3; 60, en-US
d2ureepe,Version: 2.11.8.1 2009-05-11T16:00:23+02:00 - Seite 239 Z
Page 242 of 312
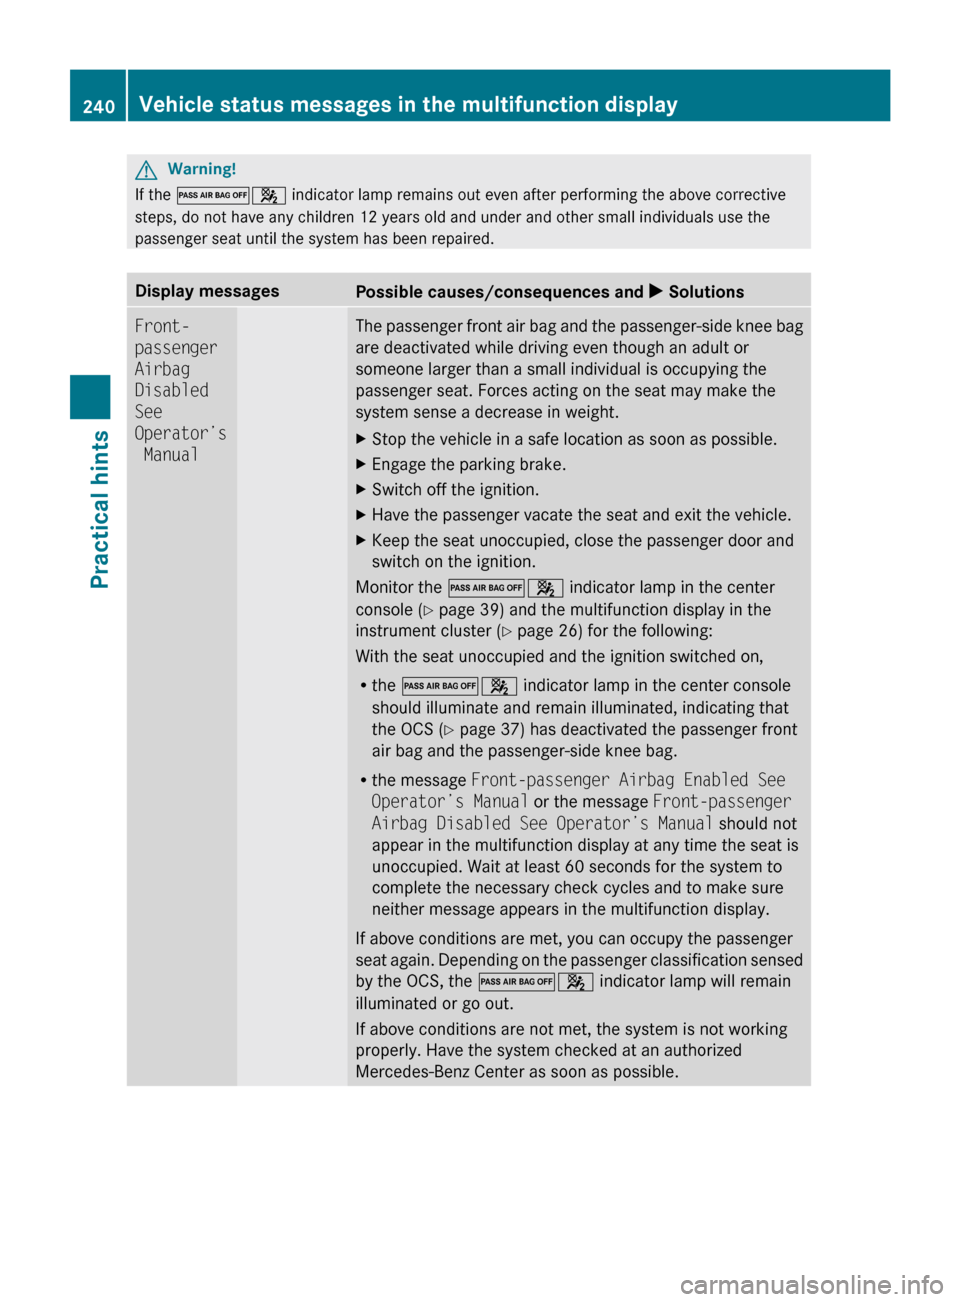
G
Warning!
If the 04 indicator lamp remains out even after performing the above corrective
steps, do not have any children 12 years old and under and other small individuals use the
passenger seat until the system has been repaired. Display messages
Possible causes/consequences and
X SolutionsFront-
passenger
Airbag
Disabled
See
Operator’s
Manual The passenger front air bag and the passenger-side knee bag
are deactivated while driving even though an adult or
someone larger than a small individual is occupying the
passenger seat. Forces acting on the seat may make the
system sense a decrease in weight.
X
Stop the vehicle in a safe location as soon as possible.
X Engage the parking brake.
X Switch off the ignition.
X Have the passenger vacate the seat and exit the vehicle.
X Keep the seat unoccupied, close the passenger door and
switch on the ignition.
Monitor the 04 indicator lamp in the center
console (Y page 39) and the multifunction display in the
instrument cluster
(Y page 26) for the following:
With the seat unoccupied and the ignition switched on,
R the 04 indicator lamp in the center console
should illuminate and remain illuminated, indicating that
the OCS (Y page 37) has deactivated the passenger front
air bag and the passenger-side knee bag.
R the message Front-passenger Airbag Enabled See
Operator’s Manual or the message Front-passenger
Airbag Disabled See Operator’s Manual should not
appear in the multifunction display at any time the seat is
unoccupied. Wait at least 60 seconds for the system to
complete the necessary check cycles and to make sure
neither message appears in the multifunction display.
If above conditions are met, you can occupy the passenger
seat again. Depending on the passenger classification sensed
by the OCS, the 04 indicator lamp will remain
illuminated or go out.
If above conditions are not met, the system is not working
properly. Have the system checked at an authorized
Mercedes-Benz Center as soon as possible. 240
Vehicle status messages in the multifunction displayPractical hints
171_AKB; 3; 60, en-US
d2ureepe,
Version: 2.11.8.1 2009-05-11T16:00:23+02:00 - Seite 240
Page 246 of 312
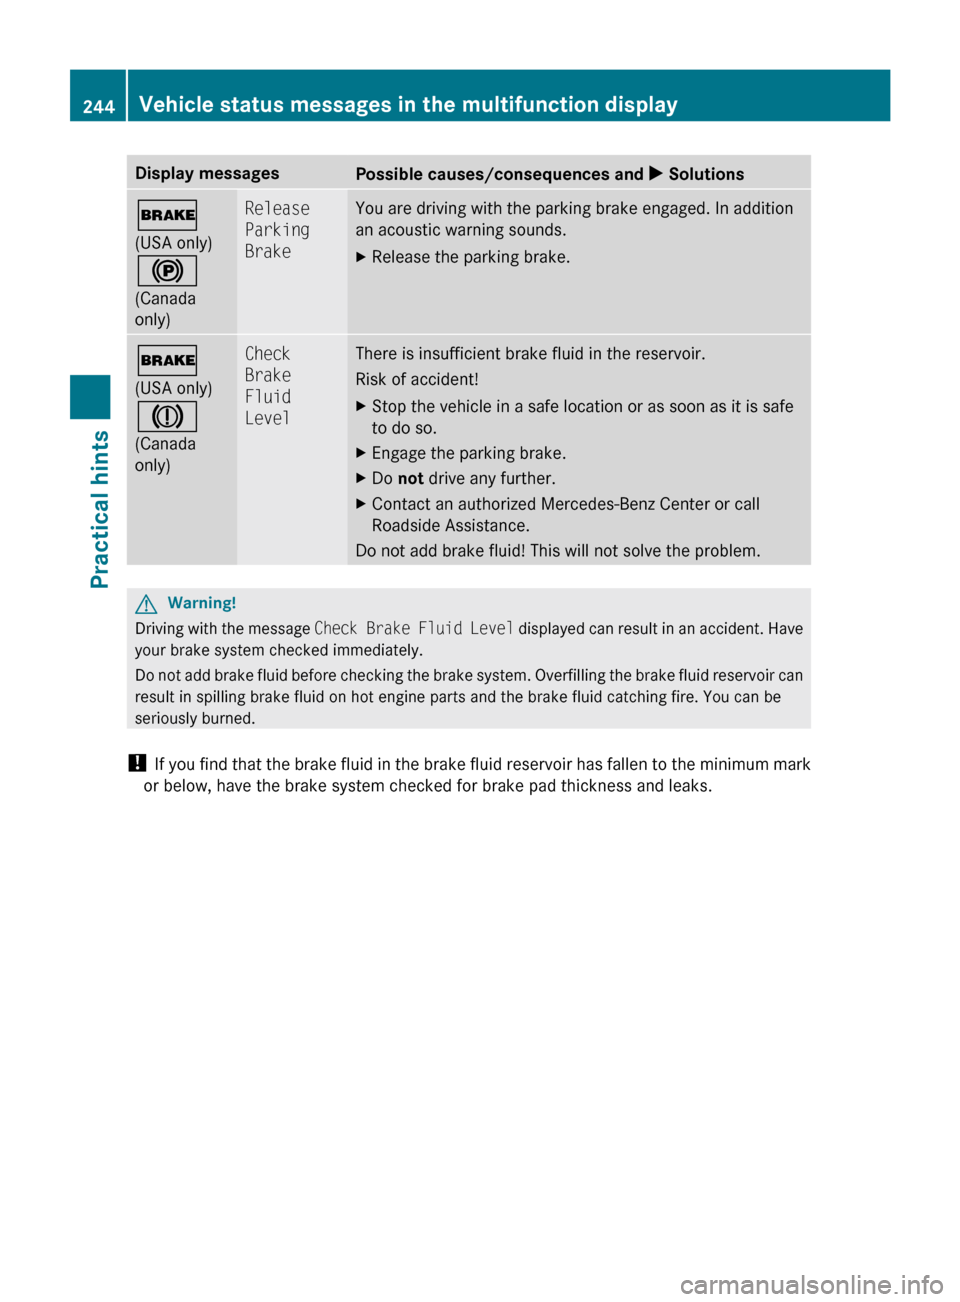
Display messages
Possible causes/consequences and
X Solutions$
(USA only)
!
(Canada
only) Release
Parking
Brake You are driving with the parking brake engaged. In addition
an acoustic warning sounds.
X
Release the parking brake. $
(USA only)
J
(Canada
only) Check
Brake
Fluid
Level There is insufficient brake fluid in the reservoir.
Risk of accident!
X
Stop the vehicle in a safe location or as soon as it is safe
to do so.
X Engage the parking brake.
X Do not drive any further.
X Contact an authorized Mercedes-Benz Center or call
Roadside Assistance.
Do not add brake fluid! This will not solve the problem. G
Warning!
Driving with the message Check Brake Fluid Level displayed can result in an accident. Have
your brake system checked immediately.
Do not add brake fluid before checking the brake system. Overfilling the brake fluid reservoir can
result in spilling brake fluid on hot engine parts and the brake fluid catching fire. You can be
seriously burned.
! If you find that the brake fluid in the brake fluid reservoir has fallen to the minimum mark
or below, have the brake system checked for brake pad thickness and leaks. 244
Vehicle status messages in the multifunction display
Practical hints
171_AKB; 3; 60, en-US
d2ureepe,
Version: 2.11.8.1 2009-05-11T16:00:23+02:00 - Seite 244