2010 MERCEDES-BENZ SLK300 lock
[x] Cancel search: lockPage 89 of 312
Transmission positions
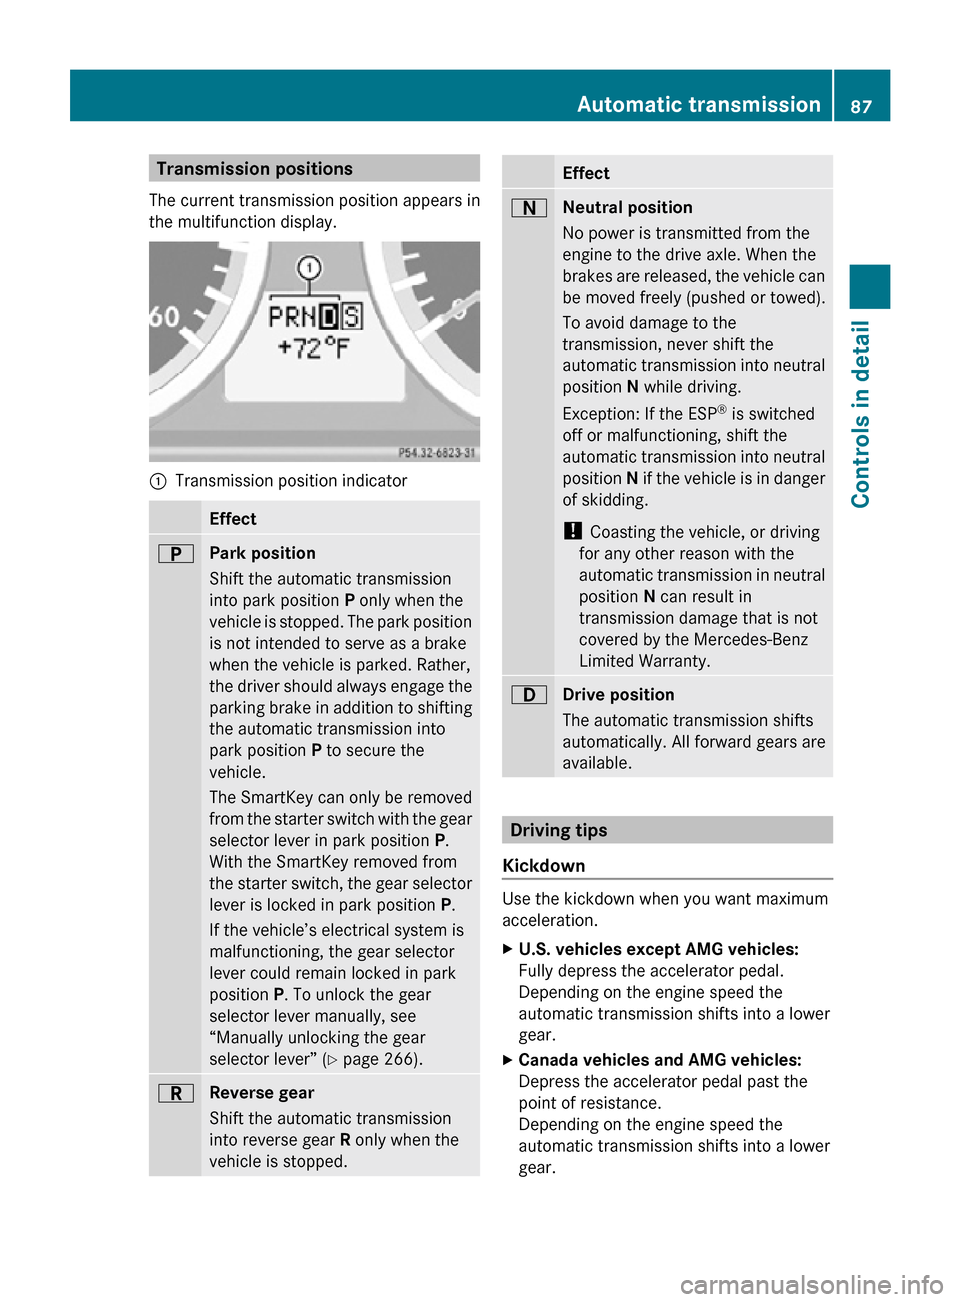
The current transmission position appears in
the multifunction display. :
Transmission position indicator Effect
B
Park position
Shift the automatic transmission
into park position P only when the
vehicle is stopped. The park position
is not intended to serve as a brake
when the vehicle is parked. Rather,
the driver should always engage the
parking brake in addition to shifting
the automatic transmission into
park position P to secure the
vehicle.
The SmartKey can only be removed
from the starter switch with the gear
selector lever in park position P.
With the SmartKey removed from
the starter switch, the gear selector
lever is locked in park position
P.
If the vehicle’s electrical system is
malfunctioning, the gear selector
lever could remain locked in park
position P. To unlock the gear
selector lever manually, see
“Manually unlocking the gear
selector lever” ( Y page 266). C
Reverse gear
Shift the automatic transmission
into reverse gear R only when the
vehicle is stopped. Effect
A
Neutral position
No power is transmitted from the
engine to the drive axle. When the
brakes are released, the vehicle can
be moved freely (pushed or towed).
To avoid damage to the
transmission, never shift the
automatic transmission into neutral
position N while driving.
Exception: If the ESP ®
is switched
off or malfunctioning, shift the
automatic transmission into neutral
position N if the vehicle is in danger
of skidding.
! Coasting the vehicle, or driving
for any other reason with the
automatic transmission in neutral
position N can result in
transmission damage that is not
covered by the Mercedes-Benz
Limited Warranty. 7
Drive position
The automatic transmission shifts
automatically. All forward gears are
available.
Driving tips
Kickdown Use the kickdown when you want maximum
acceleration.
X
U.S. vehicles except AMG vehicles:
Fully depress the accelerator pedal.
Depending on the engine speed the
automatic transmission shifts into a lower
gear.
X Canada vehicles and AMG vehicles:
Depress the accelerator pedal past the
point of resistance.
Depending on the engine speed the
automatic transmission shifts into a lower
gear. Automatic transmission
87Controls in detail
171_AKB; 3; 60, en-US
d2ureepe, Version: 2.11.8.1 2009-05-11T16:00:23+02:00 - Seite 87 Z
Page 95 of 312

Activating the instrument cluster
The instrument cluster is activated when you
R open the driver’s door
R switch on the ignition
R press reset button .
R switch on the exterior lamps
i Opening the driver’s door or pressing the
reset button . without switching on the
ignition or the exterior lamps activates the
instrument cluster illumination only for
30 seconds. Adjusting the instrument cluster
illumination
X To brighten illumination: Press knob :
briefly.
X To dim illumination: Press knob ;
briefly.
The illumination brightness for the instrument
cluster changes each time you press
knob :
or ;. Several settings are possible.
i The instrument cluster illumination is
dimmed or brightened automatically to suit
ambient light conditions.
You can only adjust the brightness of the
instrument cluster illumination when it is
dark outside.
i With the exterior lighting switched on, the
brightness of the switches in the center
console will also be adjusted when using
knob : or ;. Resetting trip odometer
X Make sure you are viewing the standard
display
(Y page 96) in the multifunction
display.
X Press and hold reset button .
until the trip
odometer is reset. Tachometer
The red marking on the tachometer
(Y
page 26) denotes excessive engine speed.
! Avoid driving at excessive engine speeds,
as it may result in serious engine damage
that is not covered by the Mercedes-Benz
Limited Warranty.
To help protect the engine, the fuel supply is
interrupted if the engine is operated within
the red marking. Clock
In vehicles with the audio system, the clock
can be set via the control system
(Y page 105).
For setting the time with the COMAND
system, see separate COMAND system
operating instructions. Control system
Introduction
The
control system is activated as soon as the
starter switch is in position 1.
The control system enables you to call up
information about your vehicle and to change
vehicle settings.
For example, you can use the control system
to find out when your vehicle is next due for
maintenance service, to set the language for
messages in the instrument cluster display,
and much more. G
Warning!
A driver’s attention to the road and traffic
conditions must always be his/her primary
focus when driving.
For your safety and the safety of others,
selecting features through the multifunction
steering wheel should only be done by the
driver
when traffic and road conditions permit
it to be done safely. Control system
93
Controls in detail
171_AKB; 3; 60, en-US
d2ureepe, Version: 2.11.8.1 2009-05-11T16:00:23+02:00 - Seite 93 Z
Page 105 of 312
X
Press the reset button . in the instrument
cluster for approximately 3 seconds.
The message Reset to factory
settings? Push reset button to
confirm appears in the multifunction
display.
X Press the reset button . once more.
The settings of all the submenus will be
reset to factory settings.
The settings you have changed will not be
reset unless you confirm the action by
pressing the reset button . a second time.
After approximately 5 seconds, the
Settings menu reappears in the
multifunction display.
Submenus in the Settings menu X
Press button V or U repeatedly until
the Settings menu appears in the
multifunction display.
X Press button &.
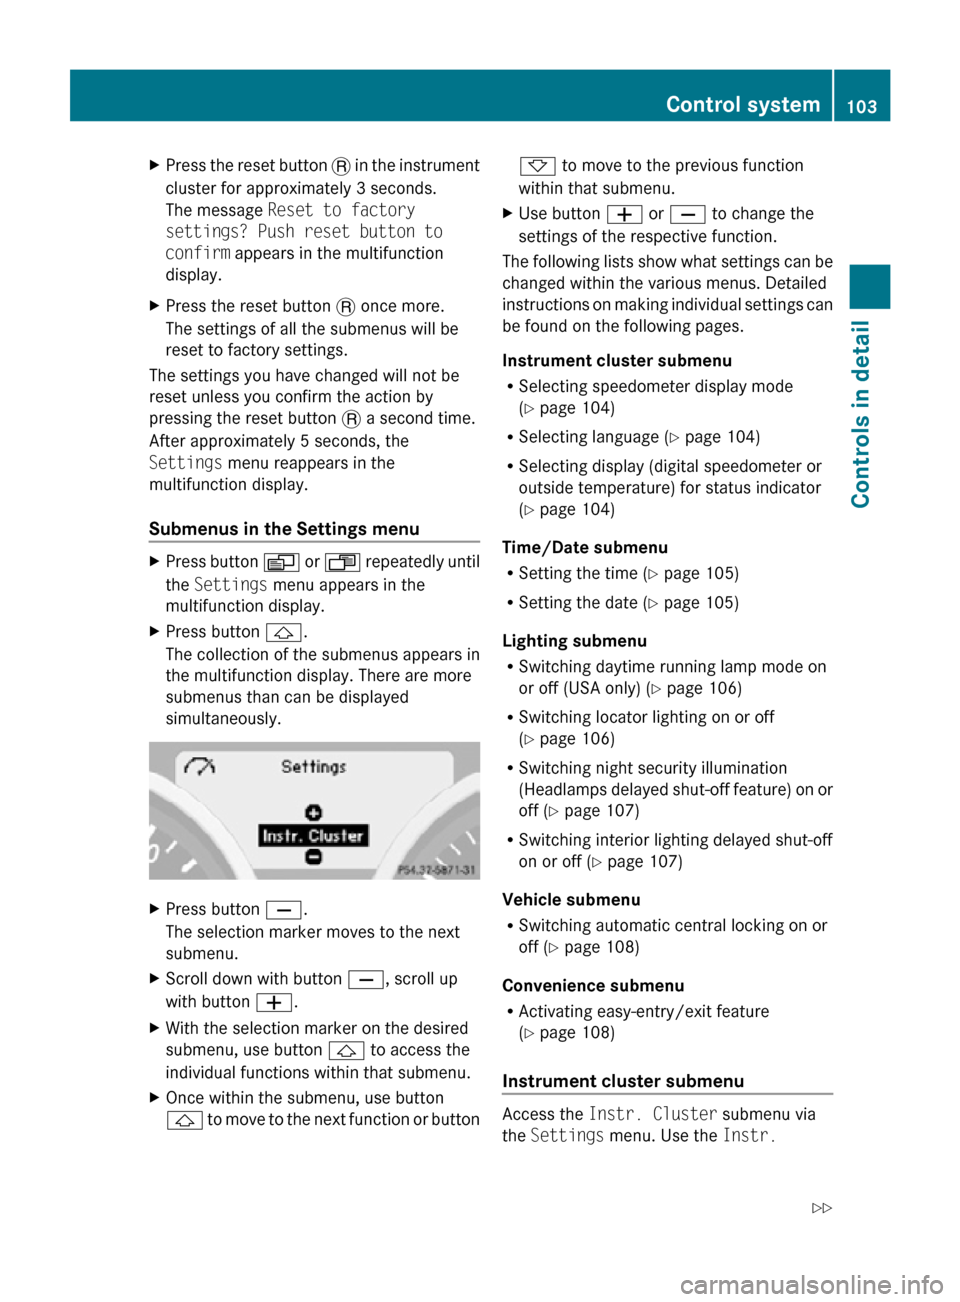
The collection of the submenus appears in
the multifunction display. There are more
submenus than can be displayed
simultaneously. X
Press button X.
The selection marker moves to the next
submenu.
X Scroll down with button X, scroll up
with button W.
X With the selection marker on the desired
submenu, use button & to access the
individual functions within that submenu.
X Once within the submenu, use button
& to move to the next function or button * to move to the previous function
within that submenu.
X Use button W or X to change the
settings of the respective function.
The following lists show what settings can be
changed within the various menus. Detailed
instructions on making individual settings can
be found on the following pages.
Instrument cluster submenu
R Selecting speedometer display mode
(Y page 104)
R Selecting language ( Y page 104)
R Selecting display (digital speedometer or
outside temperature) for status indicator
(Y page 104)
Time/Date submenu
R Setting the time ( Y page 105)
R Setting the date (Y page 105)
Lighting submenu
R Switching daytime running lamp mode on
or off (USA only) (Y page 106)
R Switching locator lighting on or off
(Y page 106)
R Switching night security illumination
(Headlamps delayed shut-off feature) on or
off (Y page 107)
R Switching interior lighting delayed shut-off
on or off ( Y page 107)
Vehicle submenu
R Switching automatic central locking on or
off (Y page 108)
Convenience submenu
R Activating easy-entry/exit feature
(Y page 108)
Instrument cluster submenu Access the
Instr. Cluster submenu via
the Settings menu. Use the Instr. Control system
103Controls in detail
171_AKB; 3; 60, en-US
d2ureepe, Version: 2.11.8.1 2009-05-11T16:00:23+02:00 - Seite 103 Z
Page 108 of 312
The following functions are available:
R
Switching daytime running lamp mode on
or off (USA only) (Y page 106)
R Switching locator lighting on or off
(Y page 106)
R Switching night security illumination
(Headlamps delayed shut-off feature) on or
off (Y page 107)
R Switching interior lighting delayed shut-off
on or off ( Y page 107)
Switching daytime running lamp mode on
or off (USA only)
X Press button V or U repeatedly until
the Settings menu appears in the
multifunction display.
X Press button &.
X Move the selection marker with button
W or X to the Lighting submenu.
X Press button & or * repeatedly until
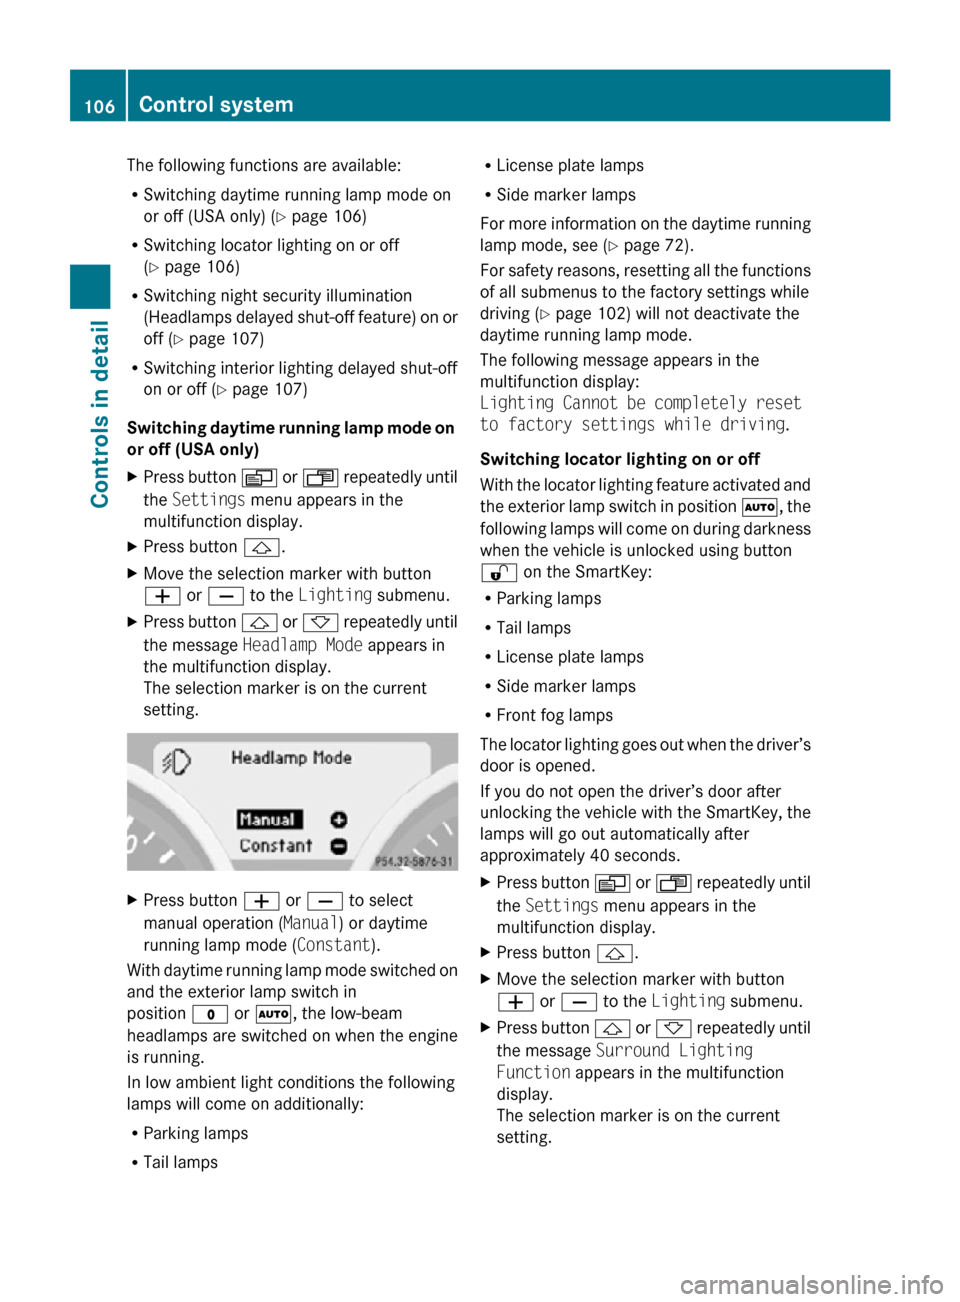
the message Headlamp Mode appears in
the multifunction display.
The selection marker is on the current
setting. X
Press button W or X to select
manual operation ( Manual) or daytime
running lamp mode ( Constant).
With daytime running lamp mode switched on
and the exterior lamp switch in
position $ or Ã, the low-beam
headlamps are switched on when the engine
is running.
In low ambient light conditions the following
lamps will come on additionally:
R Parking lamps
R Tail lamps R
License plate lamps
R Side marker lamps
For more information on the daytime running
lamp mode, see ( Y page 72).
For safety reasons, resetting all the functions
of all submenus to the factory settings while
driving ( Y page 102) will not deactivate the
daytime running lamp mode.
The following message appears in the
multifunction display:
Lighting Cannot be completely reset
to factory settings while driving.
Switching locator lighting on or off
With the locator lighting feature activated and
the exterior lamp switch in position Ã, the
following lamps will come on during darkness
when the vehicle is unlocked using button
% on the SmartKey:
R Parking lamps
R Tail lamps
R License plate lamps
R Side marker lamps
R Front fog lamps
The locator lighting goes out when the driver’s
door is opened.
If you do not open the driver’s door after
unlocking the vehicle with the SmartKey, the
lamps will go out automatically after
approximately 40 seconds.
X Press button V or U repeatedly until
the Settings menu appears in the
multifunction display.
X Press button &.
X Move the selection marker with button
W or X to the Lighting submenu.
X Press button & or * repeatedly until
the message Surround Lighting
Function appears in the multifunction
display.
The selection marker is on the current
setting. 106
Control systemControls in detail
171_AKB; 3; 60, en-US
d2ureepe,
Version: 2.11.8.1 2009-05-11T16:00:23+02:00 - Seite 106
Page 110 of 312
X
Move the selection marker with button
W or X to the Lighting submenu.
X Press button & or * repeatedly until
the message Interior Lighting
Delayed Shut-off appears in the
multifunction display.
The selection marker is on the current
setting. X
Press button W or X to switch the
interior lighting delayed shut-off feature
On or Off.
Vehicle submenu Access the
Vehicle submenu via the
Settings menu. Use the Vehicle submenu
to set the automatic central locking.
Switching automatic central locking on or
off
Use this function to switch the automatic
central locking on or off. With the automatic
central locking activated, the vehicle is
locked centrally at a vehicle speed of
approximately 9 mph (15 km/h).
X Press button V or U repeatedly until
the Settings menu appears in the
multifunction display.
X Press button &.
X Move the selection marker with button
W or X to the Vehicle submenu.
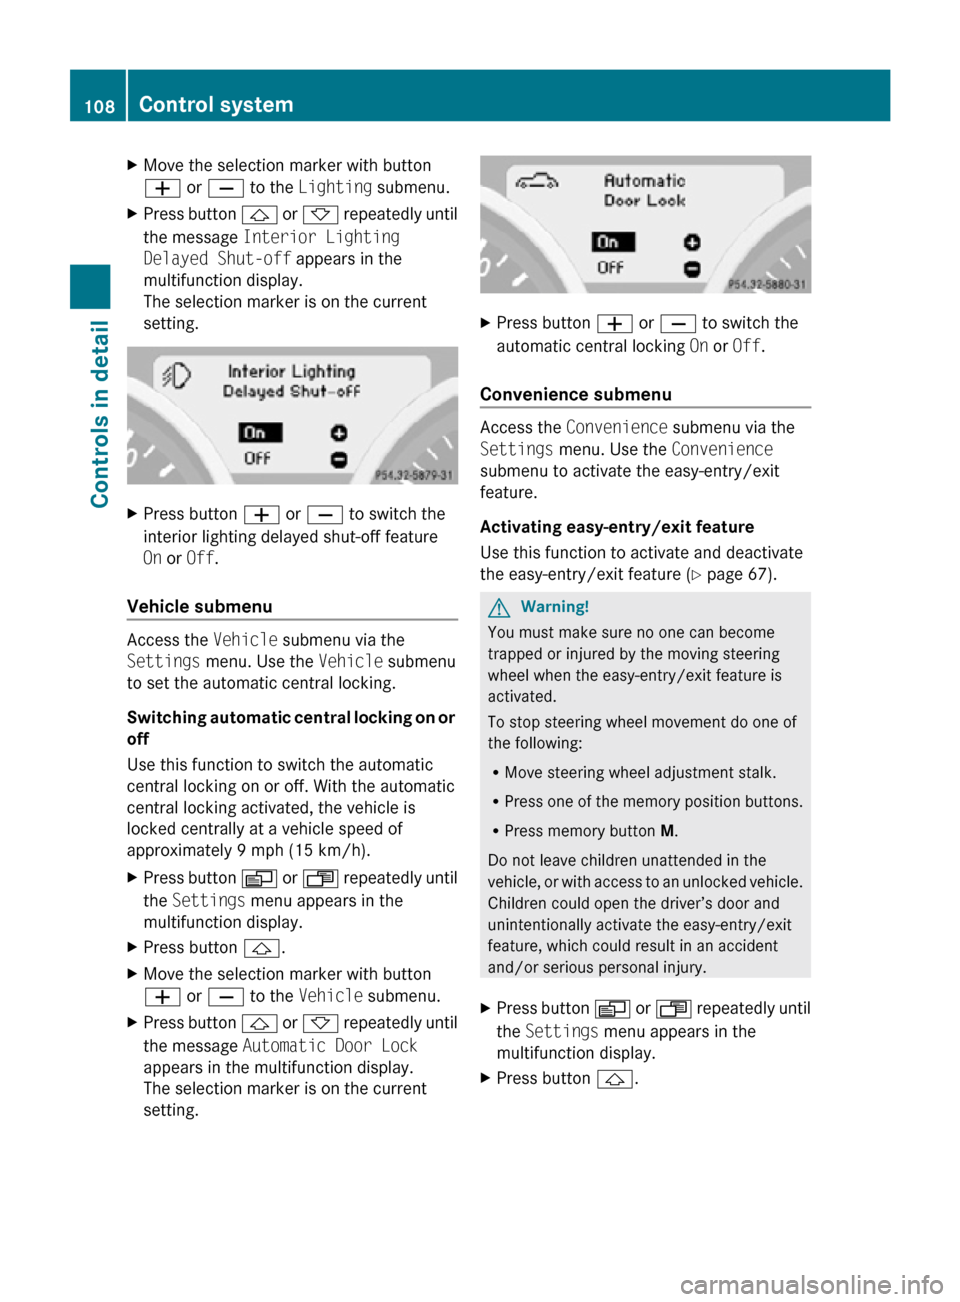
X Press button & or * repeatedly until
the message Automatic Door Lock
appears in the multifunction display.
The selection marker is on the current
setting. X
Press button W or X to switch the
automatic central locking On or Off.
Convenience submenu Access the
Convenience submenu via the
Settings menu. Use the Convenience
submenu to activate the easy-entry/exit
feature.
Activating easy-entry/exit feature
Use this function to activate and deactivate
the easy-entry/exit feature (Y page 67). G
Warning!
You must make sure no one can become
trapped or injured by the moving steering
wheel when the easy-entry/exit feature is
activated.
To stop steering wheel movement do one of
the following:
R Move steering wheel adjustment stalk.
R Press one of the memory position buttons.
R Press memory button M.
Do not leave children unattended in the
vehicle, or with access to an unlocked vehicle.
Children could open the driver’s door and
unintentionally activate the easy-entry/exit
feature, which could result in an accident
and/or serious personal injury.
X Press button V or U repeatedly until
the Settings menu appears in the
multifunction display.
X Press button &. 108
Control systemControls in detail
171_AKB; 3; 60, en-US
d2ureepe,
Version: 2.11.8.1 2009-05-11T16:00:23+02:00 - Seite 108
Page 150 of 312
features available for your mobile phone of
choice.
i
In
order for the functions described in this
section to work correctly, the Bluetooth ®
telephone must be linked to the audio
system. Please make sure any other
Bluetooth ®
device linked with the mobile
phone is switched off before you use the
telephone functions with the audio system.
Changes or modifications not expressly
approved by the party responsible for
compliance could void the user’s authority to
operate the equipment.
The head unit internal Bluetooth ®
transmitter
must not be co-located or operated in
conjunction with any other antenna or
transmitter.
This equipment complies with FCC/IC
radiation exposure limits set forth for
uncontrolled equipment and meets the FCC
radio frequency (RF) Exposure Guidelines in
Supplement C to OET65 and RSS-102 of the
IC radio frequency (RF) Exposure rules. This
equipment has very low levels of RF energy
that it is deemed to comply without testing of
specific absorption ratio (SAR).
Unless otherwise indicated, the descriptions
and illustrations in this section refer to the
audio system.
Caller ID
The audio system can display the telephone
number and the name of the caller, e.g. for an
incoming call and also in other menus or
displays.
For the telephone number to be displayed,
the caller must transmit their telephone
number. Otherwise Unknown will be shown on
the audio display.
This is also the case for name displays. For
this, the telephone number and the name of
the caller must also be saved in the telephone
book. Functional restrictions
You
will not be able to use the mobile phone,
or you may have to wait a while, in the
following situations:
R If the mobile phone is switched off.
R If the mobile phone is not connected via the
Bluetooth ®
interface to the audio system.
R If the mobile phone is locked.
R If the mobile phone has not yet acquired a
network signal.
The mobile phone automatically tries to log
into a network. If no network is available,
you will also not be able to make a “911”
emergency call. If you attempt to make an
outgoing call, the No Service message will
appear for a short while.
R If you switch off the audio system in the
middle of a call, e.g. by switching off the
ignition, that call will be cut off. You can
prevent this from happening as follows:
-Switch the mobile phone to “private
mode” before switching the audio
system off (see mobile phone operating
instructions).
Activating the mobile phone Prerequisites for the mobile phone
For making calls using the audio system via
the Bluetooth
®
interface, you will need a
Bluetooth ®
enabled mobile phone.
Your mobile phone must support the
Bluetooth ®
hands-free profile 1.0 or higher to
make or receive calls (see mobile phone
operating instructions).
i For further information on suitable mobile
phones and connecting Bluetooth ®
-
enabled mobile phones to the audio system
R visit www.mbusa-mobile.com
R call the Mercedes-Benz Customer
Assistance Center at 148
Audio system
Controls in detail
171_AKB; 3; 60, en-US
d2ureepe,
Version: 2.11.8.1 2009-05-11T16:00:23+02:00 - Seite 148
Page 154 of 312
The following information is displayed in the
status bar:
R
Bluetooth ®
device name of the connected
mobile phone, in this case: blue_mobile.
R Mobile phone network signal strength
r. This information will only be shown
with suitable mobile phones.
The bars indicate the current signal
strength of the mobile phone network for
reception. Optimum reception is indicated
by
all bars full. All bars empty indicates very
poor or no reception.
R Receiver symbol 6 or ~. The
receiver symbol indicates whether a call is
being connected or is in progress:
~ - not active
R READY indicates that a call is possible.
R NO SERVICE indicates that the mobile
network is not available.
Setting transmit and receive volume i
These settings should normally not be
changed as the factory settings are
matched to most mobile phones. Find out
about
the optimum settings for your mobile
phone at an authorized Mercedes-Benz
Center.
i Changes may result in significant
impairments to the transmission quality.
These settings may not be changed during
an active phone call.
X % Q Phone Q Adjust Volume Q
Reception Volume or Transmission
Volume.
X Setting the volume: Press button 9
or :.
The volume bar moves up or down.
X Confirming selection: Press button 9. Emergency calls “911”
i The “911” emergency call system is a
public service. Using it without due cause
is a criminal offense.
i This function places a call to the local
“911” provider. It does not initiate a Tele
Aid call.
The following describes how to dial a “911”
emergency call using the audio system head
unit when a Mercedes-Benz specified mobile
phone is connected via the Bluetooth ®
interface to the audio system. Unless
otherwise
specified, the descriptions refer to
the audio system head unit.
Consult the separate mobile phone operating
instructions that came with your mobile
phone for information on how to place a
“911” emergency call on the mobile phone.
The following conditions must be met for a
“911” emergency call via the audio system:
R Mobile phone must be switched on.
R The corresponding mobile
communications network must be
available.
i Emergency calls may not be possible with
all telephone networks or if certain network
services and/or telephone functions are
active. Check with your local service
providers and mobile phone instructions.
If you cannot make an emergency call, you
will have to initiate rescue measures yourself.
Placing a “911” emergency call using
audio control unit with the mobile
phone unlocked X
Press button % to switch to telephone
mode.
X Enter 911 using the number keypad on the
audio control unit. 152
Audio system
Controls in detail
171_AKB; 3; 60, en-US
d2ureepe,
Version: 2.11.8.1 2009-05-11T16:00:23+02:00 - Seite 152
Page 155 of 312
X
Press button 6.
Connecting... appears in the audio
display
while the mobile phone establishes
the connection.
X Wait until the emergency call center
answers, then describe the emergency.
i Depending on the phone type, if no SIM
card is inserted in a GSM mobile phone or
if there is no service on a CDMA mobile
phone, NO SERVICE may appear in the
audio display. In that case, you only can
make an emergency call on the mobile
phone itself, without the use of the audio
control unit.
Placing
a “911” emergency call with the
mobile phone locked i
If
the mobile phone is locked, you only can
make an emergency call on the mobile
phone itself, without the use of the audio
control unit. Phone book
You
can save telephone numbers in the audio
system’s phone book.
i These entries are retained even if you use
the audio system with another mobile
phone. You should delete these entries
before handing over or selling your vehicle.
Receiving business cards (vCards) You can import business cards (vCards) from
external Bluetooth
®
phones into your audio
system’s phone book. To do this:
R Bluetooth ®
must be activated on the audio
system and on the external Bluetooth ®
phone (see the operating instructions of
the mobile phone).
R The external Bluetooth ®
phone must be
able to send vCards via Bluetooth ®
(see the operating instructions of the mobile
phone).
R The external Bluetooth ®
phone in the
vehicle must be switched on and
authorized.
i If you switch to a different mode while
vCards are being received (e.g., press
button $), reception of vCards will be
aborted.
X % Q Phone Q Download
Contacts.
X Press button 9 to confirm.
X Importing: Start the data transfer on the
external Bluetooth ®
phone (“Export
business
cards (vCards)”, see the operating
instructions of the mobile phone).
The audio system imports the data for the
business cards and displays the number of
business cards received.
i Select Back,
press button k or switch
to a different mode to abort reception.
X Aborting reception: Press 9.
or
X Press button k.
Deleting external Data X
% Q Phone Q Delete Contacts.
A
prompt appears asking whether the data
should be deleted.
X Select Yes or No.
If
you select Yes all personal data are then
deleted from the phone book.
Opening the phone book X
% Q Name.
Entries in the phone book are displayed in
alphabetical order. The search speller is
active when more multiple entries are
available. The search speller appears on
the lower edge of the display.
You can use the search speller to reduce the
number of entries you need to make. Audio system
153
Controls in detail
171_AKB; 3; 60, en-US
d2ureepe, Version: 2.11.8.1 2009-05-11T16:00:23+02:00 - Seite 153 Z