2010 MERCEDES-BENZ S65AMG instrument cluster
[x] Cancel search: instrument clusterPage 318 of 548
The red indicator lamp F (USA only)
or ! (Canada only) in the instrument
cluster comes on.
i In addition to engaging the electronic
parking brake, the automatic transmission
may shift into park position P
automatically.
Emergency braking with electronic
parking brake
In an emergency situation, you can also brake
your vehicle by using the electronic parking
brake.XWhile driving, press handle :.
All four wheels of the vehicle will be braked
for as long as you press and hold the handle
for the electronic parking brake. The longer
you keep the handle pressed, the stronger
your vehicle will be braked.
During the braking procedure
R an acoustic warning sounds
R the message Please Release Parking
Brake appears in the multifunction display
R the red indicator lamp for the electronic
parking brake F (USA only) or !
(Canada only) in the instrument cluster
flashes
Once the vehicle comes to a complete stop,
the electronic parking brake will engage
automatically.
Turning off the engine
GWarning!
Do not turn off the engine before the vehicle
has come to a complete stop. With the engine
not running, there is no power assistance for
the brake and steering systems. In this case,
it is important to keep in mind that a
considerably higher degree of effort is
necessary to brake and steer the vehicle.
i If the engine cannot be turned off as
described, see “Emergency engine
shutdown” ( Y page 521).XShift the automatic transmission into park
position P.
i
Observe instructions if you want the
automatic transmission to remain in
neutral position N, see “Remaining in
neutral position N” ( Y page 319).
With SmartKey
XTurn the SmartKey in the starter switch to
position 0.XRemove the SmartKey from the starter
switch.
When you turn off the engine using the
SmartKey, and remove the SmartKey from
the starter switch or open a front door, the
automatic transmission will shift into park
position P automatically.
GWarning!
Keep in mind that turning off the engine alone
only will shift the automatic transmission into
neutral position N automatically.
Always shift the automatic transmission into
park position P before turning off the engine.
Otherwise the vehicle could roll away which
could result in an accident and/or serious
personal injury.
With KEYLESS-GO
XPress the KEYLESS-GO start/stop button.
With the driver’s door closed, the starter
switch is now in position 1. With the driver’s
door opened, the starter switch is set to
position 0, same as the SmartKey removed
from the starter switch ( Y page 284).
When you turn off the engine using the
KEYLESS-GO start/stop button and open a
front door, the automatic transmission will
shift into park position P automatically.
316Driving and parkingControls in detail
221_AKB; 6; 20, en-USd2ugruen,Version: 2.11.8.12009-09-24T13:28:17+02:00 - Seite 316
Page 328 of 548

otherwise seriously damage the brake
system or the transfer case which is not
covered by the Mercedes-Benz Limited
Warranty.
! Because the ESC operates automatically,
the engine and ignition must be shut off
(SmartKey in starter switch position 0 or
1 or KEYLESS-GO start/stop button in
position 0 or 1) when the electronic parking
brake is being tested on a brake test
dynamometer or when the vehicle is being
towed with one axle raised.
Active braking action through the ESC may
otherwise seriously damage the brake
system which is not covered by the
Mercedes-Benz Limited Warranty.
Instrument cluster
Introduction
For a full view illustration of the instrument
cluster, see “Instrument cluster”
(Y page 32).
GWarning!
No messages will be displayed if either the
instrument cluster or the multifunction
display is inoperative.
As a result, you will not be able to see
information about your driving conditions,
such as
Rspeed
Routside temperature
Rwarning/indicator lamps
Rmalfunction/warning messages
Rfailure of any systems
Driving characteristics may be impaired.
If you must continue to drive, do so with added
caution. Contact an authorized Mercedes-
Benz Center as soon as possible.
GWarning!
HYBRID vehicles: It is imperative that you read
the HYBRID Supplemental Operating
Instructions included in your vehicle literature
portfolio. You may otherwise not receive all
necessary safety information and warning for
the operation of your vehicle.
The language setting for the multifunction
display can be changed via COMAND
(Y page 94).
Activating the instrument cluster
The instrument cluster is activated when you
Ropen a door
Rswitch on the ignition
Rswitch on the exterior lamps
Adjusting the instrument cluster
illumination
XTo brighten illumination: Turn knob :
clockwise.
XTo dim illumination: Turn knob :
counterclockwise.
iThe instrument cluster illumination is
dimmed or brightened automatically to suit
ambient light conditions.
The instrument cluster illumination will also
be adjusted automatically when you switch
on the vehicle’s exterior lamps.
326Instrument clusterControls in detail
221_AKB; 6; 20, en-USd2ugruen,Version: 2.11.8.12009-09-24T13:28:17+02:00 - Seite 326
Page 329 of 548
Coolant temperature gauge
The coolant temperature gauge is located on
the left side in the instrument cluster
( Y page 32).GWarning!
Driving when your engine is overheated can
cause some fluids which may have leaked into
the engine compartment to catch fire. You
could be seriously burned.
Steam from an overheated engine can cause
serious burns which can occur just by opening
the engine hood. Stay away from the engine
if you see or hear steam coming from it.
Stop the vehicle in a safe location away from
other traffic. Turn off the engine, get out of the
vehicle and do not stand near the vehicle until
the engine has cooled down.
During severe operating conditions, e.g. stop-
and-go traffic, the coolant temperature may
rise close to 248‡ (120†), i.e close to the
red zone of the temperature gauge.
! Excessive coolant temperature triggers a
warning in the multifunction display.
The engine should not be operated with a
coolant temperature above 248‡ (120†),
i.e. in the red zone of the coolant
temperature gauge. Doing so may cause
serious engine damage which is not
covered by the Mercedes-Benz Limited
Warranty.
Tachometer
The red marking on the tachometer
( Y page 32) denotes excessive engine speed.
! Avoid driving at excessive engine speeds,
as it may result in serious engine damage
that is not covered by the Mercedes-Benz
Limited Warranty.
To help protect the engine, the fuel supply is
interrupted if the engine is operated within
the red marking.
Outside temperature indicator
The outside temperature indicator is on the
bottom left-hand side of the instrument
cluster ( Y page 32).GWarning!
The outside temperature indicator is not
designed to serve as an ice-warning device
and is therefore unsuitable for that purpose.
Indicated temperatures just above the
freezing point do not guarantee that the road
surface is free of ice. The road may still be icy,
especially in wooded areas or on bridges.
Fuel gauge
The fuel gauge is on the left-hand side of the
instrument cluster (Y page 32). Once the fuel
level has fallen below the reserve mark, the
yellow segment indicator for the fuel reserve
comes on.
Driving systems
Introduction
This section describes the following driving
systems of your vehicle:
R Cruise control
R DISTRONIC PLUS
R Hill-start assist system
R HOLD function
R AIRMATIC
R Active Body Control (ABC)
R All-wheel drive (4MATIC)
R Parktronic system with Parking Guidance
R Rear view camera
R Night View Assist Plus
R ATTENTION ASSIST
R Blind Spot Assist
R Lane Keeping Assist
Driving systems327Controls in detail221_AKB; 6; 20, en-USd2ugruen,Version: 2.11.8.12009-09-24T13:28:17+02:00 - Seite 327Z
Page 335 of 548
iCanada only:
This device complies with RSS-210 of
Industry Canada. Operation is subject to
the following two conditions:
1.This device may not cause interference,
and
2. this device must accept any
interference received, including
interference that may cause undesired
operation of the device.
Removal, tampering, or altering of the
device will void any warranties, and is not
permitted. Do not tamper with, alter, or use
in any non-approved way.
Any unauthorized modification to this
device could void the user’s authority to
operate the equipment.
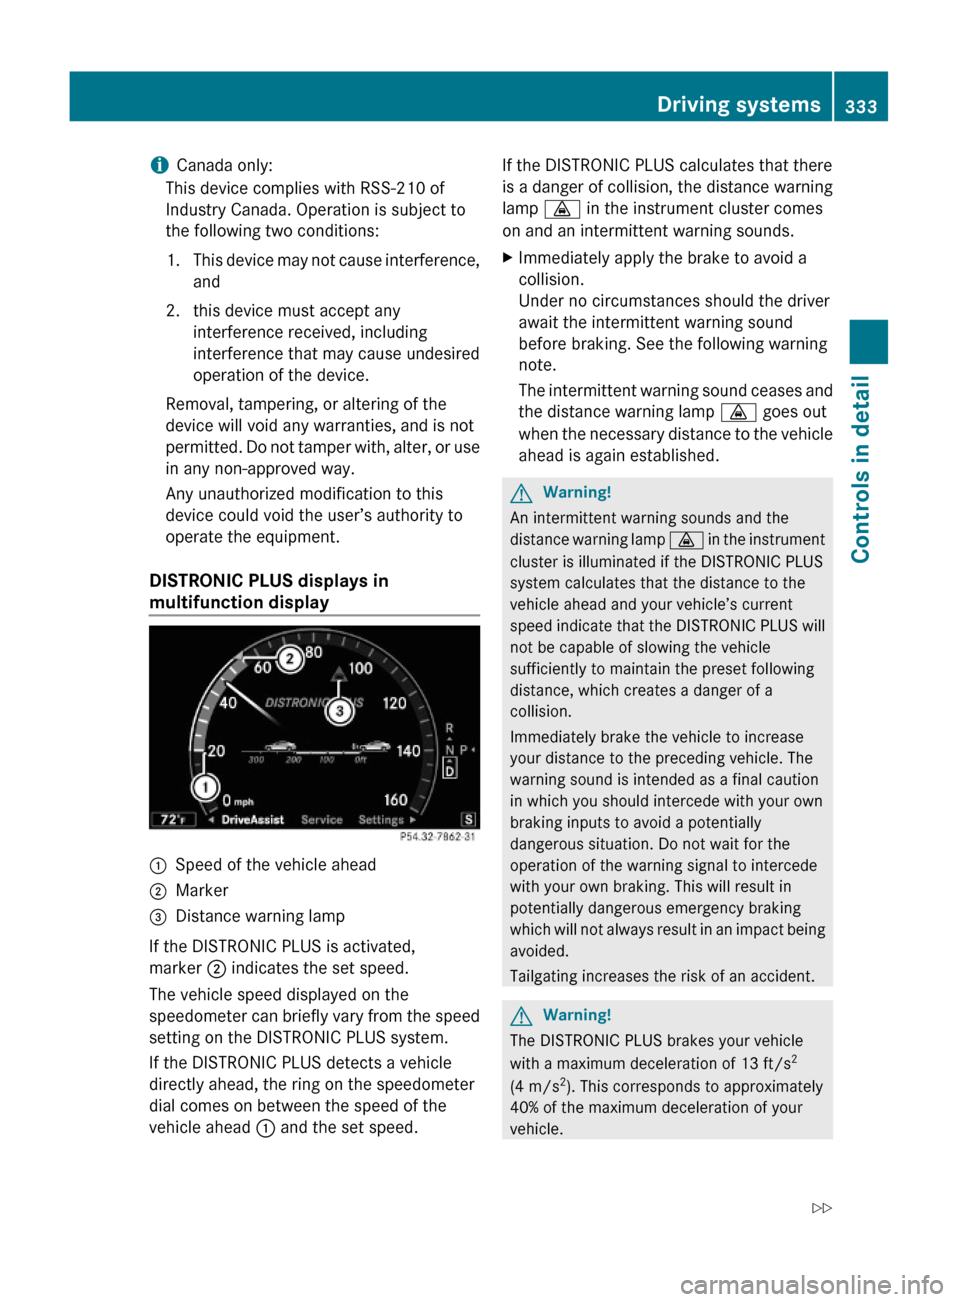
DISTRONIC PLUS displays in
multifunction display
:Speed of the vehicle ahead;Marker=Distance warning lamp
If the DISTRONIC PLUS is activated,
marker ; indicates the set speed.
The vehicle speed displayed on the
speedometer can briefly vary from the speed
setting on the DISTRONIC PLUS system.
If the DISTRONIC PLUS detects a vehicle
directly ahead, the ring on the speedometer
dial comes on between the speed of the
vehicle ahead : and the set speed.
If the DISTRONIC PLUS calculates that there
is a danger of collision, the distance warning
lamp · in the instrument cluster comes
on and an intermittent warning sounds.
XImmediately apply the brake to avoid a
collision.
Under no circumstances should the driver
await the intermittent warning sound
before braking. See the following warning
note.
The intermittent warning sound ceases and
the distance warning lamp · goes out
when the necessary distance to the vehicle
ahead is again established.
GWarning!
An intermittent warning sounds and the
distance warning lamp · in the instrument
cluster is illuminated if the DISTRONIC PLUS
system calculates that the distance to the
vehicle ahead and your vehicle’s current
speed indicate that the DISTRONIC PLUS will
not be capable of slowing the vehicle
sufficiently to maintain the preset following
distance, which creates a danger of a
collision.
Immediately brake the vehicle to increase
your distance to the preceding vehicle. The
warning sound is intended as a final caution
in which you should intercede with your own
braking inputs to avoid a potentially
dangerous situation. Do not wait for the
operation of the warning signal to intercede
with your own braking. This will result in
potentially dangerous emergency braking
which will not always result in an impact being
avoided.
Tailgating increases the risk of an accident.
GWarning!
The DISTRONIC PLUS brakes your vehicle
with a maximum deceleration of 13 ft/s2
(4 m/s2). This corresponds to approximately
40% of the maximum deceleration of your
vehicle.
Driving systems333Controls in detail221_AKB; 6; 20, en-USd2ugruen,Version: 2.11.8.12009-09-24T13:28:17+02:00 - Seite 333Z
Page 338 of 548
Below 20 mph (30 km/h), you can only switch
on the DISTRONIC PLUS if the preceding
vehicle has been detected and is shown in the
multifunction display. If you no longer see the
preceding vehicle in the multifunction display
and if it is no longer detected because it has
changed lanes, for example, the DISTRONIC
PLUS switches off and a signal sounds.XPull the DISTRONIC PLUS lever briefly in
direction of arrow ? to call up the last set
speed, or if no speed is stored, to set and
store the current speed.
The DISTRONIC PLUS is switched on.
or
XTap the DISTRONIC PLUS lever up : or
down ; until desired speed is set.
The DISTRONIC PLUS is switched on.XRemove your foot from the accelerator
pedal.
Your vehicle adapts its speed to the
preceding vehicle, observing the set speed
as a maximum value.
If you do not completely remove your foot
from the accelerator pedal, the message
DISTRONIC PLUS Override appears in the
multifunction display. The distance to a
slower-driving vehicle will not be set. You will
drive at the speed you dictate by pressing the
accelerator pedal.
Switching on when approaching a
stationary vehicle
It is helpful to switch on the DISTRONIC PLUS
display in the multifunction display to see that
a preceding vehicle is detected
( Y page 334). You can only switch on the
DISTRONIC PLUS below a speed of 20 mph
(30 km/h) when a preceding vehicle is
detected.
If the preceding vehicle is stationary, you can
only switch on the DISTRONIC PLUS if your
vehicle is also at a standstill.
XPull the DISTRONIC PLUS lever briefly in
direction of arrow ?.
The DISTRONIC PLUS is switched on.XTap the DISTRONIC PLUS lever up : or
down ; until desired speed is set.
You can adjust the set speed using the
DISTRONIC PLUS lever and the target
distance using the distance setting switch on
the DISTRONIC PLUS lever ( Y page 339).
i If the DISTRONIC PLUS is switched off,
the PRE-SAFE ®
Brake (Y page 69) will warn
of an impending collision if this function has
been activated with the instrument cluster
control system ( Y page 232).
Starting off
When the preceding vehicle starts off:
XRemove your foot from the brake pedal.XPull the DISTRONIC PLUS lever briefly in
direction of arrow ?.
or
XBriefly step on the accelerator pedal.
Your vehicle starts off and adapts its speed
to the preceding vehicle.
Driving
If there is no preceding vehicle, the
DISTRONIC PLUS functions like the cruise
control ( Y page 328).
When the DISTRONIC PLUS detects that the
preceding vehicle is driving more slowly, it
brakes the vehicle in order to keep the
distance specified by you.
When the DISTRONIC PLUS detects that the
preceding vehicle is driving faster, it
accelerates the vehicle up to the set speed.
GWarning!
When you step on the brake pedal, you switch
off the DISTRONIC PLUS except when the
vehicle is at a standstill. The DISTRONIC PLUS
will no longer brake your vehicle. You are
always responsible for maintaining a distance
from other vehicles, observing road speeds
and braking well in advance.
336Driving systemsControls in detail
221_AKB; 6; 20, en-USd2ugruen,Version: 2.11.8.12009-09-24T13:28:17+02:00 - Seite 336
Page 342 of 548
The DISTRONIC PLUS regulates only the
distance between your vehicle and those
directly ahead of it. It may not register
stationary objects in the road, e.g.:
Ra stopped vehicle in a traffic jam
Ra disabled vehicle
Ran oncoming vehicle
The driver must always be alert, observe all
traffic and intercede as required by means of
steering or braking the vehicle.
GWarning!
The DISTRONIC PLUS should not be used in
snowy or icy road conditions.
The most likely cause for a malfunctioning
system is a dirty sensor (located in the hood
grille and in the bumper), especially at times
of snow and ice or heavy rain.
In such a case, the DISTRONIC PLUS will
switch off, and the message DISTRONIC
PLUS Currently Unavailable See
Oper. Manual appears in the multifunction
display.
For cleaning and care of the sensors, see
(Y page 443).
iIf the message DISTRONIC PLUS
Currently Unavailable See Oper.
Manual disappears during driving and the
last speed stored flashes for approximately
5 seconds, the dirt (e.g. slush) has
dissolved; the DISTRONIC PLUS is available
again.
Another cause might be that the radar
sensors have been manually switched off in
the instrument cluster control system. Please
verify that the radar sensors are switched on
(Y page 236).
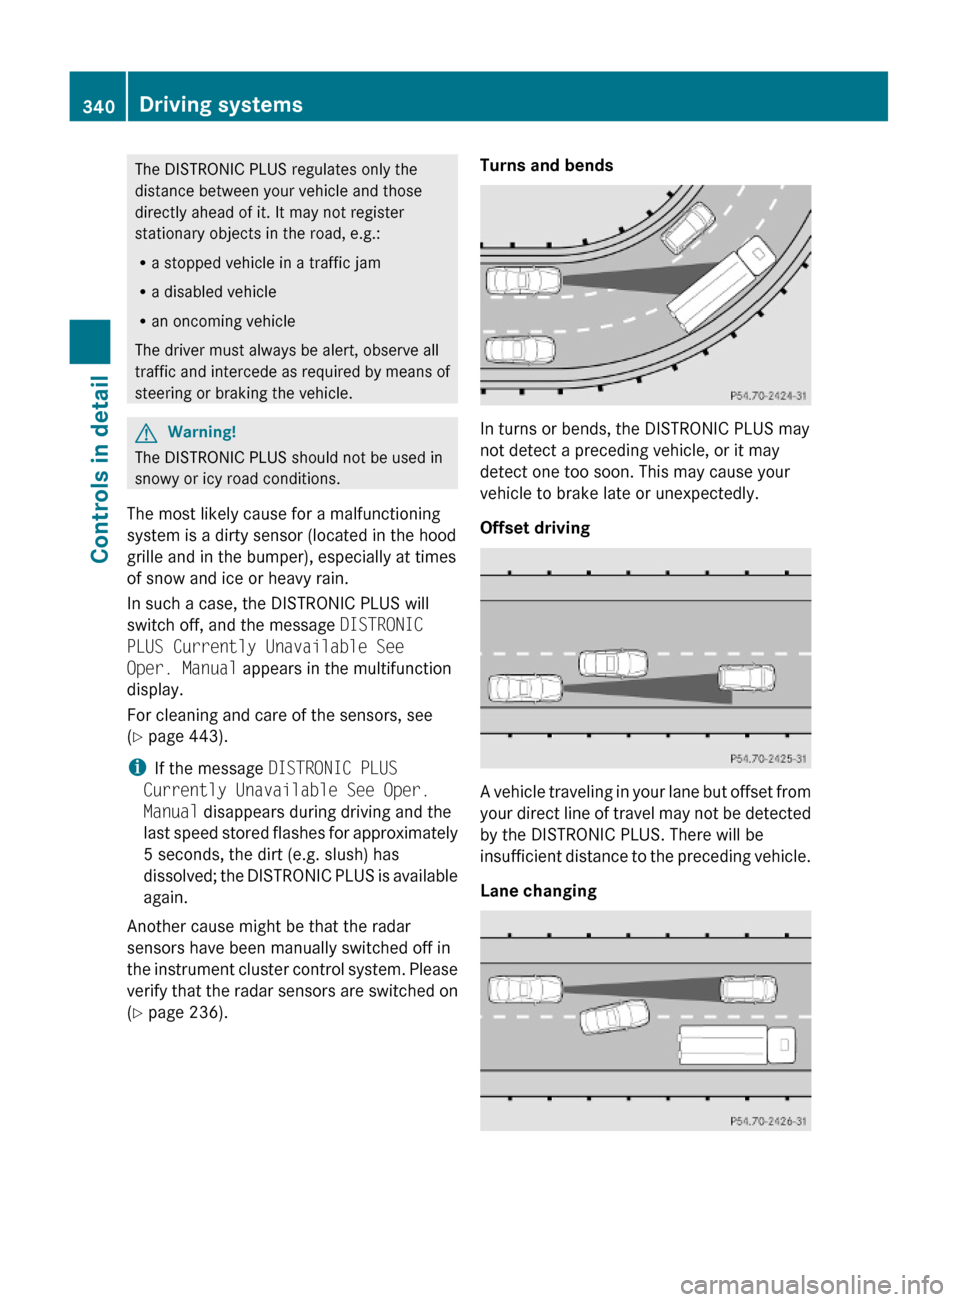
Turns and bends
In turns or bends, the DISTRONIC PLUS may
not detect a preceding vehicle, or it may
detect one too soon. This may cause your
vehicle to brake late or unexpectedly.
Offset driving
A vehicle traveling in your lane but offset from
your direct line of travel may not be detected
by the DISTRONIC PLUS. There will be
insufficient distance to the preceding vehicle.
Lane changing
340Driving systemsControls in detail
221_AKB; 6; 20, en-USd2ugruen,Version: 2.11.8.12009-09-24T13:28:17+02:00 - Seite 340
Page 360 of 548

and cannot check the function of the Night
View Assist Plus.
Image on multifunction display
When you switch on the Night View Assist
Plus, the dial for the speedometer changes on
the multifunction display. The speedometer
dial is shown as a bar on the lower edge of
the multifunction display. The line for main
menus is no longer available. If you would like
to change a setting using the steering wheel
buttons, you must first switch off the Night
View Assist Plus.
Pedestrian detection
The Night View Assist Plus detects
pedestrians by means of specific
characteristics, e.g. a human silhouette.
Pedestrian detection is activated when
Rthe Night View Assist Plus is switched on
Rthe vehicle speed is above approximately
6 mph (10 km/h)
Rdriving in darkness, e.g. on highways
without road lighting
:Night View Assist Plus image;Detected pedestrian=Frame?Symbol for active pedestrian detectionASpeedometer dial
When pedestrian detection is active,
symbol ? appears in the Night View Assist
Plus image. Once a pedestrian is detected,
that pedestrian is highlighted by frame =.
When you have been made aware of a
pedestrian, assess the situation by looking
through the windshield. The actual distance
between your vehicle and objects or
pedestrians cannot be assessed properly via
a screen display.
Other objects apart from pedestrians may
also be highlighted.
GWarning!
The pedestrian detection may be impaired or
unavailable when
Rpedestrians are obstructed fully or in part
by other objects such as parking vehicles
Rthe silhouette in the Night View Assist Plus
image is displayed incomplete or
interrupted, e.g. by significant light
reflection
Ra pedestrian’s silhouette is not rich enough
in contrast compared to the background
Rpedestrians are not in erected position but,
for example, sit, crouch down, or lie
iAnimals cannot be detected.
Adjusting instrument cluster illumination
If you change the brightness of the
instrument cluster while the Night View
Assist Plus is switched on, only the brightness
of the multifunction display is changed.
XMake sure the Night View Assist Plus is
switched on.
XBrightening illumination: Turn knob :
clockwise.
358Driving systemsControls in detail
221_AKB; 6; 20, en-USd2ugruen,Version: 2.11.8.12009-09-24T13:28:17+02:00 - Seite 358
Page 416 of 548
can overheat them, possibly causing a
blowout. Overloading the tires can also result
in handling or steering problems, or brake
failure.
Check the tire inflation pressure at least once
a month.
Check and adjust the tire inflation pressure
when the tires are cold ( Y page 411).
Checking tire inflation pressure
manually
Follow the steps below to achieve correct tire
inflation pressure:
XRemove the cap from the valve on one tire.XFirmly press a tire gauge onto the valve.XRead the tire inflation pressure on the tire
gauge and check against the
recommended tire inflation pressure on the
Tire and Loading Information placard on the
driver’s door B-pillar ( Y page 418). If
necessary, add air to achieve the
recommended tire inflation pressure.XIf you have overfilled the tire, release tire
inflation pressure by pushing the metal
stem of the valve with e.g. a tip of a pen.
Then recheck the tire inflation pressure
with the tire gauge.XInstall the valve cap.XRepeat this procedure for each tire.
Advanced Tire Pressure Monitoring
System (Advanced TPMS)
Your vehicle is equipped with the Advanced
Tire Pressure Monitoring System (Advanced
TPMS). It measures the tire inflation pressure
in the vehicle’s tires and issues warnings in
case of pressure loss in one or more of the
tires.
The TPMS is equipped with a combination low
tire pressure/ TPMS malfunction telltale
(USA) or a low tire pressure telltale (Canada)
in the instrument cluster. Depending on how
the telltale illuminates, it indicates a low tire
pressure condition or a malfunction in the
TPMS system itself:
R If the telltale illuminates continuously, one
or more of your tires is significantly
underinflated. There is no malfunction in
the TPMS.
R USA only: If the telltale flashes for 60
seconds and then stays illuminated, the
TPMS system itself is not operating
properly.
The TPMS only functions on wheels that are
equipped with the proper electronic sensors.GWarning!
The TPMS does not indicate a warning for
wrongly selected inflation pressures. Always
adjust tire inflation pressure according to the
Tire and Loading Information placard or the
supplemental tire inflation pressure
information on the inside of the fuel filler flap.
The TPMS is not able to issue a warning due
to a sudden dramatic loss of pressure (e.g. tire
blowout caused by a foreign object). In this
case bring the vehicle to a halt by carefully
applying the brakes and avoiding abrupt
steering maneuvers.
GWarning!
Each tire, including the spare (if provided),
should be checked at least once a month
when cold and inflated to the inflation
pressure recommended by the vehicle
manufacturer on the Tire and Loading
Information placard on the driver’s door B-
pillar or the tire inflation pressure label on the
inside of the fuel filler flap. If your vehicle has
tires of a different size than the size indicated
on the Tire and Loading Information placard
or the tire inflation pressure label, you should
determine the proper tire inflation pressure
for those tires.
414Tires and wheelsOperation
221_AKB; 6; 20, en-USd2ugruen,Version: 2.11.8.12009-09-24T13:28:17+02:00 - Seite 414